2014 FORD F150 display
[x] Cancel search: displayPage 251 of 472
6. Release the parking brake. With your
foot on the brake pedal and with the
air conditioning on, put your vehicle in
D (Drive) and allow the engine to idle
for at least one minute.
• If you do not allow the engine to
relearn its idle trim, the idle quality
of your vehicle may be adversely
affected until the idle trim is
eventually relearned.
7. Drive your vehicle to complete the relearning process
•Your vehicle may need to be driven
10 miles (16 kilometers) or more to
relearn the idle and fuel trim
strategy along with the ethanol
content for flexible fuel vehicles.
• For flexible fuel vehicles, if you are
operating on E85, you may
experience poor starts or an
inability to start the engine and
driveability problems until the fuel
trim and ethanol content have been
relearned.
If the battery has been disconnected or a
new battery has been installed, the clock
and radio settings must be reset once the
battery is reconnected.
Always dispose of automotive
batteries in a responsible manner.
Follow your local authorized standards
for disposal. Call your local authorized
recycling center to find out more about
recycling automotive batteries.
Battery Management System (If
Equipped)
The battery management system (BMS)
monitors battery conditions and takes
actions to extend battery life. If excessive
battery drain is detected, the system may
temporarily disable certain electrical
features to protect the battery. Those
electrical accessories affected include the
rear defrost, heated/cooled seats, climate control fan, heated steering wheel, audio
and navigation system. A message may be
shown in the information displays to alert
the driver that battery protection actions
are active. These messages are only for
notification that an action is taking place,
and not intended to indicate an electrical
problem or that the battery requires
replacement.
Electrical accessory installation
To ensure proper operation of the Battery
Management System, any electrical
devices that are added to your vehicle
should not have their ground connection
made directly at the negative battery post.
A connection at the negative battery post
can cause inaccurate measurements of
the battery condition and potential
incorrect system operation.
Note:
Electrical or electronic accessories
added to your vehicle by the dealer or the
owner, may adversely affect battery
performance and durability, and may affect
the performance of other electrical systems
in your vehicle.
When a battery replacement is required,
the battery should only be replaced with
a Ford-recommended replacement battery
that matches the electrical requirements
of your vehicle. After battery replacement,
or in some cases after charging the battery
with the external charger, the Battery
Management System requires eight hours
of vehicle sleep time (key off with doors
closed) to relearn the new battery state of
charge. Prior to relearning the state of
charge, the Battery Management System
may disable electrical features (to protect
the battery) earlier than normal.
248
F150 (TF6) , enUSA Maintenance
Page 291 of 472

•
To reduce the chances of interference
from another vehicle, perform the
system reset procedure at least three
feet (one meter) away from another
Ford Motor Company vehicle
undergoing the system reset procedure
at the same time.
• Do not wait more than two minutes
between resetting each tire sensor or
the system will time-out and the entire
procedure will have to be repeated on
all four wheels.
• A double horn will sound indicating the
need to repeat the procedure.
Performing the System Reset Procedure
Read the entire procedure before
attempting.
1. Drive the vehicle above 20 mph (32 km/h) for at least two minutes, then
park in a safe location where you can
easily get to all four tires and have
access to an air pump.
2. Place the ignition in the off position and
keep the key in the ignition.
3. Cycle the ignition to the on position with the engine off.
4. Turn the hazard flashers on then off three times. You must accomplish this
within 10 seconds. If the reset mode
has been entered successfully, the horn
will sound once, the system indicator
will flash and a message is shown in
the information display. If this does not
occur, please try again starting at Step
2. If after repeated attempts to enter
the reset mode, the horn does not
sound, the system indicator does not
flash and no message is shown in the
information display, seek service from
your authorized dealer. 5. Train the tire pressure monitoring
system sensors in the tires using the
following system reset sequence
starting with the left front tire in the
following clockwise order: Left front
(driver's side front tire), Right front
(passenger's side front tire), Right rear
(passenger's side rear tire), Left rear
(driver's side rear tire)
6. Remove the valve cap from the valve stem on the left front tire. Decrease the
air pressure until the horn sounds.
Note: The single horn chirp confirms
that the sensor identification code has
been learned by the module for this
position. If a double horn is heard, the
reset procedure was unsuccessful, and
you must repeat it.
7. Remove the valve cap from the valve stem on the right front tire. Decrease
the air pressure until the horn sounds.
8. Remove the valve cap from the valve stem on the right rear tire. Decrease the
air pressure until the horn sounds.
9. Remove the valve cap from the valve stem on the left rear tire. Decrease the
air pressure until the horn sounds.
Training is complete after the horn
sounds for the last tire trained (driver's
side rear tire), the system indicator
stops flashing, and a message is shown
in the information display.
10. Turn the ignition off. If two short horn
beeps are heard, the reset procedure
was unsuccessful and you must
repeat it. If after repeating the
procedure and two short beeps are
heard when the ignition is turned to
off, seek assistance from your
authorized dealer.
288
F150 (TF6) , enUSA Wheels and Tires
Page 308 of 472
1
Ford recommends using Motorcraft (Ford) DOT 4 LV High Performance Motor Vehicle
Brake Fluid or equivalent meeting WSS-M6C65-A2. Use of any fluid other than the
recommended fluid may cause degraded brake performance and not meet the Ford
performance standards. Keep brake fluid clean and dry. Contamination with dirt, water,
petroleum products or other materials may result in brake system damage and possible
failure.
2 The design of your engine allows for the use of Motorcraft engine oils or equivalent oils
that meet Ford specifications. It is also acceptable to use an engine oil of recommended
viscosity grade that meets API SN requirements and displays the API certification mark
for gasoline engines.
3 Do not use supplemental engine oil additives in your engine. They are unnecessary and
could lead to engine damage not covered by your Ford warranty.
Do not use API S category oils labeled as SN, SM, SL or lower category unless the label
also displays the API certification mark. These oils do not meet the requirements of the
engine and emission system.
4 Add the coolant type originally equipped in your vehicle.
5 Service refill capacity is determined by filling the axle to 1/4-9/16 inch (6-14 millimeter)
below the bottom of the filler hole with the vehicle on a level surface. Add 4 fl oz. (118
milliliters) of Additive Friction Modifier XL-3 (US) / CXL-3 (Canada) or equivalent meeting
Ford specification EST-M2C118-A, for complete fill of 8.8-inch Traction-Lok axles.
6 Filled with a synthetic rear axle lubricant, consider the rear axle on your vehicle filled for
life. You do not need to check or change the rear axle lubricant unless you suspect a leak.
Change the rear axle lubricant any time you have submerged the rear axle in water.
7 Service refill capacity is determined by filling the transfer case to the bottom of the filler
hole with the vehicle on a level surface.
8 Make sure the correct automatic transmission fluid is used. Transmission fluid
requirements are indicated on the dipstick blade or the dipstick handle. Before adding,
check the container to verify the fluid is of the correct type. Refer to your scheduled
maintenance information to determine the correct service interval.
Note: Automatic transmissions that require MERCON LV should only use MERCON LV fluid.
Use of any fluid other than the recommended fluid may cause transmission damage.
9 Indicates only approximate dry-fill capacity. Some applications may vary based on cooler
size and if equipped with an in-tank cooler. Use the indication on the dipstick, showing
the normal operating range, to determine the amount of transmission fluid and the fluid
level.
10 See the Warning below: WARNING
The air conditioning refrigerant system contains refrigerant R-134a under high
pressure. Opening the air conditioning refrigerant system can cause personal injury.
Have the air conditioning refrigerant system serviced only by qualified personnel.
305
F150 (TF6) , enUSA Capacities and Specifications
Page 310 of 472
•
MP3 folder mode represents a folder
structure consisting of one level of
folders. The CD player numbers all MP3
tracks on the disc (noted by the .mp3
file extension) and all folders
containing MP3 files, from F001
(folder) T001 (track) to F253 T255.
• Creating discs with only one level of
folders helps with navigation through
the disc files.
If you are burning your own MP3 discs, it is
important to understand how the system
reads the structures you create. While
various files may be present, (files with
extensions other than mp3), only files with
the .mp3 extension are played; other files
are ignored by the system. This enables
you to use the same MP3 disc for a variety
of tasks on your work computer, home
computer and your in-vehicle system. In track mode, the system displays and
plays the structure as if it were only one
level deep (all .mp3 files play, regardless
of being in a specific folder). In folder
mode, the system only plays the .mp3 files
in the current folder.
AUDIO UNIT - VEHICLES WITH:
AM/FM WARNING
Driving while distracted can result in
loss of vehicle control, crash and
injury. We strongly recommend that
you use extreme caution when using any
device that may take your focus off the
road. Your primary responsibility is the safe
operation of your vehicle. We recommend
against the use of any hand-held device
while driving and encourage the use of
voice-operated systems when possible.
Make sure you are aware of all applicable
local laws that may affect the use of
electronic devices while driving. 307
F150 (TF6) , enUSA Audio SystemE163157
Page 311 of 472
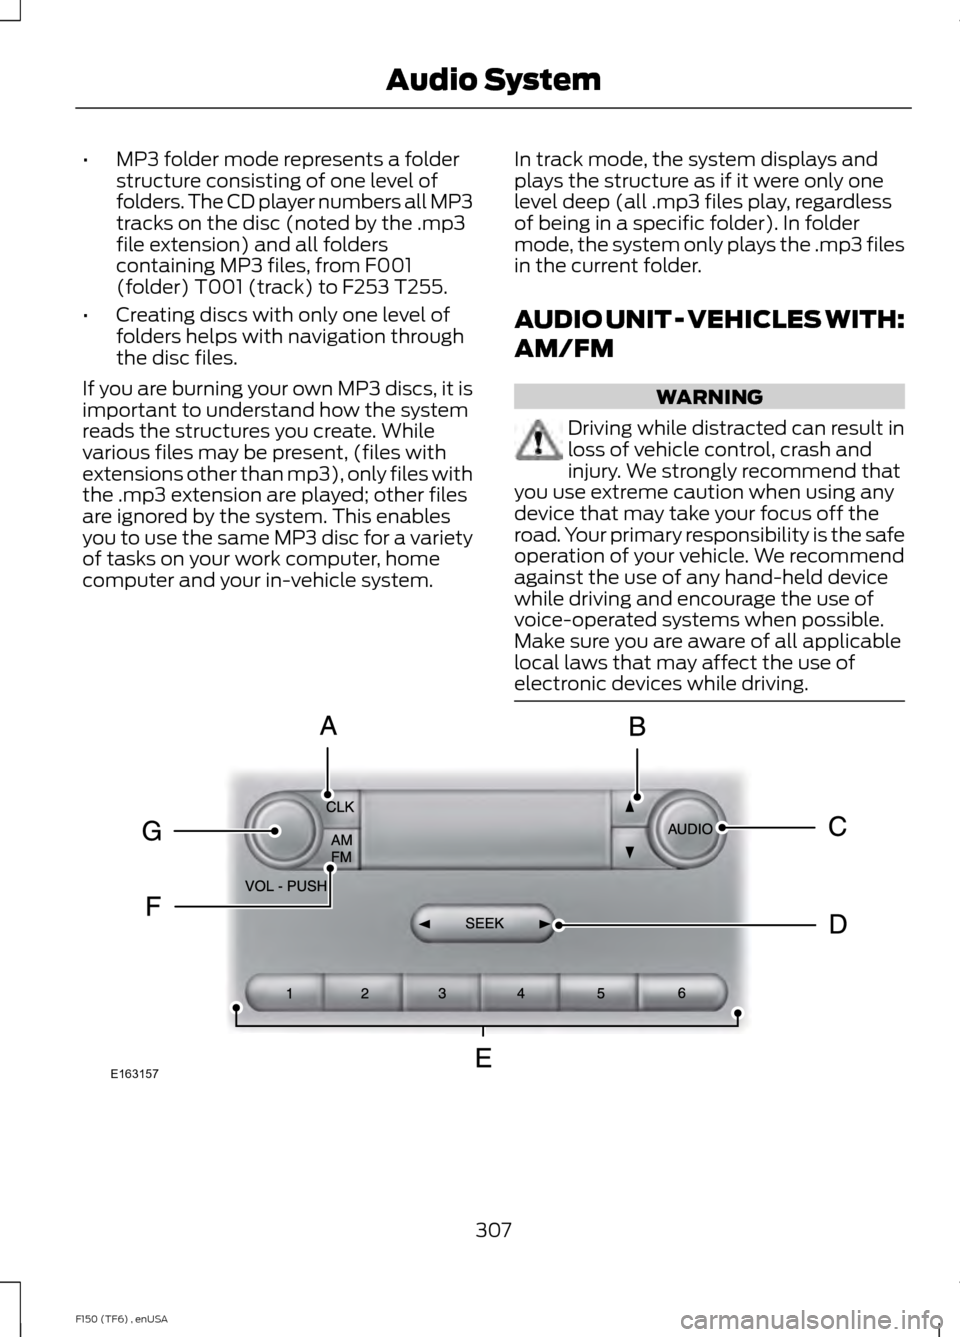
CLK: Press this button to switch the display between the clock and radio
frequency. To set the time, press and hold the button until the hours start to
flash. Press the arrow buttons (B) to adjust he hours, then repeat to set the
minutes. Press
CLK again to exit clock mode.
A
Tune: Press these arrow buttons to manually search through the radio frequency
band. Press and hold for a fast search. In AUDIO mode, press the buttons to
adjust different sound settings.
B
AUDIO:
Press this button to access settings for Treble, Middle, Bass, Fade and
Balance.
C
SEEK:
Press this button to go to the previous or next strong station on the
frequency band.
D
Memory presets:
Store your favorite radio stations. To store a radio station,
tune to the station, then press and hold a preset button until sound returns.
E
AM/FM:
Press this button to select a frequency band.
F
VOL-PUSH:
Press this button to switch the system off and on. Turn the control
to adjust the volume.
G
AUDIO UNIT - VEHICLES WITH:
AM/FM/CD/SYNC/SATELLITE
RADIO WARNING
Driving while distracted can result in
loss of vehicle control, crash and
injury. We strongly recommend that
you use extreme caution when using any
device that may take your focus off the
road. Your primary responsibility is the safe
operation of your vehicle. We recommend
against the use of any hand-held device
while driving and encourage the use of
voice-operated systems when possible.
Make sure you are aware of all applicable
local laws that may affect the use of
electronic devices while driving. Note:
Some features, such as Sirius satellite
radio, may not be available in your location.
Check with an authorized dealer.
308
F150 (TF6) , enUSA Audio System
Page 312 of 472
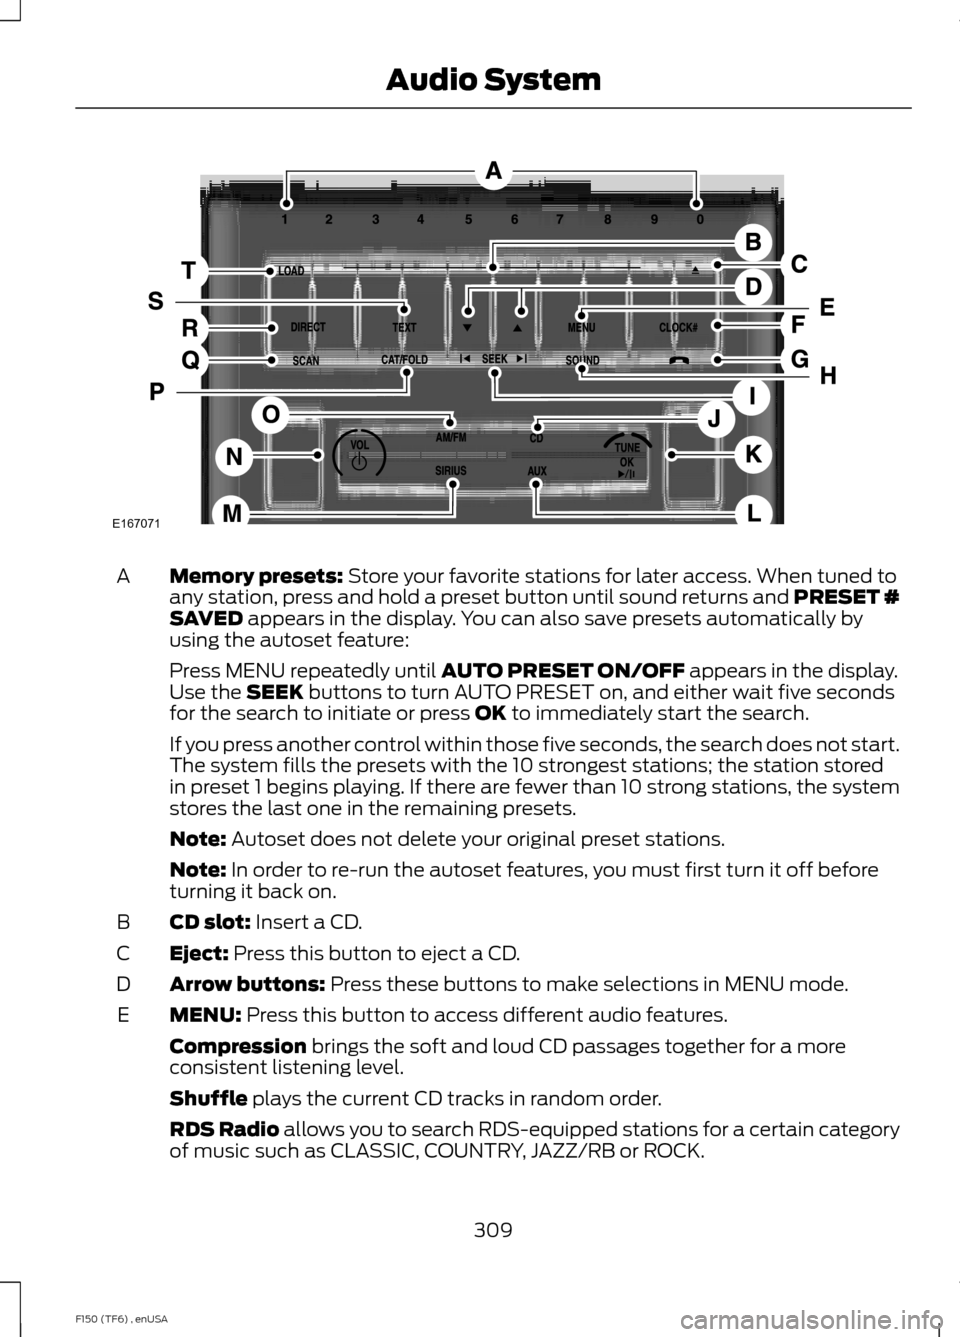
Memory presets: Store your favorite stations for later access. When tuned to
any station, press and hold a preset button until sound returns and PRESET #
SAVED
appears in the display. You can also save presets automatically by
using the autoset feature:
A
Press MENU repeatedly until
AUTO PRESET ON/OFF appears in the display.
Use the SEEK buttons to turn AUTO PRESET on, and either wait five seconds
for the search to initiate or press OK to immediately start the search.
If you press another control within those five seconds, the search does not start.
The system fills the presets with the 10 strongest stations; the station stored
in preset 1 begins playing. If there are fewer than 10 strong stations, the system
stores the last one in the remaining presets.
Note:
Autoset does not delete your original preset stations.
Note:
In order to re-run the autoset features, you must first turn it off before
turning it back on.
CD slot:
Insert a CD.
B
Eject:
Press this button to eject a CD.
C
Arrow buttons:
Press these buttons to make selections in MENU mode.
D
MENU:
Press this button to access different audio features.
E
Compression
brings the soft and loud CD passages together for a more
consistent listening level.
Shuffle
plays the current CD tracks in random order.
RDS Radio allows you to search RDS-equipped stations for a certain category
of music such as CLASSIC, COUNTRY, JAZZ/RB or ROCK.
309
F150 (TF6) , enUSA Audio SystemE167071
Page 313 of 472
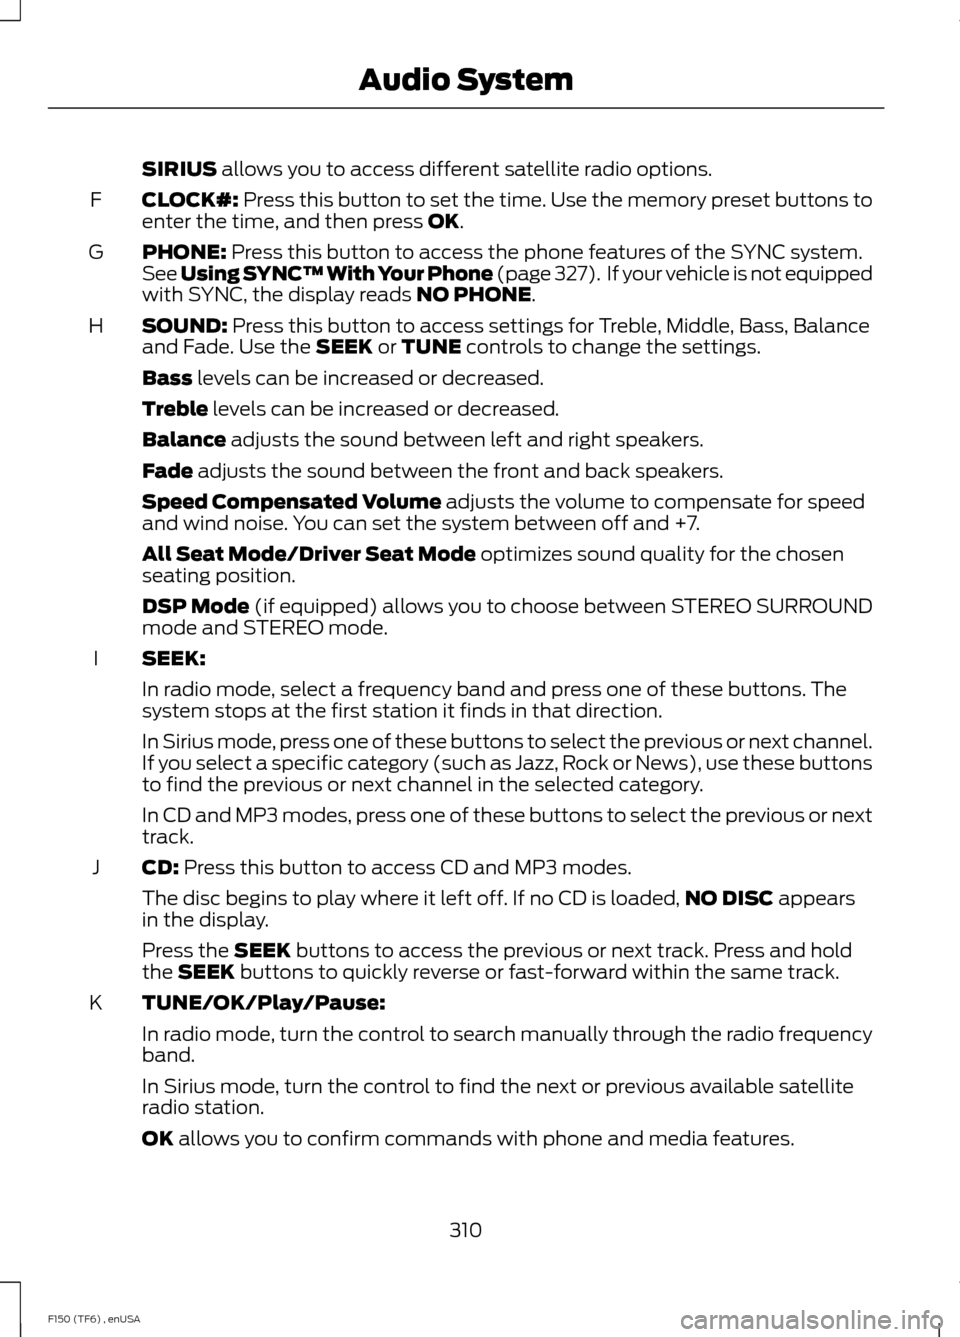
SIRIUS allows you to access different satellite radio options.
CLOCK#:
Press this button to set the time. Use the memory preset buttons to
enter the time, and then press OK.
F
PHONE:
Press this button to access the phone features of the SYNC system.
See Using SYNC™ With Your Phone (page 327). If your vehicle is not equipped
with SYNC, the display reads NO PHONE.
G
SOUND:
Press this button to access settings for Treble, Middle, Bass, Balance
and Fade. Use the SEEK or TUNE controls to change the settings.
H
Bass
levels can be increased or decreased.
Treble
levels can be increased or decreased.
Balance
adjusts the sound between left and right speakers.
Fade
adjusts the sound between the front and back speakers.
Speed Compensated Volume
adjusts the volume to compensate for speed
and wind noise. You can set the system between off and +7.
All Seat Mode/Driver Seat Mode
optimizes sound quality for the chosen
seating position.
DSP Mode
(if equipped) allows you to choose between STEREO SURROUND
mode and STEREO mode.
SEEK:
I
In radio mode, select a frequency band and press one of these buttons. The
system stops at the first station it finds in that direction.
In Sirius mode, press one of these buttons to select the previous or next channel.
If you select a specific category (such as Jazz, Rock or News), use these buttons
to find the previous or next channel in the selected category.
In CD and MP3 modes, press one of these buttons to select the previous or next
track.
CD:
Press this button to access CD and MP3 modes.
J
The disc begins to play where it left off. If no CD is loaded, NO DISC
appears
in the display.
Press the
SEEK buttons to access the previous or next track. Press and hold
the SEEK buttons to quickly reverse or fast-forward within the same track.
TUNE/OK/Play/Pause:
K
In radio mode, turn the control to search manually through the radio frequency
band.
In Sirius mode, turn the control to find the next or previous available satellite
radio station.
OK
allows you to confirm commands with phone and media features.
310
F150 (TF6) , enUSA Audio System
Page 314 of 472
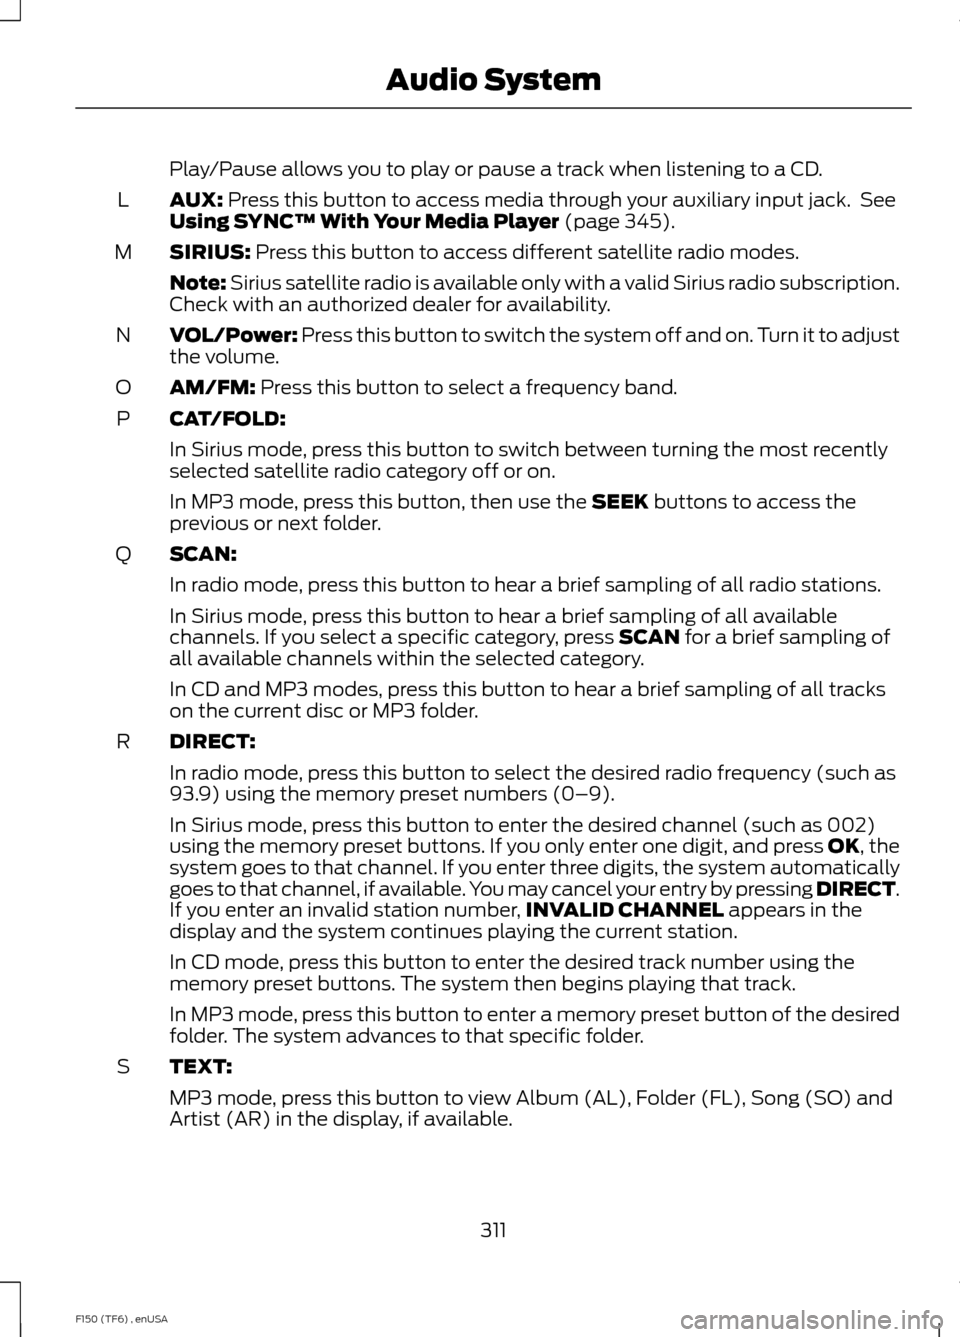
Play/Pause allows you to play or pause a track when listening to a CD.
AUX: Press this button to access media through your auxiliary input jack. See
Using SYNC™ With Your Media Player (page 345).
L
SIRIUS:
Press this button to access different satellite radio modes.
M
Note:
Sirius satellite radio is available only with a valid Sirius radio subscription.
Check with an authorized dealer for availability.
VOL/Power:
Press this button to switch the system off and on. Turn it to adjust
the volume.
N
AM/FM:
Press this button to select a frequency band.
O
CAT/FOLD:
P
In Sirius mode, press this button to switch between turning the most recently
selected satellite radio category off or on.
In MP3 mode, press this button, then use the
SEEK buttons to access the
previous or next folder.
SCAN:
Q
In radio mode, press this button to hear a brief sampling of all radio stations.
In Sirius mode, press this button to hear a brief sampling of all available
channels. If you select a specific category, press
SCAN for a brief sampling of
all available channels within the selected category.
In CD and MP3 modes, press this button to hear a brief sampling of all tracks
on the current disc or MP3 folder.
DIRECT:
R
In radio mode, press this button to select the desired radio frequency (such as
93.9) using the memory preset numbers (0–9).
In Sirius mode, press this button to enter the desired channel (such as 002)
using the memory preset buttons. If you only enter one digit, and press OK, the
system goes to that channel. If you enter three digits, the system automatically
goes to that channel, if available. You may cancel your entry by pressing
DIRECT.
If you enter an invalid station number, INVALID CHANNEL appears in the
display and the system continues playing the current station.
In CD mode, press this button to enter the desired track number using the
memory preset buttons. The system then begins playing that track.
In MP3 mode, press this button to enter a memory preset button of the desired
folder. The system advances to that specific folder.
TEXT:
S
MP3 mode, press this button to view Album (AL), Folder (FL), Song (SO) and
Artist (AR) in the display, if available.
311
F150 (TF6) , enUSA Audio System