2014 FORD EXPEDITION display
[x] Cancel search: displayPage 356 of 519
E.Left arrow button
•In radio mode, press and release this button to scroll through
memory presets. Press and hold to go to the previous station
•In CD and SYNC modes, press and release this button to advance to
the previous track. Press and hold to rewind within that track.
F.Auxiliary audio input jacks:Plug in and play auxiliary audio
sources.
G.VOLUMEPress the up and down arrow buttons to increase or
decrease the headphone volume level. From the rear seat controls, the
volume cannot be higher than the current audio setting unless the
speakers are off.
H.Wired headphone jack
I.-Press the button to access the previous CD.
J.+Press to access the next CD.
Switching the Rear Audio Controls On
After you switch the ignition on, FULL rear controls are on and the
system is in Single Play mode.
Parental Control
The multimedia system allows for three varying levels of parental control.
By simultaneously pressing the 3 and 5 memory preset buttons, the rear
passengers may be allowed to access FULL or LOCAL control or be
LOCKED out of rear seat controls altogether.
1. Press the 3 and 5 memory preset buttons at the same time. LOCAL
illuminates in both front and rear audio displays, indicating that only
LOCAL rear control is available.Note:While in Single Play mode,
LOCAL is the same as LOCKED. In Dual Play mode, LOCAL allows
the driver to control the media selected at the radio, or over media
played through the rear auxiliary input jacks.
2. Pressing the 3 and 5 buttons a second time locks the rear control.
The rear passengers are restricted from control over media of any
kind (the rear controls are disabled).Note:If in Dual Play mode, the
headphone icon normally illuminated in the audio display when in
Dual Play turns off in the audio display.
3. Pressing the 3 and 5 buttons a third time restores full control to the
rear seat controls. Switching the ignition off and then on again has
the same effect.
Audio System355
2014 Expedition(exd)
Owners Guide gf, 1st Printing, June 2013
USA(fus)
Page 357 of 519
Switching Dual Play Mode On
You can switch Dual Play mode on by simultaneously pressing the 2 and
4 memory preset buttons on the audio or by doing the following:
1. Press the headphone/speaker control. The headphone icon
illuminates in both front and rear audio displays indicating the rear
seat speakers are off and the headphones are on.
2. Press MEDIA to change audio sources (as heard in the headphones
only).
3. Use the other controls to adjust the playing media.
Switching Off Dual Play Mode
Use any one of the following to switch off Dual Play mode:
•Press the 2 and 4 memory preset buttons simultaneously again.
•Press the 3 and 5 memory preset buttons simultaneously to LOCK
the rear seat controls.
•Press the headphone/speaker button again.
Using Dual Play Mode with Headphones
WARNING:Do not leave children unattended in your vehicle
and do not let children operate the system while unsupervised. If
wired headphones or auxiliary systems are used, children may become
entangled in the cords and seriously injure themselves.
Plug a 1/8–inch (3.5 millimeter) headphone (not included) into the
headphone jack. Press the speaker button, or the 2 and 4 memory preset
buttons simultaneously on the radio to switch on the headphones. DUAL
PLAY illuminates in the audio display, there is no sound from the rear
speakers and the fade control is inactive, signaling that Dual Play is on.
The front speakers remain on for the front passengers. Press the speaker
button, or the 2 and 4 memory preset buttons simultaneously on the
radio again to switch off the headphones and Dual Play mode. SINGLE
PLAY illuminates in the audio display; fade control is active and there is
sound from rear speakers, signaling that Single Play is on.
You need to switch the rear seat controls on to use any rear controls
(whether in Single Play or Dual Play mode). To use Dual Play, switch on
the rear seat controls; the headphone icon illuminates in the audio
display. SeeSwitching the rear audio controls onpreviously.
356Audio System
2014 Expedition(exd)
Owners Guide gf, 1st Printing, June 2013
USA(fus)
Page 358 of 519
SATELLITE RADIO INFORMATION (IF EQUIPPED)
Satellite Radio Channels
Sirius broadcasts a variety of music, news, sports, weather, traffic and
entertainment satellite radio channels. For more information and a
complete list of Sirius satellite radio channels, visit www.siriusxm.com in
the United States, www.sirius.ca in Canada, or call Sirius at
1–888–539–7474.
Note:This receiver includes the eCos real-time operating system. eCos
is published under the eCos License.
Satellite Radio Reception Factors
Potential satellite radio reception issues
Antenna
obstructionsFor optimal reception performance, keep the
antenna clear of snow and ice build-up and
keep luggage and other material as far away
from the antenna as possible.
TerrainHills, mountains, tall buildings, bridges,
tunnels, freeway overpasses, parking garages,
dense tree foliage and thunderstorms can
interfere with your reception.
Station overloadWhen you pass a ground-based
broadcast-repeating tower, a stronger signal
may overtake a weaker one and the audio
system may mute.
Satellite radio signal
interferenceYour display may show ACQUIRING...to
indicate the interference and the audio
system may mute.
Audio System357
2014 Expedition(exd)
Owners Guide gf, 1st Printing, June 2013
USA(fus)
Page 360 of 519
Troubleshooting
Radio display Condition Possible action
Acquiring Radio requires more than
two seconds to produce
audio for the selected
channel.No action required. This
message should disappear
shortly.
Sat Fault/SIRIUS
system failureThere is an internal
module or system failure
present.If this message does not
clear shortly, or with an
ignition key cycle, your
receiver may have a fault.
See an authorized dealer
for service.
Invalid Channel The channel is no longer
available.Tune to another channel
or choose another preset.
Unsubscribed
ChannelYour subscription does
not include this channel.Contact Sirius at
1–888–539–7474 to
subscribe to the channel,
or tune to another
channel.
No Signal The signal is lost from the
Sirius satellite or Sirius
tower to your vehicle
antenna.The signal is blocked.
When you move into an
open area, the signal
should return.
Updating Update of channel
programming in progress.No action required. The
process may take up to
three minutes.
Call SIRIUS
1–888–539–7474Your satellite service is no
longer available.Call Sirius at
1–888–539–7474 to
resolve subscription
issues.
None Found. Check
Channel Guide.All the channels in the
selected category are
either skipped or locked.Use the channel guide to
turn off the Lock or Skip
function on that station.
Subscription
UpdatedSirius has updated the
channels available for
your vehicle.No action required.
Audio System359
2014 Expedition(exd)
Owners Guide gf, 1st Printing, June 2013
USA(fus)
Page 362 of 519

4. Adjust the volume as desired.
5. Switch your portable music player on and adjust its volume to half its
maximum level.
6. PressAUXuntilLINEorLINE INappears in the display. You
should hear music from your device even if it is low.
7. Adjust the volume on your portable music player until it reaches the
volume level of the FM station or CD. Do this by switching back and
forth between the AUX and FM or CD controls.
USB PORT (IF EQUIPPED)
WARNING:Driving while distracted can result in loss of vehicle
control, crash and injury. We strongly recommend that you use
extreme caution when using any device that may take your focus off
the road. Your primary responsibility is the safe operation of your
vehicle. We recommend against the use of any hand-held device while
driving and encourage the use of voice-operated systems when possible.
Make sure you are aware of all applicable local laws that may affect the
use of electronic devices while driving.
The USB port allows you to plug in
media playing devices, memory
sticks and charge devices
(if supported). See theSYNC
chapter for more information.
LINE IN
Audio System361
2014 Expedition(exd)
Owners Guide gf, 1st Printing, June 2013
USA(fus)
Page 363 of 519

REAR SEAT ENTERTAINMENT SYSTEM (IF EQUIPPED)
WARNING:Driving while distracted can result in loss of vehicle
control, crash and injury. We strongly recommend that you use
extreme caution when using any device that may take your focus off
the road. Your primary responsibility is the safe operation of your
vehicle. We recommend against the use of any hand-held device while
driving and encourage the use of voice-operated systems when possible.
Make sure you are aware of all applicable local laws that may affect the
use of electronic devices while driving.
Note:Make sure you run the engine while using the device. To avoid
discharging your vehicle battery:
•Do not use this device without the engine running.
•Turn off the device when your vehicle is not in use for long periods.
The system consists of the following features:
•Seven-inch color TFT-LCD panel (480x234) with 16:9 aspect
•Built-in, top-loading slot load DVD player
•Infrared transmitters for infrared wireless headphones
•Audio/Video source input (three RCA jacks)
•USB 2.0 (optional)
•One-eighth inch stereo headphone jack
•Forward remote sensor on the front panel
•Full-function remote control
•Five control buttons on the front panel: POWER, SOURCE, STOP,
PLAY and EJECT
•On-screen display control
•12V DC power input
•FM transmitter (may be optional)
Note:Do not touch the inner pins of the jacks on the front panel.
Electrostatic discharge may cause permanent damage to the device.
Your system plays the following types of discs:
•DVD-Video:DVD contains video.
•DVD +/- R:DVD contains video.
•CD-DA:CD contains musical or sound content only.
•CD-Video:CD contains movie only.
•CD-R/RW:CD contains audio files (such as a CD-R with MP3 files),
MPEG or JPEG files.
362Audio System
2014 Expedition(exd)
Owners Guide gf, 1st Printing, June 2013
USA(fus)
Page 367 of 519

D.STOP*:Press this button to stop playing the disc.
E.PLAY*:Press this button to play the disc.
F.Headphone jack:Plug in your wired headphones with a 1/8-inch
(3.5 millimeter) stereo connector plug to listen to audio from the
program.
G.Video input jack (red):Connect an RCA cable to this port.
H.Video input jack (white):Connect an RCA cable to this port.
I.Video input jack (yellow):Connect an RCA cable to this port.
J.USB port (optional):Listen to music or view images you stored on a
USB device such as a USB memory stick or a memory card reader.
K.SOURCE:Press this button to select Monitor A, Monitor B, AUX/TV
(if available), and AUX 2 (if available).
L.POWER:Press this button to turn the system off and on.
M.TFT LCD panel:Seven-inch TFT LCD panel.
N.Level lock and release latch:Use this latch to change the viewing
angle of the LCD panel or lock the panel into the secured position.
O.Infrared sensor - forward sensor eye:This allows the remote
control to navigate the on-screen display.
Remote Control
Note:The remote control uses infrared light to send commands to the
DVD player, just as many home video systems do. Just point the remote
control at the DVD player infrared window located above each screen in
order to control that DVD player. While you can connect a second device
such as a VCR through the auxiliary inputs, and view the playback on
the screen, you cannot control that device by aiming its remote control
at the Ford DVD player. The Ford DVD system remote control is the
only remote control you can use with the system. For example, if you
connect a VCR to the DVD system, you must point the VCR remote
control at the VCR to control it.
Installing the Battery
Before using your remote control, install the batteries as follows:
1. Turn the remote control face down. Press down on the ridged area of
the battery cover and slide it off.
2. Install two AAA batteries. Make sure you install the batteries
properly, with the + and – facing the correct way, as shown in the
battery compartment.
3. Slide the cover back until it clicks.
366Audio System
2014 Expedition(exd)
Owners Guide gf, 1st Printing, June 2013
USA(fus)
Page 368 of 519
Note:Different types of batteries have different characteristics. Do not
mix different types.
Note:Do not mix old and new batteries. Mixing old and new batteries
can shorten battery life and cause chemical leaks from the old batteries.
Note:Keep the batteries out of the reach of children. If someone
swallows a battery, immediately consult a doctor. When you dispose of
used batteries, keep to governmental regulations or environmental public
institution rules that apply in your area.
Note:Remove the batteries if the remote control is not used for a month
or longer.
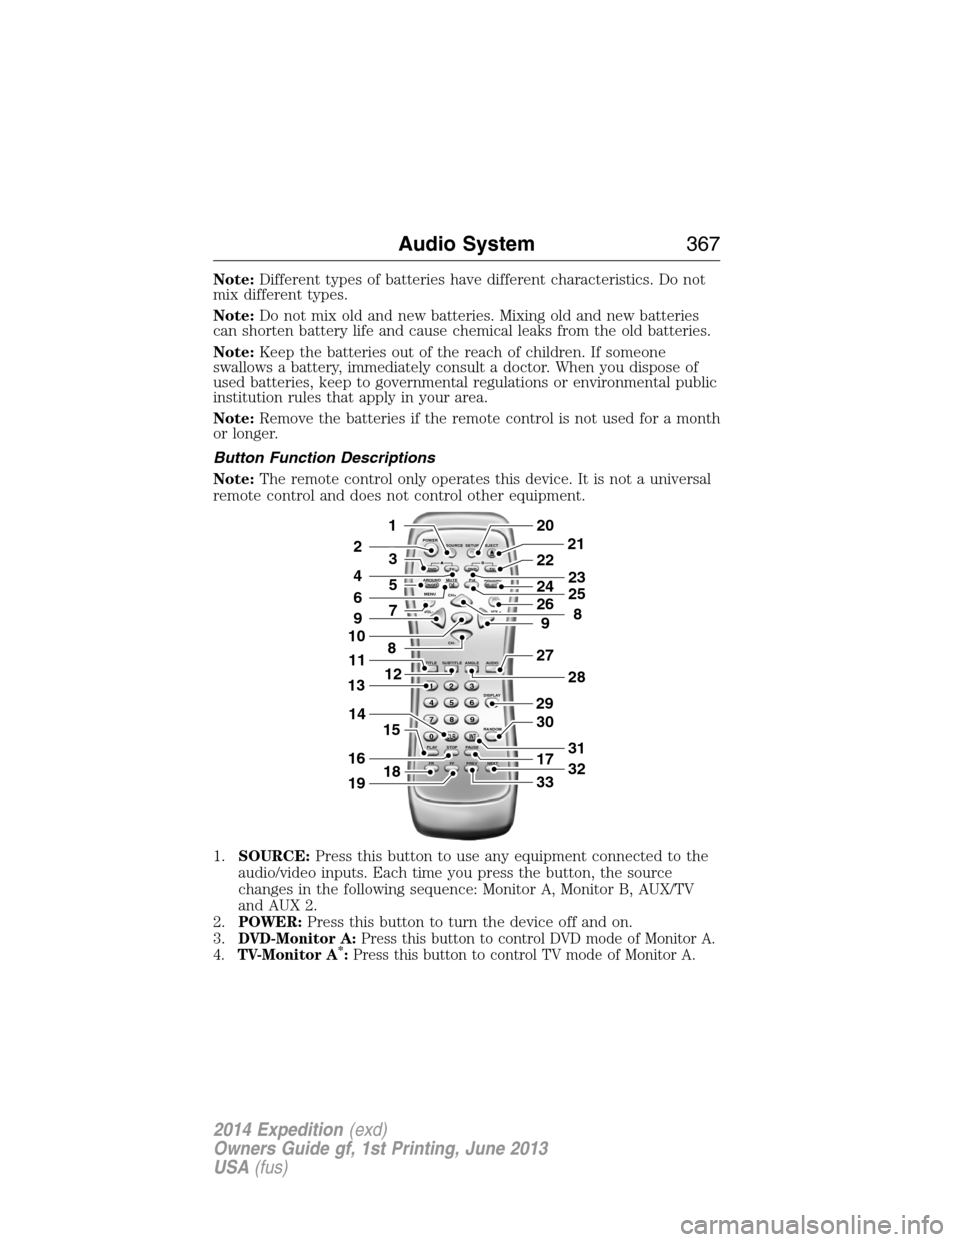
Button Function Descriptions
Note:The remote control only operates this device. It is not a universal
remote control and does not control other equipment.
1.SOURCE:Press this button to use any equipment connected to the
audio/video inputs. Each time you press the button, the source
changes in the following sequence: Monitor A, Monitor B, AUX/TV
and AUX 2.
2.POWER:Press this button to turn the device off and on.
3.
DVD-Monitor A:Press this button to control DVD mode of Monitor A.
4.TV-Monitor A*:Press this button to control TV mode of Monitor A.
POWER
SOURCE
A
SOUND
AROUNDSOUND
AROUND MUTE
MENU REPEAT
CH+
CH-
TITLESUBTITLE ANGLE AUDIO
DISPLAY
RANDOM
PLAY
123
6 5 4
789
0
CLR INT
FR FF PREV NEXTSTOP PAUSE VOL- VOL+PIX A
D
VD
ON/OFFSELECT
TV DVD TVSETUP EJECTB
5
9
29
27
30
17
33
28
32
31
201
2
7
8
12
4
3
15
21
22
24
2625
8
23
6
9
10
16
13
18
11
14
19
Audio System367
2014 Expedition(exd)
Owners Guide gf, 1st Printing, June 2013
USA(fus)