2014 FORD EXPEDITION display
[x] Cancel search: displayPage 236 of 519
The controller shows gain setting, output bar graph, and trailer
connectivity status in the information display. They appear in the
information display as follows:
•TBC GAIN = XX.X NO TRAILER:Shows the current gain setting
during a given ignition cycle and when adjusting the gain. This also
displays if you use the manual control lever or make gain adjustments
with no trailer connected.
•TBC GAIN = XX.X OUTPUT=//////:Displays when you push
your vehicle’s brake pedal, or when you use the manual control. Bar
indicators illuminate in the information display to indicate the amount
of power going to the trailer brakes relative to the brake pedal or
manual control input. One bar indicates the least amount of output;
six bars indicate maximum output.
•TRAILER CONNECTED:Displays when the system senses a
correct trailer wiring connection (a trailer with electric trailer brakes)
during a given ignition cycle.
•TRAILER DISCONNECTED:Displays, accompanied by a single
audible chime, when the system senses a trailer connection and then
a disconnection, either intentional or unintentional, during a given
ignition cycle. It also displays if a truck or trailer-wiring fault occurs
causing the trailer to appear disconnected. This message can also
display if you use the manual control lever without a trailer
connected.
B.Manual control lever:Slide the control lever to the left to turn on
the trailer’s electric brakes independent of the tow vehicle’s brakes. See
the followingProcedure for adjusting gainsection for instructions on
proper use of this feature. If you use the manual control while the brake
is also applied, the greater of the two inputs determines the power sent
to the trailer brakes.
•Stop lamps:Using the manual control lever illuminates both the
trailer brake lamps and your vehicle brake lamps except the center
high-mount stop lamp, if you make the proper electrical connection
to the trailer. Pressing your vehicle brake pedal also illuminates both
trailer and vehicle brake lamps.
Procedure for Adjusting Gain
Note:Only perform this procedure in a traffic-free environment at
speeds of approximately 20–25 mph (30–40 km/h).
The gain setting sets the trailer brake controller for the specific towing
condition. You should change the setting as towing conditions change.
Changes to towing conditions include trailer load, vehicle load, road
conditions and weather.
Towing235
2014 Expedition(exd)
Owners Guide gf, 1st Printing, June 2013
USA(fus)
Page 237 of 519
The gain should be set to provide the maximum trailer braking assistance
while making sure the trailer wheels do not lock when using the brakes.
Locked trailer wheels may lead to trailer instability.
1. Make sure the trailer brakes are in good working condition,
functioning normally and properly adjusted. See your trailer dealer if
necessary.
2. Hook up the trailer and make the electrical connections according to
the trailer manufacturer’s instructions.
3. When you plug in a trailer with electric or electric-over-hydraulic
brakes,TRAILER CONNECTEDappears in the information display.
4. Use the gain adjustment (+ and -) buttons to increase or decrease
the gain setting to the desired starting point. A gain setting of 6.0 is a
good starting point for heavier loads.
5. In a traffic-free environment, tow the trailer on a dry, level surface at
a speed of 20–25 mph (30–40 km/h) and squeeze the manual control
lever completely.
6. If the trailer wheels lock up, indicated by squealing tires, reduce the
gain setting. If the trailer wheels turn freely, increase the gain setting.
Repeat Steps 5 and 6 until the gain setting is at a point just below
trailer wheel lock-up. If towing a heavier trailer, trailer wheel lock-up
may not be attainable even with the maximum gain setting of 10.
Explanation of Information Display Warning Messages
Note:An authorized dealer can diagnose the trailer brake controller to
determine exactly which trailer fault has occurred. However, your Ford
warranty doesnotcover this diagnosis if the fault is with the trailer.
TRAILER BRAKE MODULE FAULT:Displays in response to faults
sensed by the trailer brake controller, accompanied by a single chime.
If this message appears, contact an authorized dealer as soon as possible
for diagnosis and repair. The controller may still function, but
performance may be degraded.
WIRING FAULT ON TRAILER:Displays when there is a short circuit
on the electric brake output wire. If theWIRING FAULT ON TRAILER
message displays, accompanied by a single chime, with no trailer
connected, the problem is with your vehicle wiring between the trailer
brake controller and the 7–pin connector at the bumper. If the message
only displays with a trailer connected, the problem is with the trailer
wiring. Consult your trailer dealer for assistance. This can be a short to
ground (such as a chaffed wire), short to voltage (such as a pulled pin
on trailer emergency breakaway battery) or the trailer brakes may be
drawing too much current.
236Towing
2014 Expedition(exd)
Owners Guide gf, 1st Printing, June 2013
USA(fus)
Page 238 of 519
Points to Remember
Note:Do not attempt removal of the trailer brake controller without
consulting theWorkshop Manual.Damage to the unit may result.
•Adjust gain setting before using the trailer brake controller for the
first time.
•Adjust gain setting, using the procedure above, whenever road,
weather and trailer or vehicle loading conditions change from when
the gain was initially set.
•Only use the manual control lever for proper adjustment of the gain
during trailer setup. Misuse, such as application during trailer sway,
could cause instability of trailer or tow vehicle.
•Avoid towing in adverse weather conditions. The trailer brake
controller does not provide anti-lock control of the trailer wheels.
Trailer wheels can lock up on slippery surfaces, resulting in reduced
stability of trailer and tow vehicle.
•The trailer brake controller is equipped with a feature that reduces
output at vehicle speeds below 11 mph (18 km/h) so trailer and
vehicle braking is not jerky or harsh. This feature is only available
when applying the brakes using your vehicle’s brake pedal, not the
controller.
•The controller interacts with the brake control system and powertrain
control system of your vehicle to provide the best performance on
different road conditions.
•Your vehicle’s brake system and the trailer brake system work
independently of each other. Changing the gain setting on the
controller does not affect the operation of your vehicle’s brakes
whether you attach a trailer or not.
•When you turn the engine off, the controller output is disabled and
the display and module shut down. The controller module and display
turn on when you turn the ignition on.
•The trailer brake controller is only a factory-installed or
dealer-installed item. Ford is not responsible for warranty or
performance of the controller due to misuse or customer installation.
Towing237
2014 Expedition(exd)
Owners Guide gf, 1st Printing, June 2013
USA(fus)
Page 341 of 519

Item Capacity Ford part nameFord part number /
Ford specification
3We have designed your engine to use Motorcraft motor oils or equivalent oil brands that meet our
specifications. Motor oils of the recommended viscosity grade that meet API SN requirements and display
the API Certification Mark for gasoline engines are also acceptable.4Do not use API S category oils labeled as SN, SM, SL or lower category unless the label also displays the
API certification mark. These oils do not meet all the requirements of your vehicles engine and emission
system.5Do not use supplemental engine oil additives in your engine. They are unnecessary and could lead to
engine damage that is not covered by your Ford warranty.6Automatic transmissions that require MERCON™ LV should only use MERCON LV fluid. Refer to
scheduled maintenance informationto determine the correct service interval. Use of any fluid other than
the recommended fluid may cause transmission damage.7Indicates only approximate dry-fill capacity. Some applications may vary based on cooler size and if
equipped with an in-tank cooler.8Your vehicle’s rear axle is filled with a synthetic rear axle lubricant and is considered lubricated for life.
These lubricants are not to be checked or changed unless a leak is suspected, service is required or the axle
has been submerged in water. The axle lubricant should be changed any time the axle has been submerged
in water.9Add 4 oz. (118 ml) of Additive Friction Modifier XL-3 or equivalent for complete refill of Ford limited slip
rear axles.10Warning:The air conditioning refrigerant system contains refrigerant R–134a under high pressure.
Opening and air conditioning refrigerant system can cause personal injury. Only qualified personnel should
service the air conditioning refrigerant system.
340Capacities and Specifications
2014 Expedition(exd)
Owners Guide gf, 1st Printing, June 2013
USA(fus)
Page 351 of 519

MP3 Track and Folder Structure
Audio systems capable of recognizing and playing MP3 individual tracks
and folder structures work as follows:
•There are two different modes for MP3 disc playback: MP3 track
mode (system default) and MP3 folder mode.
•MP3 track mode ignores any folder structure on the MP3 disc. The
player numbers each MP3 track on the disc (noted by the .mp3 file
extension) from T001 to a maximum of T255.Note:The maximum
number of playable MP3 files may be less depending on the structure
of the CD and exact model of radio present.
•MP3 folder mode represents a folder structure consisting of one level
of folders. The CD player numbers all MP3 tracks on the disc (noted
by the .mp3 file extension) and all folders containing MP3 files, from
F001 (folder) T001 (track) to F253 T255.
•Creating discs with only one level of folders helps with navigation
through the disc files.
If you are burning your own MP3 discs, it is important to understand
how the system reads the structures you create. While various files may
be present, (files with extensions other than mp3), only files with the
.mp3 extension are played; other files are ignored by the system. This
enables you to use the same MP3 disc for a variety of tasks on your work
computer, home computer and your in-vehicle system.
In track mode, the system displays and plays the structure as if it were
only one level deep (all .mp3 files play, regardless of being in a specific
folder). In folder mode, the system only plays the .mp3 files in the
current folder.
350Audio System
2014 Expedition(exd)
Owners Guide gf, 1st Printing, June 2013
USA(fus)
Page 353 of 519
•Set the strongest stations on the radio frequency by pressingMENU
untilAUTOSETappears.AUTOSETdoes not override your original
presets.
•RBDSdisplays text transmitted by certain radio stations and
searches for music categories. To search for music categories, turn on
RBDS (by using theSEEKbuttons whenRBDS ON/OFFappears).
Press the up and down arrow buttons to scroll through categories,
then use theSEEKbuttons to begin the search.
•SPEEDVOL(speed compensated volume) allows you to adjust radio
volume to compensate for noise levels when vehicle speed increases.
•Track/Folderis only available on MP3 files when in CD mode. In
track mode, pressing theSEEKarrows allows you to scroll through
all the tracks on the disc. In folder mode, pressing theSEEKarrows
allows you to scroll through all the tracks within the selected folder.
Press theFOLDERbuttons to access other folders.
•COMPRESS(Compression) is only available in CD and MP3 modes.
Switching compression on brings the soft and loud passages together
for a more consistent listening level. Use theSEEKbuttons and up
and down arrow buttons to switch it on and off.
•SINGLE PLAY/DUAL PLAYallows for separate listening modes for
front seat and rear seat passengers. SeeRear seat controlslater in
this chapter.
F.AUX:Press this button to access the media features of the SYNC®
system. See theSYNC®chapter for more information.
G.SEEK:
•In radio mode, press and release these buttons to go to the next
(or previous) preset radio station or disc track.
•In CD and MP3 modes, press these buttons to select the next
(or previous) track, or press and hold to advance (or reverse) within
the same track.
H.Play, Pause and OK:
•Play and Pause allow you to play or pause a track when listening to a
CD.
•OKallows you to confirm commands with phone and media features
of the SYNC system. See theSYNC®chapter for more information.
I.SHUFFLE:Play music on the selected CD or MP3 folder in random
order.
352Audio System
2014 Expedition(exd)
Owners Guide gf, 1st Printing, June 2013
USA(fus)
Page 354 of 519
J.Folder:Press this button to access the next folder on an MP3 disc.
K.Folder:Press this button to access the previous folder on an MP3
disc.
L.FF:Press this button to manually fast forward in a CD track or MP3
file.
M.REW:Press this button to manually rewind in a CD track or MP3 file.
N.Memory presets:Store your favorite radio stations. To store a radio
station, tune to the station, then press and hold a preset button until
sound returns.
O.TEXT/SCAN:
•In radio, CD and MP3 modes, press and hold to hear a brief sampling
of radio stations, CD tracks or MP3 files.
•In CD and MP3 modes, press and release to display track title, artist
name and disc title.
Note:In text mode, sometimes the display requires additional text to
show. When theindicatorison,pressTEXT and then use the
SEEK buttons to view the additional display text.
P.AM/FM:Press this button to select a frequency band.
Q.VOL-PUSH:
•Press this button to switch the system off and on.
•Turn it to adjust the volume.
R.CD:Press this button to enter CD or MP3 mode.
Audio System353
2014 Expedition(exd)
Owners Guide gf, 1st Printing, June 2013
USA(fus)
Page 355 of 519
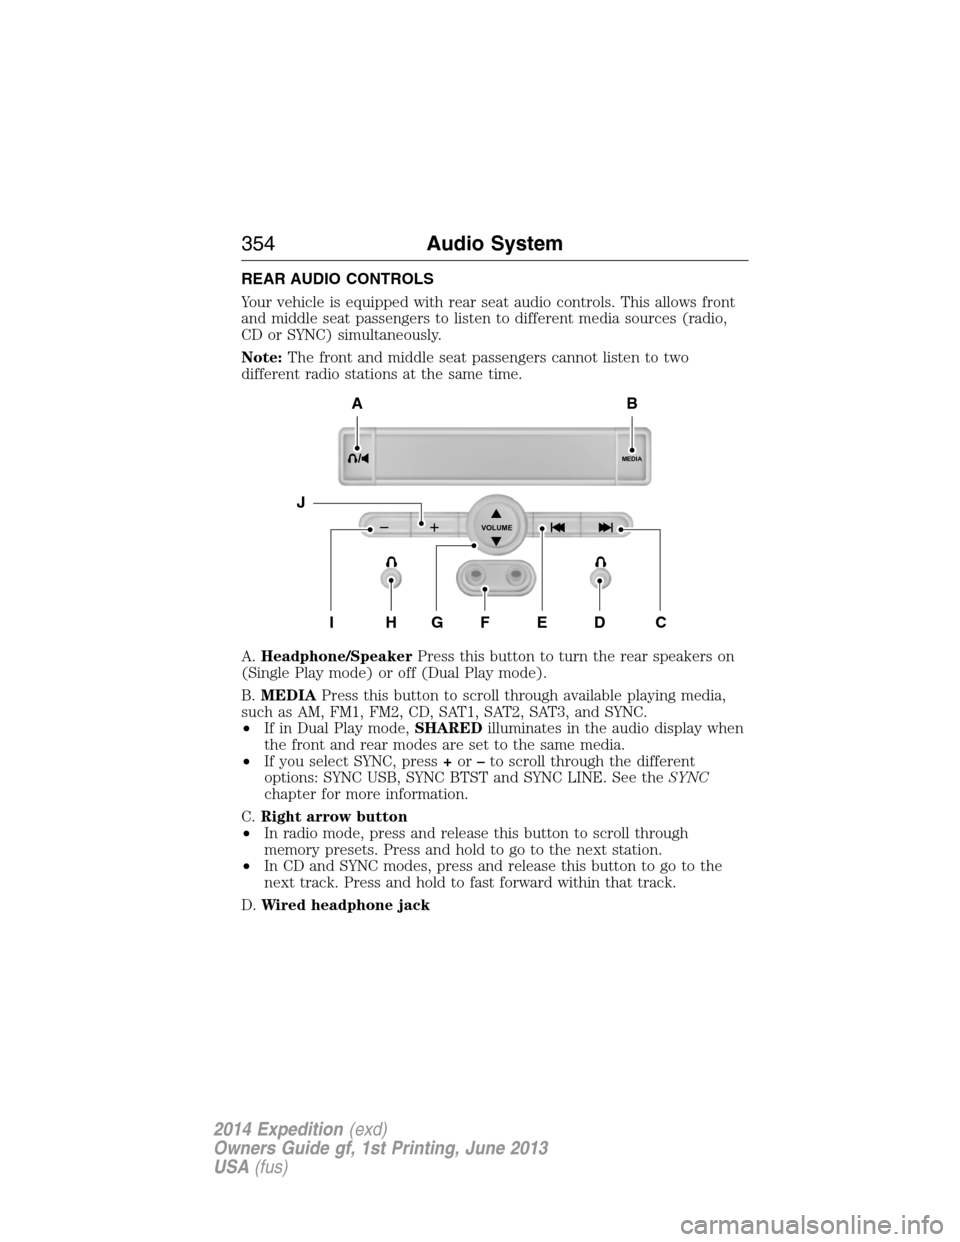
REAR AUDIO CONTROLS
Your vehicle is equipped with rear seat audio controls. This allows front
and middle seat passengers to listen to different media sources (radio,
CD or SYNC) simultaneously.
Note:The front and middle seat passengers cannot listen to two
different radio stations at the same time.
A.Headphone/SpeakerPress this button to turn the rear speakers on
(Single Play mode) or off (Dual Play mode).
B.MEDIAPress this button to scroll through available playing media,
such as AM, FM1, FM2, CD, SAT1, SAT2, SAT3, and SYNC.
•If in Dual Play mode,SHAREDilluminates in the audio display when
the front and rear modes are set to the same media.
•If you select SYNC, press+or–to scroll through the different
options: SYNC USB, SYNC BTST and SYNC LINE. See theSYNC
chapter for more information.
C.Right arrow button
•In radio mode, press and release this button to scroll through
memory presets. Press and hold to go to the next station.
•In CD and SYNC modes, press and release this button to go to the
next track. Press and hold to fast forward within that track.
D.Wired headphone jack
MEDIA
VOLUME
B
HFGEDCI
A
J
354Audio System
2014 Expedition(exd)
Owners Guide gf, 1st Printing, June 2013
USA(fus)