Page 8 of 519

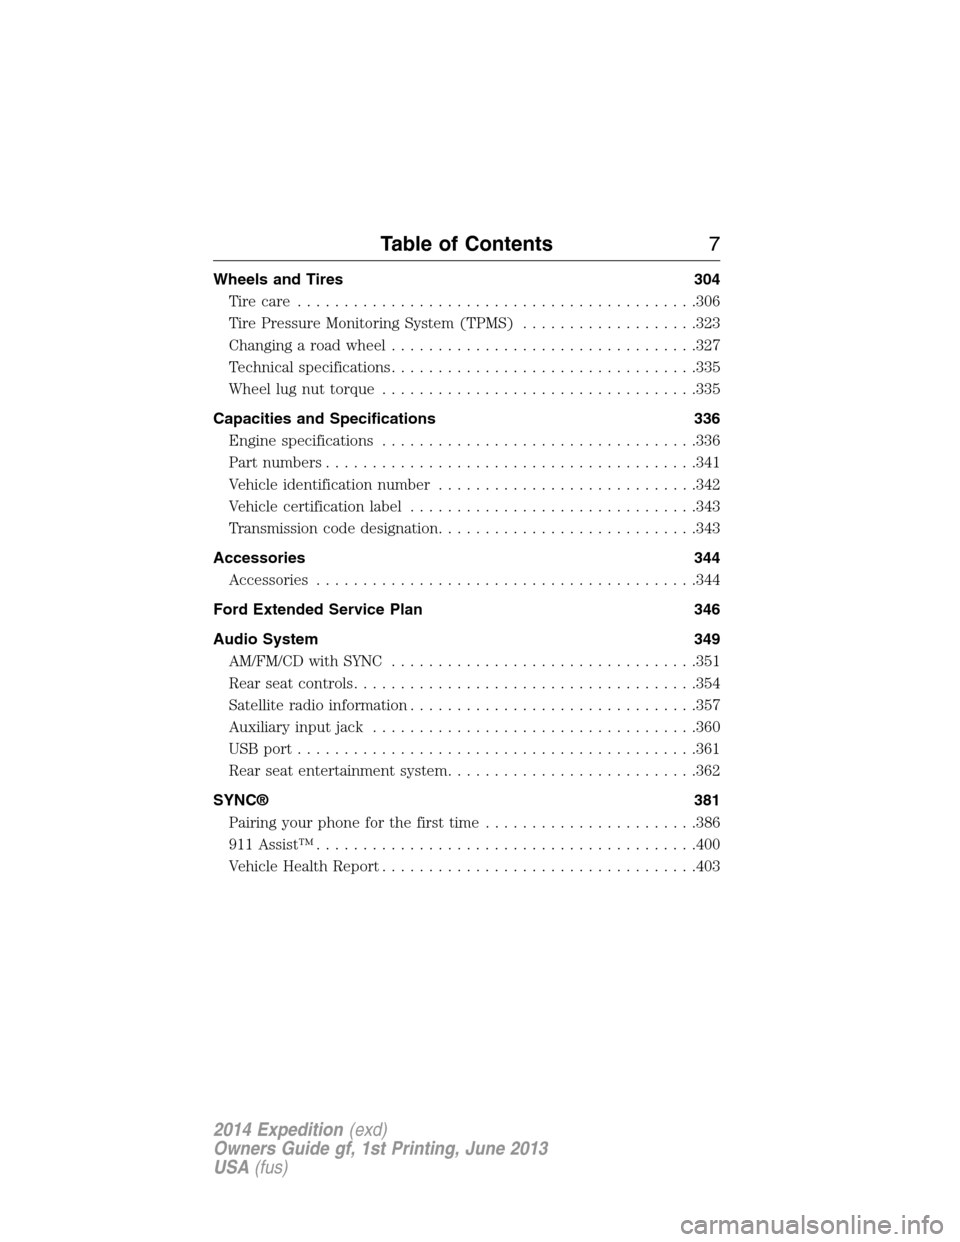
Wheels and Tires 304
Tire care...........................................306
Tire Pressure Monitoring System (TPMS)...................323
Changing a road wheel.................................327
Technical specifications.................................335
Wheel lug nut torque..................................335
Capacities and Specifications 336
Engine specifications..................................336
Part numbers........................................341
Vehicle identification number............................342
Vehicle certification label...............................343
Transmission code designation............................343
Accessories 344
Accessories.........................................344
Ford Extended Service Plan 346
Audio System 349
AM/FM/CD with SYNC.................................351
Rear seat controls.....................................354
Satellite radio information...............................357
Auxiliary input jack...................................360
USBport...........................................361
Rear seat entertainment system...........................362
SYNC® 381
Pairing your phone for the first time.......................386
911 Assist™.........................................400
Vehicle Health Report..................................403
Table of Contents7
2014 Expedition(exd)
Owners Guide gf, 1st Printing, June 2013
USA(fus)
Page 335 of 519

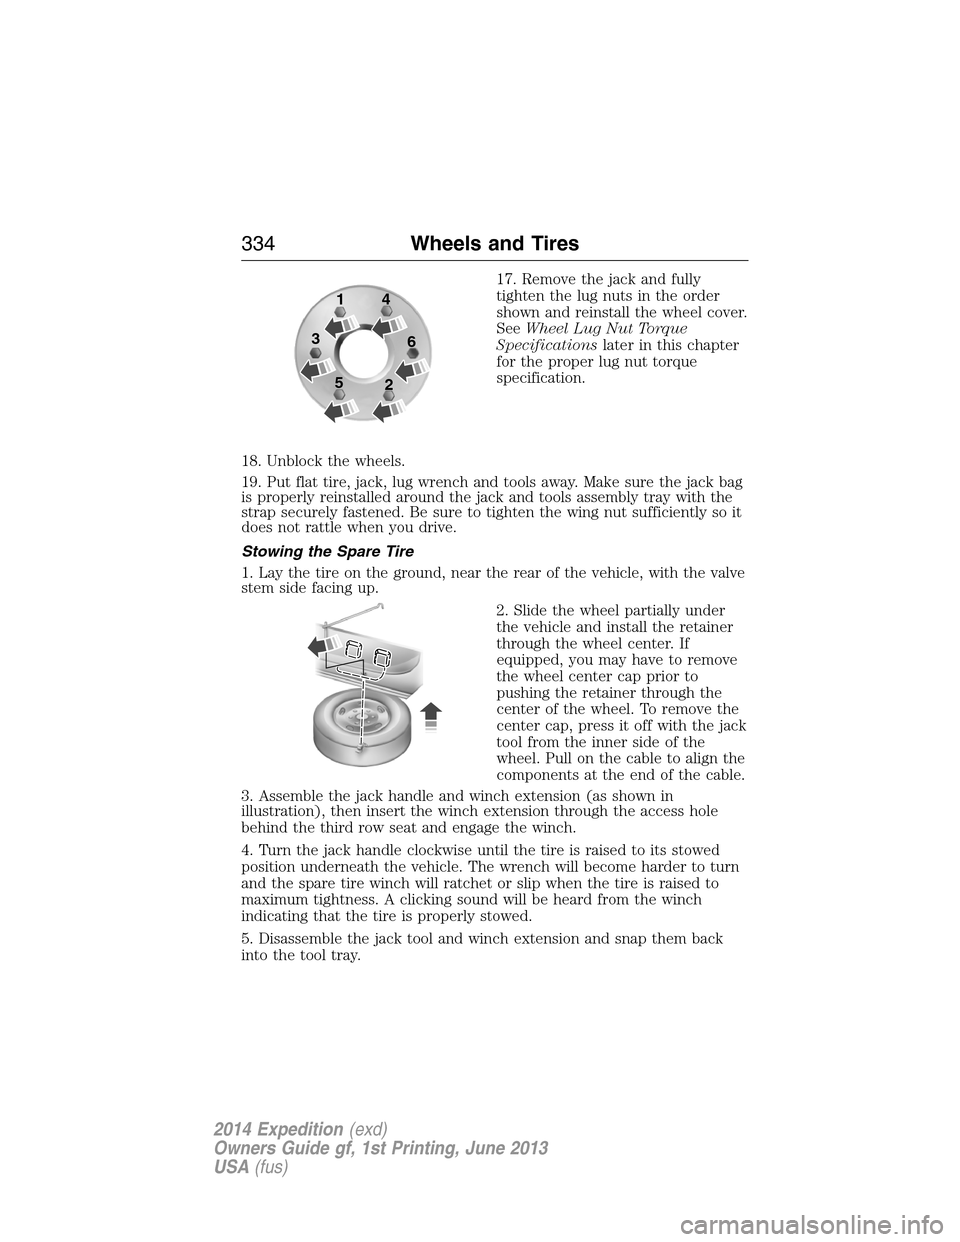
17. Remove the jack and fully
tighten the lug nuts in the order
shown and reinstall the wheel cover.
SeeWheel Lug Nut Torque
Specificationslater in this chapter
for the proper lug nut torque
specification.
18. Unblock the wheels.
19. Put flat tire, jack, lug wrench and tools away. Make sure the jack bag
is properly reinstalled around the jack and tools assembly tray with the
strap securely fastened. Be sure to tighten the wing nut sufficiently so it
does not rattle when you drive.
Stowing the Spare Tire
1. Lay the tire on the ground, near the rear of the vehicle, with the valve
stem side facing up.
2. Slide the wheel partially under
the vehicle and install the retainer
through the wheel center. If
equipped, you may have to remove
the wheel center cap prior to
pushing the retainer through the
center of the wheel. To remove the
center cap, press it off with the jack
tool from the inner side of the
wheel. Pull on the cable to align the
components at the end of the cable.
3. Assemble the jack handle and winch extension (as shown in
illustration), then insert the winch extension through the access hole
behind the third row seat and engage the winch.
4. Turn the jack handle clockwise until the tire is raised to its stowed
position underneath the vehicle. The wrench will become harder to turn
and the spare tire winch will ratchet or slip when the tire is raised to
maximum tightness. A clicking sound will be heard from the winch
indicating that the tire is properly stowed.
5. Disassemble the jack tool and winch extension and snap them back
into the tool tray.
1
3
54
6
2
334Wheels and Tires
2014 Expedition(exd)
Owners Guide gf, 1st Printing, June 2013
USA(fus)
Page 336 of 519

6. Reinstall the jack bag properly around the jack and tool assembly tray,
making sure the strap is securely fastened.
7. Close the access hole with the rubber plug.
8. Reinstall the tray into the vehicle and secure it with the wing nut
(turn clockwise until tight).
TECHNICAL SPECIFICATIONS
Wheel Lug Nut Torque Specifications
WARNING:When a wheel is installed, always remove any
corrosion, dirt or foreign materials present on the mounting
surfaces of the wheel or the surface of the wheel hub, brake drum or
brake disc that contacts the wheel. Make sure that any fasteners that
attach the rotor to the hub are secured so they do not interfere with
the mounting surfaces of the wheel. Installing wheels without correct
metal-to-metal contact at the wheel mounting surfaces can cause the
wheel nuts to loosen and the wheel to come off while the vehicle is in
motion, resulting in loss of control.
Retighten the lug nuts to the specified torque within 100 miles
(160 kilometers) after any wheel disturbance (such as rotation, flat tire,
wheel removal).
Bolt size Wheel lug nut torque*
ft-lb N•m
M14 x 2.0 150 200
* Torque specifications are for nut and bolt threads free of dirt and
rust. Use only Ford recommended replacement fasteners.
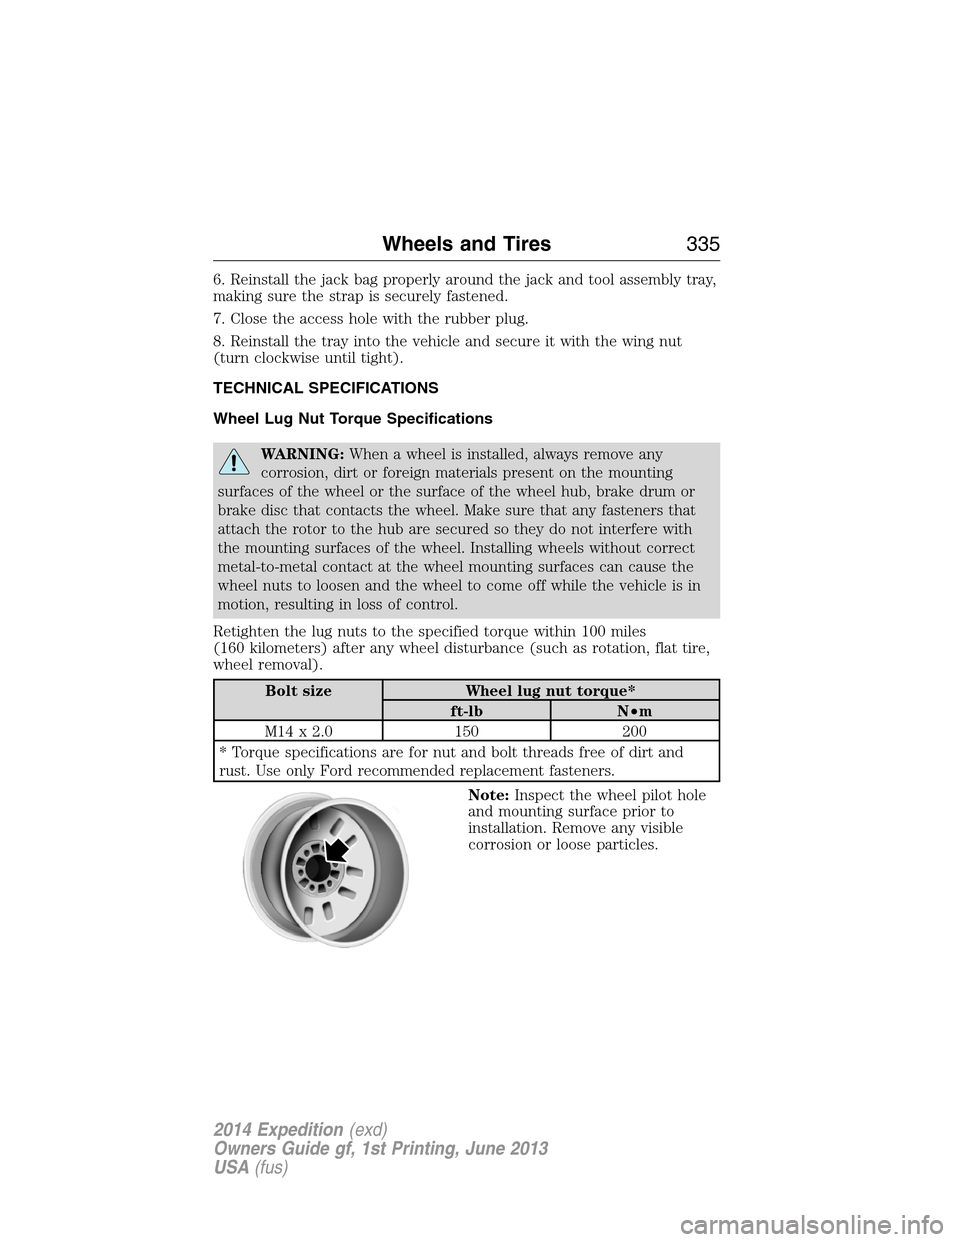
Note:Inspect the wheel pilot hole
and mounting surface prior to
installation. Remove any visible
corrosion or loose particles.
Wheels and Tires335
2014 Expedition(exd)
Owners Guide gf, 1st Printing, June 2013
USA(fus)
Page 339 of 519

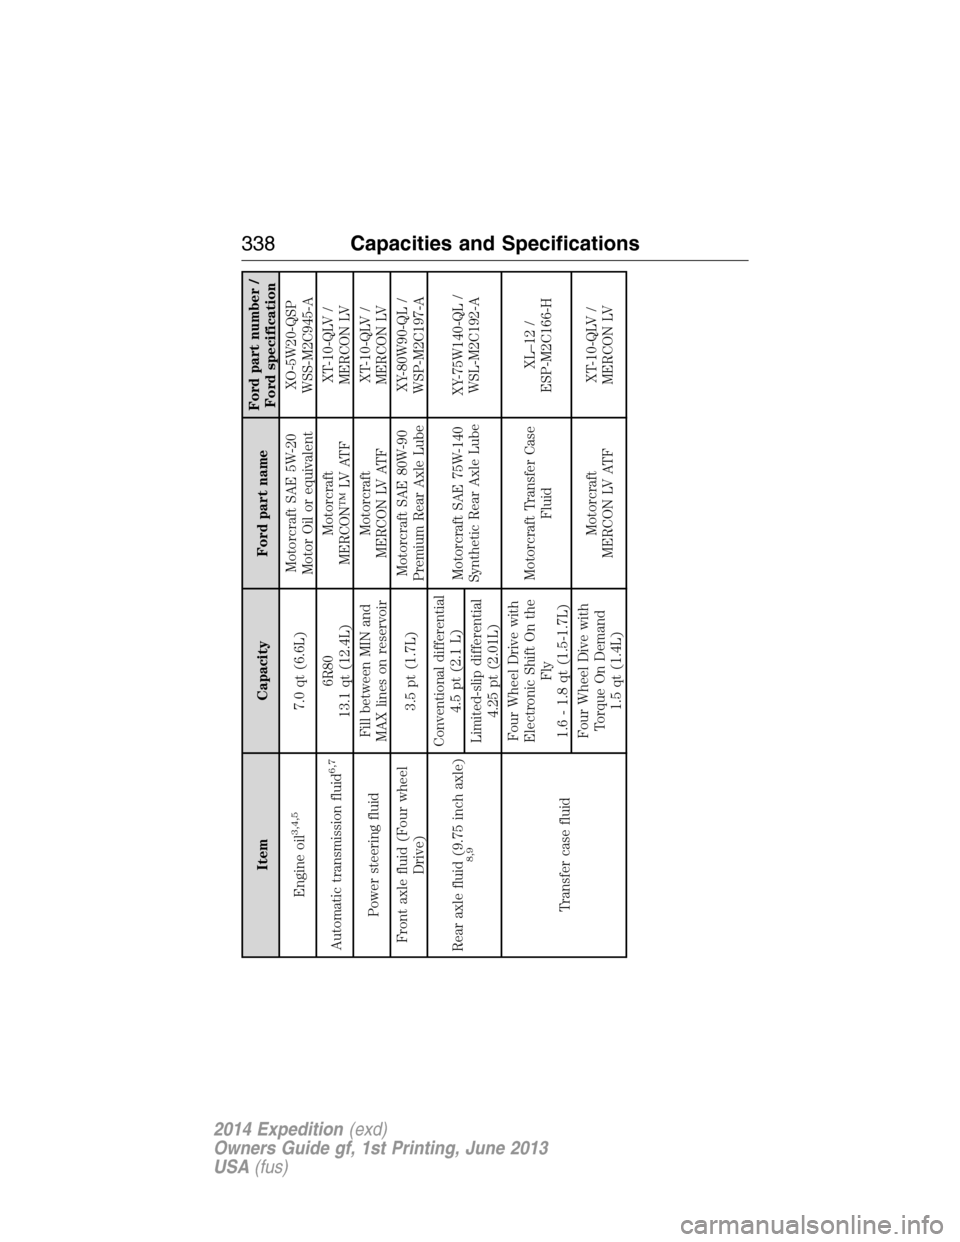
Item Capacity Ford part nameFord part number /
Ford specification
Engine oil
3,4,5
7.0 qt (6.6L)Motorcraft SAE 5W-20
Motor Oil or equivalentXO-5W20-QSP
WSS-M2C945-A
Automatic transmission fluid
6,7
6R80
13.1 qt (12.4L)Motorcraft
MERCON™ LV ATFXT-10-QLV /
MERCON LV
Power steering fluidFill between MIN and
MAX lines on reservoirMotorcraft
MERCON LV ATFXT-10-QLV /
MERCON LV
Front axle fluid (Four wheel
Drive)3.5 pt (1.7L)Motorcraft SAE 80W-90
Premium Rear Axle LubeXY-80W90-QL /
WSP-M2C197-A
Rear axle fluid (9.75 inch axle)
8,9
Conventional differential
4.5 pt (2.1 L)
Motorcraft SAE 75W-140
Synthetic Rear Axle LubeXY-75W140-QL /
WSL-M2C192-A
Limited-slip differential
4.25 pt (2.01L)
Transfer case fluidFour Wheel Drive with
Electronic Shift On the
Fly
1.6 - 1.8 qt (1.5-1.7L)Motorcraft Transfer Case
FluidXL–12 /
ESP-M2C166-H
Four Wheel Dive with
Torque On Demand
1.5 qt (1.4L)Motorcraft
MERCON LV ATFXT-10-QLV /
MERCON LV
338Capacities and Specifications
2014 Expedition(exd)
Owners Guide gf, 1st Printing, June 2013
USA(fus)