2014 FIAT STRADA Owner handbook (in English)
-
 1
1 -
 2
2 -
 3
3 -
 4
4 -
 5
5 -
 6
6 -
 7
7 -
 8
8 -
 9
9 -
 10
10 -
 11
11 -
 12
12 -
 13
13 -
 14
14 -
 15
15 -
 16
16 -
 17
17 -
 18
18 -
 19
19 -
 20
20 -
 21
21 -
 22
22 -
 23
23 -
 24
24 -
 25
25 -
 26
26 -
 27
27 -
 28
28 -
 29
29 -
 30
30 -
 31
31 -
 32
32 -
 33
33 -
 34
34 -
 35
35 -
 36
36 -
 37
37 -
 38
38 -
 39
39 -
 40
40 -
 41
41 -
 42
42 -
 43
43 -
 44
44 -
 45
45 -
 46
46 -
 47
47 -
 48
48 -
 49
49 -
 50
50 -
 51
51 -
 52
52 -
 53
53 -
 54
54 -
 55
55 -
 56
56 -
 57
57 -
 58
58 -
 59
59 -
 60
60 -
 61
61 -
 62
62 -
 63
63 -
 64
64 -
 65
65 -
 66
66 -
 67
67 -
 68
68 -
 69
69 -
 70
70 -
 71
71 -
 72
72 -
 73
73 -
 74
74 -
 75
75 -
 76
76 -
 77
77 -
 78
78 -
 79
79 -
 80
80 -
 81
81 -
 82
82 -
 83
83 -
 84
84 -
 85
85 -
 86
86 -
 87
87 -
 88
88 -
 89
89 -
 90
90 -
 91
91 -
 92
92 -
 93
93 -
 94
94 -
 95
95 -
 96
96 -
 97
97 -
 98
98 -
 99
99 -
 100
100 -
 101
101 -
 102
102 -
 103
103 -
 104
104 -
 105
105 -
 106
106 -
 107
107 -
 108
108 -
 109
109 -
 110
110 -
 111
111 -
 112
112 -
 113
113 -
 114
114 -
 115
115 -
 116
116 -
 117
117 -
 118
118 -
 119
119 -
 120
120 -
 121
121 -
 122
122 -
 123
123 -
 124
124 -
 125
125 -
 126
126 -
 127
127 -
 128
128 -
 129
129 -
 130
130 -
 131
131 -
 132
132 -
 133
133 -
 134
134 -
 135
135 -
 136
136 -
 137
137 -
 138
138 -
 139
139 -
 140
140 -
 141
141 -
 142
142 -
 143
143 -
 144
144 -
 145
145 -
 146
146 -
 147
147 -
 148
148 -
 149
149 -
 150
150 -
 151
151 -
 152
152 -
 153
153 -
 154
154 -
 155
155 -
 156
156 -
 157
157 -
 158
158 -
 159
159 -
 160
160 -
 161
161 -
 162
162 -
 163
163 -
 164
164 -
 165
165 -
 166
166 -
 167
167 -
 168
168 -
 169
169 -
 170
170 -
 171
171 -
 172
172 -
 173
173 -
 174
174 -
 175
175 -
 176
176 -
 177
177 -
 178
178 -
 179
179 -
 180
180 -
 181
181 -
 182
182 -
 183
183 -
 184
184 -
 185
185 -
 186
186
 CLIMATE CONTROL/HEATING SYSTEM
1 - Diffusers for windscreen
demisting.
2 - Diffusers for front side window
demisting.
3 - Adjustable side and central
diffusers.
4 - Side vents to direct air to the
f")
 ADJUSTABLE DIFFUSERS
fig. 56-57
The diffusers can be rotated
upwards and downwards.
A - Air flow adjustment control:
– turned to ❏: diffuser open;
– turned to ■: diffuser closed.B - Lateral ai")
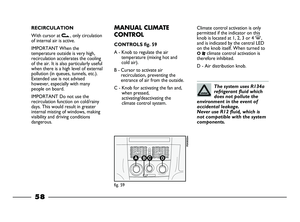
 HEATING
1) Air temperature knob A:
indicator on red section.
2) Fan knob C: indicator on desired
speed.
3) Air distribution knob D; indicator
on:
≤to warm the feet and, at the
same time, demist the")
 RECIRCULATION
With cursor at v, only circulation
of internal air is active.
IMPORTANT When the
temperature outside is very high,
recirculation accelerates the cooling
of the air. It is also particular")
 CLIMATE CONTROL
(COOLING)
To cool the air in the passenger
compartment quickly, the vehicle
features a climate control system.
Proceed as indicated below:
1) Air temperature knob A:
indicator on blue")
 IMPORTANT With the air
distribution knob at -air also
comes out of the central and side
diffusers. To optimise demisting
/defrosting (also on side windows)
stop the air flow at the central
diffusers (")
 fig. 61
F0X0036m
DIRECTION
INDICATORS fig. 61
Up = right indicator.
Down = left indicator.
The
¥or Îwarning light flashes on
the instrument panel.
The direction indicators are
switched off automat")
 WINDOW CLEANING
The right stalk fig. 63 controls
windscreen wiper/washer and
heated rear window wiper/washer
operation.
WINDSCREEN
WASHER/WIPER
This operates only with the ignition
key turned to MAR.")