Page 33 of 231
FIXED PARTITION (for N1 4 seat
versions)This is located behind the backrest of the rear seats
fig. 21.
HEADRESTFRONT
These are height-adjustable and lock into place
automatically fig. 22.
❒Upward adjustment: lift the headrest until it locks.
❒Downward adjustment: press button A fig. 22and
lower the headrest.
fig. 21
F0T0340
fig. 22
F0T0053
29KNOW YOUR
VEHICLESAFETY
STARTING AND
DRIVING
WARNING LIGHTS
AND MESSAGES
IN AN EMERGENCY
SERVICING AND
MAINTENANCE
TECHNICAL
SPECIFICATIONS
INDEX
Page 34 of 231
WARNING
All adjustments must be carried out only
with the vehicle stationary and the
engine off. Headrests must be adjusted so that
the head, rather than the neck, rests on them.
Only in this case they can protect your head
correctly.To maximise the protective action
provided by the headrest , adjust the seat back
so that your trunk is upright and keep your
head as close to the headrest as possible.
REAR
(for versions/markets, where provided)
Lift up to use.
To put the headrests away, press buttons A fig. 23
fig. 24 and push them down into the backrest.To extract the headrests, raise them until you hear
the click (which indicates they are in "all extracted"
position).
IMPORTANT The headrests must always be in the
"all extracted" position when the rear seats are
in use.
fig. 23
F0T0054
fig. 24 - N1 versions (4 seats)
F0T0341
30KNOW YOUR
VEHICLE
SAFETY
STARTING AND
DRIVING
WARNING LIGHTS
AND MESSAGES
IN AN EMERGENCY
SERVICING AND
MAINTENANCE
TECHNICAL
SPECIFICATIONS
INDEX
Page 35 of 231
STEERING WHEELThe height and axial position of the steering wheel
can be adjusted on some versions.
To carry out the adjustment, proceed as follows:
❒release lever A fig. 25 by pushing it forwards
(position 1);
❒adjust the steering wheel;
❒lock lever A by pulling it towards the steering
wheel (position 2).
WARNING
All adjustments must be carried out only
with the vehicle stationary and the
engine off.
WARNING
It is absolutely forbidden to carr y out
any after-market operation involving
steering system or steering column
modifications (e.g. installation of anti-theft
device) that could badly affect performance and
safety, invalidate the warranty and also result
in the vehicle failing to comply with regulations.
fig. 25
F0T0040
31KNOW YOUR
VEHICLESAFETY
STARTING AND
DRIVING
WARNING LIGHTS
AND MESSAGES
IN AN EMERGENCY
SERVICING AND
MAINTENANCE
TECHNICAL
SPECIFICATIONS
INDEX
Page 36 of 231
REAR-VIEW MIRRORSINTERIOR REAR-VIEW MIRROR
(for versions/markets, where provided)
The mirror is fitted with a safety device that causes
its release in the event of a violent impact with
the passenger.
Lever A fig. 26can be used to move the mirror to
two different positions: normal or antiglare.WING MIRRORS
Manual mirror folding
When required (for example when the shape causes
difficulty in narrow spaces), the mirrors can be
folded by moving them from position A fig. 27 to
position B.
WARNING
When driving, the mirrors shall always
be in position A.fig. 27
WARNING
The door mirrors, being curved, slightly
alter the perception of distance.
fig. 26
F0T0027
fig. 27
F0T0042
32KNOW YOUR
VEHICLE
SAFETY
STARTING AND
DRIVING
WARNING LIGHTS
AND MESSAGES
IN AN EMERGENCY
SERVICING AND
MAINTENANCE
TECHNICAL
SPECIFICATIONS
INDEX
Page 37 of 231
Manual adjustment
From inside, use device A fig. 28.
Electric adjustment
(for versions/markets, where provided)
You can only adjust the door mirrors electrically
when the ignition key is turned to MAR.Proceed as follows:
❒select the required mirror with switch A fig. 29
(right or left);
❒move switch A to position B and manipulate it to
adjust the left wing mirror;
❒move switch A to position D and manipulate it to
adjust the right wing mirror.
Once you have finished the adjustment, return switch
A to intermediate locking position C.
fig. 28
F0T0194
fig. 29
F0T0041
33KNOW YOUR
VEHICLESAFETY
STARTING AND
DRIVING
WARNING LIGHTS
AND MESSAGES
IN AN EMERGENCY
SERVICING AND
MAINTENANCE
TECHNICAL
SPECIFICATIONS
INDEX
Page 38 of 231
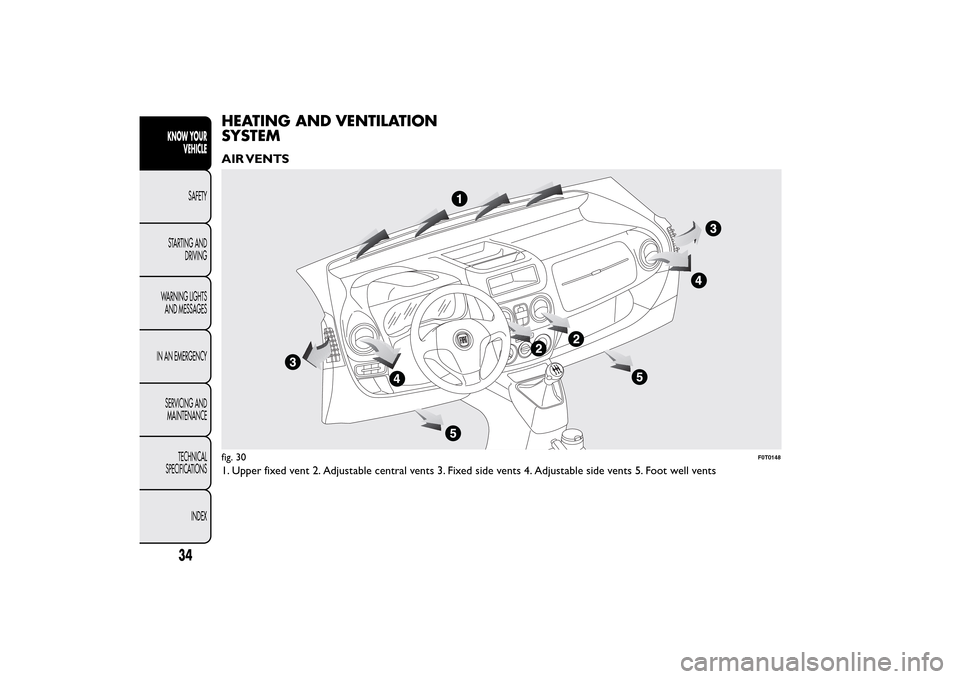
HEATING AND VENTILATION
SYSTEMAIR VENTS1. Upper fixed vent 2. Adjustable central vents 3. Fixed side vents 4. Adjustable side vents 5. Foot well ventsfig. 30
F0T0148
34KNOW YOUR
VEHICLE
SAFETY
STARTING AND
DRIVING
WARNING LIGHTS
AND MESSAGES
IN AN EMERGENCY
SERVICING AND
MAINTENANCE
TECHNICAL
SPECIFICATIONS
INDEX
Page 39 of 231
CENTRAL AND SIDE VENTS
A Adjustable side vent fig. 31
B Side window fixed vent fig. 31
C Adjustable central ventsfig. 32
To use vents A and C, adjust them as required.
HEATING AND VENTILATIONCOMMANDS
The main heating and ventilation commands are
listed below fig. 33:A
air temperature adjustment knob (hot/cold air
mixing)
Bair recirculation on/off sliderC
fan activation knob
D
air distribution knob.
TEMPERATURE COMFORT
Knob D enables fresh air to reach all parts of the
passenger compartment through five options:delivers air from the central and side vents;warms the feet and keeps the face cool (bi-level
function)
fig. 31
F0T0031
fig. 32
F0T0030
fig. 33
F0T0074
35KNOW YOUR
VEHICLESAFETY
STARTING AND
DRIVING
WARNING LIGHTS
AND MESSAGES
IN AN EMERGENCY
SERVICING AND
MAINTENANCE
TECHNICAL
SPECIFICATIONS
INDEX
Page 40 of 231

allows the passenger compartment to be
warmed more quickly;warms up the passenger compartment and
demists the windscreen at the same time;demists and defrosts the windscreen and front
side windows.
HEATING
Proceed as follows:
❒turn knob A all to the right (to
)
❒turn knob C to the required speed
❒turn knob D to:
❒
to warm the feet and demist the windscreen at
the same time
❒to send air to the feet and introduce fresher air
from the central and dashboard vents
❒to warm up quickly.
FAST HEATING
Proceed as follows:
❒close all the vents in the dashboard
❒turn knob A to
❒turn knob C to 4❒turn knob D to
RAPID WINDSCREEN AND FRONT SIDE
WINDOWS DEMISTING/DEFROSTING
(MAX-DEF function)
Proceed as follows:
❒turn knob A to❒turn knob C to 4❒turn knob D to❒take the slider B to
.
After demisting/defrosting, operate the controls as
normal to restore the required comfort conditions.
Window demisting
In the event of considerable external moisture
and/or rain and/or large differences in the
temperature inside and outside the passenger
compartment, perform the following preventive
window demisting procedure:
❒take the slider B to
❒turn knob A to❒turn knob C to 2
❒turn knob D to
with the option of moving to
position
if there is no sign of the windows
steaming up.
36KNOW YOUR
VEHICLE
SAFETY
STARTING AND
DRIVING
WARNING LIGHTS
AND MESSAGES
IN AN EMERGENCY
SERVICING AND
MAINTENANCE
TECHNICAL
SPECIFICATIONS
INDEX