Page 64 of 476
Entering From The Rear
Vehicles that come up from behind your vehicle on
either side and enter the rear detection zone with a
relative speed of less than 31 mph (50 km/h).
Overtaking Traffic
If you pass another vehicle slowly with a relative speed
less than 15 mph (25 km/h) and the vehicle remains in
the blind spot for approximately 1.5 seconds, the warn-
ing light will be illuminated. If the difference in speed
between the two vehicles is greater than 15 mph
(25 km/h), the warning light will not illuminate.
Rear Monitoring
Overtaking/Approaching
Overtaking/Passing
62 GETTING TO KNOW YOUR VEHICLE
Page 65 of 476
The BSM system is designed not to issue an alert on
stationary objects such as guardrails, posts, walls, foli-
age, berms, etc. However, occasionally the system may
alert on such objects. This is normal operation and your
vehicle does not require service.
The BSM system will not alert you of objects that are
traveling in the opposite direction of the vehicle in
adjacent lanes.
WARNING!
The Blind Spot Monitoring system is only an aid to
help detect objects in the blind spot zones. The
BSM system is not designed to detect pedestrians,
bicyclists, or animals. Even if your vehicle is
equipped with the BSM system, always check your
vehicles mirrors, glance over your shoulder, and use
your turn signal before changing lanes. Failure to
do so can result in serious injury or death.
Stationary Objects
Opposing Traffic
4
GETTING TO KNOW YOUR VEHICLE 63
Page 66 of 476

Rear Cross Path (RCP)
The Rear Cross Path (RCP) feature is intended to aid the
driver when backing out of parking spaces where their
vision of oncoming vehicles may be blocked. Proceed
slowly and cautiously out of the parking space until the
rear end of the vehicle is exposed. The RCP system will
then have a clear view of the cross traffic and if an
oncoming vehicle is detected, alert the driver.
RCP monitors the rear detection zones on both sides of
the vehicle, for objects that are moving toward the side
of the vehicle with a minimum speed of approximately1 mph (2 km/h), to objects moving a maximum of
approximately 22 mph (35 km/h), such as in parking lot
situations.
NOTE:
In a parking lot situation, oncoming vehicles
can be obscured by vehicles parked on either side. If the
sensors are blocked by other structures or vehicles, the
system will not be able to alert the driver.
When RCP is on and the vehicle is in REVERSE, the
driver is alerted using both the visual and audible
alarms, including reducing the radio volume.
WARNING!
RCP is not a back up aid system. It is intended to be
used to help a driver detect an oncoming vehicle in
a parking lot situation. Drivers must be careful
when backing up, even when using RCP. Always
check carefully behind your vehicle, look behind
you, and be sure to check for pedestrians, animals,
other vehicles, obstructions, and blind spots before
backing up. Failure to do so can result in serious
injury or death.
RCP Detection Zones
64 GETTING TO KNOW YOUR VEHICLE
Page 68 of 476

Blind Spot Monitoring Fault Warnings
Sensor Blinded
In the case of a sensor blinded:
•BSM Mirror Warning Lights are turned on continu-
ously.
• A instrument cluster message will display “Blind
Spot Monitoring Unavailable - Wipe Rear Bumper
Corners.”
NOTE: The rear bumper must be clean and free of any
obstructing debris.
System Not Available
In the case of the system being temporary unavailable:
• BSM Mirror Warning Lights are turned on continu-
ously.
• A instrument cluster message will display “Blind
Spot Monitoring Temporary Unavailable.”
In the case of the system being completely unavailable:
• A chime will turn on.
• A instrument cluster message will display “Blind
Spot Monitoring Unavailable - Service Required.” NOTE:
Vehicle must be taken to the nearest authorized
dealer for service.
General Information
This vehicle has systems that operate on radio fre-
quency that comply with Part 15 of the Federal Com-
munications Commission (FCC) rules and with Indus-
try Canada Standards RSS- GEN/210/220/310.
Operation is subject to the following two conditions:
1. The device may not cause harmful interference.
2. The device must accept any interference received, including interference that may cause undesired
operation of the device.
Changes or modifications to any of these systems by
other than an authorized service facility could void
authorization to use this equipment.
EXTERIOR LIGHTS
Headlights
The headlight switch is located on the left side of the
instrument panel. The headlight switch controls the
66 GETTING TO KNOW YOUR VEHICLE
Page 78 of 476

If the lever is pulled while the wipers are in the off
position, the wipers will operate for several wipe cycles,
then turn off.
WARNING!
Sudden loss of visibility through the windshield
could lead to a collision. You might not see other
vehicles or other obstacles. To avoid sudden icing of
the windshield during freezing weather, warm the
windshield with the defroster before and during
windshield washer use.
Mist
Use this feature when weather conditions make occa-
sional usage of the wipers necessary. Push the lever
upward to the MIST position and release for a single
wiping cycle.
NOTE: The mist feature does not activate the washer
pump; therefore, no washer fluid will be sprayed on the
windshield. The wash function must be used in order to
spray the windshield with washer fluid.
Rain Sensor — If Equipped
This feature senses moisture on the windshield and
automatically activates the wipers for the driver. The
feature is especially useful for road splash or overspray
from the windshield washers of the vehicle ahead.
Rotate the end of the multifunction lever to one of two
settings to activate this feature.
The sensitivity of the system can be adjusted with the
multifunction lever. Wiper delay position one is the
least sensitive, and wiper delay position two is the most
sensitive. Setting one should be used for normal rain
conditions, and can be used if the driver desires less
Rain Sensor Location
76 GETTING TO KNOW YOUR VEHICLE
Page 100 of 476

WINDOWS
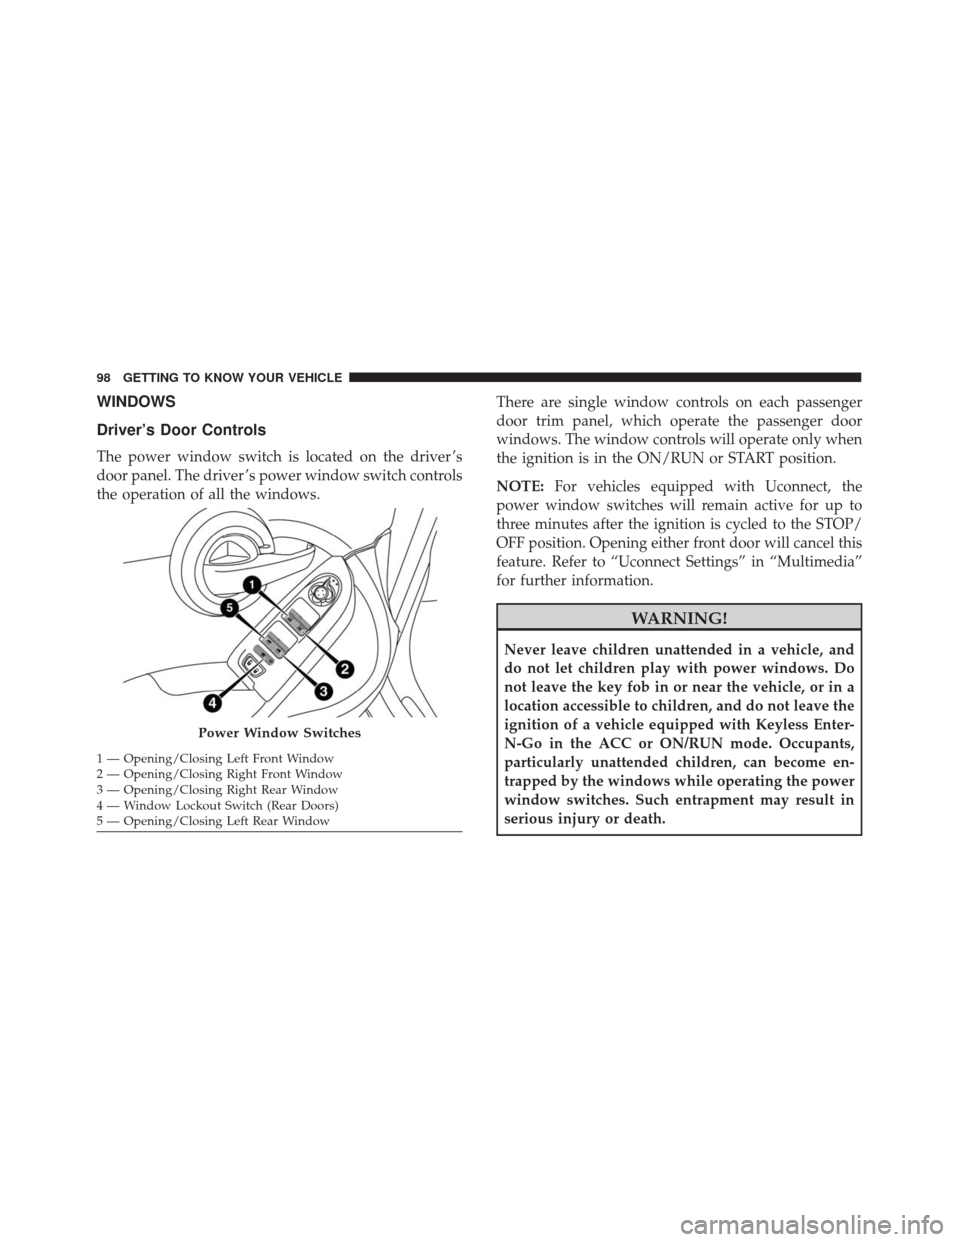
Driver’s Door Controls
The power window switch is located on the driver ’s
door panel. The driver ’s power window switch controls
the operation of all the windows.There are single window controls on each passenger
door trim panel, which operate the passenger door
windows. The window controls will operate only when
the ignition is in the ON/RUN or START position.
NOTE:
For vehicles equipped with Uconnect, the
power window switches will remain active for up to
three minutes after the ignition is cycled to the STOP/
OFF position. Opening either front door will cancel this
feature. Refer to “Uconnect Settings” in “Multimedia”
for further information.
WARNING!
Never leave children unattended in a vehicle, and
do not let children play with power windows. Do
not leave the key fob in or near the vehicle, or in a
location accessible to children, and do not leave the
ignition of a vehicle equipped with Keyless Enter-
N-Go in the ACC or ON/RUN mode. Occupants,
particularly unattended children, can become en-
trapped by the windows while operating the power
window switches. Such entrapment may result in
serious injury or death.
Power Window Switches
1 — Opening/Closing Left Front Window
2 — Opening/Closing Right Front Window
3 — Opening/Closing Right Rear Window
4 — Window Lockout Switch (Rear Doors)
5 — Opening/Closing Left Rear Window 98 GETTING TO KNOW YOUR VEHICLE
Page 102 of 476

NOTE:
•If the window runs into any obstacle during auto-
closure, it will reverse direction and then go back
down. Remove the obstacle and use the window
switch again to close the window.
• Any impact due to rough road conditions may trig-
ger the auto-reverse function unexpectedly during
auto-closure. If this happens, pull the switch lightly
and hold to close the window manually.
WARNING!
There is no anti-pinch protection when the window
is almost closed. Be sure to clear all objects from the
window before closing.
Reset Auto-Up
Should the Auto-Up feature stop working, the window
probably needs to be reset. To reset Auto-Up:
1. Pull the window switch up to close the window completely and continue to hold the switch up for an
additional two seconds after the window is closed.
Wind Buffeting
Wind buffeting can be described as the perception of
pressure on the ears or a helicopter-type sound in the
ears. Your vehicle may exhibit wind buffeting with the
windows down, or the sunroof in certain open or
partially open positions. This is a normal occurrence
and can be minimized. If the buffeting occurs with the
rear windows open, open the front and rear windows
together to minimize the buffeting. If the buffeting
occurs with the sunroof open, adjust the sunroof open-
ing to minimize the buffeting or open any window.
POWER SUNROOF — IF EQUIPPED
The sunroof has two glass panels (the front one is
operational and the rear one fixed) and is equipped
with two manual operated sun blinds, front and rear.
The power sunroof can be operated only with the
ignition is placed in RUN mode.
The power sunroof switches are located in the overhead
console.
100 GETTING TO KNOW YOUR VEHICLE
Page 103 of 476

WARNING!
•Never leave children alone in a vehicle, or with
access to an unlocked vehicle. Never leave the key
fob in or near the vehicle or in a location acces-
sible to children. Occupants, particularly unat-
tended children, can become entrapped by the
power sunroof while operating the power sunroof
(Continued)
WARNING! (Continued)
switch. Such entrapment may result in serious
injury or death.
• In a collision, there is greater risk of being thrown
from a vehicle with an open sunroof. You could
also be seriously injured or killed. Always fasten
your seat belt properly and make sure all passen-
gers are properly secured too.
• Do not allow small children to operate the sun-
roof. Never allow your fingers, other body parts,
or any object to project through the sunroof
opening. Injury may result.
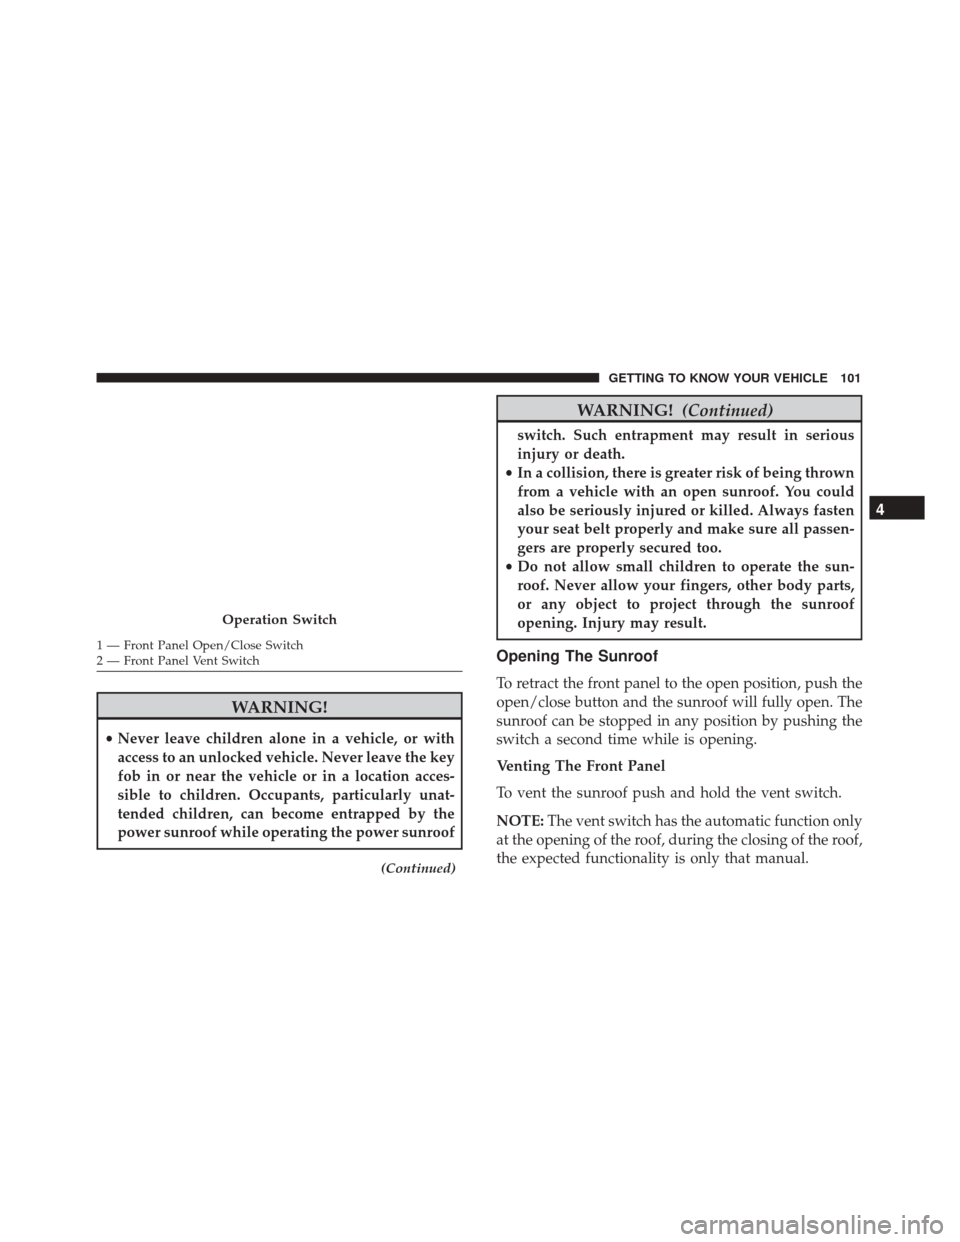
Opening The Sunroof
To retract the front panel to the open position, push the
open/close button and the sunroof will fully open. The
sunroof can be stopped in any position by pushing the
switch a second time while is opening.
Venting The Front Panel
To vent the sunroof push and hold the vent switch.
NOTE: The vent switch has the automatic function only
at the opening of the roof, during the closing of the roof,
the expected functionality is only that manual.
Operation Switch
1 — Front Panel Open/Close Switch
2 — Front Panel Vent Switch
4
GETTING TO KNOW YOUR VEHICLE 101