Page 321 of 476
CAUTION!
Do not attempt to raise the vehicle by jacking on
locations other than those indicated in the Jacking
Instructions for this vehicle.
1. Remove the spare tire, jack, and wheel bolt wrench.
2. If equipped with wheels where the center cap covers the wheel bolts, use the wheel bolt wrench to pry the
center cap off carefully before raising the vehicle. 3. Before raising the vehicle, use the wheel bolt wrench
to loosen, but not remove the wheel bolts on the
wheel with the flat tire. Turn the wheel bolts coun-
terclockwise one turn while the wheel is still on the
ground.
4. Place the jack underneath the lift area that is closest to the flat tire. Turn the jack screw clockwise to firmly
engage the jack saddle with the lift area of the sill
flange, centering the jack saddle inside the cutout in
the sill cladding.
Jack Warning Label
Loosen The Wheel Bolt
8
IN CASE OF EMERGENCY 319
Page 324 of 476

NOTE:•Your vehicle may be equipped with a compact
spare tire or a limited — use spare tire. For further
information refer to “Tires — General Information”
in “Maintaining Your Vehicle”.
• For vehicles so equipped, do not attempt to install
a center cap or wheel cover on the compact spare.
8. Install the wheel bolts with the threaded end of the wheel bolt toward the wheel. Lightly tighten the
wheel bolts.
WARNING!
To avoid the risk of forcing the vehicle off the jack,
do not fully tighten the wheel bolts until the
vehicle has been lowered. Failure to follow this
warning may result in serious injury.
9. Lower the vehicle to the ground by turning the wheel bolt wrench counterclockwise.
10. Finish tightening the wheel bolts. Push down on the wrench while at the end of the handle for increased
leverage. Tighten the wheel bolts in a star pattern
until each wheel bolt has been tightened twice. Refer to “Torque Specifications” in “Technical Data”
for the proper lug bolt torque. If in doubt about the
correct tightness, have them checked with a torque
wrench by your authorized dealer or at a service
station.
11. Securely stow the jack, tools, chocks and flat tire.
WARNING!
A loose tire or jack thrown forward in a collision or
hard stop could endanger the occupants of the
vehicle. Always stow the jack parts and the spare
tire in the places provided. Have the deflated (flat)
tire repaired or replaced immediately.
Road Tire Installation
1. Mount the road tire on the axle.
2. Install the remaining wheel bolts with the threaded end of the wheel bolt toward the wheel. Lightly
tighten the wheel bolts.
322 IN CASE OF EMERGENCY
Page 325 of 476

WARNING!
To avoid the risk of forcing the vehicle off the jack,
do not tighten the lug nuts fully until the vehicle
has been lowered. Failure to follow this warning
may result in serious injury.
3. Lower the vehicle to the ground by turning the jack handle counterclockwise.
4. Finish tightening the wheel bolts. Push down on the wrench while at the end of the handle for increased
leverage. Tighten the wheel bolts in a star pattern
until each wheel bolt has been tightened twice. Refer
to “Torque Specifications” in the “Technical Data”
section for the proper lug bolt torque. If in doubt
about the correct tightness, have them checked with
a torque wrench by your authorized dealer or service
station.
5. Lower the jack until it is free. Remove the wheel chocks. Stow the jack and tools back in the proper
storage location. Release the Electric Park Brake
before driving the vehicle. 6. After 25 miles (40 km) check the wheel bolt torque
with a torque wrench to ensure that all wheel bolts
are properly seated against the wheel.
TIRE SERVICE KIT STORAGE
The Tire Service Kit is located in the rear storage
compartment inside a storage container. Located inside
the container are a screwdriver and the emergency fuel
funnel. To access the Tire Service Kit open the liftgate
and remove the load floor.
Tire Service Kit Location
8
IN CASE OF EMERGENCY 323
Page 417 of 476

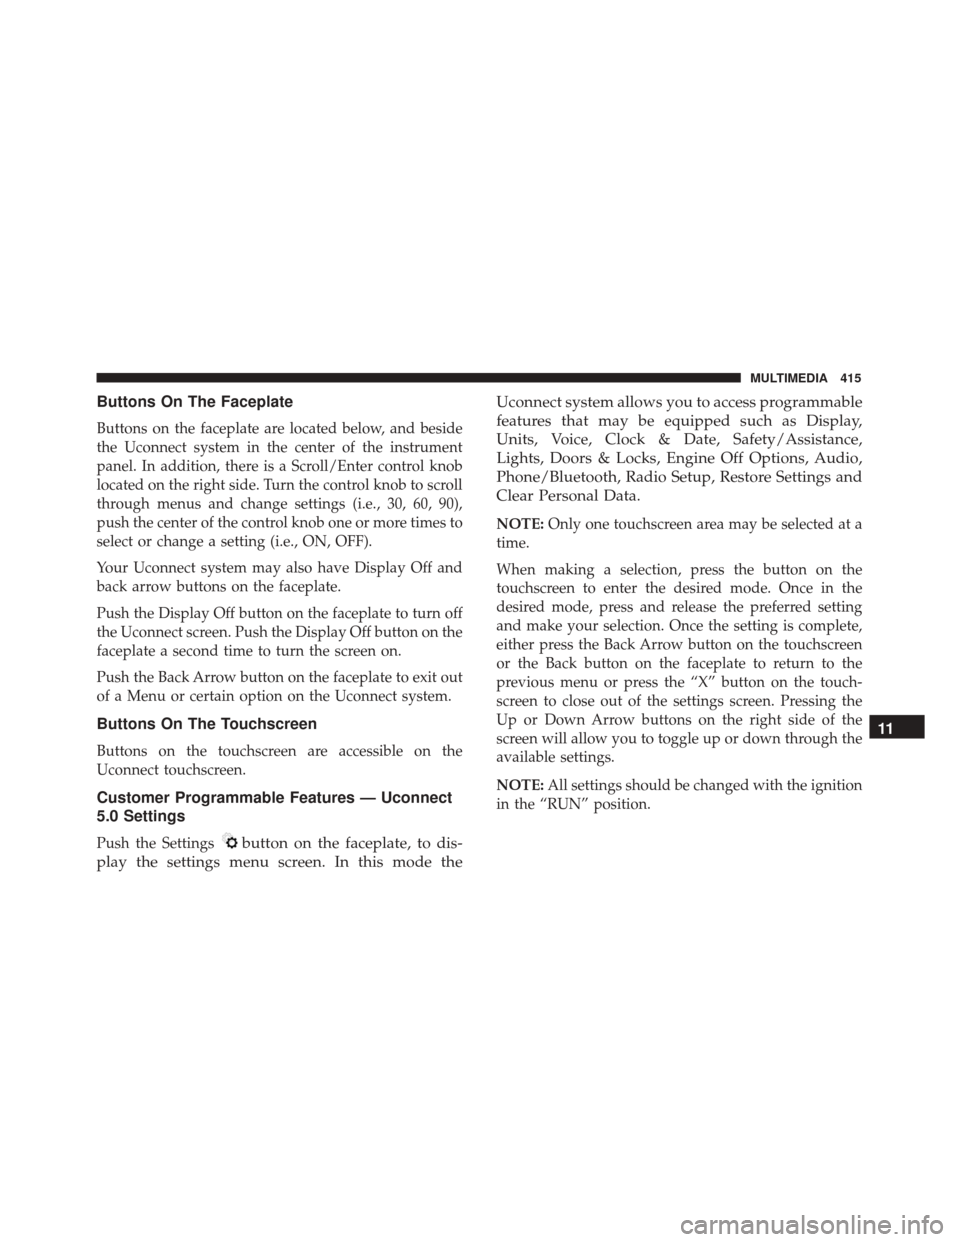
Buttons On The Faceplate
Buttons on the faceplate are located below, and beside
the Uconnect system in the center of the instrument
panel. In addition, there is a Scroll/Enter control knob
located on the right side. Turn the control knob to scroll
through menus and change settings (i.e., 30, 60, 90),
push the center of the control knob one or more times to
select or change a setting (i.e., ON, OFF).
Your Uconnect system may also have Display Off and
back arrow buttons on the faceplate.
Push the Display Off button on the faceplate to turn off
the Uconnect screen. Push the Display Off button on the
faceplate a second time to turn the screen on.
Push the Back Arrow button on the faceplate to exit out
of a Menu or certain option on the Uconnect system.
Buttons On The Touchscreen
Buttons on the touchscreen are accessible on the
Uconnect touchscreen.
Customer Programmable Features — Uconnect
5.0 Settings
Push the Settingsbutton on the faceplate, to dis-
play the settings menu screen. In this mode the Uconnect system allows you to access programmable
features that may be equipped such as Display,
Units, Voice, Clock & Date, Safety/Assistance,
Lights, Doors & Locks, Engine Off Options, Audio,
Phone/Bluetooth, Radio Setup, Restore Settings and
Clear Personal Data.
NOTE:
Only one touchscreen area may be selected at a
time.
When making a selection, press the button on the
touchscreen to enter the desired mode. Once in the
desired mode, press and release the preferred setting
and make your selection. Once the setting is complete,
either press the Back Arrow button on the touchscreen
or the Back button on the faceplate to return to the
previous menu or press the “X” button on the touch-
screen to close out of the settings screen. Pressing the
Up or Down Arrow buttons on the right side of the
screen will allow you to toggle up or down through the
available settings.
NOTE: All settings should be changed with the ignition
in the “RUN” position.
11
MULTIMEDIA 415
Page 420 of 476
Clock & Date
After pressing the “Clock & Date” button on the touch-
screen, the following settings will be available:
Setting NameSelectable Options
Set Time & Format 12 hour24 hour
NOTE: Press the corresponding arrow above and below the current time to adjust, then select “AM” or “PM.”
Show Time Status OnOff
Set Date Up Arrow Button Down Arrow Button
Sync Time — If Equipped OnOff
NOTE: When in this display, you may sync the time with GPS.
418 MULTIMEDIA
Page 432 of 476

Customer Programmable Features — Uconnect
6.5 NAV Settings
Press the Settings button to display the menu setting
screen. In this mode the Uconnect system allows you to
access programmable features that may be equipped
such as Display, Clock, Safety & Driving Assistance,
Lights, Doors & Locks, Engine Off Options, Audio,
Phone/Bluetooth, SiriusXM Setup, Restore Settings De-
faults, Clear Personal Data and System Information.
NOTE:
•Only one touchscreen area may be selected at a time.
• Depending on the vehicles options, feature settings
may vary. When making a selection, press the button on the
touchscreen to enter the desired mode. Once in the
desired mode, press and release the preferred setting
and make your selection. Once the setting is complete,
either press the Back Arrow button on the touchscreen
to return to the previous menu, or press the “X” button
on the touchscreen to close out of the settings screen.
Pressing the Up or Down Arrow button on the right
side of the screen will allow you to toggle up or down
through the available settings.
430 MULTIMEDIA
Page 435 of 476
Voice
After pressing the “Voice” button on the touchscreen,
the following settings will be available:
Setting NameSelectable Options
Voice Response Length Brief Detailed
Show Command List AlwaysWith Help Never
Clock
After pressing the “Clock” button on the touchscreen,
the following settings will be available:
Setting Name Selectable Options
Show Time In Status Bar OnOff
Sync Time With GPS OnOff
Set Day +–
Set Month +–
Set Year +–
Set Hours +–
Set Minutes +–
Time Format 12 hrs24 hrs
11
MULTIMEDIA 433
Page 446 of 476

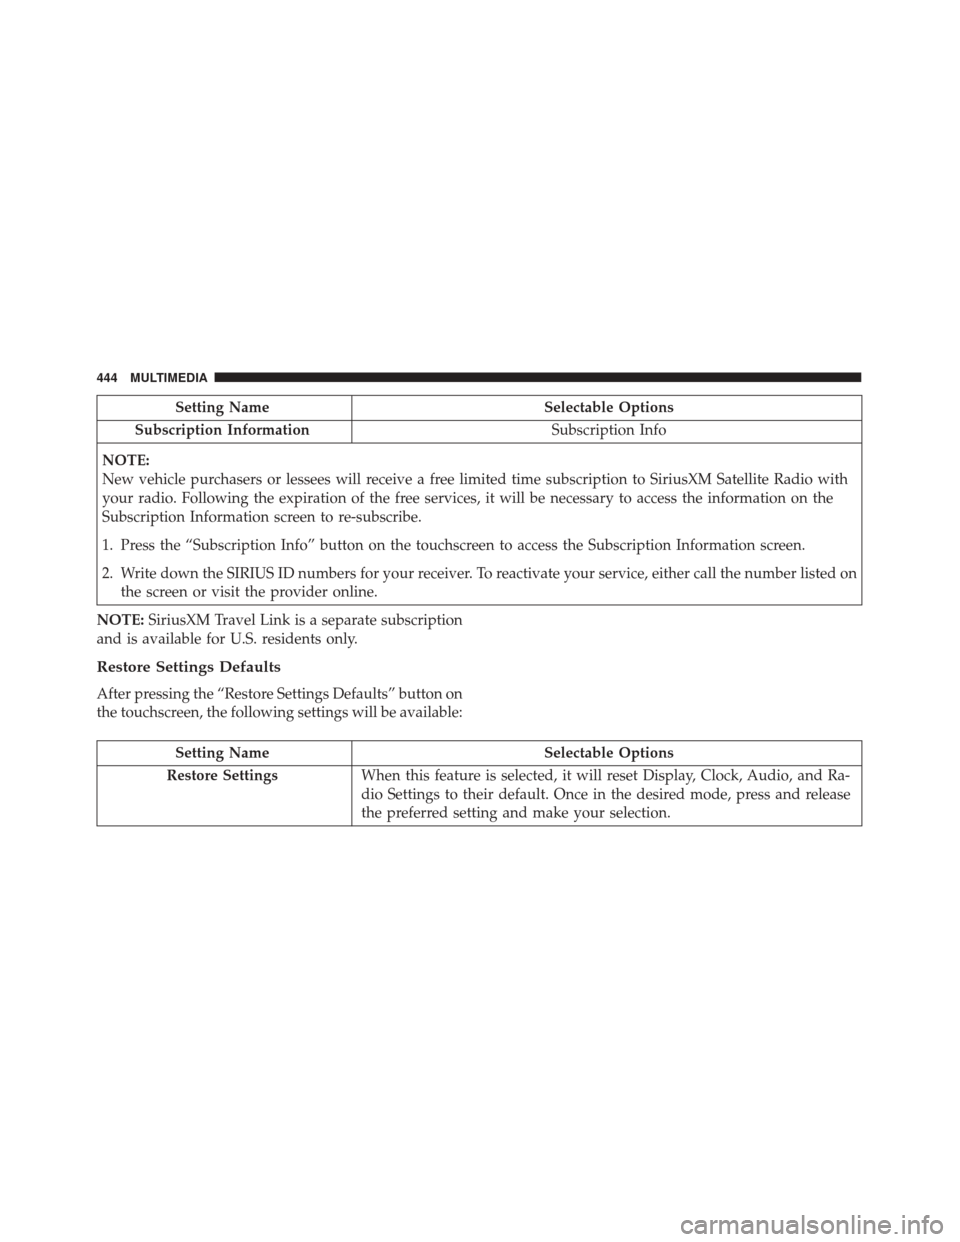
Setting NameSelectable Options
Subscription Information Subscription Info
NOTE:
New vehicle purchasers or lessees will receive a free limited time subscription to SiriusXM Satellite Radio with
your radio. Following the expiration of the free services, it will be necessary to access the information on the
Subscription Information screen to re-subscribe.
1. Press the “Subscription Info” button on the touchscreen to access the Subscription Information screen.
2. Write down the SIRIUS ID numbers for your receiver. To reactivate your service, either call the number listed on the screen or visit the provider online.
NOTE: SiriusXM Travel Link is a separate subscription
and is available for U.S. residents only.
Restore Settings Defaults
After pressing the “Restore Settings Defaults” button on
the touchscreen, the following settings will be available:
Setting Name Selectable Options
Restore Settings When this feature is selected, it will reset Display, Clock, Audio, and Ra-
dio Settings to their default. Once in the desired mode, press and release
the preferred setting and make your selection.
444 MULTIMEDIA
Page:
< prev 1-8 9-16 17-24