2014 FIAT 500X tow
[x] Cancel search: towPage 56 of 476
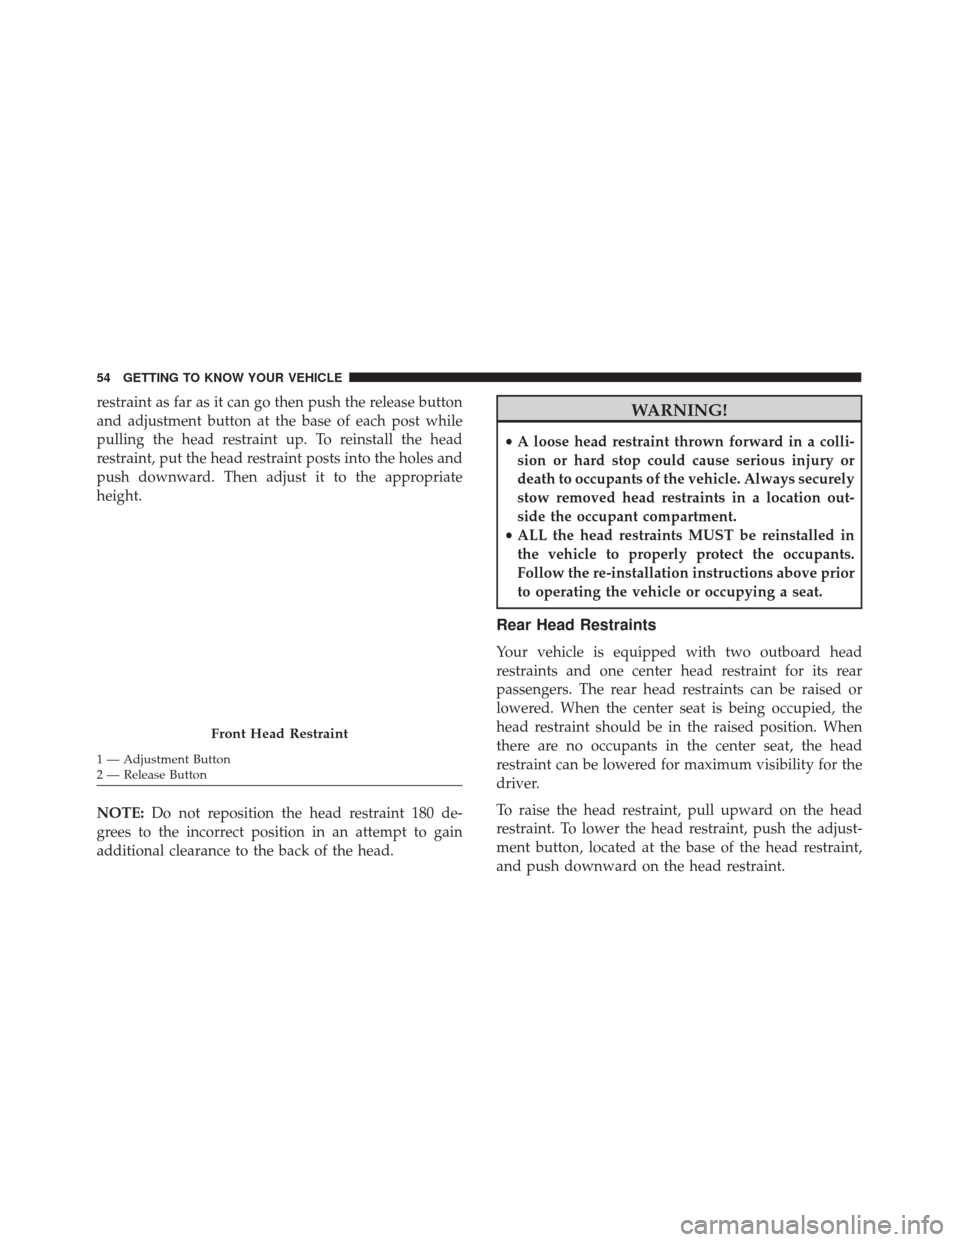
restraint as far as it can go then push the release button
and adjustment button at the base of each post while
pulling the head restraint up. To reinstall the head
restraint, put the head restraint posts into the holes and
push downward. Then adjust it to the appropriate
height.
NOTE:Do not reposition the head restraint 180 de-
grees to the incorrect position in an attempt to gain
additional clearance to the back of the head.WARNING!
• A loose head restraint thrown forward in a colli-
sion or hard stop could cause serious injury or
death to occupants of the vehicle. Always securely
stow removed head restraints in a location out-
side the occupant compartment.
• ALL the head restraints MUST be reinstalled in
the vehicle to properly protect the occupants.
Follow the re-installation instructions above prior
to operating the vehicle or occupying a seat.
Rear Head Restraints
Your vehicle is equipped with two outboard head
restraints and one center head restraint for its rear
passengers. The rear head restraints can be raised or
lowered. When the center seat is being occupied, the
head restraint should be in the raised position. When
there are no occupants in the center seat, the head
restraint can be lowered for maximum visibility for the
driver.
To raise the head restraint, pull upward on the head
restraint. To lower the head restraint, push the adjust-
ment button, located at the base of the head restraint,
and push downward on the head restraint.
Front Head Restraint
1 — Adjustment Button
2 — Release Button 54 GETTING TO KNOW YOUR VEHICLE
Page 57 of 476
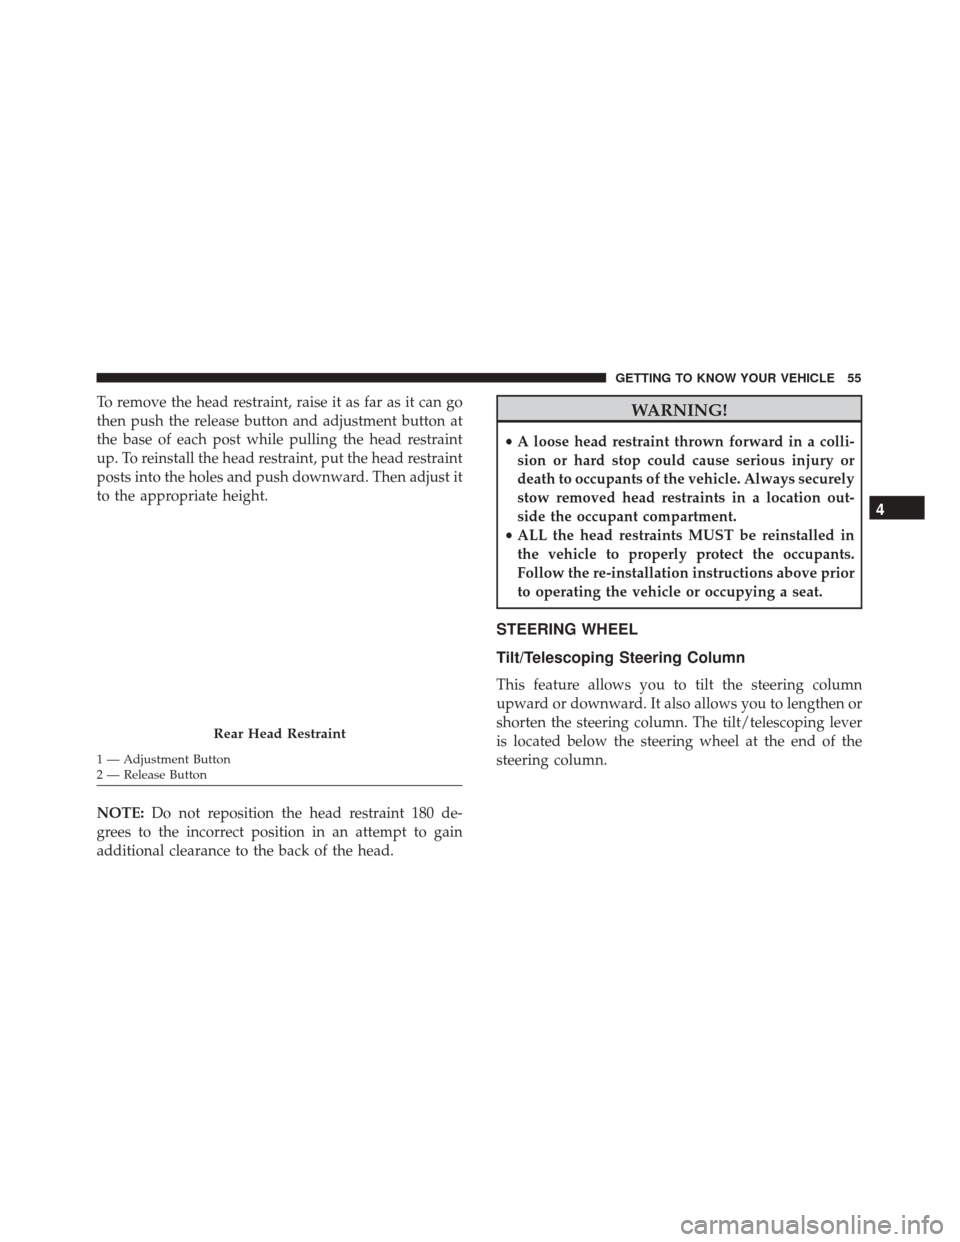
To remove the head restraint, raise it as far as it can go
then push the release button and adjustment button at
the base of each post while pulling the head restraint
up. To reinstall the head restraint, put the head restraint
posts into the holes and push downward. Then adjust it
to the appropriate height.
NOTE:Do not reposition the head restraint 180 de-
grees to the incorrect position in an attempt to gain
additional clearance to the back of the head.WARNING!
• A loose head restraint thrown forward in a colli-
sion or hard stop could cause serious injury or
death to occupants of the vehicle. Always securely
stow removed head restraints in a location out-
side the occupant compartment.
• ALL the head restraints MUST be reinstalled in
the vehicle to properly protect the occupants.
Follow the re-installation instructions above prior
to operating the vehicle or occupying a seat.
STEERING WHEEL
Tilt/Telescoping Steering Column
This feature allows you to tilt the steering column
upward or downward. It also allows you to lengthen or
shorten the steering column. The tilt/telescoping lever
is located below the steering wheel at the end of the
steering column.
Rear Head Restraint
1 — Adjustment Button
2 — Release Button
4
GETTING TO KNOW YOUR VEHICLE 55
Page 58 of 476
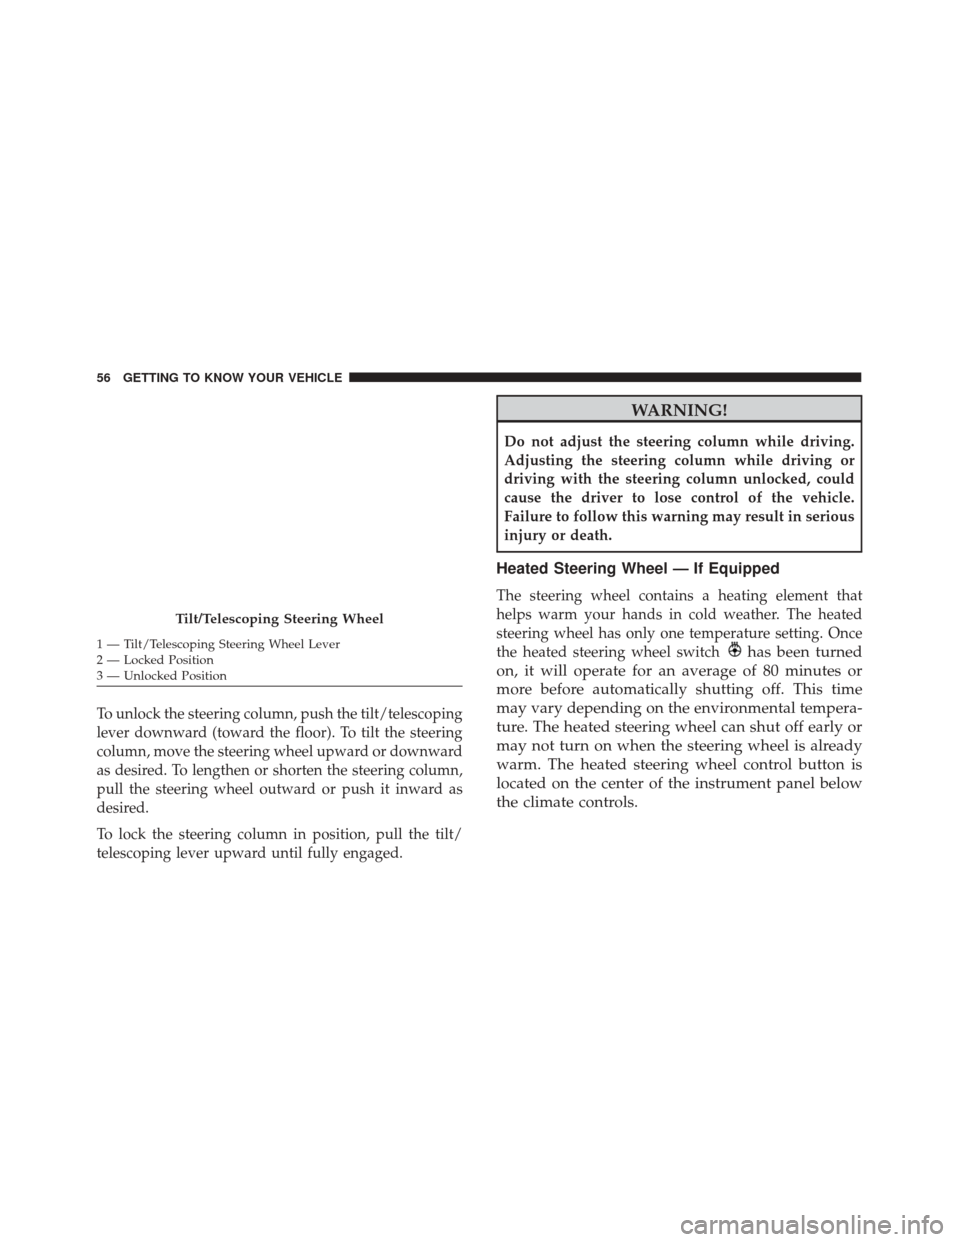
To unlock the steering column, push the tilt/telescoping
lever downward (toward the floor). To tilt the steering
column, move the steering wheel upward or downward
as desired. To lengthen or shorten the steering column,
pull the steering wheel outward or push it inward as
desired.
To lock the steering column in position, pull the tilt/
telescoping lever upward until fully engaged.
WARNING!
Do not adjust the steering column while driving.
Adjusting the steering column while driving or
driving with the steering column unlocked, could
cause the driver to lose control of the vehicle.
Failure to follow this warning may result in serious
injury or death.
Heated Steering Wheel — If Equipped
The steering wheel contains a heating element that
helps warm your hands in cold weather. The heated
steering wheel has only one temperature setting. Once
the heated steering wheel switch
has been turned
on, it will operate for an average of 80 minutes or
more before automatically shutting off. This time
may vary depending on the environmental tempera-
ture. The heated steering wheel can shut off early or
may not turn on when the steering wheel is already
warm. The heated steering wheel control button is
located on the center of the instrument panel below
the climate controls.
Tilt/Telescoping Steering Wheel
1 — Tilt/Telescoping Steering Wheel Lever
2 — Locked Position
3 — Unlocked Position 56 GETTING TO KNOW YOUR VEHICLE
Page 59 of 476
Auto On Comfort — If Equipped
If the external temperature is below 40 °F (5 °C) at each
start-up of the vehicle the heated steering wheel func-
tionality is turned on.
WARNING!
•Persons who are unable to feel pain to the skin
because of advanced age, chronic illness, diabe-
tes, spinal cord injury, medication, alcohol use,
exhaustion, or other physical conditions must
exercise care when using the steering wheel
heater. It may cause burns even at low tempera-
tures, especially if used for long periods.
• Do not place anything on the steering wheel that
insulates against heat, such as a blanket or steer-
ing wheel covers of any type and material. This
may cause the steering wheel heater to overheat.
MIRRORS
Inside Day/Night Mirror
The mirror can be adjusted up, down, left, and right.
The mirror should be adjusted to center on the view
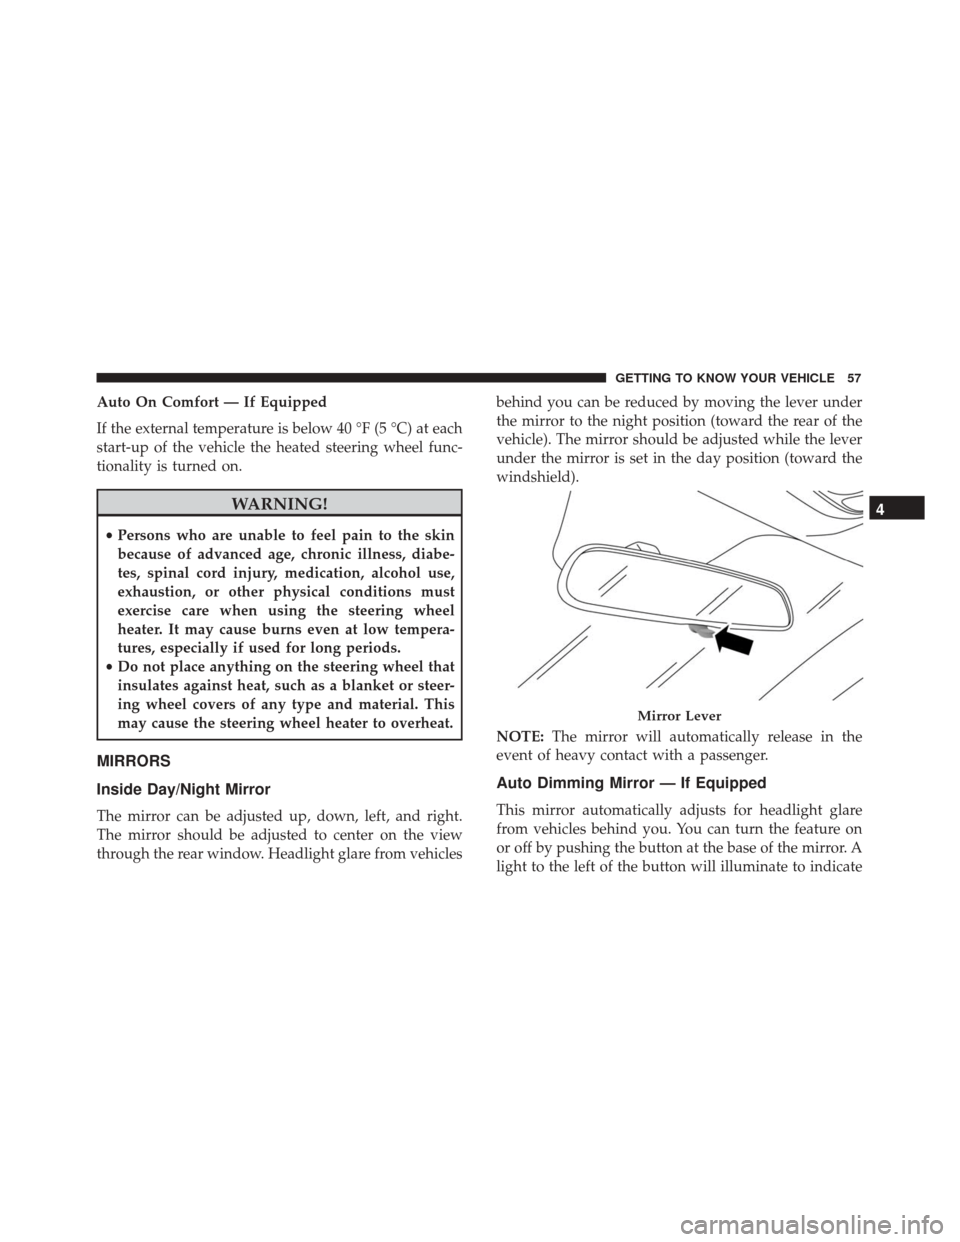
through the rear window. Headlight glare from vehicles behind you can be reduced by moving the lever under
the mirror to the night position (toward the rear of the
vehicle). The mirror should be adjusted while the lever
under the mirror is set in the day position (toward the
windshield).
NOTE:
The mirror will automatically release in the
event of heavy contact with a passenger.
Auto Dimming Mirror — If Equipped
This mirror automatically adjusts for headlight glare
from vehicles behind you. You can turn the feature on
or off by pushing the button at the base of the mirror. A
light to the left of the button will illuminate to indicate
Mirror Lever
4
GETTING TO KNOW YOUR VEHICLE 57
Page 66 of 476

Rear Cross Path (RCP)
The Rear Cross Path (RCP) feature is intended to aid the
driver when backing out of parking spaces where their
vision of oncoming vehicles may be blocked. Proceed
slowly and cautiously out of the parking space until the
rear end of the vehicle is exposed. The RCP system will
then have a clear view of the cross traffic and if an
oncoming vehicle is detected, alert the driver.
RCP monitors the rear detection zones on both sides of
the vehicle, for objects that are moving toward the side
of the vehicle with a minimum speed of approximately1 mph (2 km/h), to objects moving a maximum of
approximately 22 mph (35 km/h), such as in parking lot
situations.
NOTE:
In a parking lot situation, oncoming vehicles
can be obscured by vehicles parked on either side. If the
sensors are blocked by other structures or vehicles, the
system will not be able to alert the driver.
When RCP is on and the vehicle is in REVERSE, the
driver is alerted using both the visual and audible
alarms, including reducing the radio volume.
WARNING!
RCP is not a back up aid system. It is intended to be
used to help a driver detect an oncoming vehicle in
a parking lot situation. Drivers must be careful
when backing up, even when using RCP. Always
check carefully behind your vehicle, look behind
you, and be sure to check for pedestrians, animals,
other vehicles, obstructions, and blind spots before
backing up. Failure to do so can result in serious
injury or death.
RCP Detection Zones
64 GETTING TO KNOW YOUR VEHICLE
Page 71 of 476
turn off the headlights within two minutes. The delay
interval begins when the headlight switch is turned off.
Headlight Delay Disable
The feature is disabled by turning on the headlights, the
parking lights or by placing the ignition in RUN mode.
If you shut off the lights before the ignition is turned on,
they will turn off in the normal manner.
NOTE:The lights must be turned off within two
minutes of placing the ignition in STOP mode to
activate this feature.
High Beams
To turn on the high beam headlights, push the turn
signal lever forward (toward the front of the vehicle)
and an indicator will illuminate in the cluster. To turn
off the high beams, pull the turn signal lever rearward
(toward the rear of the vehicle). NOTE:
The headlights must be on for the high beams to
activate.
High Beam And Turn Signal Controls
4
GETTING TO KNOW YOUR VEHICLE 69
Page 77 of 476
WIPERS AND WASHERS
Front Wiper Operation
The windshield wiper/washer controls are located on
the lever on the right side of the steering column. The
front wipers are operated by rotating a switch, located
on the end of the lever.
CAUTION!
Always remove any buildup of snow that prevents
the windshield wiper blades from returning to the
“park” position. If the windshield wiper switch is
turned off, and the blades cannot return to the
“park” position, damage to the wiper motor may
occur.
Windshield Wiper Operation
Rotate the windshield wiper knob to one of the two
detent positions for intermittent settings, the third
detent for low wiper operation and the fourth for high
wiper operation.
Windshield Washer Operation
To use the washer, pull the lever toward you and hold
while spray is desired. If the lever is pulled while in the
intermittent setting, the wipers will turn on and operate
for several wipe cycles after the lever is released, and
then resume the intermittent interval previously se-
lected.
Windshield Wiper Stalk
4
GETTING TO KNOW YOUR VEHICLE 75
Page 86 of 476
IconDescription
Panel Mode
Panel Mode
Air is directed through the outlets in the instrument panel. These outlets can be adjusted to
direct airflow. The center instrument panel outlets can be adjusted so that they are directed
toward the rear seat passengers for maximum airflow to the rear.
Bi-Level Mode
Bi-Level Mode
Air comes from the instrument panel outlets and floor outlets. A slight amount of air is
directed through the defrost and side window demister outlets.
Floor Mode
Floor Mode
Air is directed through the floor outlets with a small amount flowing through the defrost
and side window demister outlets.
Mix Mode
Mix Mode
Air is directed through the floor, defrost, and side window demister outlets. This setting
works best in cold or snowy conditions that require extra heat to the windshield. This set-
ting is good for maintaining comfort while reducing moisture on the windshield.
84 GETTING TO KNOW YOUR VEHICLE