Page 49 of 88
TRAILER TOWING
• Trailer towing with this vehicle is not recommended.
RECREATIONAL TOWING (BEHIND MOTORHOME,
ETC.)
Towing This Vehicle Behind Another Vehicle
Towing ConditionWheels OFF TheGroundManual Transmission
Flat Tow NONE Transmission in NEUTRAL
Dolly TowFront OK
Rear NO
On Trailer ALL OK
NOTE:
• Vehicles equipped with manual transmissions may be recreationally towed (flat
towed) at any legal highway speed, for any distance, if the manual transmission is
in NEUTRAL.
• This vehicle may be towed on a flatbed or vehicle trailer provided all four wheels
are OFF the ground.
CAUTION!
Towing this vehicle in violation of the above requirements can cause severe trans-
mission damage. Damage from improper towing is not covered under the New
Vehicle Limited Warranty.
UTILITY
47
Page 50 of 88

24-HOUR ROADSIDE ASSISTANCE
• If your Abarth requires jump start assistance, out of gas/fuel delivery, tire service,
lockout service or towing due to a defect covered under the Basic Limited War-
ranty, dial toll-free 1-888-242-6342. See your Warranty booklet for further details.
• Provide your name, vehicle identification number and license plate number.
• Provide your location, including telephone number, from which you are calling.
• Briefly describe the nature of the problem and answer a few simple questions.
• You will be given the name of the service provider and an estimated time of ar-
rival. If you feel you are in an “unsafe situation,” please let us know. With your
consent, we will contact local police or safety authorities.
INSTRUMENT CLUSTER WARNING LIGHTS
- Generic Warning Light
• The Generic Warning Light will illuminate if any of the following conditions occur:
Oil Change Request, Engine Oil Pressure Sensor Failure, External Light Failure,
Fuel Cut-Off Intervention, Fuel Cut-Off Not Available, Parking Sensor Failure.
- Power Steering System Warning
•This light is used to manage the electrical warning of the EPS (Electric Power SteeringSystem). When the ignition is turned to the ON/RUN position, the warning light will illu-minate momentarily. If the warning light stays on, cycle the ignition to the OFF positionand back to ON/RUN. If the warning light stays on, contact your authorized Fiat Dealer.
If the warning light switches on while driving you may not have steering assistance.
Although it will still be possible to steer the car, the effort needed to operate the steer-
ing wheel could be increased: contact an authorized Fiat Dealer as soon as possible.
Refer to “Power Steering” in “Starting and Operating” for further information.
- Engine Temperature Warning Light
• This light warns of an overheated engine condition.
• If the light turns on or flashes continuously while driving, safely pull over and stop
the vehicle. If the A/C system is on, turn it off. Also, shift the transmission into
NEUTRAL and idle the vehicle. If the temperature reading does not return to nor-
mal, turn the engine off immediately.
• We recommend that you do not operate the vehicle or engine damage will occur.
Have the vehicle serviced immediately.
WARNING!
A hot engine cooling system is dangerous. You or others could be badly burned
by steam or boiling coolant.
WHAT TO DO IN EMERGENCIES
48
Page 51 of 88
 Light
•This light informs you of a problem with the Electronic Throttle Control (ETC) system.
• If a problem is detected, the light will come on while the engin")
- Electronic Throttle Control (ETC) Light
•This light informs you of a problem with the Electronic Throttle Control (ETC) system.
• If a problem is detected, the light will come on while the engine is running. Cycle
the ignition when the vehicle has completely stopped; the light should turn off.
• If the light remains lit with the engine running, your vehicle will usually be drivable;
however, see an authorized service center immediately. If the light is flashing
when the engine is running, immediate service is required and you may experi-
ence reduced performance, an elevated/rough idle or engine stall and your ve-
hicle may require towing.
- Electronic Stability Control (ESC) OFF Indicator Light
• This light indicates the ESC system has been turned off by the driver.
Partial Off
This mode is entered by momentarily pressing the ESC Off switch. This mode is intended
for times when a more spirited driving experience is desired. It is also intended for driving
in deep snow, sand or gravel conditions, when more wheel spin than ESC would nor-
mally allow is required to gain traction. To turn ESC on again, momentarily press the
switch again. This will restore the normal ESC On mode of operation.
Full Off
This mode is intended for off-highway or off-road use only and should not be used on
public roadways. In this mode, all TCS and ESC stability features are turned OFF, ex-
cept for the limited slip feature described in the TCS section. To enter the “Full Off”
mode, depress and hold the ESC OFF switch for five seconds. After five seconds, the
ESC OFF Indicator Light will illuminate, and the “ESC OFF” message will display in the
EVIC. To turn ESC ON again, momentarily press the ESC OFF switch.
- Electronic Stability Control (ESC) Activation / Malfunction
Indicator Light
• The “ESC Activation/Malfunction Indicator Light” in the instrument cluster will
come on for four seconds when the ignition switch is turned to the ON/RUN posi-
tion. If the “ESC Activation/Malfunction Indicator Light” comes on continuously
with the engine running, a malfunction has been detected in the ESC system. If
this light remains on, see your authorized dealer as soon as possible to have the
problem diagnosed and corrected.
NOTE:
• The “ESC Off Indicator Light” and the “ESC Activation/Malfunction Indicator
Light” come on momentarily each time the ignition switch is turned to ON/RUN.
• Each time the ignition is turned to ON/RUN, the ESC system will be ON even if it
was turned off previously.
• ESC Activation/Malfunction Light can blink during a ESC or TC intervention.
WHAT TO DO IN EMERGENCIES
49
Page 52 of 88

• The TTC system uses the brakes to prevent unwanted wheelspin during corner-
ing, to maximize acceleration and minimize understeering during aggressive driv-
ing. This")
TTC (Torque Transfer Control)
• The TTC system uses the brakes to prevent unwanted wheelspin during corner-
ing, to maximize acceleration and minimize understeering during aggressive driv-
ing. This feature is active in all modes. While TTC is active, the “ESC” lamp in the
instrument cluster may flash.
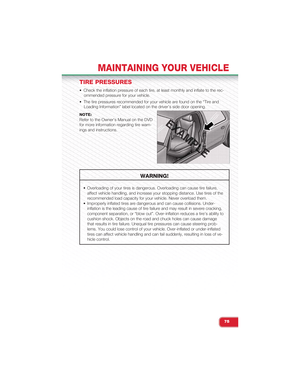
- Tire Pressure Monitoring System (TPMS) Light
• Each tire, including the spare (if provided), should be checked monthly when cold
and inflated to the inflation pressure recommended by the vehicle manufacturer
on the vehicle placard or tire inflation pressure label. (If your vehicle has tires of a
different size than the size indicated on the vehicle placard or tire inflation pres-
sure label, you should determine the proper tire inflation pressure for those tires.)
• As an added safety feature, your vehicle has been equipped with a Tire Pressure
Monitoring System (TPMS) that illuminates a low tire pressure telltale when one or
more of your tires is significantly under-inflated. Accordingly, when the low tire
pressure telltale illuminates, you should stop and check your tires as soon as
possible, and inflate them to the proper pressure. Driving on a significantly under-
inflated tire causes the tire to overheat and can lead to tire failure. Under-inflation
also reduces fuel efficiency and tire tread life, and may affect the vehicle’s han-
dling and stopping ability.
•IF THE LIGHT STARTS FLASHING INDICATING A LOW TIRE PRES-
SURE, ADJUST THE AIR PRESSURE IN THE LOW TIRE TO THE AIR
PRESSURE SHOWN ON THE VEHICLE PLACARD OR TIRE INFLATION
PRESSURE LABEL LOCATED ON THE DRIVER'S DOOR. NOTE: AFTER
INFLATION, THE VEHICLE MAY NEED TO BE DRIVEN FOR 20 MIN-
UTES BEFORE THE FLASHING LIGHT WILL TURN OFF.
•Please note that the TPMS is not a substitute for proper tire maintenance, and it is
the driver’s responsibility to maintain correct tire pressure, even if under-inflation has
not reached the level to trigger illumination of the TPMS low tire pressure telltale.
• Your vehicle has also been equipped with a TPMS malfunction indicator to indi-
cate when the system is not operating properly. The TPMS malfunction indicator
is combined with the low tire pressure telltale. When the system detects a mal-
function, the telltale will flash for approximately one minute and then remain con-
tinuously illuminated. This sequence will continue upon subsequent vehicle start-
ups as long as the malfunction exists.
• When the malfunction indicator is illuminated, the system may not be able to de-
tect or signal low tire pressure as intended. TPMS malfunctions may occur for a
variety of reasons, including the installation of replacement or alternate tires or
wheels on the vehicle that prevent the TPMS from functioning properly. Always
check the TPMS malfunction telltale after replacing one or more tires or wheels
on your vehicle, to ensure that the replacement or alternate tires and wheels al-
low the TPMS to continue to function properly.
WHAT TO DO IN EMERGENCIES
50
Page 53 of 88
 per 12° F (7° C) of air tem-
perature change. Keep this in mind when checking tire pressure inside a garage,
especially in the winter. Exam")
NOTE:
Tire pressures change by approximately 1 psi (7 kPa) per 12° F (7° C) of air tem-
perature change. Keep this in mind when checking tire pressure inside a garage,
especially in the winter. Example: If garage temperature is 68°F (20°C) and the out-
side temperature is 32°F (0°C), then the cold tire inflation pressure should be in-
creased by 3 psi (21 kPa), which equals 1 psi (7 kPa) for every 12°F (7°C) for this
outside temperature condition.
CAUTION!
The TPMS has been optimized for the original equipment tires and wheels. TPMS
pressures and warning have been established for the tire size equipped on your
vehicle. Undesirable system operation or sensor damage may result when using
replacement equipment that is not of the same size, type, and/or style. Aftermar-
ket wheels can cause sensor damage. Do not use tire sealant from a can, or bal-
ance beads if your vehicle is equipped with a TPMS, as damage to the sensors
may result.
BRAKE- Brake Warning Light
• The Brake Warning light illuminates when there is either a system malfunction or
the parking brake is applied. If the light is on and the parking brake is not applied,
it indicates a possible brake hydraulic malfunction, brake booster problem or an
Anti-Lock Brake System problem.
• Please have your vehicle serviced immediately.
WARNING!
Driving a vehicle with the red brake light on is dangerous. Part of the brake sys-
tem may have failed. It will take longer to stop the vehicle. You could have a colli-
sion. Have the vehicle checked immediately.
WHAT TO DO IN EMERGENCIES
51
Page 54 of 88

• Certain conditions, such as a loose or missing gas cap, poor fuel quality, etc.,
may illuminate the MIL after engine start. The vehicle should be serviced if th")
- Malfunction Indicator Light (MIL)
• Certain conditions, such as a loose or missing gas cap, poor fuel quality, etc.,
may illuminate the MIL after engine start. The vehicle should be serviced if the
light stays on through several typical driving cycles. In most situations, the vehicle
will drive normally and not require towing.
• If the MIL flashes when the engine is running, serious conditions may exist that
could lead to immediate loss of power or severe catalytic converter damage.
We recommend you do not operate the vehicle. Have the vehicle serviced
immediately.
- Charging System Light
• This light shows the status of the electrical charging system. If the charging sys-
tem light remains on, it means that the vehicle is experiencing a problem with the
charging system.
• We recommend you do not continue driving if the charging system light is on.
Have the vehicle serviced immediately.
- Oil Pressure Warning Light
• This light indicates low engine oil pressure. If the light turns on while driving, stop
the vehicle and shut off the engine as soon as possible. A chime will sound when
this light turns on.
• We recommend you do not operate the vehicle or engine damage will occur.
Have the vehicle serviced immediately.
- Anti-Lock Brake (ABS) Light
• This light monitors the Anti-Lock Brake System (ABS).
• If the light is not on during starting, stays on, or turns on while driving, we recom-
mend you drive to the nearest authorized dealer and have the vehicle serviced
immediately.
- Air Bag Warning Light
• If the light is not on during starting, stays on, or turns on while driving, have the
vehicle serviced by an authorized dealer immediately.
WHAT TO DO IN EMERGENCIES
52
Page 55 of 88

IF YOUR ENGINE OVERHEATS
• In any of the following situations, you can reduce the potential for overheating by
taking the appropriate action.
• On the highways — slow down.
• In city traffic — while stopped, shift transmission into NEUTRAL, but do not in-
crease engine idle speed.
NOTE:There are steps that you can take to slow down an overheat condition:
• If your air conditioner (A/C) is on, turn it off. The A/C system adds heat to the en-
gine cooling system and turning the A/C off can help remove this heat.
• You can also turn the Temperature control to maximum heat, the Mode control to
floor and the Fan control to high. This allows the heater core to act as a supple-
ment to the radiator and aids in removing heat from the engine cooling system.
• If the temperature reading does not return to normal, turn the engine off immedi-
ately.
• We recommend that you do not operate the vehicle or engine damage will occur.
Have the vehicle serviced immediately.
CAUTION!
Driving with a hot cooling system could damage your vehicle. If the temperature
gauge reads hot, pull over and stop the vehicle. Idle the vehicle with the air condi-
tioner turned off until the pointer drops back into the normal range. If the pointer
remains on hot, turn the engine off immediately and call for service.
WARNING!
You or others can be badly burned by hot engine coolant (antifreeze) or steam
from your radiator. If you see or hear steam coming from under the hood, do not
open the hood until the radiator has had time to cool. Never try to open a cooling
system pressure cap when the radiator or coolant bottle is hot.
WHAT TO DO IN EMERGENCIES
53
Page 56 of 88
 in the tire tread can be sealed with TIREFIT.
Foreign objects (e.g., screws or nails) should no")
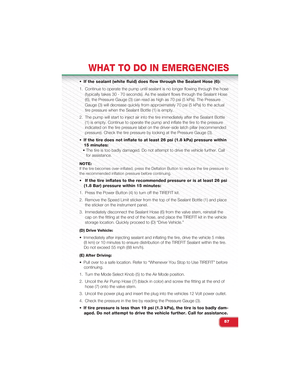
TIREFIT KIT
• Your vehicle may be equipped with a TIREFIT Kit.
• Small punctures up to 1/4” (6 mm) in the tire tread can be sealed with TIREFIT.
Foreign objects (e.g., screws or nails) should not be removed from the tire. TIRE-
FIT can be used in outside temperatures down to approximately -4°F (-20°C).
• This kit will provide a temporary tire seal, allowing you to drive your vehicle up to
100 miles (160 km) with a maximum speed of 55 mph (90 km/h).
TIREFIT Storage
• The TIREFIT kit is located under the front driver's seat.
TIREFIT Kit Components And Operation
1 – Sealant Bottle 5 – Mode Select Knob
2 – Deflation Button 6 – Sealant Hose (Clear)
3 – Pressure Gauge 7 – Air Pump Hose (Black)
4 – Power Button 8 – Power Plug
Using The Mode Select Knob And Hoses
• Your TIREFIT kit is equipped with the following symbols to indicate the air or seal-
ant mode.
Selecting Air Mode
• Turn the Mode Select Knob (5) to this position for air pump operation only. Use
the Black Air Pump Hose (7) when selecting this mode.
Selecting Sealant Mode
• Turn the Mode Select Knob (5) to this position to inject the TIREFIT Sealant and
to inflate the tire. Use the Sealant Hose (clear hose) (6) when selecting this mode.
WHAT TO DO IN EMERGENCIES
54


Towing This Vehicle Behind Another Vehicle
Towing ConditionWheels OFF TheGroundManu")