Page 57 of 140
MP3 Player/USB/CD/Audio Jack/Bluetooth® Operation
Selecting The Source
• The MP3 Player/USB, CD, Audio Jack, orBluetooth® source is accessed by touch-
ing the “Player” soft-key to enter the
Player main screen, then touch the
“Source” soft-key and choose between
Disc, Aux, MP3 Player or Bluetooth®.
NOTE:
Uconnect® will automatically switch to the
appropriate mode when something is first
connected or inserted into the system.
ELECTRONICS
55
Page 58 of 140
USB Port
• Connect your MP3 Player or compatibledevice using a USB cable into the USB
Port. USB Memory sticks with audio files
can also be used. Then, audio from the
device can be played on the vehicles
sound system while providing metadata
(artist, track title, album, etc.) information
on the radio display.
• When connected, the MP3 Player/ compatible USB device can be controlled
using the radio or Steering Wheel Audio
Controls to play, skip to the next or previ-
ous track, browse, and list the contents.
• The MP3 Player battery charges when plugged into the USB port (if supported by
the specific device).
• To route the audio cable out of the center console, use the access cut out on the right side of the console.
ELECTRONICS
56
Page 59 of 140

NOTE:
When connecting your MP3 Player device for the first time, the system may take several
minutes to read your music, depending on the number of files. For example, the system will
take approximately five minutes for every 1000 songs loaded on the device. Also during the
reading process, the Shuffle and Browse functions will be disabled. This process is needed
to ensure the full use of your MP3 Player features and only happens the first time it is
connected. After the first time, the reading process of your MP3 Player will take consider-
ably less time unless changes are made or new songs are added to the playlist.
• The USB port supports certain Mini, Classic, Nano, Touch, and iPhone® devices. The USBport also supports playing music from compatible external USB Mass Storage Class
memory devices. Some iPod® software versions may not fully support the USB port
features. Please visit Apple’s website for iPod® software updates.
Audio Jack
• The Audio Jack allows a portable device, such as an MP3 player or an iPod® to be pluggedinto the radio and utilize the vehicle’s sound system, using a standard 3.5 mm audio
cable, to amplify the source and play through the vehicle speakers.
• Touch the “Player” soft-key on the then choose AUX source will change the mode to auxiliary device if the Audio Jack is connected, allowing the music from your portable
device to be heard through the vehicle's speakers.
• The functions of the portable device are controlled using the device controls. The volume may be controlled using the radio or portable device.
• To route the audio cable out of the center console, use the access cut out on the right side of the console.
Remote CD/Disc Player — If Equipped
• The CD/Disc Player is located inside the center console.
• With the printed side facing the rear of the car, lift up the protective door and insert thedisc into the disc slot. The radio pulls the disc in automatically. The radio selects the
appropriate mode after the disc is recognized, and starts playing the first track.
• The CD/Disc can also be selected by touching the “Player” soft-key, then touch the “Source” soft-key and then touch the “Disc” soft-key.
NOTE: • Depending on the CD/Disc being used, you will only be able to browse by folder.
• There are Voice Commands available while in this mode. Refer to the Uconnect® VoiceCommand section in this guide.
ELECTRONICS
57
Page 60 of 140

Bluetooth® Streaming Audio
• If equipped with Uconnect® Voice Command, your Bluetooth-equipped MP3 Playerdevices, cell phones or other media players, may also be able to stream music to
your vehicle's sound system. Your connected device must be Bluetooth-compatible,
and paired with your Uconnect® system (see Uconnect® Phone section or
www.UconnectPhone.com for pairing instructions). You can access the music from your
connected Bluetooth® device by touching the Source soft-key while in Player mode.
Garmin® Navigation (8.4N Only)
• Uconnect® 8.4N integrates Garmin’s consumer-friendly navigation into your vehicle.Garmin Navigation includes Lane Assist and Junction View, Speed Limit information,
and a database with over 6 million points of interest.
• Touch the “Nav” soft-key in the menu bar to access the Navigation system.
Changing The Navigation Voice Prompt Volume
1. Program a destination.
2. While traveling on your route, touch the upper left area of the map screen where your next turn is displayed.
3. The Navigation system will then repeat the distance to your next turn.
4. While the Navigation system is speaking, use the ON/OFF VOLUME rotary knob to adjust the volume to a comfortable level. Please note the volume setting for Navigation Voice
Prompt is different than the audio system.
ELECTRONICS
58
Page 61 of 140
Main Navigation Menu
Acquiring Satellites
• The GPS Satellite strength bars indicate the strength of your satellite reception.
• Acquiring satellite signals can take a few minutes. When at least one of the bars is green,your device has acquired satellite signals. If no signal is found the Navigation system still
can operate with internal gyro direction & location based on data provided by the vehicle.
• Sensor Assisted GPS technology uses the speed sensors attached to your vehicle’s drivetrain and a gyroscope to supplement the existing GPS data. The combined data
provides accurate positioning for your vehicle in tunnels, indoor parking garages, urban
canyons, and any other area where GPS signals can become obstructed.
Finding Points Of Interest
• From the main Navigation menu touch the “Where To?” soft-key, then touch
“Points of Interest.”
• Select a Category and then a subcat- egory, if necessary.
• Select your destination and touch “Go.”
ELECTRONICS
59
Page 62 of 140

Finding A Place By Spelling The Name
•
From the Main Navigation Menu touch the “Where To?” soft-key, touch “Points of Interest”,
then touch “Spell Name.”
• Enter the name of your destination.
• Touch “Done.”
• Select your destination and touch “Go.”
Entering A Destination Address
• From the main Navigation menu touch the “Where To?” soft-key, then touch “Address.”
• Follow the on-screen prompts to enter the address and touch “Go.”
Searching Near Another Location
• From the main Navigation menu touch the “Where To?” soft-key, touch a destination, then touch “Near.”
• Select an option from the available choices.
Setting Or Changing Your Home Location
• Touch the “NAV” soft-key in the menu bar to access the Navigation system and the Main Navigation menu.
• Touch the “Where To?” soft-key, then touch “Go Home.”
• You may enter your address directly, use your current location as your home address, or choose from recently found locations.
• To edit your Home location (or other saved locations), touch the “Where To?” soft-key from the Main Navigation menu, touch “Favorites,” then touch the location you want to
edit. After selecting a location to edit, touch “Press for More,” then “Edit.”
Go Home
• A Home location must be saved in the system. From the Main Navigation menu touch the “Where To?” soft-key, then touch “Go Home.”
Searching By Phone Number
• From the main Navigation menu touch the “Where To?” soft-key, touch the
“down” arrow to display the secondary
selections, then touch “Phone Number.”
• Enter the desired Phone Number and fol- low the prompts.
ELECTRONICS
60
Page 63 of 140
Secondary Search Selections
• From the main Navigation menu touch the “Where To?” soft-key, then touch the “down”arrow to display the secondary search selections.
Selection Selection Description
Extras Visit www.garmin.com/extras to add more
content to your device with purchasable and
free downloads.
Cities Select a City within the current state to route
to that specific City Center.
Routes Let’s you create your own route with your own
destinations or points of interests.
Browse Maps Let’s you browse the Map.
Browse Maps Enter destination using its Geographical coor-
dinates instead of an address.
Following Your Route
•Your route is marked with a magenta line on the map. If you depart from the original route,
your route is recalculated. A speed limit icon could appear as you travel on major roadways.
• Lane Assist helps you decide which lane to be in at upcoming junctions.
• Junction View gives you an expanded view as junctions approach.
ELECTRONICS
61
Page 64 of 140
Adding A Via Point
• To add a via point you must be navigating a route.
• Touch the “back” arrow to return to the Main Navigation menu.
• Touch the “Where To?” soft-key, then search for the via point. Select the via point to addfrom the search results.
• Touch “Go,” then touch “Add as a Via Point.”
Taking A Detour
• To take a detour you must be navigating a route.
• Touch “Detour.”
NOTE:
If the route you are currently taking is the only reasonable option, the device might not
calculate a detour.
Traffic
• When you are receiving traffic informa- tion, a traffic icon appears on the map.
• The traffic icon changes color to indicate the severity of the traffic conditions on
your route or on the road you are currently
traveling.
Color Description Meaning
Green Low severity Traffic is flowing normally
Yellow Medium severity Traffic is slightly congested
Red High severity Traffic is heavily congested or
stopped
Gray No data Traffic data has not updated
ELECTRONICS
62
 1
1 2
2 3
3 4
4 5
5 6
6 7
7 8
8 9
9 10
10 11
11 12
12 13
13 14
14 15
15 16
16 17
17 18
18 19
19 20
20 21
21 22
22 23
23 24
24 25
25 26
26 27
27 28
28 29
29 30
30 31
31 32
32 33
33 34
34 35
35 36
36 37
37 38
38 39
39 40
40 41
41 42
42 43
43 44
44 45
45 46
46 47
47 48
48 49
49 50
50 51
51 52
52 53
53 54
54 55
55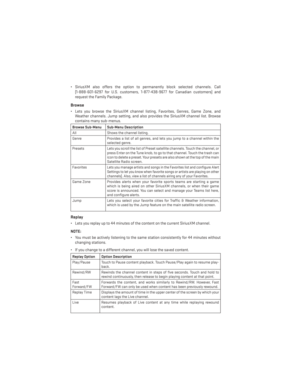 56
56 57
57 58
58 59
59 60
60 61
61 62
62 63
63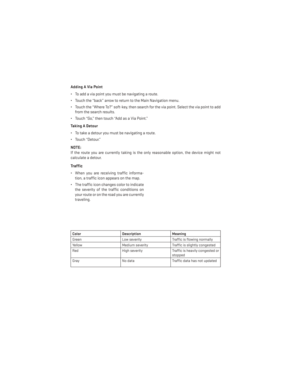 64
64 65
65 66
66 67
67 68
68 69
69 70
70 71
71 72
72 73
73 74
74 75
75 76
76 77
77 78
78 79
79 80
80 81
81 82
82 83
83 84
84 85
85 86
86 87
87 88
88 89
89 90
90 91
91 92
92 93
93 94
94 95
95 96
96 97
97 98
98 99
99 100
100 101
101 102
102 103
103 104
104 105
105 106
106 107
107 108
108 109
109 110
110 111
111 112
112 113
113 114
114 115
115 116
116 117
117 118
118 119
119 120
120 121
121 122
122 123
123 124
124 125
125 126
126 127
127 128
128 129
129 130
130 131
131 132
132 133
133 134
134 135
135 136
136 137
137 138
138 139
139


