Page 89 of 140

Oil Change Indicator
ŌĆó Your vehicle is equipped with an engine oil change indicator system. The ŌĆ£Oil ChangeDueŌĆØ message will flash in the EVIC display for approximately 10 seconds after a single
chime has sounded, to indicate the next scheduled oil change interval. The engine oil
change indicator system is duty cycle based, which means the engine oil change interval
may fluctuate, dependent upon your personal driving style.
ŌĆó Unless reset, this message will continue to display each time you turn the ignition switch to the ON/RUN position or cycle the ignition to the ON/RUN position if equipped with
Keyless Enter-N-GoŌäó. To turn off the message temporarily, press and release the MENU
button. To reset the oil change indicator system (after performing the scheduled main-
tenance) refer to the following procedure.
Vehicles Equipped With Keyless Enter-N-GoŌäó
1. Without pressing the brake pedal, cycle the ignition to the ON/RUN position (do not start the engine).
2. Fully depress the accelerator pedal, slowly, three times within 10 seconds.
3. Cycle the ignition to the OFF/LOCK position.
Vehicles Not Equipped With Keyless Enter-N-GoŌäó
1. Turn the ignition switch to the ON/RUN position (do not start the engine).
2. Fully depress the accelerator pedal, slowly, three times within 10 seconds.
3. Turn the ignition switch to the OFF/LOCK position.
Using The EVIC Menu
Vehicles Equipped With Passive Entry
ŌĆó Without pressing the brake pedal, press the ENGINE START/STOP button and cycle the ignition to the ON/RUN position (Do not start the engine.)
ŌĆó Press and release the DOWN
arrow button to scroll downward through the main
menu to ŌĆ£Vehicle InfoŌĆØ.
ŌĆó Press and release the RIGHT
arrow button to access the ŌĆØOil LifeŌĆØ screen.
ŌĆó Press and hold the RIGHT
arrow button for one second to access the ŌĆØOil Life ResetŌĆØ
screen.
ŌĆó Press and hold the DOWN
arrow button until the screen shows 100% oil life.
ŌĆó Press and release the Up arrow button to exit the EVIC screen.
Vehicles Not Equipped With Passive Entry
ŌĆó Without pressing the brake pedal, cycle the ignition to the ON/RUN position (Do not start the engine.)
ŌĆó Press and release the DOWN
arrow button to scroll downward through the main
menu to ŌĆ£Vehicle InfoŌĆØ.
ŌĆó Press and release the RIGHT
arrow button to access the ŌĆØOil LifeŌĆØ screen.
WHAT TO DO IN EMERGENCIES
87
Page 90 of 140

ŌĆó Press and hold the RIGHTarrow button for one second to access the ŌĆØOil Life ResetŌĆØ
screen.
ŌĆó Press and hold the DOWN
arrow button until the screen shows 100% oil life.
ŌĆó Press and release the Up arrow button to exit the EVIC screen.
NOTE:
If the indicator message illuminates when you start the vehicle, the oil change indicator
system did not reset. If necessary, repeat this procedure.
IF YOUR ENGINE OVERHEATS
ŌĆó In any of the following situations, you can reduce the potential for overheating by taking the appropriate action.
ŌĆó On the highways ŌĆö slow down.
ŌĆó In city traffic ŌĆö while stopped, place the transmission in NEUTRAL, but do not increase engine idle speed.
NOTE:
There are steps that you can take to slow down an impending overheat condition:
ŌĆó If your air conditioner (A/C) is on, turn it off. The A/C system adds heat to the engine cooling system and turning the A/C off can help remove this heat.
ŌĆó You can also turn the temperature control to maximum heat, the mode control to floor and the blower control to high. This allows the heater core to act as a supplement to the
radiator and aids in removing heat from the engine cooling system.
CAUTION!
Vehicles with base cluster
ŌĆó Driving with a hot cooling system could damage your vehicle. If the temperature gauge reads H (hot), pull over and stop the vehicle. Idle the vehicle with the air
conditioner turned off until the pointer drops back into the normal range. If the
pointer remains on H (hot), turn the engine off immediately and call for service.
Vehicles with premium cluster
ŌĆó Driving with a hot cooling system could damage your vehicle. If the temperature gauge reads 240┬░F (116 ┬░C) or greater pull over and stop the vehicle. Idle the vehicle
with the air conditioner turned off until the pointer drops back into the normal range
200ŌĆō230┬░F (93ŌĆō110┬░C). If the pointer remains at 240┬░F (116┬░C) or greater and you hear
a chime, turn the engine off immediately and call for service.
WHAT TO DO IN EMERGENCIES
88
Page 91 of 140
WARNING!
You or others can be badly burned by hot engine coolant (antifreeze) or steam from your
radiator. If you see or hear steam coming from under the hood, do not open the hood until
the radiator has had time to cool. Never try to open a cooling system pressure cap when
the radiator or coolant bottle is hot.
JACKING AND TIRE CHANGING
Jack Location/Spare Tire Stowage
The jack and spare tire are both stowed under an access cover in the trunk. Follow these
steps to access the jack and spare tire.
1. Open the trunk.
2. Lift the access cover using the pull strap.
WHAT TO DO IN EMERGENCIES
89
Page 92 of 140
3. Remove the fastener securing the jack and spare tire.
4. Remove the scissors jack and wheel boltwrench from the spare wheel as an as-
sembly. Turn the jack screw to the left to
loosen the wheel bolt wrench, and re-
move the wrench from the jack assembly.
5. Remove the spare tire.
Preparations For Jacking
1. Park the vehicle on a firm, level surface as far from the edge of the roadway as possible. Avoid icy or slippery areas.
2. Turn on the Hazard Warning flasher.
3. Set the parking brake.
4. Place the shift lever into PARK.
5. Turn OFF the ignition.
6. Block the front and rear of the wheel diagonally opposite of the jacking position. For example, if changing the right front tire, block the left rear wheel.
NOTE:
Passengers should not remain in the vehicle
when the vehicle is being jacked.
Wheel Blocked
WHAT TO DO IN EMERGENCIES
90
Page 93 of 140
Jacking And Changing A Tire
1. Remove the spare tire, jack, and wheelbolt wrench.
2. If equipped with aluminum wheels where the center cap covers the wheel bolts,
use the wheel bolt wrench to pry the cen-
ter cap off carefully before raising the
vehicle.
3. Before raising the vehicle, use the wheel bolt wrench to loosen, but not remove,
the wheel bolts on the wheel with the flat
tire. Turn the wheel bolts counterclock-
wise one turn while the wheel is still on the ground.
4. Place the jack underneath the lift area that is closest to the flat tire. Turn the jack screw clockwise to firmly engage the jack saddle with the lift area of the sill flange, centering
the jack saddle between the locating notches on the sill flange.
5. Raise the vehicle just enough to remove the flat tire and install the spare tire.
6. Remove the wheel bolts and tire.
WHAT TO DO IN EMERGENCIES
91
Page 94 of 140

7. Mount the spare tire.
8. Install the wheel bolts with the threadedend of the wheel bolt toward the wheel.
Lightly tighten the wheel bolts.
9. Lower the vehicle to the ground by turn- ing the jack handle counterclockwise.
10. Finish tightening the wheel bolts. Push down on the wrench while at the end of
the handle for increased leverage.
Tighten the wheel bolts in a star pattern
until each bolt has been tightened twice.
The correct tightness of each wheel bolt
is 100 ft/lb. (135 N┬Ęm). If in doubt about the correct tightness, have them checked with
a torque wrench by your authorized dealer or at a service station.
11. Stow the jack, tools and flat tire. Install the jack with the base facing the front of the vehicle before tightening down the fastener.
Road Tire Installation
Vehicles Equipped With Wheel Covers
1. Mount the road tire on the axle.
2. To ease the installation process for steel wheels with wheel covers, install two wheelbolts on the wheel which are on each side of the valve stem. Install the wheel bolts with
the threaded end of the bolt toward the wheel. Lightly tighten the wheel bolts.
3. Align the valve notch in the wheel cover with the valve stem on the wheel. Install
the cover by hand, snapping the cover
over the two wheel bolts. Do not use a
hammer or excessive force to install the
cover.
4. Install the remaining wheel bolts with the threaded end of the wheel bolt toward the
wheel. Lightly tighten the wheel bolts.
5. Lower the vehicle to the ground by turn- ing the jack handle counterclockwise.
1 ŌĆö Valve Stem 4 ŌĆö Wheel Cover
2 ŌĆö Valve Notch 5 ŌĆö Road Wheel
3 ŌĆö Wheel bolt
WHAT TO DO IN EMERGENCIES
92
Page 95 of 140

6. Finish tightening the wheel bolts. Push down on the wrench while at the end of thehandle for increased leverage. Tighten the wheel bolts in a star pattern until each wheel
bolt has been tightened twice. The correct tightness of each wheel bolt is 100 ft/lbs
(135 N┬Ęm). If in doubt about the correct tightness, have them checked with a torque
wrench by your authorized dealer or service station.
7. After 25 miles (40 km) check the wheel bolt torque with a torque wrench to ensure that all wheel bolts are properly seated against the wheel.
Vehicles Without Wheel Covers
1. Mount the road tire on the axle.
2. Install the remaining wheel bolts with the threaded end of the wheel bolt toward the wheel. Lightly tighten the wheel bolts.
3. Lower the vehicle to the ground by turning the jack handle counterclockwise.
4.
Finish tightening the wheel bolts. Push down on the wrench while at the end of the handle
for increased leverage. Tighten the wheel bolts in a star pattern until each bolt has been
tightened twice. The correct tightness of each wheel bolt is 100 ft/lbs (135 N┬Ęm). If in doubt
about the correct tightness, have them checked with a torque wrench by your authorized
dealer or service station.
5. After 25 miles (40 km) check the wheel bolt torque with a torque wrench to ensure that all wheel bolts are properly seated against the wheel.
CAUTION!
ŌĆó The winch mechanism is designed for use with the jack-handle only. Use of an air wrench or other power tools is not recommended and they can damage the winch.
ŌĆó Do not attempt to raise the vehicle by jacking on locations other than those indicated
in the Jacking Instructions for this vehicle.
ŌĆó Be sure to mount the spare tire with the valve stem facing outward. The vehicle could
be damaged if the spare tire is mounted incorrectly.
WHAT TO DO IN EMERGENCIES
93
Page 96 of 140

WARNING!
ŌĆó Do not attempt to change a tire on the side of the vehicle close to moving traffic. Pullfar enough off the road to avoid the danger of being hit when operating the jack or
changing the wheel.
ŌĆó Being under a jacked-up vehicle is dangerous. The vehicle could slip off the jack and
fall on you. You could be crushed. Never put any part of your body under a vehicle that
is on a jack. If you need to get under a raised vehicle, take it to an authorized service
center where it can be raised on a lift.
ŌĆó Never start or run the engine while the vehicle is on a jack.
ŌĆó The jack is designed to be used as a tool for changing tires only. The jack should not
be used to lift the vehicle for service purposes. The vehicle should be jacked on a firm
level surface only. Avoid ice or slippery areas.
ŌĆó Carefully follow these tire changing warnings to help prevent personal injury or
damage to your vehicle:
ŌĆó Always park on a firm, level surface as far from the edge of the roadway as possible
before raising the vehicle.
ŌĆó Turn on the Hazard Warning flasher.
ŌĆó Block the wheel diagonally opposite the wheel to be raised.
ŌĆó Set the parking brake firmly and set an automatic transmission in PARK.
ŌĆó Do not let anyone sit in the vehicle when it is on a jack.
ŌĆó Do not get under the vehicle when it is on a jack.
ŌĆó Only use the jack in the positions indicated and for lifting this vehicle during a tire
change.
ŌĆó If working on or near a roadway, be extremely careful of motor traffic.
ŌĆó To assure that spare tires, flat or inflated, are securely stowed, spares must be
stowed with the valve stem facing the ground.
ŌĆó Raising the vehicle higher than necessary can make the vehicle less stable. It could
slip off the jack and hurt someone near it. Raise the vehicle only enough to remove
the tire.
ŌĆó To avoid possible personal injury, handle the wheel covers with care to avoid contact
with any sharp edges.
ŌĆó
To avoid the risk of forcing the vehicle off the jack, do not tighten the wheel nuts fully
until the vehicle has been lowered. Failure to follow this warning may result in personal
injury.
ŌĆó A loose tire or jack, thrown forward in a collision or hard stop could endanger the
occupants of the vehicle. Always stow the jack parts and the spare tire in the places
provided. Have the deflated (flat) tire repaired or replaced immediately.
WHAT TO DO IN EMERGENCIES
94
 1
1 2
2 3
3 4
4 5
5 6
6 7
7 8
8 9
9 10
10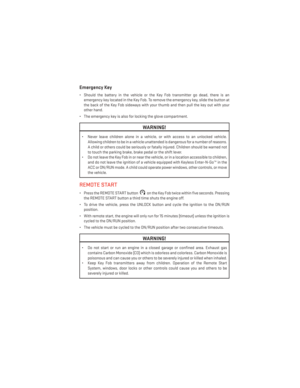 11
11 12
12 13
13 14
14 15
15 16
16 17
17 18
18 19
19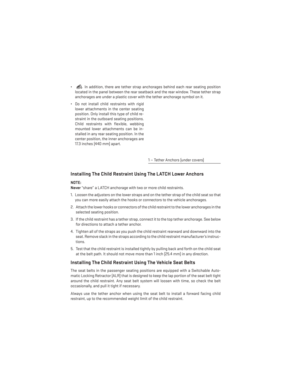 20
20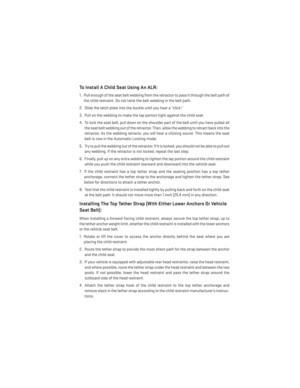 21
21 22
22 23
23 24
24 25
25 26
26 27
27 28
28 29
29 30
30 31
31 32
32 33
33 34
34 35
35 36
36 37
37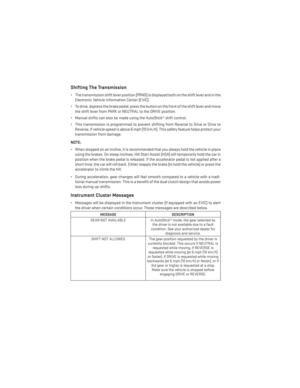 38
38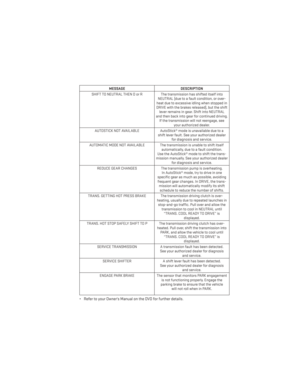 39
39 40
40 41
41 42
42 43
43 44
44 45
45 46
46 47
47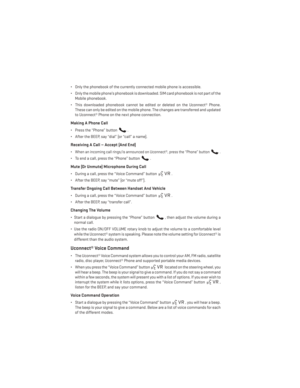 48
48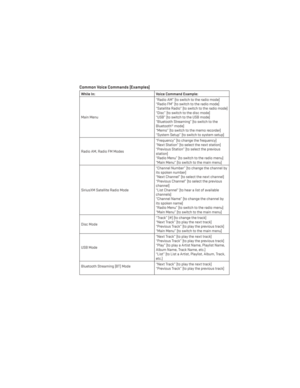 49
49 50
50 51
51 52
52 53
53 54
54 55
55 56
56 57
57 58
58 59
59 60
60 61
61 62
62 63
63 64
64 65
65 66
66 67
67 68
68 69
69 70
70 71
71 72
72 73
73 74
74 75
75 76
76 77
77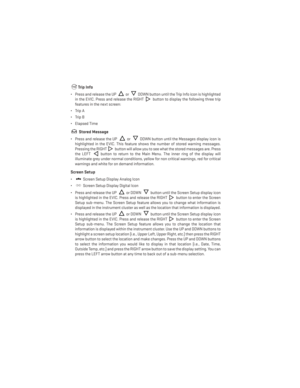 78
78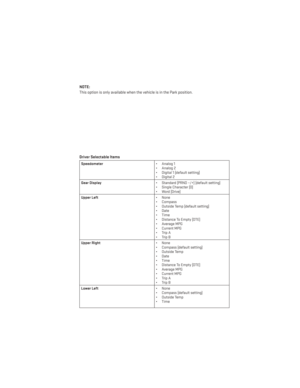 79
79 80
80 81
81 82
82 83
83 84
84 85
85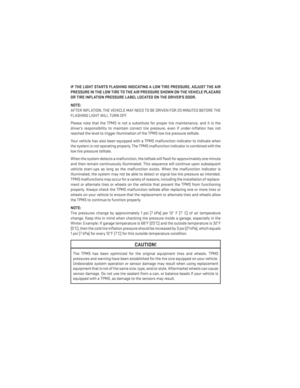 86
86 87
87 88
88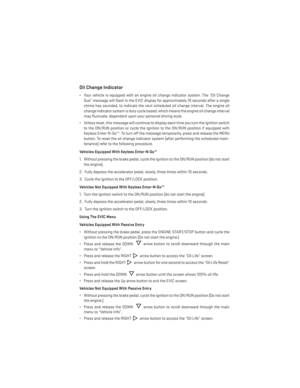 89
89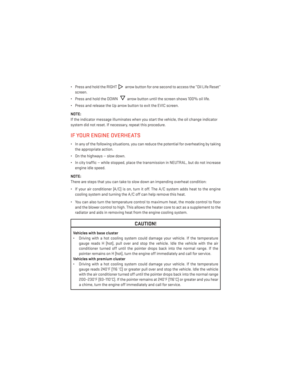 90
90 91
91 92
92 93
93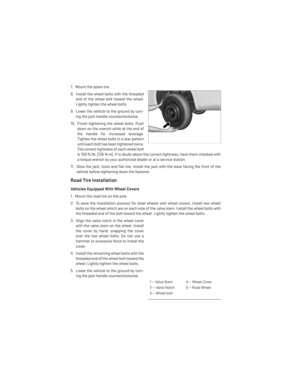 94
94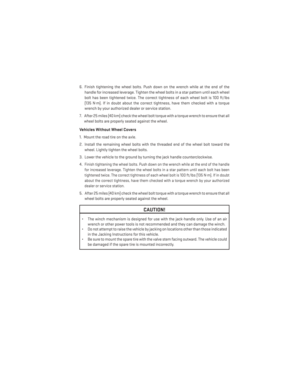 95
95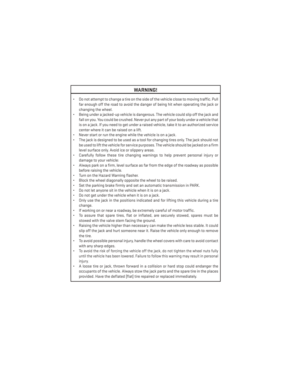 96
96 97
97 98
98 99
99 100
100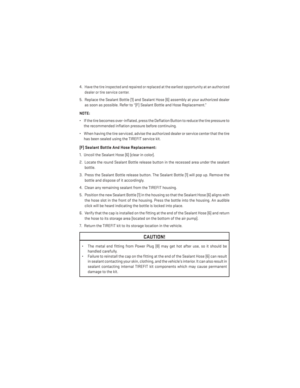 101
101 102
102 103
103 104
104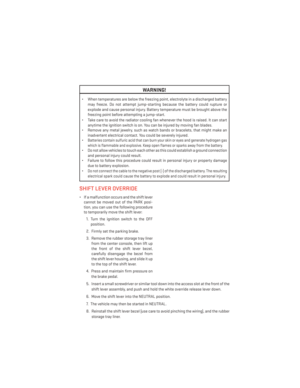 105
105 106
106 107
107 108
108 109
109 110
110 111
111 112
112 113
113 114
114 115
115 116
116 117
117 118
118 119
119 120
120 121
121 122
122 123
123 124
124 125
125 126
126 127
127 128
128 129
129 130
130 131
131 132
132 133
133 134
134 135
135 136
136 137
137 138
138 139
139 or steam from your
radiator. If you see or hear steam coming from under the hood, do not open the hood until
the radiator")

