2014 CITROEN RELAY Handbook (in English)
-
 1
1 -
 2
2 -
 3
3 -
 4
4 -
 5
5 -
 6
6 -
 7
7 -
 8
8 -
 9
9 -
 10
10 -
 11
11 -
 12
12 -
 13
13 -
 14
14 -
 15
15 -
 16
16 -
 17
17 -
 18
18 -
 19
19 -
 20
20 -
 21
21 -
 22
22 -
 23
23 -
 24
24 -
 25
25 -
 26
26 -
 27
27 -
 28
28 -
 29
29 -
 30
30 -
 31
31 -
 32
32 -
 33
33 -
 34
34 -
 35
35 -
 36
36 -
 37
37 -
 38
38 -
 39
39 -
 40
40 -
 41
41 -
 42
42 -
 43
43 -
 44
44 -
 45
45 -
 46
46 -
 47
47 -
 48
48 -
 49
49 -
 50
50 -
 51
51 -
 52
52 -
 53
53 -
 54
54 -
 55
55 -
 56
56 -
 57
57 -
 58
58 -
 59
59 -
 60
60 -
 61
61 -
 62
62 -
 63
63 -
 64
64 -
 65
65 -
 66
66 -
 67
67 -
 68
68 -
 69
69 -
 70
70 -
 71
71 -
 72
72 -
 73
73 -
 74
74 -
 75
75 -
 76
76 -
 77
77 -
 78
78 -
 79
79 -
 80
80 -
 81
81 -
 82
82 -
 83
83 -
 84
84 -
 85
85 -
 86
86 -
 87
87 -
 88
88 -
 89
89 -
 90
90 -
 91
91 -
 92
92 -
 93
93 -
 94
94 -
 95
95 -
 96
96 -
 97
97 -
 98
98 -
 99
99 -
 100
100 -
 101
101 -
 102
102 -
 103
103 -
 104
104 -
 105
105 -
 106
106 -
 107
107 -
 108
108 -
 109
109 -
 110
110 -
 111
111 -
 112
112 -
 113
113 -
 114
114 -
 115
115 -
 116
116 -
 117
117 -
 118
118 -
 119
119 -
 120
120 -
 121
121 -
 122
122 -
 123
123 -
 124
124 -
 125
125 -
 126
126 -
 127
127 -
 128
128 -
 129
129 -
 130
130 -
 131
131 -
 132
132 -
 133
133 -
 134
134 -
 135
135 -
 136
136 -
 137
137 -
 138
138 -
 139
139 -
 140
140 -
 141
141 -
 142
142 -
 143
143 -
 144
144 -
 145
145 -
 146
146 -
 147
147 -
 148
148 -
 149
149 -
 150
150 -
 151
151 -
 152
152 -
 153
153 -
 154
154 -
 155
155 -
 156
156 -
 157
157 -
 158
158 -
 159
159 -
 160
160 -
 161
161 -
 162
162 -
 163
163 -
 164
164 -
 165
165 -
 166
166 -
 167
167 -
 168
168 -
 169
169 -
 170
170 -
 171
171 -
 172
172 -
 173
173 -
 174
174 -
 175
175 -
 176
176 -
 177
177 -
 178
178 -
 179
179 -
 180
180 -
 181
181 -
 182
182 -
 183
183 -
 184
184 -
 185
185
 63
3
EASE OF USE
and
COMFOR
T
Ventilation
Setting the time of the internal clock
Set the clock on the control panel before
programming the deferred switching on of
the heating.
Immediate sw")

Ventilation
Cancelling the programming
Press this button briefly to clear
the programmed start time.
The screen illumination and the
pre-selection number (e.g. 1) are
switched off.")
 65
3
EASE OF USE
and
COMFOR
T
Seats
DRIVERS SEAT SEATS
Head restraint
Press the tab to adjust the height of the
head restraint.
To remove the head restraint, press the tabs
and raise the hea")

Seats
Lumbar support
Turn the control.
Seat cushion height adjustment
Lift the handle 1
to raise
or lower the front of the seat.
Lift the handle 2
to raise
or lower th")
 67
3
EASE OF USE
and
COMFOR
T
Seats
2-SEAT FRONT BENCH
This is fitted with two seat belts.
Grab handle
This is located above the centre passenger.
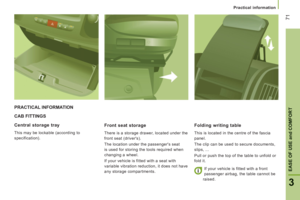
Writing table
The back of the centre sea")
 68
Seats
REAR SEATS
Seat back an
gle
Turn the control to adjust the
angle of the seat back.
Access to the rear seats
To gain access to row 3, manoeuvre the
control on the out")
 69
3
EASE OF USE
and
COMFOR
T
Seats
REAR BENCH SEATS
Removing the bench seat
At least two people are required to
remove the bench seat.
Fold the seat back onto the cushion as
described abo")
 70
Seats
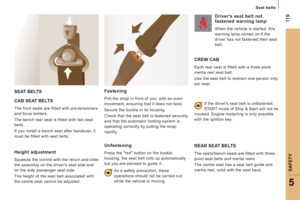
CREW CAB
Consisting of an ergonomic 4-seat bench
and a high-strength partition, it offers
comfort and safety.
Each seat of the bench is fitted with an
inertia reel seat belt")