2014 CITROEN RELAY Handbook (in English)
-
 1
1 -
 2
2 -
 3
3 -
 4
4 -
 5
5 -
 6
6 -
 7
7 -
 8
8 -
 9
9 -
 10
10 -
 11
11 -
 12
12 -
 13
13 -
 14
14 -
 15
15 -
 16
16 -
 17
17 -
 18
18 -
 19
19 -
 20
20 -
 21
21 -
 22
22 -
 23
23 -
 24
24 -
 25
25 -
 26
26 -
 27
27 -
 28
28 -
 29
29 -
 30
30 -
 31
31 -
 32
32 -
 33
33 -
 34
34 -
 35
35 -
 36
36 -
 37
37 -
 38
38 -
 39
39 -
 40
40 -
 41
41 -
 42
42 -
 43
43 -
 44
44 -
 45
45 -
 46
46 -
 47
47 -
 48
48 -
 49
49 -
 50
50 -
 51
51 -
 52
52 -
 53
53 -
 54
54 -
 55
55 -
 56
56 -
 57
57 -
 58
58 -
 59
59 -
 60
60 -
 61
61 -
 62
62 -
 63
63 -
 64
64 -
 65
65 -
 66
66 -
 67
67 -
 68
68 -
 69
69 -
 70
70 -
 71
71 -
 72
72 -
 73
73 -
 74
74 -
 75
75 -
 76
76 -
 77
77 -
 78
78 -
 79
79 -
 80
80 -
 81
81 -
 82
82 -
 83
83 -
 84
84 -
 85
85 -
 86
86 -
 87
87 -
 88
88 -
 89
89 -
 90
90 -
 91
91 -
 92
92 -
 93
93 -
 94
94 -
 95
95 -
 96
96 -
 97
97 -
 98
98 -
 99
99 -
 100
100 -
 101
101 -
 102
102 -
 103
103 -
 104
104 -
 105
105 -
 106
106 -
 107
107 -
 108
108 -
 109
109 -
 110
110 -
 111
111 -
 112
112 -
 113
113 -
 114
114 -
 115
115 -
 116
116 -
 117
117 -
 118
118 -
 119
119 -
 120
120 -
 121
121 -
 122
122 -
 123
123 -
 124
124 -
 125
125 -
 126
126 -
 127
127 -
 128
128 -
 129
129 -
 130
130 -
 131
131 -
 132
132 -
 133
133 -
 134
134 -
 135
135 -
 136
136 -
 137
137 -
 138
138 -
 139
139 -
 140
140 -
 141
141 -
 142
142 -
 143
143 -
 144
144 -
 145
145 -
 146
146 -
 147
147 -
 148
148 -
 149
149 -
 150
150 -
 151
151 -
 152
152 -
 153
153 -
 154
154 -
 155
155 -
 156
156 -
 157
157 -
 158
158 -
 159
159 -
 160
160 -
 161
161 -
 162
162 -
 163
163 -
 164
164 -
 165
165 -
 166
166 -
 167
167 -
 168
168 -
 169
169 -
 170
170 -
 171
171 -
 172
172 -
 173
173 -
 174
174 -
 175
175 -
 176
176 -
 177
177 -
 178
178 -
 179
179 -
 180
180 -
 181
181 -
 182
182 -
 183
183 -
 184
184 -
 185
185
 47
3
EASE OF USE
and
COMFOR
T
Steering mounted controls
LIGHTING CONTROL STALK
Selection is by rotation of the white mark on
the ring.
Direction indicators(green flashing)
Left: do")
 48
Steering mounted controls
AUTOMATIC ILLUMINATION OF HEADLAMPS
Activation
Turn the ring to this position.
The lamps are switched off
automatically when the ignition is
switched")
 49
3
EASE OF USE
and
COMFOR
T
Steering mounted controls
HEADLAMP BEAM
You are advised to adjust the height of the
headlamp beams in accordance with the
load in your vehicle.
This funct")
 50
Steering mounted controls
WIPER STALK
Slow continuous wiping: 2 notches downwards. Do not cover the rain sensor, located at
the top centre of the windscreen.
When washing the ve")
 51
3
EASE OF USE
and
COMFOR
T
Steering mounted controls
CRUISE CONTROL
\"This is the speed at which the driver wishes to
travel\".
This aid to driving in free-fl owing traffi c conditi")
 52
Steering mounted controls
Selecting the function - ON
When the selection is set
to ON
, this switches the
function on.
If your vehicle is fi tted with
this screen, a messag")
 53
3
EASE OF USE
and
COMFOR
T
Steering mounted controls
Good practice
When changing the programmed reference
speed by pressing and holding the control,
take care as the speed may incre")
 54
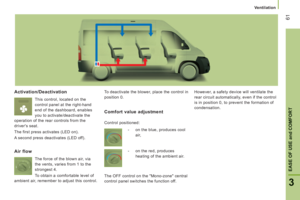
Ventilation
VENTILATION
DEMISTING AND DEFROSTING
Manual mode
Direct the control to this air
distribution setting.
For faster and more effective
demisting and defrosting of")