2014 CITROEN NEMO DAG Handbook (in English)
-
 1
1 -
 2
2 -
 3
3 -
 4
4 -
 5
5 -
 6
6 -
 7
7 -
 8
8 -
 9
9 -
 10
10 -
 11
11 -
 12
12 -
 13
13 -
 14
14 -
 15
15 -
 16
16 -
 17
17 -
 18
18 -
 19
19 -
 20
20 -
 21
21 -
 22
22 -
 23
23 -
 24
24 -
 25
25 -
 26
26 -
 27
27 -
 28
28 -
 29
29 -
 30
30 -
 31
31 -
 32
32 -
 33
33 -
 34
34 -
 35
35 -
 36
36 -
 37
37 -
 38
38 -
 39
39 -
 40
40 -
 41
41 -
 42
42 -
 43
43 -
 44
44 -
 45
45 -
 46
46 -
 47
47 -
 48
48 -
 49
49 -
 50
50 -
 51
51 -
 52
52 -
 53
53 -
 54
54 -
 55
55 -
 56
56 -
 57
57 -
 58
58 -
 59
59 -
 60
60 -
 61
61 -
 62
62 -
 63
63 -
 64
64 -
 65
65 -
 66
66 -
 67
67 -
 68
68 -
 69
69 -
 70
70 -
 71
71 -
 72
72 -
 73
73 -
 74
74 -
 75
75 -
 76
76 -
 77
77 -
 78
78 -
 79
79 -
 80
80 -
 81
81 -
 82
82 -
 83
83 -
 84
84 -
 85
85 -
 86
86 -
 87
87 -
 88
88 -
 89
89 -
 90
90 -
 91
91 -
 92
92 -
 93
93 -
 94
94 -
 95
95 -
 96
96 -
 97
97 -
 98
98 -
 99
99 -
 100
100 -
 101
101 -
 102
102 -
 103
103 -
 104
104 -
 105
105 -
 106
106 -
 107
107 -
 108
108 -
 109
109 -
 110
110 -
 111
111 -
 112
112 -
 113
113 -
 114
114 -
 115
115 -
 116
116 -
 117
117 -
 118
118 -
 119
119 -
 120
120 -
 121
121 -
 122
122 -
 123
123 -
 124
124 -
 125
125 -
 126
126 -
 127
127 -
 128
128 -
 129
129 -
 130
130 -
 131
131 -
 132
132 -
 133
133 -
 134
134 -
 135
135 -
 136
136 -
 137
137 -
 138
138 -
 139
139 -
 140
140 -
 141
141 -
 142
142 -
 143
143 -
 144
144 -
 145
145 -
 146
146 -
 147
147 -
 148
148 -
 149
149 -
 150
150 -
 151
151 -
 152
152 -
 153
153 -
 154
154 -
 155
155 -
 156
156 -
 157
157 -
 158
158 -
 159
159 -
 160
160 -
 161
161 -
 162
162 -
 163
163 -
 164
164 -
 165
165 -
 166
166 -
 167
167 -
 168
168 -
 169
169 -
 170
170 -
 171
171 -
 172
172 -
 173
173 -
 174
174 -
 175
175 -
 176
176 -
 177
177 -
 178
178 -
 179
179 -
 180
180 -
 181
181 -
 182
182 -
 183
183 -
 184
184 -
 185
185 -
 186
186 -
 187
187 -
 188
188 -
 189
189 -
 190
190 -
 191
191
 159
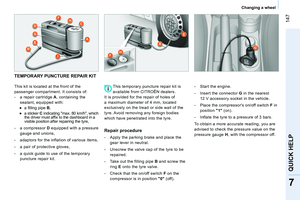
7
QUICK HELP
Changing a fuse
Mark
ing
Rating
Functions
F01
60 A Control unit
F02
40 A Passenger compartment fan.
F03
20 A St")
 160
Changing a fuse
Marking
Rating
Functions
F16
7.5 A Engine management control unit - electronic gearbox control unit and gear lever -
T20 relay coil
F17")
 161
7
QUICK HELP
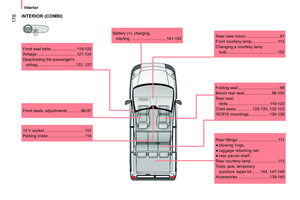
Having your vehicle towed
BEING TOWED
The removable towing eye is located in the
tool kit behind the drivers seat (Light van) or
behind the rear bench seat (Combi")
 162
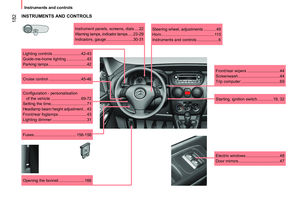
Identifi cation markings
IDENTIFICATION MARKINGS
A. Manufacturers plate
1. VF Type serial number.
2. Gross vehicle weight (GVW).
3. Gross train weight (GTW).")
 163
7
QUICK HELP
Fuel
FILLING WITH FUEL
Capacity of the fuel tank: approximately 45 litres.
Low fuel level
When the minimum fuel tank level
is reached, this warning lamp
co")
 164
Fuel
Resetting
To set off again, restore the fuel supply and
the electrical supply manually:
- with the key in the STOP position, turn
the key to the RUNNING position,")
 165
7
QUICK HELP
Maintenance with TOTAL
TOTAL & CITROËN
Partners in performance and protecting the
environment
Innovation in the search for performance
For over 40 year, the TOTAL Re")
 166
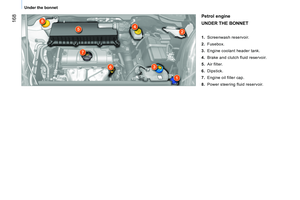
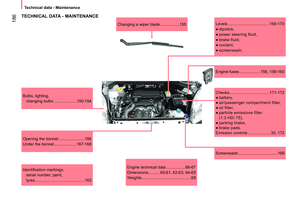
Opening the bonnet
OPENING THE BONNET
On the inside
Pull the release lever below the dashboard
towards you.
On the outside
Raise the bonnet slightly, placing your hand
fl")