Page 137 of 192
135
5
SAFETY
Child safety
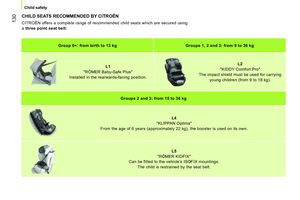
RÖMER BabySafe Plus ISOFIX
(size category E
)
Group 0+: up to 13 kg
It is installed in the rearward facing position using an ISOFIX base which attaches
to the rings A
.
The support leg for the ISOFIX base must be adjusted in height so that it is contact
with the floor of the vehicle.
RÖMER Duo Plus ISOFIX
(size category B1
)
Group 1: from 9 to 18 kg
It is installed in the forward facing position.
It is fitted with an upper strap that is attached to the ISOFIX upper ring,
called the TOP TETHER.
Three angles for the shell: sitting, inclined and lying positions.
This child seat can also be used on seats which are not fitted with ISOFIX mountings.
In this case, it must be attached to the vehicle seat using the three-point seat belt.
Follow the instructions for fitting the child seat given in the seat manufacturer's installation guide.
ISOFIX CHILD SEAT RECOMMENDED BY CITROËN AND APPROVED FOR
YOUR VEHICLE (COMBI)
Page 138 of 192

136
Child safety
LOCATIONS FOR THE INSTALLATION OF ISOFIX CHILD SEATS (COMBI)
In accordance with European regulations, this table indicates the options for the installation of ISOFIX child seats on the vehicle seats fitted
with ISOFIX mountings.
In the case of the universal and semi-universal ISOFIX child seats, the child seat's ISOFIX size category, determined by a letter from A
to G
,
is indicated on the child seat next to the ISOFIX logo.
IUF:
seat suitable for the installation of an I
sofix U
niversal seat, " F
orward facing" and secured using the "Top Tether" upper strap.
IL-SU:
seat suitable for the installation an I
sofix S
emi- U
niversal seat which is:
- "rearward facing" fitted with a "Top Tether" upper strap or a support leg,
- "forward facing" fitted with a support leg,
For securing the "Top Tether" upper strap, refer to the "Isofix Mountings" section.
X:
seat which is not suitable for the installation of an ISOFIX seat of the size category indicated.
Weight of the child / indicative age
Less than 10 kg
(group 0)
Up to 6 months
approx
Less than 10 kg
(group 0)
Less than 13 kg
(group 0+)
Up to 1 year approx
From 9 to 18 kg (group 1)
From 1 to 3 years approx
Type of ISOFIX child seat
Infant car
seat
*
"
rearward
facing"
"
rearward
facing"
"forward facing"
ISOFIX size category
F
G
C
D
E
C
D
A
B
B1
Universal and semi-universal ISOFIX child
seats which can be installed on the outer
rear seats
X
IL-SU
IL-SU
IUF
*
Infant car seats and "car cots" cannot be installed on the front passenger seat.
Page 139 of 192
137
6
ACCESSORIES
Towing a trailer
TOWING A TRAILER, CARAVAN, ETC...
Driving advice
As the fan is electrically controlled, its
cooling capacity is not dependent on the
engine speed.
On the contrary, use a high gear to lower the
engine speed and reduce your speed. In all cases, pay attention to the coolant
temperature. A towed vehicle must free wheel: gearbox in
neutral.
Cooling:
towing a trailer on a slope
increases the coolant temperature.
Page 140 of 192

138
Towing a trailer
In certain cases of particularly arduous
use (towing the maximum load up a steep
slope in high temperatures), the engine
automatically limits its power. In this case,
automatic cutting off of the air conditioning
allows the engine power to be saved.
If the coolant temperature
warning lamp comes on, stop the
vehicle and switch off the engine
as soon as possible.
See the "Levels" section of chapter 7.
Tyres:
check the tyre pressures of the
towing vehicle (see the "Identification
markings" section of chapter 7) and of
the trailer, observing the recommended
pressures.
Brakes:
towing increases the braking
distance. Drive at a moderate speed,
change down early and brake gradually.
Side wind:
sensitivity to side wind is
increased. Drive smoothly and at a
moderate speed.
ABS:
the system only controls the vehicle,
not the trailer.
Rear parking sensors:
the sensors
will be deactivated automatically
when an genuine CITROËN towbar is used
(see the "Rear parking sensors" section of
chapter 3).
Towbar
We recommend the use of genuine
CITROËN towbars and their harnesses,
which have been tested and approved from
the design stage of your vehicle, and that
the fitting of this equipment is entrusted to a
CITROËN dealer or a qualified workshop.
If this equipment is not fitted by a CITROËN
dealer, it is essential that it is fitted using
the electrical pre-equipment located at
the rear of the vehicle and following the
manufacturer's instructions.
The operation of the rear parking sensors is
deactivated automatically when the trailer
cable connector is inserted in the towbar
socket.
When the trailer cable is removed, the rear
parking sensors are re-activated.
Distribution of loads
Distribute the load in the trailer so that the
heaviest objects are as close as possible
to the axle and the nose weight is close to
the maximum authorised without, however,
exceeding it. The air density decreases with
altitude, so reducing the performance of
the engine. The maximum towed load must
be reduced by 10 % for each 1 000 metres
of altitude. Refer to the "Technical data"
chapter for details of the weights and
towed loads applicable to your vehicle
and also to the administrative documents
(V5 registration document, ...).
Page 141 of 192

139
6
ACCESSORIES
Equipment
ROOF RACK AND ROOF BARS
To install the transverse roof bars or a
roof rack, use the fixings provided for this
purpose.
Maximum load: 75 kg.
OTHER ACCESSORIES
A wide range of accessories and genuine
parts is offered by the CITROËN network.
These accessories and parts have been
tested and approved both for reliability and
for safety.
They all benefit from CITROËN's
recommendation and warranty.
Never exceed the gross vehicle weight
(GVW).
Range of professional equipment
The replacement parts department publishes
an accessory catalogue offering various
equipment and fittings, such as:
- wooden protective floor, non-slip wooden
floors, wooden side protectors, glass
protection grilles,
- roof rack, set of transverse roof bars,
loading roller,
- towbars, towbar harnesses with
7/13 sockets, 7/7 sockets, 13 socket...
The fitting of electrical equipment or
accessories not listed by CITROËN
may result in the failure of your vehicle's
electronic system or high consumption.
Please note this specific warning. You
are advised to contact a representative
of CITROËN to be shown the range of
recommended equipment and accessories.
Depending on the country in which the
vehicle is sold or operated, it may be
compulsory to have a high visibility vest,
warning triangle, replacement bulbs and
fuses available in the vehicle.
Before installing accessory radio
communication transmitters with
external aerial on your vehicle, you can
contact a CITROËN dealer, who will provide
the specification (frequency band, maximum
output power, aerial position, specific
installation conditions) of the transmitters
which can be fitted, in accordance with the
Motor Vehicle Electromagnetic Compatibility
Directive (2004/104/EC). When fitting a towbar and harness
outside the CITROËN dealer
network, the installation must be done
using the electrical pre-equipment on the
vehicle and following the manufacture's
recommendations.
Page 142 of 192

140
Equipment
Range of accessories for private vehicles
Another range is also available from
CITROËN dealers.
"Comfort":
insulated module, coat hanger fixed to a
head restraint, reading lamp, rear parking
sensors...
"Transport solutions":
boot liner, rear door net, set of transverse
and longitudinal roof bars, roof boxes...
"Style":
embellishers, secure wheel embellishers...
"Security and safety":
anti-intrusion alarm, window etching,
breathalyzer, first aid kit, high visibility vest,
warning triangle, child seats and booster
cushions, snow chains...
"Protection":
rubber mats, over-carpets, 3D mats, seat
covers compatible with lateral airbags, sets
of front and rear mudflaps...
"Multimedia":
audio systems, hands-free kit, speakers,
portable satellite navigation systems, speed
camera detectors, Wi-Fi on board...
By going to a CITROËN dealer, you can also
obtain cleaning and maintenance products
(interior and exterior) - including ecological
products from the "TECHNATURE" range -
products for topping up (screenwash...),
touch-up pens and paint aerosols for the
exact colour of your vehicle, recharges
(cartridge for the temporary puncture repair
kit...), ...
To avoid any risk of jamming of the pedals:
- ensure that the mat is positioned and
secured correctly,
- never fit one mat on top of another.
Page 143 of 192

141
7
QUICK HELP
Battery
BATTERY
Models without Stop & Start
A.
Positive battery terminal on your vehicle.
B.
Slave battery.
C.
Earth point on your vehicle.
D.
Negative battery terminal on your vehicle.
Charging the battery using a battery charger
Starting using another battery
- Connect the red cable to the positive
battery terminal A
on your vehicle then
to the positive (+) terminal of the slave
battery B
.
- Connect one end of the green or black
cable to the negative (-) terminal of the
slave battery B
.
- Connect the other end of the green
or black cable to the earth point C
on
your vehicle (not to the negative battery
terminal D
on your vehicle).
- Operate the starter, let the engine run.
- Wait for the engine to return to idle, then
disconnect the cables.
Never charge a battery without first
disconnecting the terminals.
- Disconnect the two quick-release battery terminals.
-
Follow the instructions for use provided by the
battery charger manufacturer.
-
Check that the battery posts and terminals are
clean. If they are covered with sulphate (white
or greenish deposit), disconnect them and clean
them.
-
Reconnect the two quick-release terminals,
starting with the negative (-) terminal.
Some functions are not available if
the battery is not sufficiently charged.
Page 144 of 192

142
Battery
Models with Stop & Start
A.
Protective cover.
B.
Positive battery terminal on your vehicle.
C.
Slave battery.
D.
Earth point on your vehicle.
E.
Connector release button.
F.
Check sensor connector.
G.
State of charge sensor.
H.
Negative battery terminal on your vehicle.
Charging the battery using a battery charger
- Follow the instructions for use provided
by the battery charger manufacturer.
- Check that the battery posts and
terminals are clean. If they are covered
with sulphate (white or greenish deposit),
disconnect them and clean them.
- Reconnect connector F
of the check
sensor G
.
- Refit the protective cover A
to the
positive battery terminal B
.
Starting using another battery
- Remove the protective cover A
from the
positive battery terminal B
.
- Connect the red cable to positive battery
terminal B
, then to the (+) terminal of the
slave battery C
.
- Connect one end of the green or black
cable to the (-) terminal of the slave
battery C
.
- Connect the other end of the green or
black cable to the earth point D
of your
vehicle (not to the negative battery
terminal H
of your vehicle).
- Operate the starter, let the engine run.
- Wait for the engine to return to idle, then
disconnect the cables.
- Refit the protective cover A
to the
positive battery terminal B
.
Do not disconnect the battery to charge it.
- Press the release button E
to disconnect
the connector F
.
- Disconnect the connector F
from the
check sensor G
.
- Remove the protective cover A
from the
positive battery terminal B
.
- Connect the charger cables: (+) to the
positive battery terminal B
; (-) to the
negative battery terminal H
. Never remove the check sensor G
from the negative battery terminal H
,
except when replacing the battery.