2014 AUDI TT ROADSTER warning
[x] Cancel search: warningPage 46 of 244

44 Convertible top
Convenience opening
.,. Press the unlock but ton m on the remote
control key to unlock the vehicle.
.,. Turn the key in the driver door
once to posi
tion @~
fig. 43.
.,. Within two seconds turn the key a second
t ime and hold it in t his position until the
power top has completely retracted.
Convenience clos ing
.,. Turn the key in the dr iver door once to posi
tion @
~fig. 43.
.,. Within two seconds turn the key a second
time and hold it in this position until the
power top has completely closed .
Opening or clos ing motion stops
immediately
as soon as you re lease the key. For safety rea
sons, it is not possible to activate the
conven
ience feature with the remote control.
A WARNING
When opening and closing the powe r top
make sure to keep yourself a nd others
clear of all moving parts. Risk of injury!
Wind Deflector
The wind deflector reduces turbulence in the
passenger compartment and makes driving
more comfortable.
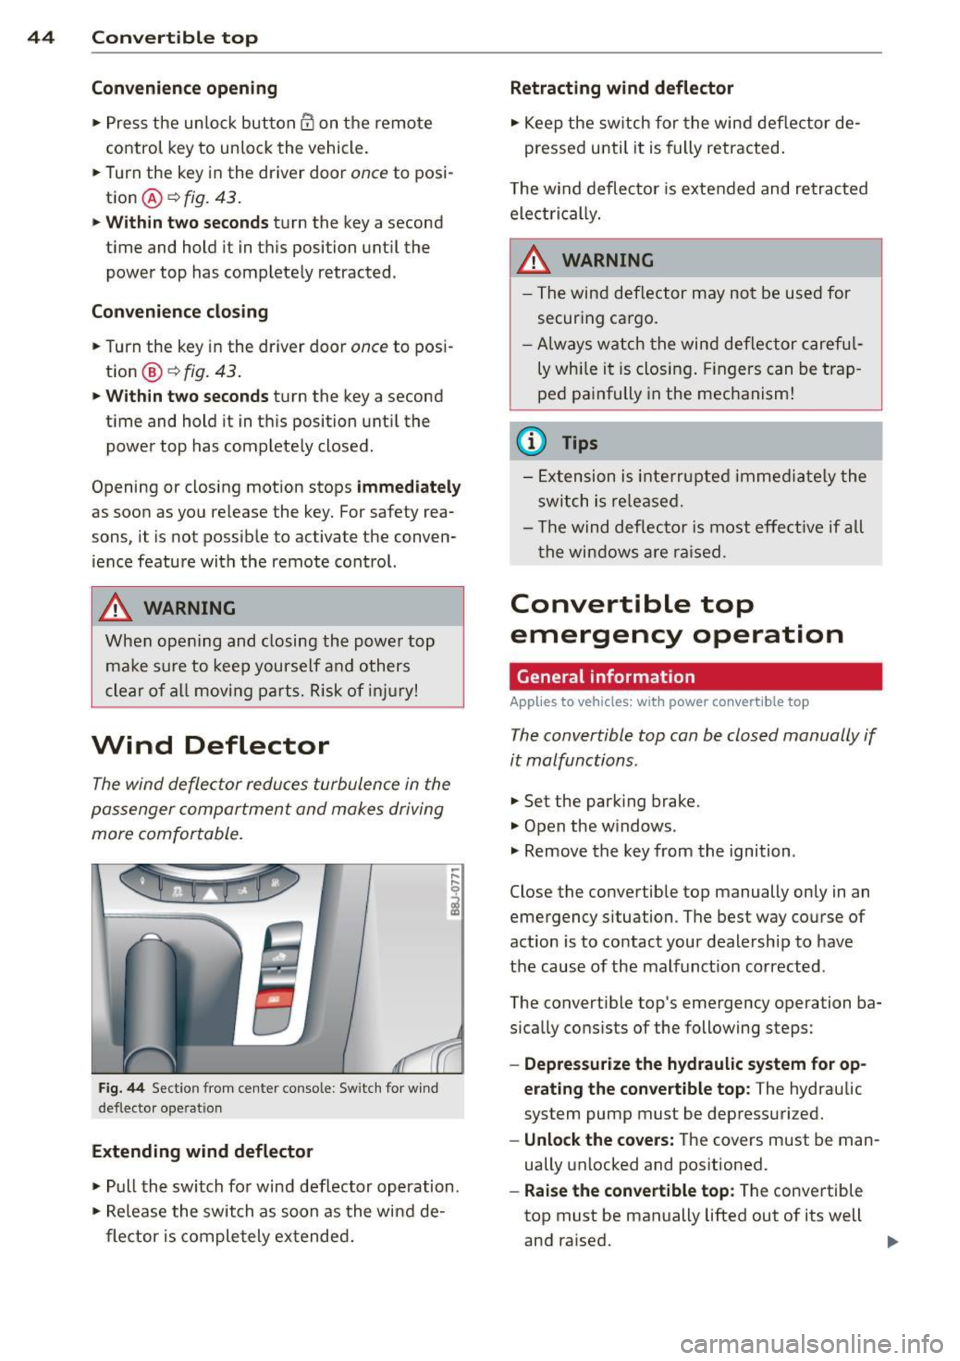
F ig. 44 Section from center console: Sw itch for w ind
deflecto r operation
Extending wind deflector
.. ,... ,... 0
i
.,. Pull the switch for wind deflector operation.
.,. Re lease the switch as soon as the wind de-
flector is completely extended.
Retracting wind deflector
.,. Keep the switch for the wind deflector de
pressed unti l it is fully retracted .
T he w ind deflector is extended and retracted
electrical ly .
A WARNING
- The wind deflector may not be used for
secur ing ca rgo.
-Al ways watch the wind deflector careful
ly while it is closing. Fingers can be trap
ped painfully in the mechanism!
(D Tips
-Extension is interrupted immediately the
switch is released.
- Th e wind deflector is most effective if all
th e windows are raised.
Convertible top
emergency operation
General information
Applies to vehicles: with power convertible top
-
The convertible top con be closed manually if
it malfunctions.
.,. Set the park ing brake.
.,. Open the w indows.
.,. Remove the key from the ignition .
Close the convertible top manually only in an
emergency situation. The best way course of
action is to contact your dealership to have
the cause of the malfunct ion corrected.
The convert ible top's emergency operation ba
s ically consists of the following steps:
- Oepressurize the hydraulic system for op
erating the convertible top :
The hydraulic
system pump must be depressurized.
- Unlock the covers: The covers must be man
ually unlocked and positioned .
-Raise the convertible top: The convertible
top must be manually lifted out of its well
and ra ised. ..,.
Page 47 of 244

-Lock the convertible top: The latches for
the convertible top must be locked with the
emergency lock key.
-Close the hydraulic system's emergency
operation bolt:
T urn the emergency opera
tion bolt¢
page 45, fig. 46 to the right to
close the hydraulic system that operates the
convertible top.
&_ WARNING
- When raising the convert ible top, take
ca re not to reach into the linkage that
operates the convertible top or any of its
other moving parts. Otherwise, your
hands may be trapped in the mechanism
- risk of injury!
- Never drive while the convertible top is
not properly secu red. Otherwise, it may
be pulled open by the wind. This can
cause injuries and damage to the vehicle
- danger of an accident!
@ Tips
Get a second person help you to close the
convertible top. It is much easier to raise
the convertib le top with the help of a sec
ond person.
Step 1: Depressurizing the hydraulic
system
Applies to vehicles: with power convertible top
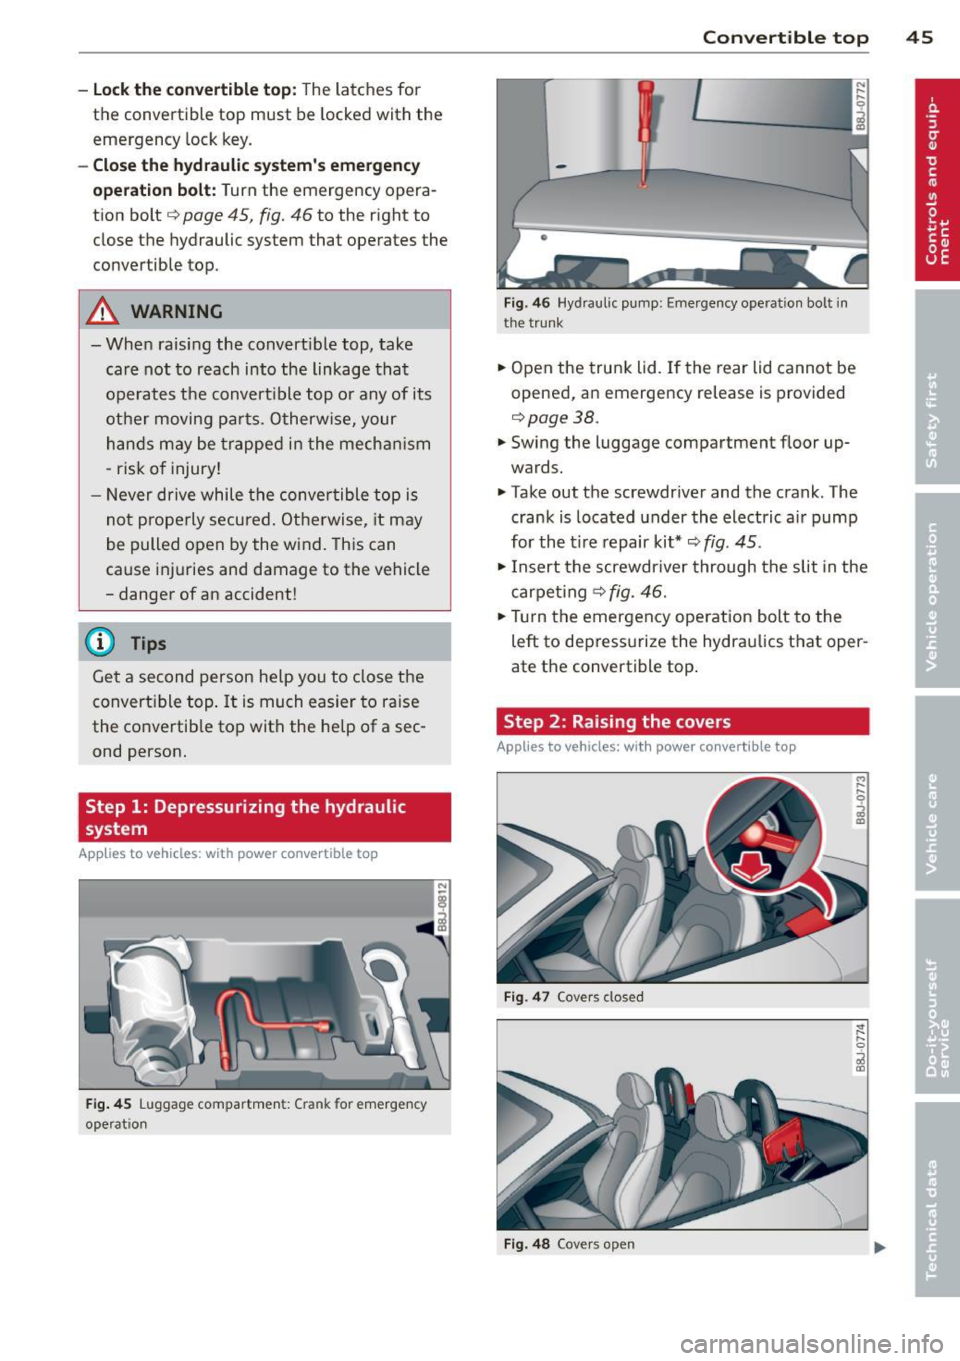
Fig . 45 Luggage compartment: Crank for emerg ency
operation
-
Convertible top 45
-
Fig . 46 Hy draul ic pump: Emergency operation bolt i n
the tr unk
.,. Open the trunk lid. If the rear lid cannot be
opened, an emergency release is provided
r=>page38.
.,. Swing the luggage compartment floor up
wards .
.,. Take out the screwdr iver and the crank. The
crank is located under the electric air pump
for the t ire repair kit*¢
fig. 45.
.,. Insert the screwdr iver through the slit in the
carpeting ¢
fig. 46.
.,. Tur n the emergency operation bolt to the
left to depressurize the hydraulics that oper
ate the convertible top .
Step 2: Raising the covers
Applies to vehicles: with power convertible top
Fig. 47 Cove rs close d
Fig . 48 Covers open
Page 48 of 244

46 Convertible top
• Disconnect the connecting rod from the
hitch ball¢
fig . 47.
• Fold the covers on the dr iver and passenger
s ides up and clip the connecting rods into
the space provided ¢
fig. 48.
Step 3: Closing the convertible top
Applies to vehicles: with power convertible top
The convertible top must be raised by hand.
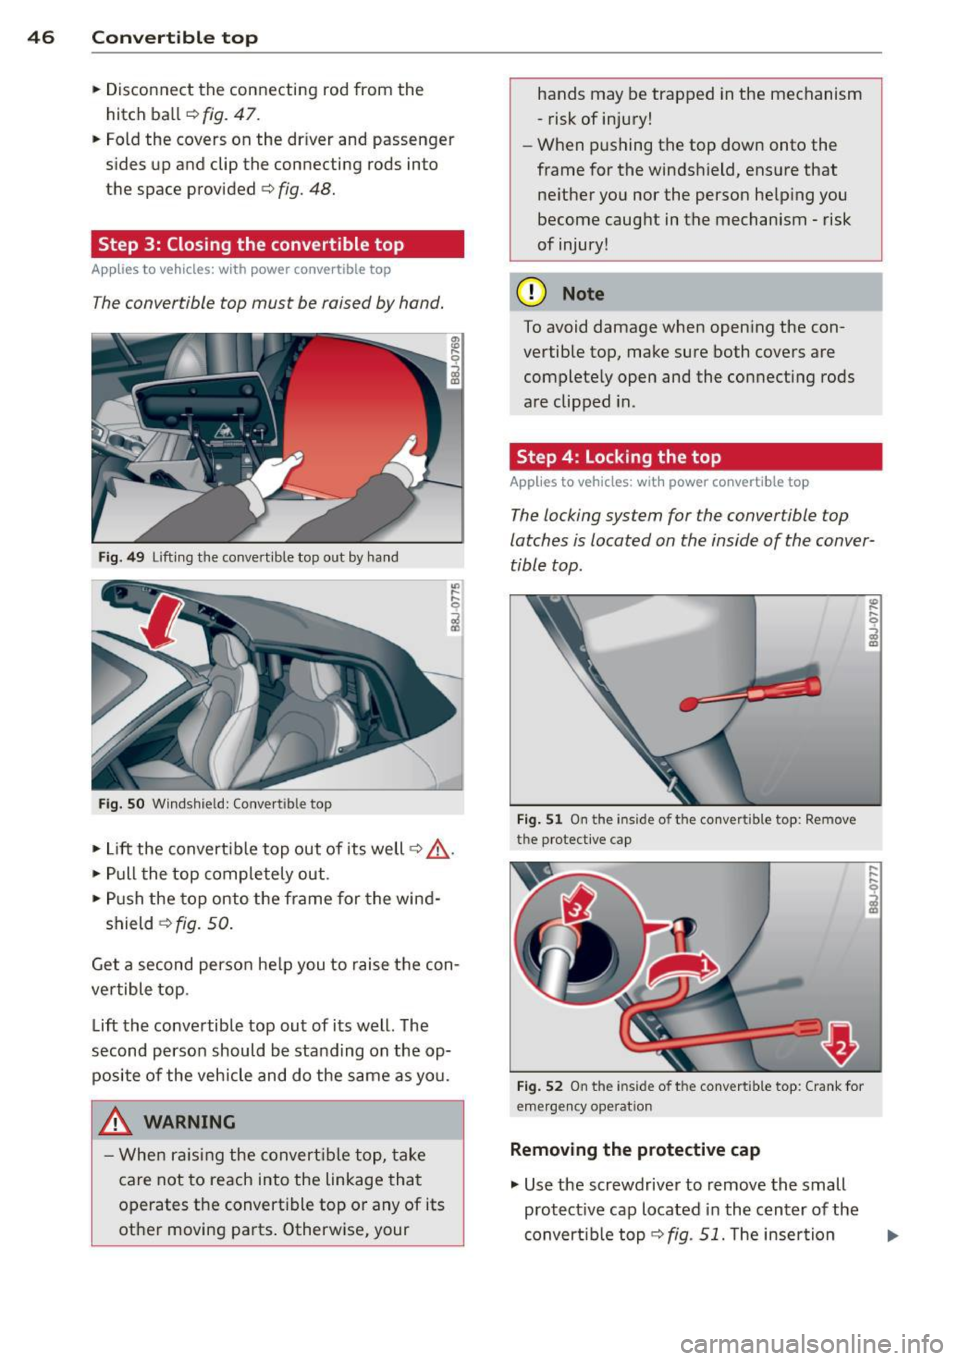
Fig. 49 Lift in g th e conve rtible top out by hand
Fig. SO Windsh ie ld: Conver tible top
• Lift the convertible top out of its well¢,& .
• Pull the top completely out.
• Push the top onto the frame for the wind-
shield ¢
fig. 50.
Get a second perso n he lp you to raise the con
ve rtible top .
Lift the convertible top out of its well. The
second person should be standing on the op posite of the veh icle and do the same as you.
A WARNING
-When raisi ng the convertible top, take
care not to reach into the linkage that
operates the convert ible top or any of its
other moving pa rts. Otherwise, your hands may
be trapped in the mechanism
- risk of injury!
- When pushing the top down onto the
frame for the windshield, ens ure that
ne ither you nor the person help ing you
become caught in the mechanism -risk
of injury!
(D Note
To avoid damage when opening the con
vertible top, make sure both covers are
complete ly open and the connecting rods
are clipped in.
Step 4: Locking the top
Applies to vehicles: with power convertible top
The locking system for the convertible top
latches is located on the inside of the conver
tible top .
Fig. 51 On the inside of t he co nvertible top: Re move
the protective cap
Fig. 52 On the inside of t he co nvert ible top: Crank for
emerge ncy operat ion
Removing the protective cap
"' Use the screwdriver to remove the small
protect ive cap located i n the center of the
convert ible top ¢
fig. 51. Th e inser tion
Page 51 of 244

light sensor checked as soon as possible at a
dealership.
Adaptive light *
The benefit of adaptive l ight is that the curve
and the edge of the road are better i llum inat
ed . The adaptive light is contro lled automati
cally, depending on vehicle speed and steering
wheel angle.
When driving a round bends, the head lights
are contro lled according to steering wheel an
g le . So that there is no black area ahead of the
ve hic le, the two main beams pivot at different
angles. The system works above a speed of
about 6 mph (10 km/h).
Com ing home /le avi ng home function *
The function is swit ched on when the switch is
in the AUTO* position and the function is
shown as active in the driver information sys
tem.
The
coming hom e function illuminates the
area around the vehicle when the ign ition is
switched off and the driver's door is ope ned.
The length of time the lights remain on can be
set in the menu display
( Illumination > Exte
rior lights > coming home ).
The leavi ng home function i lluminates the
area around the vehicle when unlocking it.
A WARNING
- Never use dayt ime running l ights to see
where you are going. They are not bright
enough and w ill not let you see far
enough ahead for safety, especially at
dusk or when it is dar k. Always switch on
the low beams at dusk or when i t is dar k.
- Automatic headlights a re only intended
to assist the dr iver. They do not re lieve
t he driver of his responsibi lity to check
t he headlights and to turn them on man
ually according to the current light and
visibility conditions. For example, fog
and rain cannot be detected by the light
sensors. So a lways switch on the head
lights under these weather cond itions
and when driving in the dark
jO .
Clear vis ion 49
- Crashes can happen when you cannot see
the road ahead and when you cannot be
seen by other motorists.
- Always turn on the headlights so that
youcanseeahe adandsothatothe ~
can see your car from the back .
- Please observe legal regulat ions w hen
using the ligh ting systems des cribed.
(D Tips
- T he light sensor for head light control is
located in the rear view mirror mount.
Do not apply any stickers to t he wind
shield in th is area to preven t malfunc
tions or fa ilures.
- Some exter io r l ighting funct ions can be
adjusted in t he driver i nformat ion sys
t em
~page 24.
- I f you remove the igni tion from t he igni
t ion lock while the headligh ts are s till
on, a buzzer wi ll sound as long as the
driver's door is o pen to remind yo u to
t u rn off the lights.
- Always observe the specific local regula
tions for your area as to when to use your
lights.
- With automatic headlights, the high
beam f unction is also available, but w ith
one restrict ion: If you have not sw itched
the high beams back to low beams dur
ing automatic headlight operation (for
example, after d riving throug h a tunnel),
only the low beams come on the next
t ime au tomati c headlights a re swi tched
on. To use the high beams , you firs t have
t o pull the hig h beam lever back and
then push the lever fo rward again .
- In coo l or damp weather, the inside of
the headlights, turn signals an d tail
lights can fog over due to the tempera
t u re difference between the inside and
outside. They w ill clear shortly after
switching them on. This does not affect
the se rv ice life of the lighting.
Page 52 of 244

50 Clear vis ion
Front fog lights
F ig. 55 Fog light act ivation: light switch pos itio n on
veh icles WITHOUT sensor light
Switching on the front fog lights iO
.,. Do no t turn the light switch ·'t/- · ¢ fig. 55 to-
ward the fog light symbol
}D.
.,. Turn the light switch to :o o: or to io .
.,. Pull the ligh t switch to the first stop @.
When the front fog lights are on, the symbol
}D next to the light switch will i llum ina te.
@ Tips
With the switch in AUTO front fog lights
cannot be turned on in addit ion.
Turn signals and high beam lever
The lever on the left side of the steering col
umn is used to operate the turn signals and
the high beam as well as the headlight flash
er .
Fig. 56 Tu rn signa l and hig h beam lever
The turn signal and high beam lever has the
following functions:
Turn signals ¢ Q ©@
.,. Push the lever up as fa r as it ca n go to t urn
on the right turn s ignal or down to tu rn on
the left turn signal ¢
fig. 56 .
.,. Move the lever briefly unti l you meet res ist
ance and release it to flash three times .
.,. Move the lever (up or down) until you meet
resistance and hold it there to determine
the flashing time for the turn signals .
High be am gD @
.,. Push the lever forward to switch on the high
beam.
.,. Pull the lever back towards you to switch off
the high beam.
Headlight fla sh er gD @
.,. Pull the lever toward the steering whee l to
use the headlight flasher.
Not es on thes e features
- The turn signals on ly work wi th the ignition
sw itched on. The indicator lights
F-1 or rl in
the instrument cluster¢
page 12 also blink.
- After you have turned a co rner, the turn s ig-
na l switches off automa tically .
- The
high beam works on ly w hen the he ad
lights a re on . The indicator light
II in t he
instrument cluster illuminates when the
high beams are on.
- The
headlight flasher works only as long as
you ho ld the lever - even if there a re no
lights turned on. The indicator light
II in
the instrument cluster illuminates when you
use the headlight flasher.
A WARNING
-
Do not use the h igh beam or head light
flasher if yo u know that these could b lind
oncom ing traffic.
-
Page 55 of 244

_& WARNING
- Curved (i. e. convex) mirror surfaces in
crease your field of view. Remember that
vehicles or other objects will appear
smaller and farther away than when seen
in a flat mirror.
If you use this mirror to
estimate distances of following vehicles
when changing lanes, you could estimate
incorrectly and cause an accident.
CD Note
- If the mirror housing is moved uninten
tionally (for example, while parking your
vehicle), then you must first fold the mir ror electrically. Do not readjust the mir
ror housing manually. You could damage
the motor which controls the mirror .
- If you wash the vehicle in an automatic
car wash, you must fold the exterior mir
rors in to reduce the risk of damage to
the mirrors . Never fold power folding ex
terior mirrors* by hand. Only fold them in and out using the power controls .
@ Tips
If there should be a malfunction in the
electrical system, you can still adjust the
exterior mirrors by pressing the edge of
the mirror .
Dimming the mirrors
Fig. 61 Automa tic dimming re arview mirror•
Manual anti-glare adjustment
• Move the small l ever (located on the bottom
edge of the mirror) to the rear.
Clear vision 53
Automatically dimming mirrors*
• To dim the rearview mirror and both exterior
mirrors, press the @button. The diode @
turns on . The rearview and exterior mirrors
dim automatically when light shines on
them, fo r ex ample from headlights on ave
hicle to the rear .
_& WARNING
Electrolyte fluid can leak from automatic
dimming mirrors if the glass is broken .
Electrolyte fluid can irritate skin, eyes and
respiratory system.
- Repeated or prolonged exposure to elec
trolyte can cause irritation to the respira
tory system, especially among people
with asthma or other respiratory condi
tions. Get fresh air immediately by leav
ing the vehicle or, if that is not possible,
open windows and doors all the way.
- If electrolyte gets into the eyes, flush
them thoroughly with large amounts of
clean water for at least 15 minutes·
. '
medical attention is recommended.
- If electrolyte contacts skin, flush affect
ed area with clean water for at least 15 minutes and then wash affected area
with soap and water; medical attention is recommended. Thoroughly wash af
fected clothing and shoes before reuse .
- If swallowed and person is conscious, rinse mouth with water for at least 15
minutes. Do not induce vomiting unless
instructed to do so by medical professio
nal. Get medical attention immediately .
CD Note
Liquid electrolyte leaking from broken mir
ror glass will damage any plastic surfaces
it comes in contact with. Clean up spilled
electrolyte immediately with clean water
and a sponge. .,..
Page 57 of 244

During brief stops, e.g. at a red light, wiper
motion will automatically be reduced to the
next lower speed. Wipers already turning at
low speed change to intermittent wiping.
When the ignition is turned on, the washer
jets are heated.
A WARNING
- Wiper blades are crucial for safe driving!
Only when they are in good condition are
they able to clear the windows properly
to provide uncompromising visibility .
Worn or damaged wiper blades are a safety hazard ¢
page 5 7, Replacing
windshield wiper blades!
- The light/rain sensor* is only designed to
assist and support the driver.
It remains
entirely the driver's responsibility to
monitor outside weather conditions and
to manually activate the wipers as soon as rain or drizzle reduces visibility
through the windshield.
- The windshield must not be treated with
water-repellent materials. They can in
crease glare under poor visibility condi
tions such as wetness, darkness, or when
the sun is low on the horizon. In addi
tion, they can cause the windshield wip
ers to chatter .
(I) Note
In freezing or near freezing conditions:
- Always check that the wiper blades are
not frozen to the glass before you turn
the wipers on . Loosen a wiper blade
which is frozen in place before operating
the wipers to prevent damage to the
wiper blade or the wiper motor.
- Do not use the wipers to clear a frosted window . Using the wipers as a conven
ient ice scraper will destroy the wiper
blades.
- Before you take your vehicle to an auto
matic car wash, make sure you have the
windshield wiper system switched off (lever in position 0), otherwise the wind
shield wiper system could get damaged
Clear vision 5 5
in the car wash if it should suddenly
come on.
(0 Tips
- The windshield wipers are switched off
when the ignition is turned off. Activate
the windshield wipers after the ignition
is switched back on by moving the wind
shield wiper lever to any position.
- Worn or dirty windshield wiper blades
cause smearing, which can affect the op
eration of the light/rain sensor* . Check
the condition of your windshield wiper
blades regularly.
- The rain sensor is part of the interval
wiping system . Turning off the ignition
will also deactivate the rain sensor. To re activate the sensor, switch off the inter
val wiping function, then switch it back
on again.
-Applies to vehicles with light/rain sen
sor : When the wipers are switched on
manually and in rain conditions, the au
tomatic headlights* turn on¢
page 48,
Switching the headlights on and off
or
off during the day when the wipers are
no longer operating. The automatic
headlights* function is available in this
case only when the light switch is in the
"AUTO" position¢
page 48, fig. 53.
-Make sure the washer fluid reservoir in
the engine compartment is topped off
before going on a long trip. Look up
¢
page 180 for checking and filling the
washer container .
- The wipers only operate with the hood
completely closed .
Headlight washer system
Applies to vehicles: with headlight washer system
The headlight washer system cleans the
headlights.
"'Operate the windshield wiper/washer sys
tem
o page 54, fig. 63 ® with the head
lights turned on by holding the lever for lon-
ger than one second . ..,.
Page 58 of 244

56 Clear vis ion
The washer jets extend forward out o f the
front bumper driven by water pressure to
spray the front headlights with water.
You shou ld inspect the headlights regularly
(for example when refueling) and clean
off
any solid dirt or insects from the lenses .
To ensure the system wo rks properly in wi nter,
keep the washer jets free of snow and remove
any ice using a de-icing spray.
Service position
It is only possible to change wiper blades if
you move the wiper arms to the service posi
tion .
In o rder to use the windsh ield wipers, t he
front lid mus t be comp lete ly closed.
Moving w iper blades to the service
position
• When there is a risk of frost, make s ure that
the wiper b lades a re not frozen to the wind
shield.
.. Switch the ignition on.
.. Move the wiper lever to position
0
c> page 54, fig. 63 .
.. Press the I Reset I button until the Displa y
typ e
menu appears in the Driver Informa
t ion System display .
.. Us ing the rocker switch and the
! Reset ! but
ton, select the
S et > W iper s > Front > Serv
ice positi on on
function. The winds hield
wiper arms move to the service position.
Moving wiper blades to park position
.. Make certain that the wiper arms are lying
against the windshie ld .
.. Switch the ign ition on and move t he wiper
l ever from posi tion
O to 4 c> page 54,
fig . 63 .
The wiper arms will move back to
the park position.
«I) Note
Never drive yo ur vehicle when the w ind
shie ld w iper arms are in the service pos i
tion and pulled away from the windshie ld .
When you dr ive faste r than 4 mp h (6 km/ h), the wiper a
rms automatically return to
the park position and cou ld cause paint
damage to the front lid!
(D Tips
- Yo u can also turn on the se rvice posit ion,
for example, if yo u want to protect the
w indshield from icing by using a cover .
- The service posit ion moves to
off a uto
matically when you operate the w ind
shield wiper lever, or speed exceeds
4 mph (6 km/h).
Cleaning windshield wiper blades
Clean the windshie ld w iper blades when they
begin to leave streaks.
.. Place the windshie ld w iper arms in the serv
ice pos it ion. Refer to
c> page 56.
.. Use a soft cloth and glass cleaner to clean
the windshield wiper blades .
A WARNING
Dirty windsh ield wipe r blades can impair
your view. This can lead to accidents .