2014 AUDI RS7 SPORTBACK light
[x] Cancel search: lightPage 57 of 292
Multifunction button
Applies to vehicles: with memory function
You con adjust the massage function, Lumbar
support, side bolsters and seating surface us ing the multifunction button .
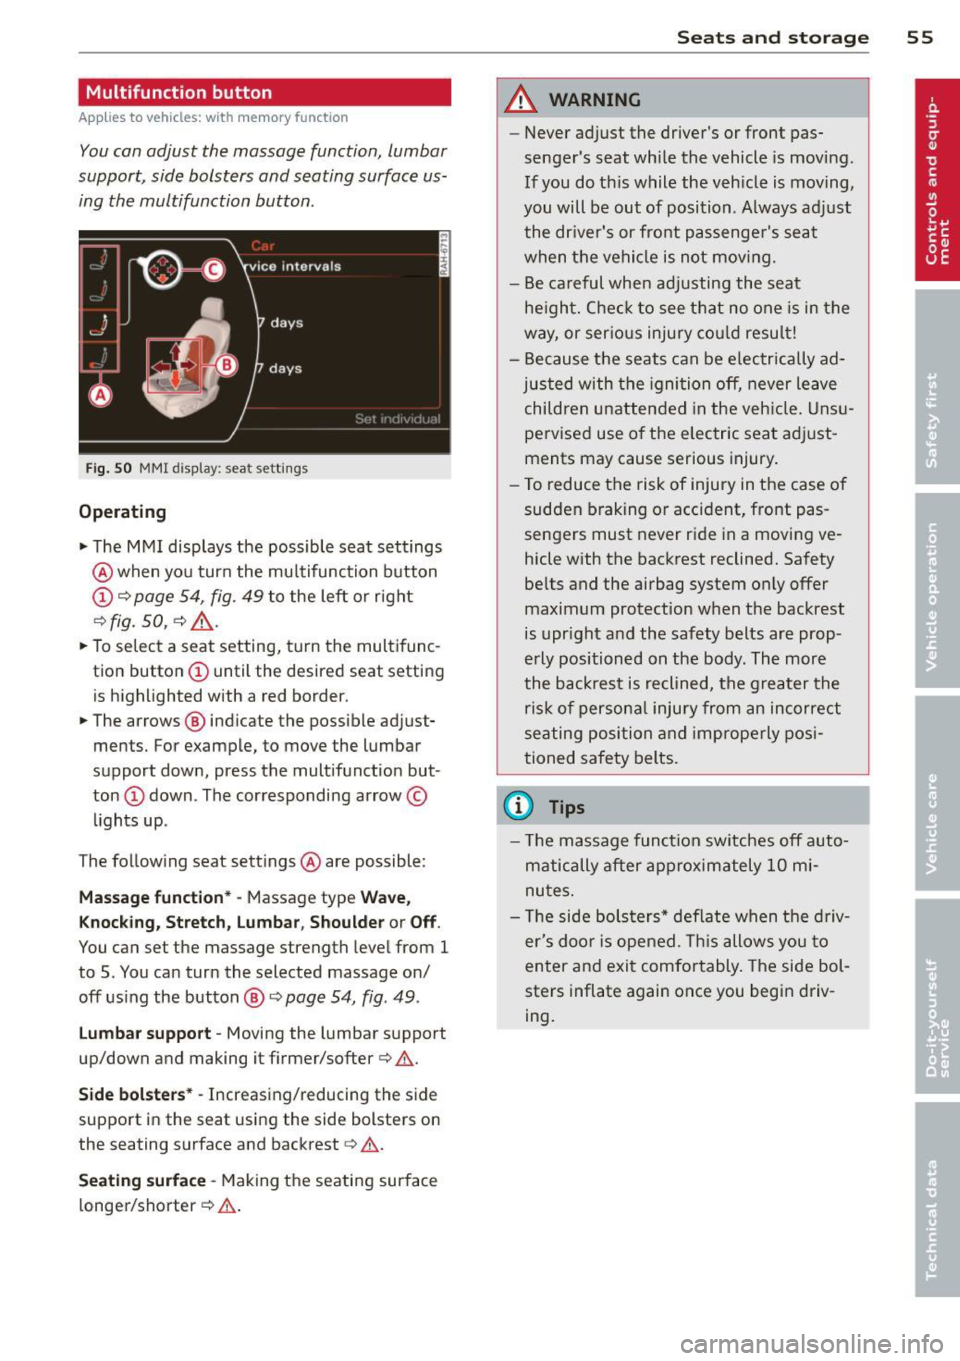
Fig. 50 MMI disp lay : sea t sett ings
Operating
.. The MMI displays the possible seat settings
@ when you turn the mu ltifunction button
(D c:> page 54, fig. 49 to the left or right
~ fig . 50 , c:> ,& .
.. To select a seat setting, turn the multifunc
tion button
(D until the desired seat setting
is highlighted with a red border.
• The arrows @ indicate the possible adjust
ments. For example, to move the lumbar
support down, press the multifunction but
ton
(D down . The corresponding arrow ©
lights up .
T he follow ing seat settings @ are possible:
Massag e fun ct ion * -Massage type Wav e,
Kn ock ing, S tretch, Lumb ar, Sho ulde r or Off.
You can set the massage strength level from 1
to 5. You can turn the selected massage on/
off us ing the button @~
page 54, fig . 49 .
Lu mba r support -Moving the lumbar support
up/down and making it firmer/softer
c:> .&. .
Side bol sters* -Increasing/reducing the side
support in the seat using the side bolsters on
the seating surface and backrest
c:> A .
Se ati ng surfac e -Making the seating surface
l onger/shorter
c:> .&. .
Sea ts a nd s to rage 55
A WARNING
-Never adjust the driver's or front pas
senger's seat while the vehicle is moving.
If you do th is while the veh icle is moving,
you will be out of position . A lways adjust
the dr iver's or front passenger's seat
when the vehicle is not moving.
- Be careful when adjusting the seat
he ight. Check to see that no one is in the
way, or ser ious injury cou ld resu lt!
- Because the seats can be electrically ad
justed with the igni tion off, never leave
children unattended in the veh icle. Unsu
pervised use o f the electric seat adjust
ments may cause serious injury.
- To reduce the risk of injury in the case of
sudden braking or accident, front pas
sengers must never ride in a moving ve
hicle with the backrest reclined. Safety
belts and the airbag system on ly offer
maximum protection when the backrest
is upr ight and the safety belts are prop
erly positioned on the body . The more
the backrest is reclined, the greater the
ris k of persona l inju ry from an incorrect
seating position and improperly posi
tioned safety belts.
(D Tips
- T he massage funct ion switches off auto
matically after approximately 10 mi
nutes.
- T he side bolsters* deflate when the driv
er's doo r is opened. This allows you to
enter and exit comfortably. The side bol
sters inflate again once you begin driv
ing.
Page 60 of 292
58 Seats and storage
Remote Memory button
control master
key
Driver Driver Front
passen- ger
Seat X X X
Stee ring X X
wheel*
Both exterior
X X
rearview mir-
rors*
Remote control key
Applies to vehicles: with memory function
To assign the driver's seat settings to the re
mote control key when locking the vehicle, the
function must be switched on .
• Se lect:
I CAR I funct ion button > (Ca r)* sys
tems
con trol button > Vehicle settings >
Seats > Driver seat > Remote control key >
On.
@ Tips
If you do not want another driver's set
tings to be assigned to the remote contro l
key, switch off the memory function using
the MMI or the
!OFF ! button c::> page 58.
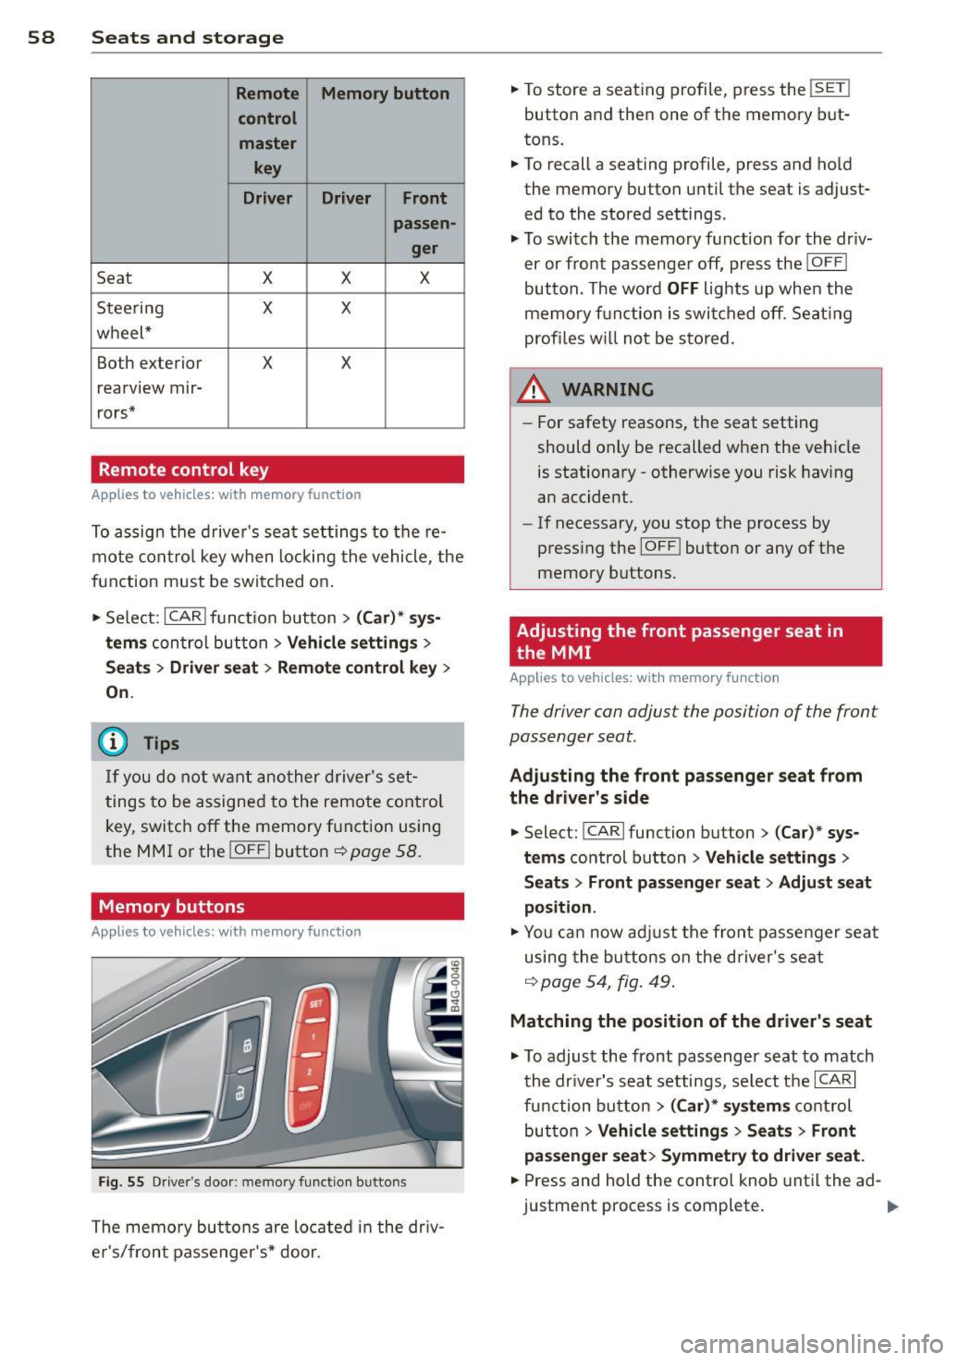
Memory buttons
Applies to vehicles: with memory function
Fig. 55 Driver's door: memory function buttons
The memory buttons are located in the dr iv
e r's/front passenger's* door. •
To store a seat ing profile, press the
!SET !
button and then one of the memory but
tons .
• To recall a seating profile, press and hold
the memory button until the seat is adjust
ed to the stored settings.
• To switch the memory function for the driv
er or front passenge r off, press the
IOFF I
button. The word OFF lights up when the
memory fu nctio n is swi tched off. Seating
profi les wi ll not be stored.
.&, WARNING
- For safety reasons, the seat setting
should only be recalled when the vehicle
is stationary -otherwise you risk having
an accident.
- If necessary, you stop the process by
press ing the
I OF F! button or any of the
memory buttons.
Adjusting the front passenger seat in
. the MMI
Applies to vehicles: with memory function
The driver con adjust the position of the front
passenger seat.
Adjusting the front pas senger seat from
the driver's side
• Select: !CARI function button> (C ar) * sys
tems
control button > Vehicle settings >
Seats> Front passenger seat > Adjust seat
position .
• You can now adjust the front passenger seat
using the buttons on the d river's seat
q poge54 , fig. 49.
Matching the position of the driver's seat
• To adjust the front passenger seat to match
the dr iver's seat settings, select the
ICARI
function button > (Car)* systems control
button
> Vehicle settings > Seats> Front
passenger seat> Symmetry to driver seat.
• Press and hold the control knob until the ad
justment process is complete.
Page 61 of 292
@ Tips
When matching seat settings, the settings for the lumbar support and seating sur-
face w ill not transfer to the front passeng
er's seat.
Ashtray
Applies to vehicles: with ashtray
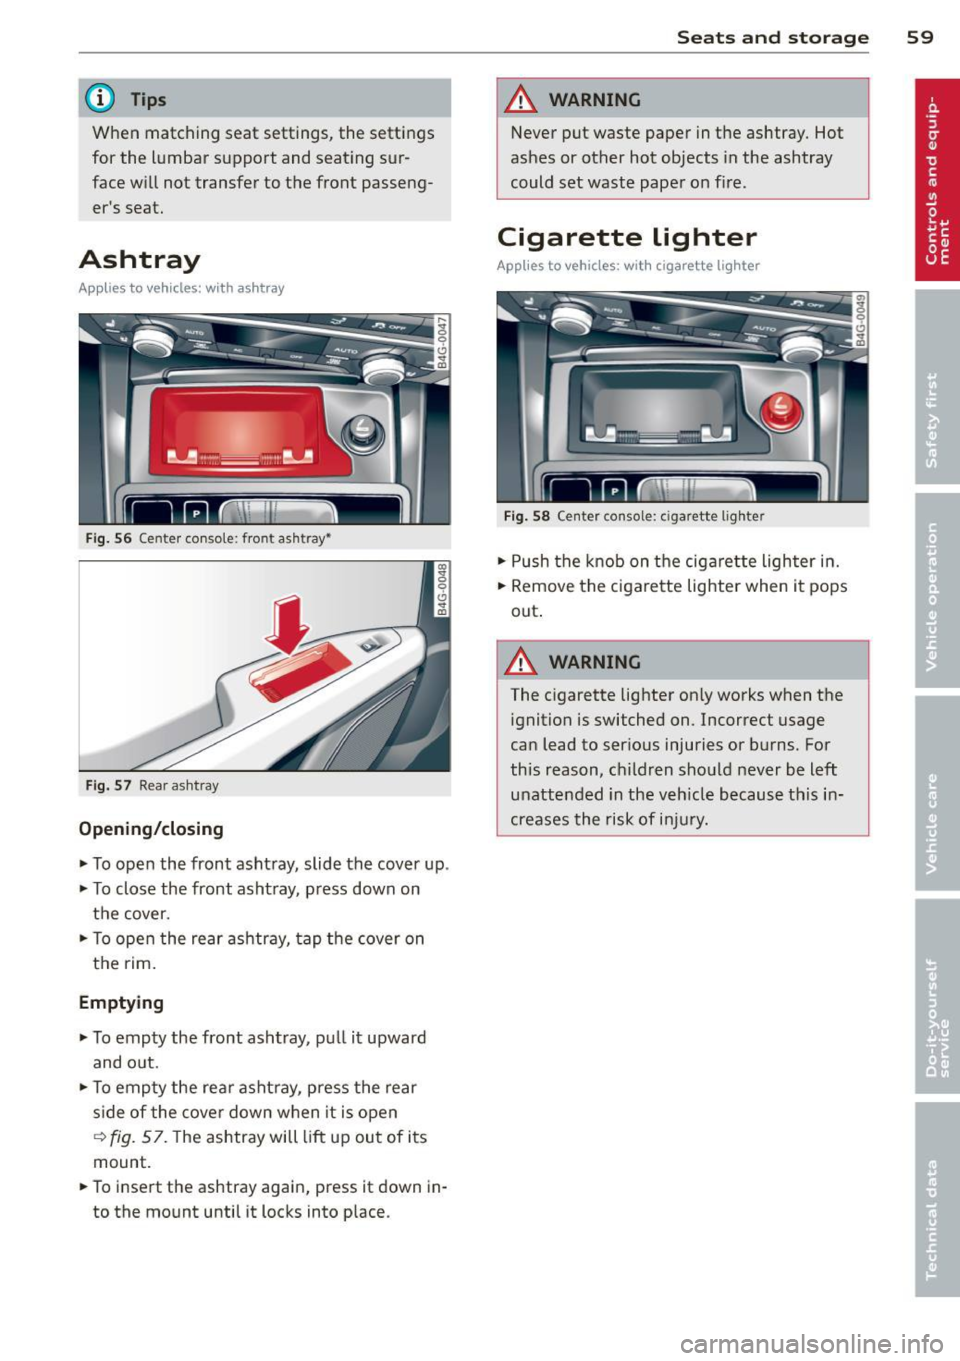
Fig. 56 Center conso le : fron t asht ray•
Fig. 57 Rear a sh tray
Opening/closing
~ To open the front ashtray, slide the cover up .
~ To close the front ashtray, press down on
the cover.
~ To open the rear ashtray, tap the cover on
the rim.
Emptying
~ To empty the front ashtray , pull it upward
and o ut.
~ To empty the rear ashtray, press the rear
s ide of the cover down when it is open
~ fig. 57. The ashtray will lift up out of its
mount.
~ To insert the ashtray again, press it down in
to the mount until it locks into place.
Seats and storage 59
A WARNING
Never put waste paper in the ashtray. Hot
ashes or other hot objects in the ashtray
could set waste paper on fire.
Cigarette lighter
Applies to vehicles: with cigarette lighter
Fig. 58 Center console: c iga rette lighte r
~ Push the knob on the cigarette lighter in.
~ Remove the cigarette lighter when it pops
out .
A WARNING ,_
The c igarette lighter only works when the
ignition is switched on. Incorrect usage
can lead to serious injuries or burns. For
this reason, children should never be left
unattended in the veh icle because this in
creases the risk of injury.
Page 64 of 292

62 Seats and storage
-Compartments* on the back of the front
seat backrests
- Garment hooks on the sides of the pillars in
the rear of the vehicle and in the rear grab
handles
- Compartment in the rear center armrest
- Storage in the trim panels in the luggage
compartment
~ WARNING
-
- Always remove objects from the instru
ment panel. Any items not stored could
slide around inside the vehicle while driv
ing or when accelerating or when apply
ing the brakes or when driving around a
corner.
- When you are driving make sure that
anything you may have placed in the cen
ter console or other storage locations
cannot fall out into the footwells. In case
of sudden braking you would not be able
to brake or accelerate.
-Always keep the lid of the compartment
for (sun)glasses* closed while driving to
reduce the risk of injury during a sudden
braking maneuver or in the event of an
accident.
- Any articles of clothing that you have
hung up must not interfere with the driv
er's view. The coat hooks are designed
only for lightweight clothing. Never hang
any clothing with hard, pointed or heavy
objects in the pockets on the coat hooks.
During sudden braking or in an accident -
especially
If the airbag is deployed -
these objects could injure any passen
gers inside the vehicle.
- To reduce the risk of personal injury in an
accident or sudden stop, always keep the
glove compartment closed while driving.
- Read and follow all WARNINGS
~ page 164, Important safety instruc
tions on the side airbag system.
-Hang clothes in such a way that they do
not impair the driver's vision.
- The coat hooks must only be used for
lightweight clothing. Do not leave any
heavy or sharp edged objects in the pock- ets which may interfere with the side cur
tain airbag deployment and can cause
personal
injury in a crash.
- Do not use coat hangers for hanging
clothing on the coat hooks as this can in
terfere with proper deployment of the side curtain airbags in an accident.
- Do not hang heavy objects on the coat
hooks, as they could cause personal in
jury in a sudden stop.
(D Note
Objects located on the rear shelf that rub
against the rear window could damage the heating wires for the rear window defog-
ger .
Roof rack
Description and mounting locations
Additional cargo can be carried with a roof
luggage rack.
Fig. 64 Roof rack attachment po ints
... Always read and follow the instructions pro
vided by the roof rack manufacturer when installing the roof rack system.
If luggage or cargo is to be carried on the
roof, you must observe the following:
- Only use roof racks approved for your vehi
cle. These approved roof racks are the basis
for a complete roof rack system. Additional
attachments or carrier systems are needed
to transport luggage and sports equipment.
We recommend using roof racks from the
Audi original accessories program . .,..
Page 69 of 292
Bag hooks
Light objects can be secured on the hooks.
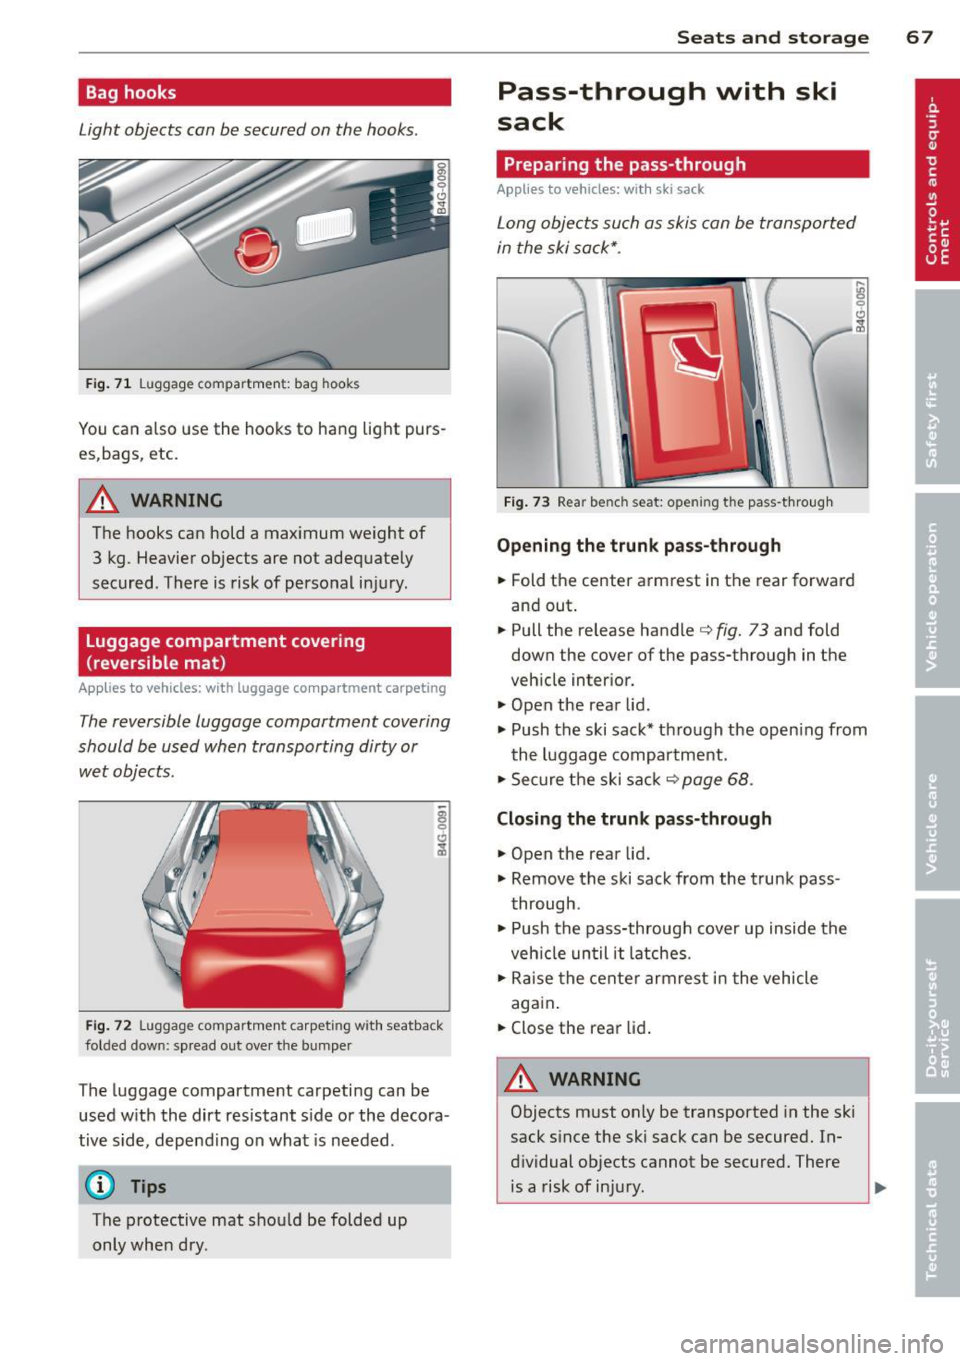
Fig. 71 Luggage compartme nt: bag hooks
You can also use the hooks to hang light purs
es,bags, etc.
A WARNING
The hooks can hold a max imum weight of
3 kg. Heavier objects are not adequately
secured. There is risk of personal injury .
Luggage compartment covering
(reversible mat )
Applies to vehicles: with luggage compartment carpeting
The reversible luggage compartment covering
should be used when transporting dirty or
wet objects.
Fig. 72 Luggage compartment carpeting with seatback
folded dow n: sp read out over the bumper
The lugg age compartment carpeting can be
used w ith the dirt resistant s ide or the decora
tive side, depending on what is needed .
@ Tips
The protective mat should be folded up
only when dry.
Seats and storage 67
Pass-through with ski
sack
Preparing the pass-through
Applies to vehicles: wi th ski sack
Long objects such as skis can be transported
in the ski sack*.
Fig. 73 Rear bench seat: opening the pass -through
Opening the trunk pass-through
.. Fold the center armrest in the rear forward
and out .
.. Pull the release handle
c::> fig. 73 and fold
down the cover of the pass-through in the
vehicle interior.
.. Open the rear lid .
.,. Push the ski sack* through the opening from
the luggage compartment.
.,. Secure the ski sack
c::> page 68 .
Closing the trunk pass-through
.,. Open the rear lid .
.,. Remove the ski sack from the trunk pass
through .
.. Push the pass-through cover up inside the
veh icle until it latches .
.,. Raise the center armrest in the vehicle
again.
.. Close the rear lid.
A WARNING ~
Objects must only be transported in the ski
sack since the ski sack can be secured. In
dividual objects cannot be secured. There is a risk of injury .
Page 72 of 292
70 Warm and cold
Operation
Applies to vehicles: with four -zone a utomat ic climate control
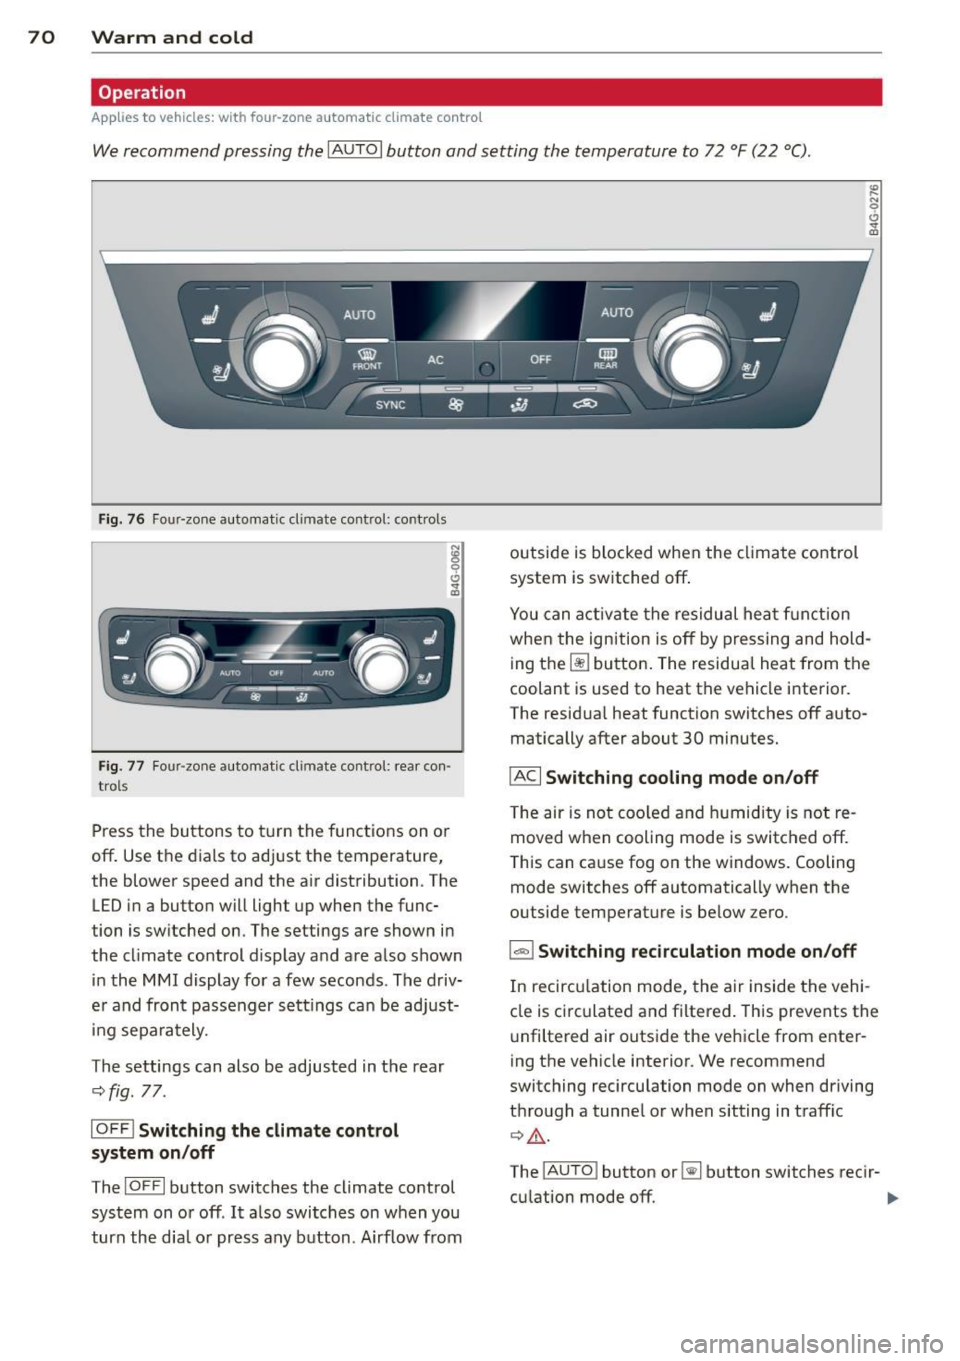
We recommend pressing the IAU TO I button and setting the temperature to 72 °F (22 °C) .
Fig. 76 Four-zone automatic climate control: controls
N :g
9 C)
"" m
Fig . 77 Four -zone automatic climate control: rear con
trols
Press the buttons to turn the functions on or
off . Use the dials to adj ust the temperature,
the blower speed and the a ir distribution. The
LED in a button will light up when the func
tion is switched on. The settings are shown in
the cl imate control display and are a lso shown
in the MMI display for a few seconds . The driv
e r and fron t passenger settings can be adjust
in g separately.
The settings can also be adjusted in the rear
c::>fig. 77.
IOFFl Switching the climate control
system on/off
The IO FFI button switches the climate control
system on or off .
It also switches on w hen you
turn the dia l or press any button . Airflow from outside is
blocked when the climate control
system is switched off.
You can activate the residual heat function
when the ignition is off by pressing and hold
ing the ~ button. The residua l heat from the
coolant is used to heat the vehicle i nterior.
The residua l heat function switches off auto
matically after about 30 minutes.
IACI Switching cooling mode on/off
T he air is not coo led and humidity is not re
moved when cooling mode is switched off.
T his can cause fog on the windows. Cooling
mode switches off automatically when the
outside temperature is be low zero .
1-1 Switching recirculation mode on/off
In recircu lation mode, the air inside the vehi
cle is circulated and filtered . This prevents the
u nfiltered air outside the vehicle from enter
ing the vehicle interior. We recommend
switching recirculation mode on when driving
through a tunne l or when sitting in traff ic
c::> ,&. .
The
! A UT O I button or~ button switches reci r-
cu lation mode off. ..,.
Page 77 of 292
Starting th e engin e
"'Press the brake peda l r::!> _&..
"'Press the I START ENGINE STOP I button
r::!> fig. 81. The engine will start .
If the engine should not sta rt immediately ,
the sta rting process is automatically stopped
after a short time. Repeat starting procedure .
A WARNING
-Never allow the engine to run in confined
spaces -danger of asphyxiation .
- Never t urn off the engine unti l the vehi
cle has come to a complete stop.
- The brake booster and power steering
only work when the engine is running . If
the engine is off, you have to use more
force when steering or braking. Because
you cannot steer and brake as you usua l
ly would, this could lead to crashes and
ser ious injur ies .
(D Note
-Avoid high engine rpm, full throttle and
heavy engine loads unti l the engine has
reached operating temperature -other
wise yo u risk eng ine damage.
- The eng ine cannot be started by pushing
or tow ing the veh icle.
(D Tips
- After a cold engine is started, there may
be a brief period of increased noise be
ca use oil pressure mus t fi rst bu ild up in
the hyd raulic valve adjusters . This is nor
mal and not a ca use for concern.
- If you leave the vehicle with the ignit ion
switched on, the ignition will switch off
after a certai n pe riod of time. P lease
note tha t electr ica l equipment s uch as
exterior lights wi ll switch off as well
when that happens.
Stopping the engine
"' Bring your vehicle to a complete stop.
"' Move the selector lever to the P or N po si
t ion.
On th e ro ad 75
"'Press the I START ENGINE ST OP I button
r::!>poge 74, fig . 81.
Ste ering lock
T he s teering locks when yo u tur n the engine
off using t he
I S TA RT ENGINE STO P! bu tton
and open the d river 's doo r. The locked steer
ing helps prevent vehicle theft.
Emergency off
If necessary, the engine can be switched off
with the selector lever in the R or D/S posi
t ion. The engine stops if you press the
I S TAR T ENG IN E ST OP I button at speeds below
6 mph (10 km/ h) .
A WARNING
- Never turn off the engine until the vehi
cle has come to a complete stop.
- The brake booster and power stee ring
only work when the eng ine is r unning . If
the engine is off, you have to use more
force when steering or braking. Because
you cannot steer and brake as you usual
ly would, this co uld lead to crashes and
serious injuries .
- For safety reasons , you should a lways
pa rk your vehicle w it h the selector lever
in P. Otherwise, the vehicle could inad
ver ten tly roll away.
- After the eng ine has been switched off,
the radiator fa n can cont in ue to run for
up to 10 minu tes -even with the ignition
sw itche d off . It can also sw itch on again
after some time i f th e coolant tempera
ture rises as the result of a heat b uildup
or if the engine is hot and the engine
compartment is additionally heated by
the sun's rays.
(U) Note
Do not stop the engine immediately after
hard o r extended driving. Keep the engine
running for approximate ly two minutes to
prevent excess ive heat bu ild-up .
Page 78 of 292
76 On the road
Driver message in the instrument
cluster display
Turn off ignition befor e le a v ing car
This message appears and a warning tone
sounds if yo u open the dr iver's door when the
ignition is switched on.
Press brake p edal to start engin e
This message appears if you press the
I STAR T ENGINE ST OP ! button to start the en
g ine and do not depress the brake pedal. The
engine can on ly be started if the brake pedal
is depressed.
!I I s ke y in th e vehicle?
If the indicator light turns on and the mes
sage appears, the remote control key was re
moved from the vehicle while the engine was
running. If the ignit ion key is not in the vehi
cle you w ill not be able to sw itch on the ign i
tion or resta rt the engine after it has been
switched off. You w ill also not be ab le to lock
the veh icle from the outside.
Shift to P , oth erwise vehicl e can roll away.
Doors do not lo ck if lever i s not in P .
This message appears for safety reasons
along w ith an audib le warn ing tone if the P
selecto r lever posit io n is not engaged when
stopping the engine with the
I STAR T ENGINE ST OP ! button. Select the P se
lector lever pos it ion. Othe rwise the veh icle
could ro ll and it cannot be locked.
(I Key is n ot recogn iz e d . Ho ld b ack o f key
ag ain st marked ar ea . Se e owner's manual.
If the indicator light tu rns on and th is mes
sage appears, there is a malfunction
c::>page 76. Starting the engine if there is a
malfunction
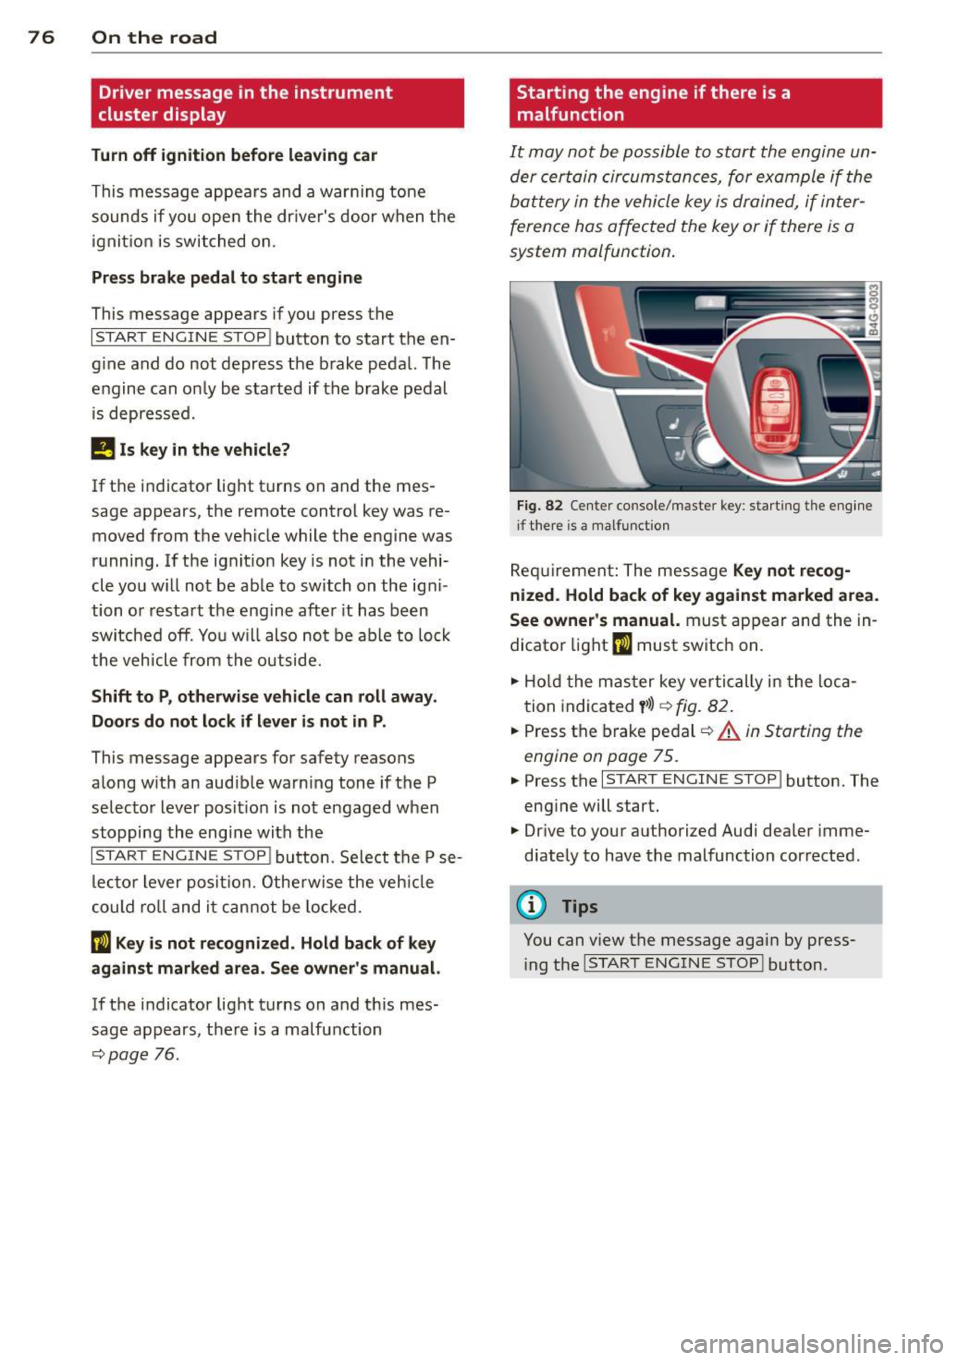
It may not be possible to start the engine un
der certain circumstances, for example if the
battery in the vehicle key
is drained, if inter
ference has affected the key or if there
is a
system malfunction .
Fig . 82 Center console/master key: starting the eng ine
i f there is a malfunction
Req uirement: The message Ke y not r ecog
ni ze d. H old back of key aga inst ma rked are a.
Se e owne r's manual.
must appear and the in
dicator
light (I must switch on.
.,.. Ho ld the mas ter key vertically in the loca
tion indicated
y >l) r=:>fig. 82.
.,.. Press the brake pedal c::> A in Starting the
engine on page 75.
.,.. Press the I START ENGINE S T OP ! button. The
eng ine will start.
.,.. Dr ive to your authorized Audi dealer imme
diately to have the malfunction corrected.
(D Tips
You can v iew the message again by press
i ng the
I STAR T ENGINE STOP I button.