2014 AUDI RS7 SPORTBACK display
[x] Cancel search: displayPage 97 of 292
Have your authorized Audi dealer or au
thorized A udi Service Facility check the ir
function.
@ Tips
- If the win dow g lass in the driver 's door
or front passenger's door has been tint
ed, the disp lay in the exterior m irror may
be misinterp reted .
- For Decla rat ion of Compliance to United
States FCC and Industry Canada regula
tions
¢ page 2 76.
Activating and deactivating
Applies to vehicles: mit side assist
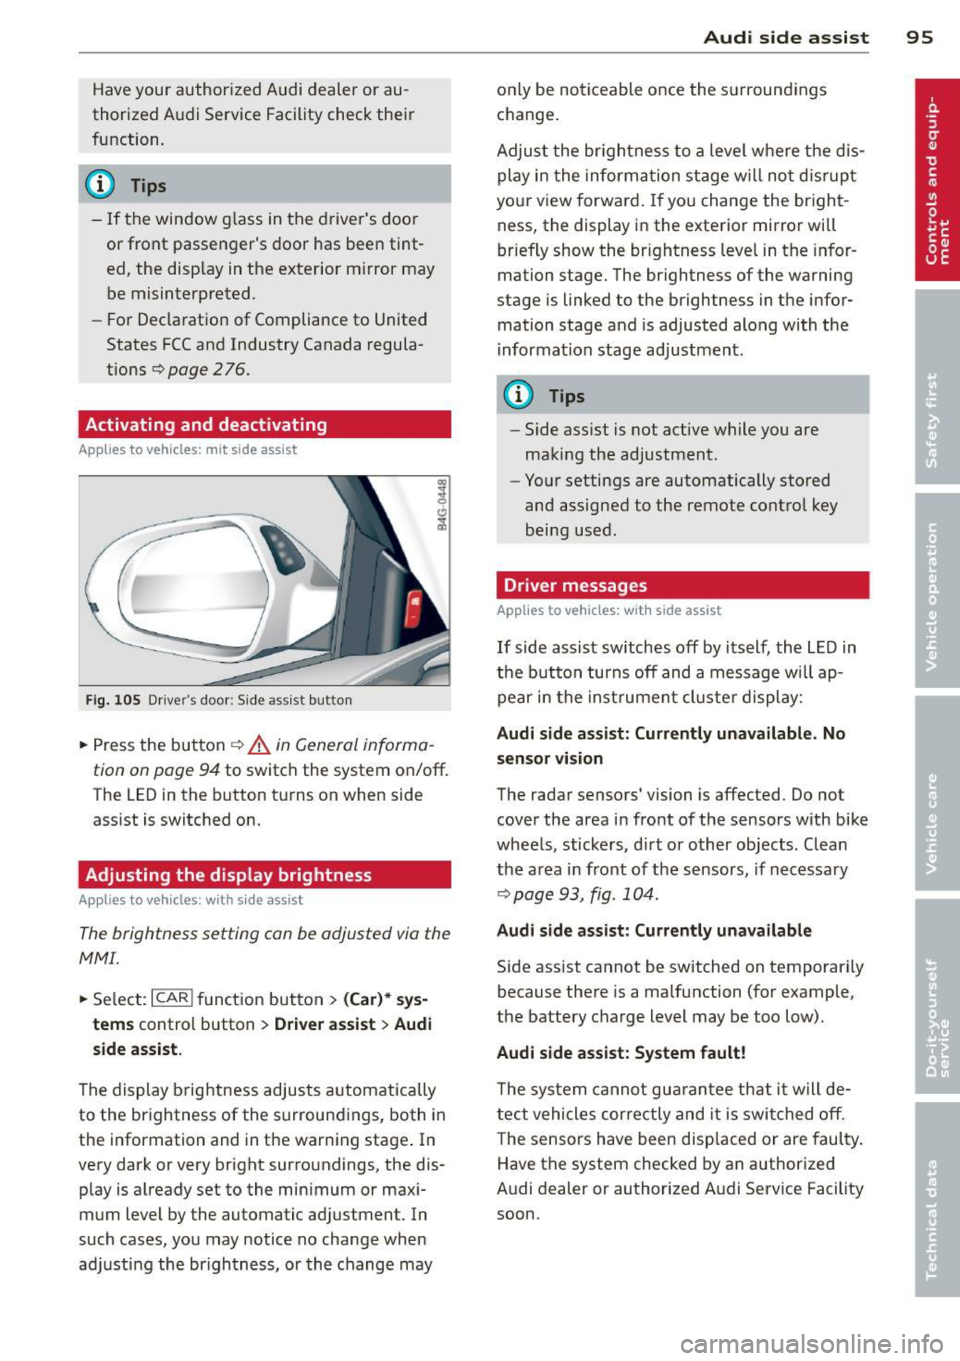
Fig. 10 5 Drive r's d oor : Sid e ass is t butt on
.. Press the but ton ¢ .&. in General informa
tion on page 94
to switch the system on/off .
The LED in the button t urns on when side
ass ist is switc hed on.
Adjusting the display brightness
Applies to vehicles: with side assist
The brightness setting can be adjusted via the
MMI.
.. Se lect : ICAR I function button> (Car)* sys
tems
contro l button > Drive r assist > Audi
side assist.
The display brig htness adjusts a utomatically
to the brightness of the surroun dings, both in
the information and in the warn ing stage . In
very dark or very bright surro undings, the dis
p lay is a lready set to the min imum or maxi
mum Level by the automatic ad justment. In
such cases, you may notice no cha nge when
a d ju sting the brightness, or the change may
Aud i side assist 95
only be no ticeable once the s urround ings
c hange.
Adjus t the br igh tness to a leve l where the dis
play i n the informa tion stage w ill no t dis rup t
your view forward . If you change the br igh t
ness, the display in the exterior mirror will
brief ly show the br ightness leve l in the infor
mation stage. The brightness of the warning
stage is linked to the brightness in the infor
mation stage and is adjusted alo ng with the
i nfor mation stage ad justment.
(D Tips
- Side ass ist is not act ive while you are
making the adjustment .
- Yo ur settings are automatically stored
and assigned to the remote contro l key
being used.
Driver messages
Applies to vehicles: with side assist
If side assist sw itches off by i tself, the L ED in
t he b utto n turns off and a message wi ll ap
pe ar in the inst rume nt cl uste r d is play:
Audi side assist: Currently unavailable. No
sensor vi sion
The rada r sensors' vision is affected. Do not
cover the area in fro nt of the sensors with bike
whee ls, sticke rs, d irt o r other objects. Clean
the a rea in front of the sensors, if necessary
¢page 93, fig . 10 4.
Audi side assist: Currently unavailable
Side assist cannot be switched on temporari ly
because there is a malfunction (for example,
the battery c ha rge level may be too low) .
Audi side assist: System fault !
The sy stem cannot gu arant ee th at it w ill de
tect vehicles correctly and it is swi tched o ff.
T he sensors have been disp laced or are faul ty .
Have the system checked by an authorized
A udi dealer or authorized A udi Service Facility
soon.
Page 100 of 292
98 Audi drive select
Adjusting the Individual mode
You can adjust the vehicle settings to your personal preferences .
• Se lect : I CAR ! function button > Set individu
al
control button. You can now adjust the in
dividual systems.
The
Individual dr iving mode will automatica l
ly be activated when you have finished config
uring the settings .
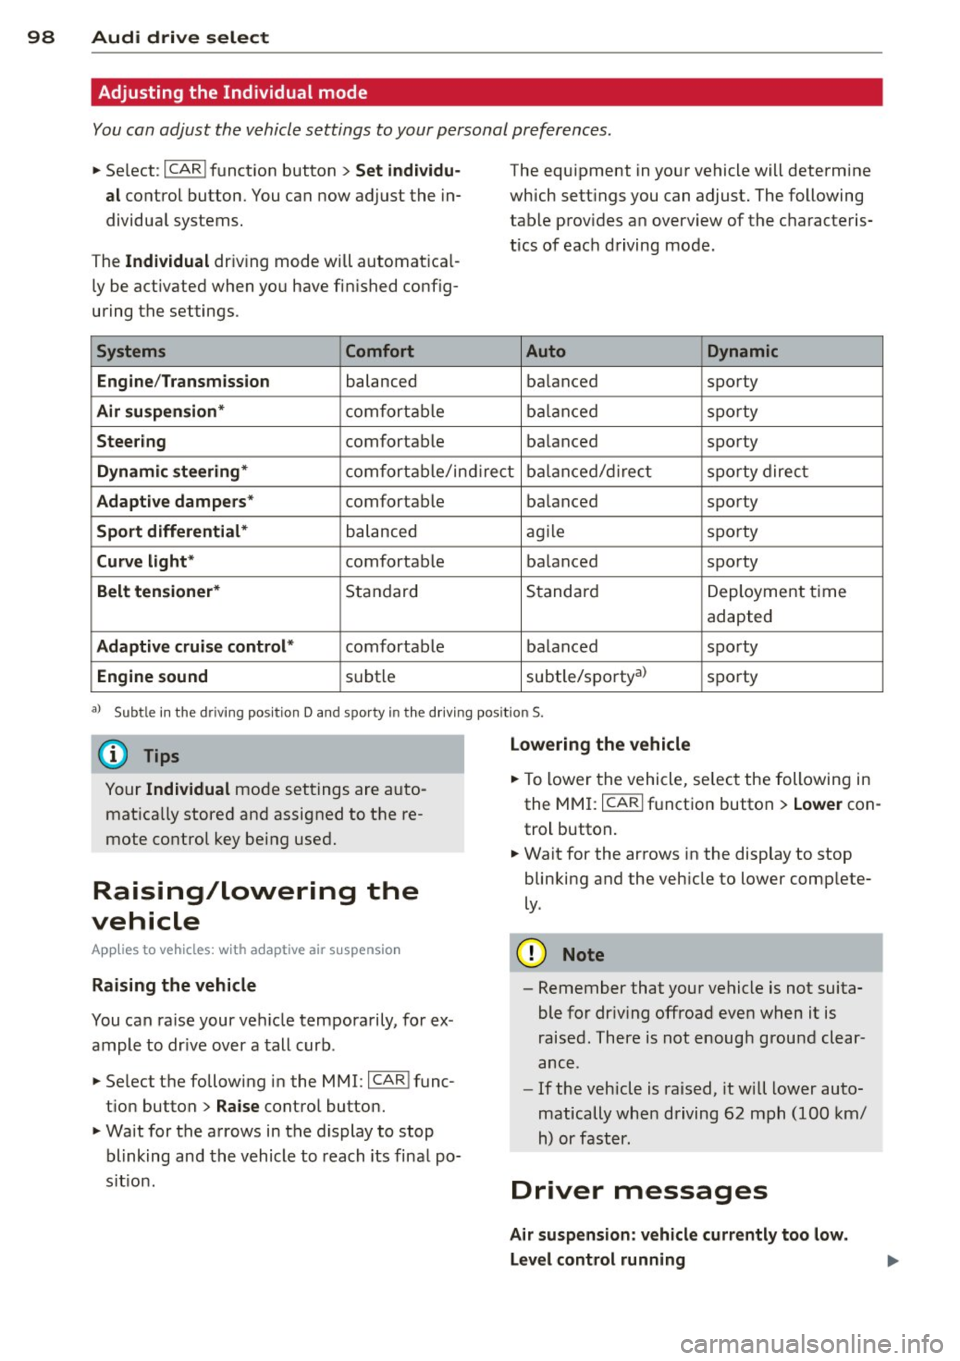
Systems Comfort
Engine /Transmission
balanced
Air suspension* comfortable
Steering comfortable The equipment
in your vehicle will determine
which settings you can adjust. The following
table provides an overview of the characteris
tics of each driving mode.
Auto Dynamic
balanced sporty
balanced sporty
balanced sporty
Dynamic steering* comfortable/indirect balanced/direct sporty direct
Adaptive dampers* comfortable balanced sporty
Sport differential* balanced agile sporty
Curve
light* comfortable balanced sporty
Belt tensioner* Standard Standard
Deployment time
adapted
Adaptive cruise control* comfortable balanced sporty
Engine sound subtle subtle/sportyal sporty
al
Sub tle in th e d riving po sit ion D an d sp orty in the driv ing pos itio n S.
(D Tips
Your Individual mode settings are auto
matically stored and assigned to the re
mote control key being used.
Raising/lowering the
vehicle
App lies to vehicles: with adaptive air suspension
Raising the vehicle
You can raise your vehicle temporarily, for ex
ample to drive over a tall curb.
• Se lect the following in the MMI: ICAR!func
tion button>
Raise control button.
• Wait for the arrows in the display to stop
blinking and the vehicle to reach its final po
s it ion .
Lowering the vehicle
• To lower the vehicle, select the following in
the MMI: ICARI function button >
Lower con
trol button.
• Wait for the arrows in the display to stop
blinking and the vehicle to lower complete
ly .
(D Note
- Remember that your vehicle is not suita
ble for dr iv ing offroad even when it is
raised. There is not enough ground clear
ance .
- If the vehicle is raised, it will lower auto
matically when driving 62 mph (100 km/
h) or faster.
Driver messages
Air suspension: vehicle currently too low.
Level control running
Page 102 of 292
100 Night vision assistant
Night vision assistant
Night vision assistant
with detected pedestrian marking
Description
App lies to vehicles: with night v isio n ass istant
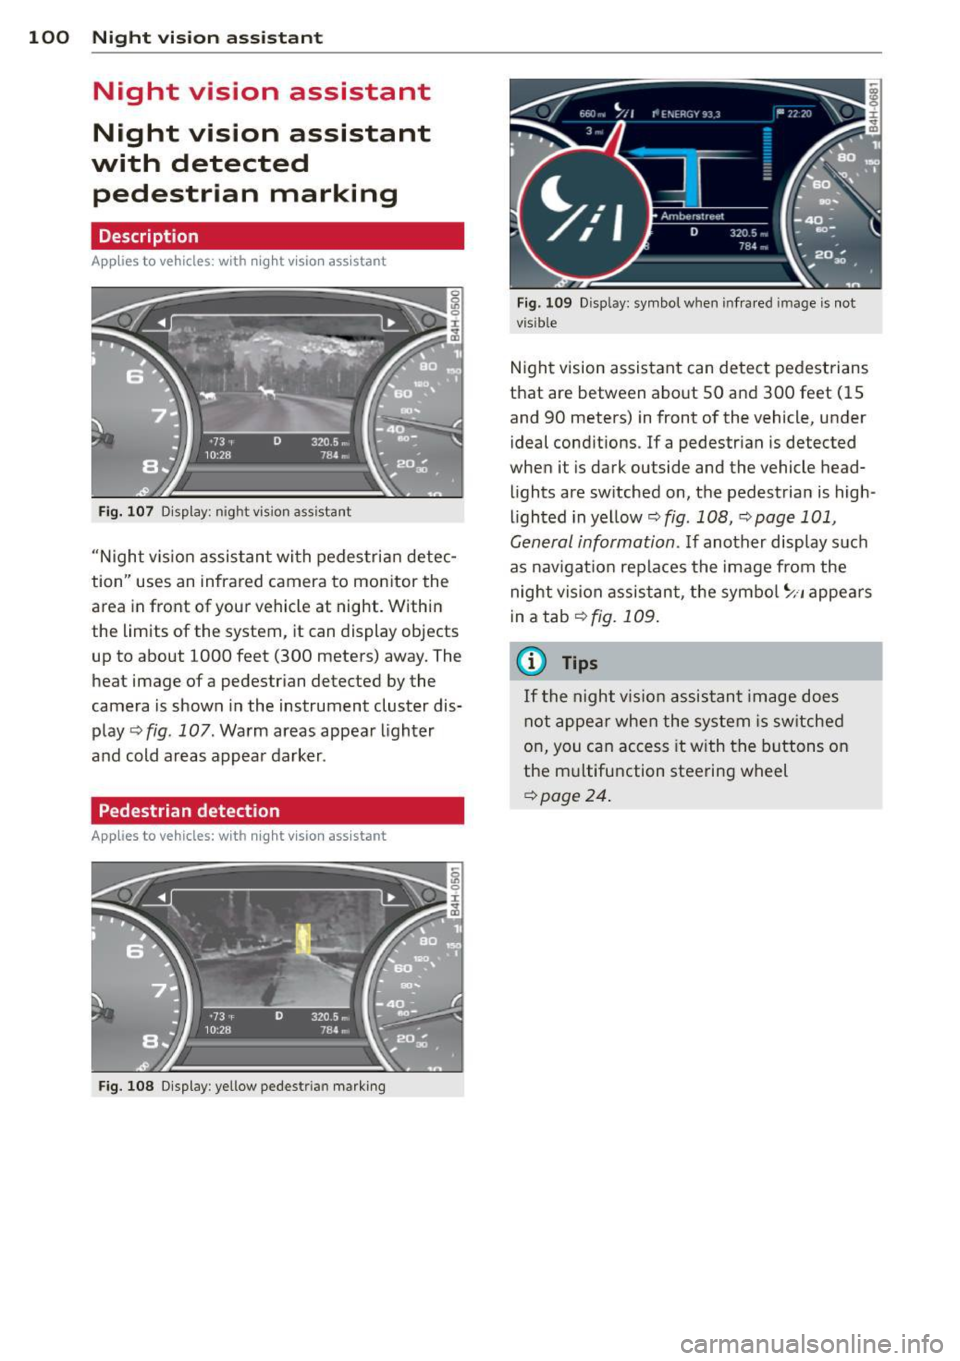
Fig. 107 Display: n ight vis ion assistant
"N ight v is ion assistant with pedestrian detec
tion" uses an infrared camera to monitor the
area in front of your vehicle at night. Within
the limits of the system, it can display objects
up to about 1000 feet (300 meters) away. The
heat image of a pedestrian detected by the
camera is shown in the instrument cluster dis
play
q fig. 107. Warm areas appear lighter
and cold areas appear darker .
Pedestrian detection
Applies to vehicles: with n ig ht v ision ass istant
Fig. 108 Display: yellow pedestrian marking Fig.
109 Disp lay: symbo l w hen infrare d im age is not
visible
N ight vision assistant can detect pedestrians
that are between about SO and 300 feet (15
and 90 meters) in front of the vehicle, under
ideal conditions . If a pedestrian is detected
when it is dark outside and the vehicle head
lights are switched on, the pedestrian is high
lighted in yellow
qfig. 108, qpage 101,
General information.
I f another display suc h
as nav igat ion rep laces the image from the
night vision assistant, the symbol
~11 appears
in a tab
qfig. 109.
(0 Tips
If
th e night vi.sion assistant image does
not appear when the system is switched
on, you can access it with the buttons on
the multifunction steering wheel
qpage 24.
Page 103 of 292
Pedestrian warning
Applies to vehicles: with nig ht v ision assistant
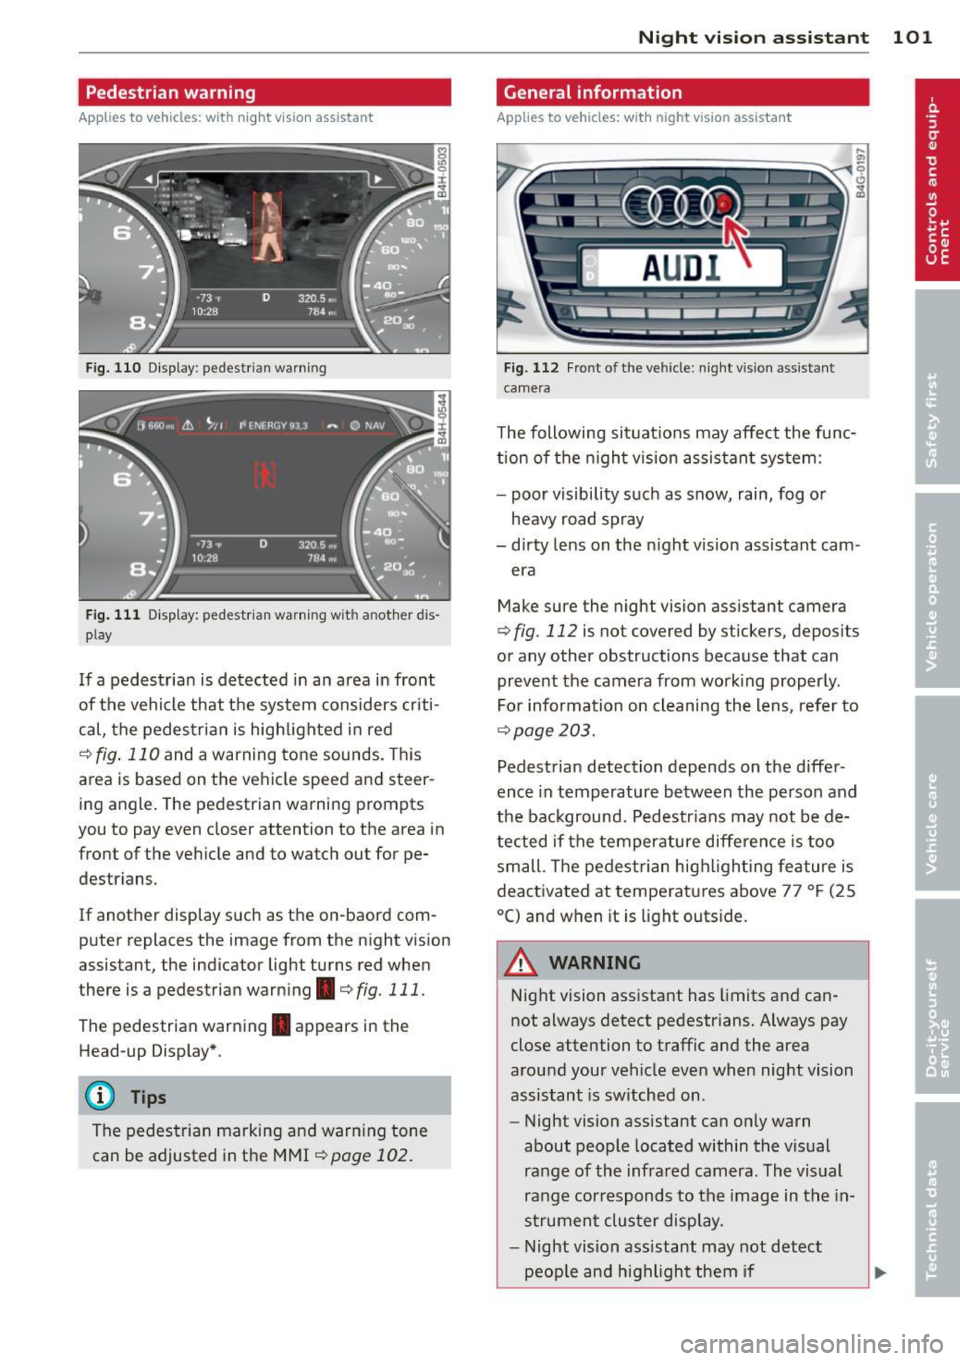
F ig. 110 D isplay : pedestri an w arning
Fig . 1 11 D isp lay: pedestr ian warning w it h an ot her di s
p lay
I f a pedestrian is detected in a n area in front
of the vehicle that the sys tem considers cr iti
cal, the pedestria n is high lighted in red
¢ fig . 110 and a warning tone sounds. This
area is based on the ve hicle speed and steer
ing angle. The pedestrian warning prompts
you to pay even close r attention to the area in
front of the vehicle and to watch out for pe
destrians.
If another display such as the on-baord com puter replaces the image from the night vision
assistant, the indicator light turns red when
there is a pedestrian warning . ¢
fig. 111 .
The pedestrian warn ing . appears in the
Head-up Display* .
(D Tips
The pedestrian marking and warn ing tone
can be adjusted in the MMI
¢page 102.
N ig ht visi on ass is ta n t 101
General information
Applies to vehicles: with night vision assistant
...
-. . .--:::: ====::;;; ::;;;::;;;== ===--......._--~
Fig. 112 Fro nt o f th e ve hicle : n ight v is ion ass istant
camera
il!,
T he following situations may affect the func
tion o f the nigh t vision assis tant sys tem:
- poor visibility such as snow, rain, fog or
heavy road spray
- dirty lens on the n ight vision assistant cam -
era
Make sure the night vision assistant camera
¢
fig . 112 is not covered by stickers, depos its
or any other obstructions because that can
prevent the camera from work ing properly .
For information on cleaning the lens, refer to
¢ page 203.
Pedestrian detection depends on the differ
ence in temperature between the person and
the background. Pedestr ians may not be de
tected if the temperature difference is too small . T he pedestrian high ligh ting feature is
deactivated at temperatures above 77 °F (25
°C) and when it is light outs ide.
A WARNING
-
Night vision assistant has limits and can
not always detect pedestr ians. Always pay
close attention to traffic and the area
around your vehicle even when night vision
assistant is sw itched on .
- Night vision assistant can only warn
about people located within the visual
range of the infra red camera. The visual
range corresponds to the image in th e in
s trument clus ter di splay.
- Night vision assistant may not detect
peop le and highlight them if
Page 104 of 292
102 Night vision assistant
-they are not in an upright position, for
example if they are s itting, crouching
or lying down and/or
- if the o utline in the display is inc om
plete or interrupted, fo r example be
cause the person is partially hidden by
a parked vehicle.
{D) Tips
- Pedestrian detection and the pedestrian
warming are lim ited to objects that are
detected as pedestrians. The system
does not detect animals. Even though
the shape and warmth radiated by each
object detected is evaluated, the system
does have limitat ions and it can give in
correct warnings.
- For techn ical reasons, the image pauses
in split second intervals .
Switching on and off
Applies to vehicles: with night visio n ass istant
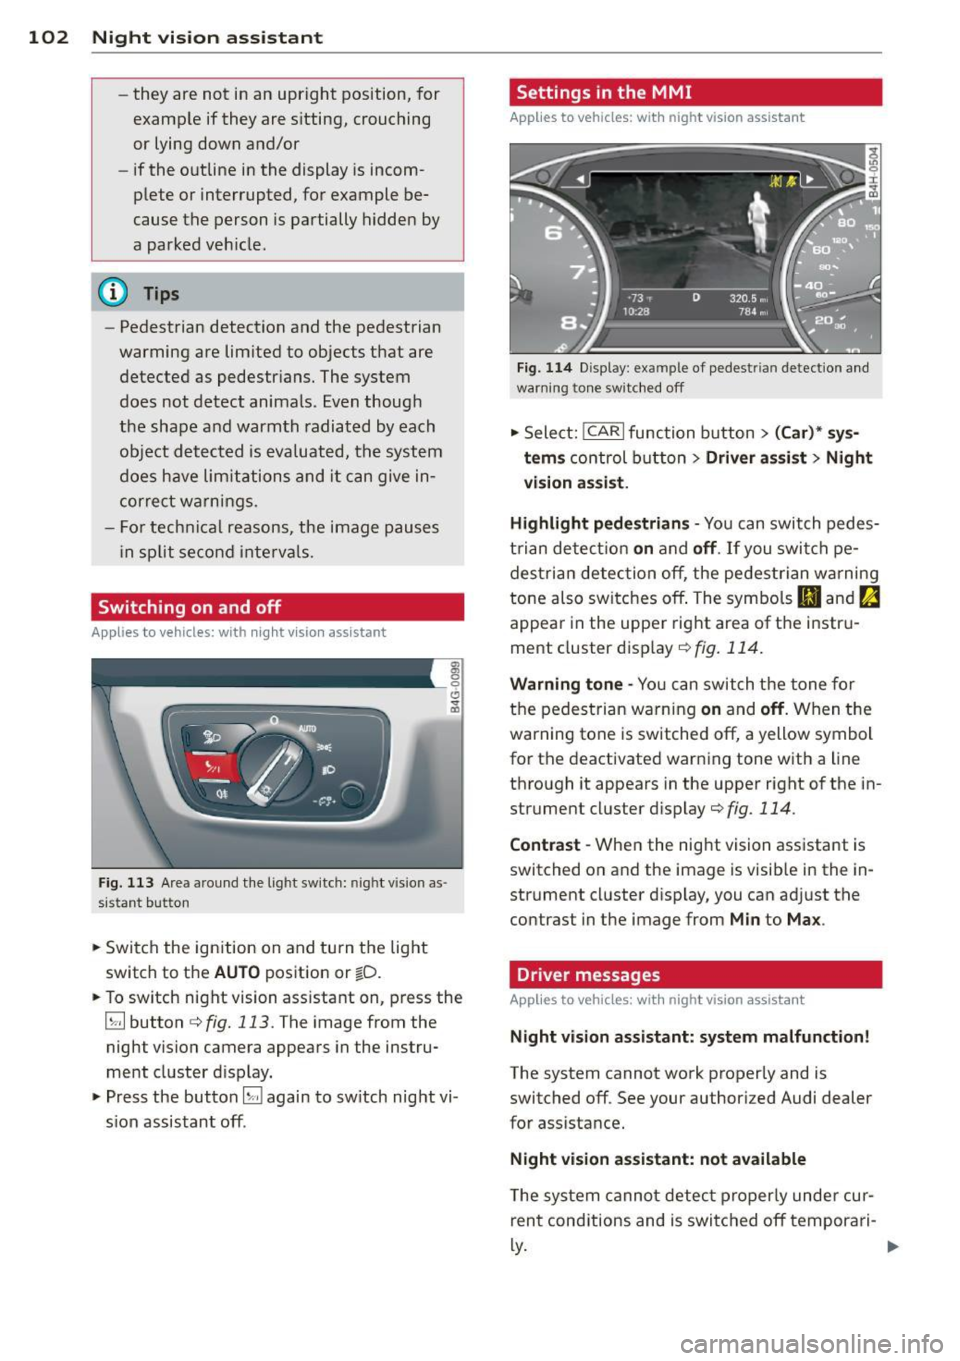
Fig. 113 Area a round the light switch: night vision as ·
sistant button
• Switch the ignition on and turn the light
switch to the
AUTO position or ~D.
• To switch night vision assistant on, press the
~ button c:> fig. 113. The image from the
night vision camera appears in the instru
ment cluster d isplay.
• Press the button~ again to switch night vi
s ion assistant off .
Settings in the MMI
Applies to vehicles: wit h night vision assistant
Fig. 114 Display : example of pedestrian detection and
warning to ne switc hed off
• Select: !CAR I function button > (Car)* sys
tems
control button > Driver assist > Night
vision assist.
Highlight pedestrians -
You can switch pedes
trian detect ion
on and off. If you switch pe
destria n detection off, the pedestrian warning
tone also switches off. The symbols
Bl and ~
appear in the uppe r right area of the instru
ment cluster disp lay
c:> fig. 114.
Warning tone -You can switch the tone for
the pedestrian warning
on and off. When the
warning tone is sw itched off, a yellow symbol
for the deactivated warning tone with a line
through it appears in the upper right of the in
strument cluster display
c:> fig. 114 .
Contrast -When the nig ht vision ass istant is
switched on and the image is visib le in the in
strument cluster display, you can adj ust the
contrast in the image from
Min to Max .
Driver messages
Applies to vehicles: wit h night vision assista nt
Night vision assistant: system malfunction!
The system cannot work properly and is
switched off. See your authorized Audi dealer
for assistance.
Night vision assistant: not available
T he system cannot detect properly under cur
rent conditions and is switched off tempora ri-
~-~
Page 106 of 292
104 Automatic Transmission
Automatic
Transmission
tiptronic
Introduction
The automatic transmission is controlled elec
tronically. The transmission upshifts or down
shifts automatically depending on which drive program is selected.
When a
moderate driving style is used, the
transmission selects the most economical driving mode. It will then change up early and
delay the downshifts to give better fuel econ
omy.
The transmission switches to a sporty mode
after a k ick-down or when the driver uses a
sporty driving style characterized by quick ac
celerator pedal movements, heavy accelera
tion, frequent changes in speed and traveling
at the maximum speed.
If desired, the driver can also select the gears
manually (tiptronic mode ) ¢ page 108.
In the tiptronic transmission, power is trans
ferred by a torque converter.
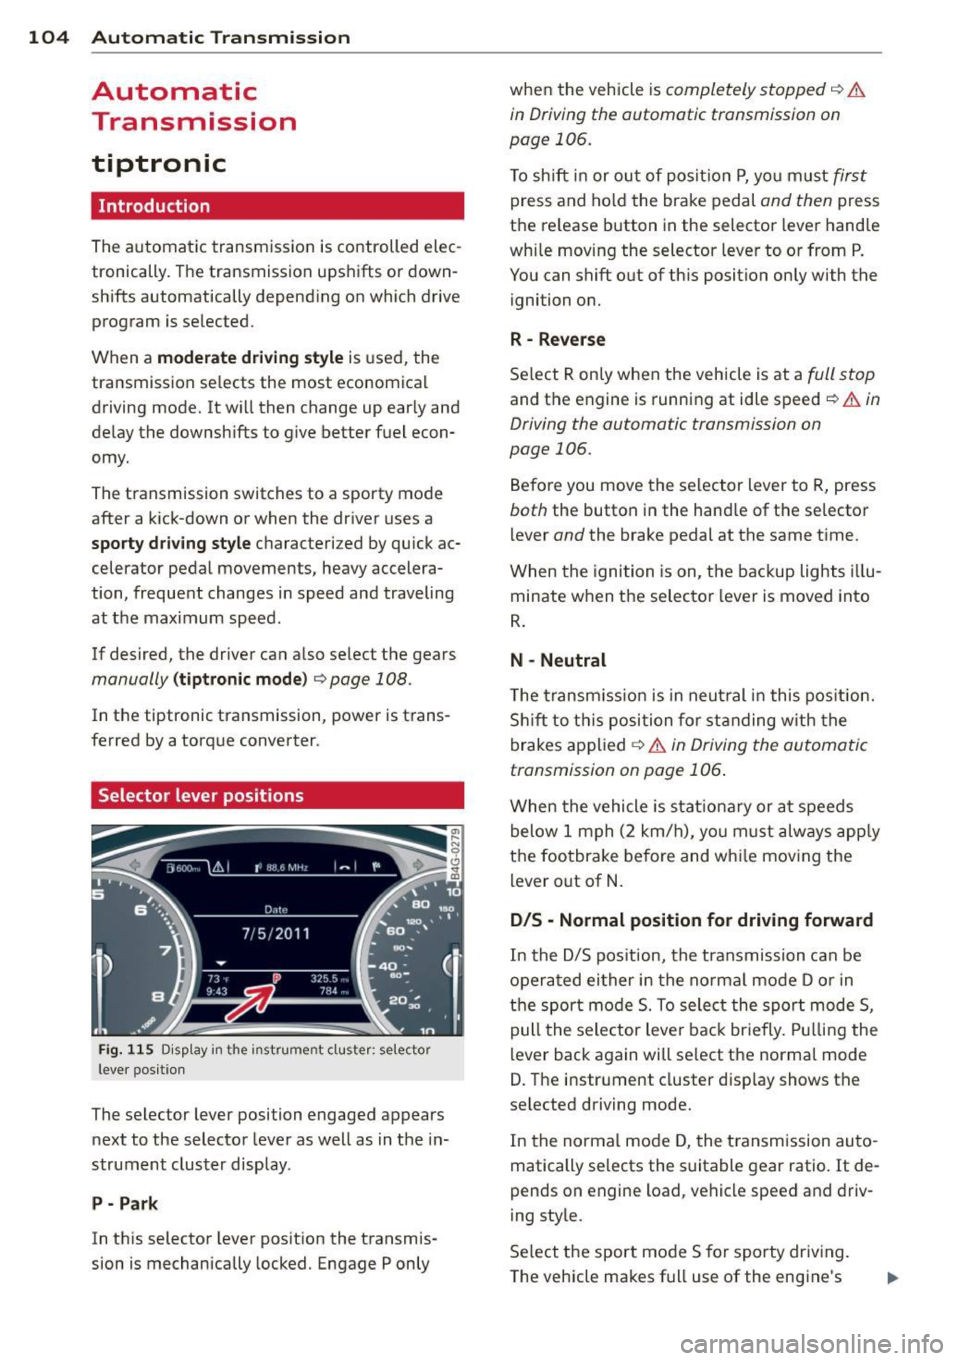
Selector lever positions
Fig . 115 D isp lay in the instrument cluster: selector
leve r pos itio n
The selector lever position engaged appears
next to the selector lever as well as in the in
strument cluster display.
P- Park
In this selector lever position the transmis
sion is mechanically locked. Engage P only when
the vehicle is
completely stopped¢ &
in Driving the automatic transmission on
page 106.
To shift in or out of posit ion P, you must first
press and hold the brake pedal and then press
the re lease button in the selector lever handle
wh ile moving the selector lever to or from P.
You can shift out of this position only with the
ignition on.
R -Reverse
Select R only when the vehicle is at a full stop
and the engine is running at idle speed¢ & in
Driving the automatic transmission on
page 106.
Before you move the selector lever to R, press
both the button in the hand le of the se lector
lever
and the brake pedal at the same time.
When the ignition is on, the backup lights illu
minate when the selector lever is moved into
R.
N -Neutral
Th e transmission is in neutral in this position.
Shift to this position for standing with the
brakes applied
¢ & in Driving the automatic
transmission on page 106 .
When the vehicle is stat ionary or at speeds
below 1 mph (2 km/h), you must always apply
the footbrake before and wh ile moving the
lever out of N.
D/S - Normal position for driving forward
In the D/S position, the transmission can be
operated either in the normal mode D or in
the sport mode 5. To select the sport mode 5,
pull the selector lever back brie fly. Pulling the
lever back again will select the normal mode
D. The instrument cluster disp lay shows the
se lected driving mode.
In the normal mode D, the transm ission auto
matically selects the suitable gear ratio.
It de
pends on engine load, vehicle speed and driv
ing style.
Select the sport mode 5 for sporty driving.
The vehicle makes full use of the engine's
Page 107 of 292
power. Shi fting may become noticeable when
accelerating .
When the veh icle is stationary or at speeds
be low 1 mph (2 km/h), you must always apply
the foot brake before and while moving the
lever to D/S out of N.
A WARNING
Read and follow all WARNINGS ¢.& in
Driving the automatic transmission on
page 106.
(D Note
Coasting downhill with the transmission in
N and the engine not running will result in
damage to the automatic transmission
and possibly the catalytic converter.
@ Tips
-Audi drive select: you can adj ust the
sporty sh ift characteristics in the
Dy
namic driving mode.Swill appear in the
i nstrument cluster display i nstead of D.
- If you accidenta lly select N while driv ing,
take your foot off the acce lerator pedal
i mmediately and wait fo r the e ngine to
s low down to idle before selecting D/S.
- If there is a power failure, the se lector
lever will not move out of t he P position .
The eme rgency release can be us ed if
t hi s happens
r::!>page 109.
Automatic Tra nsmi ssi on 105
Automatic Shift Lock (ASL)
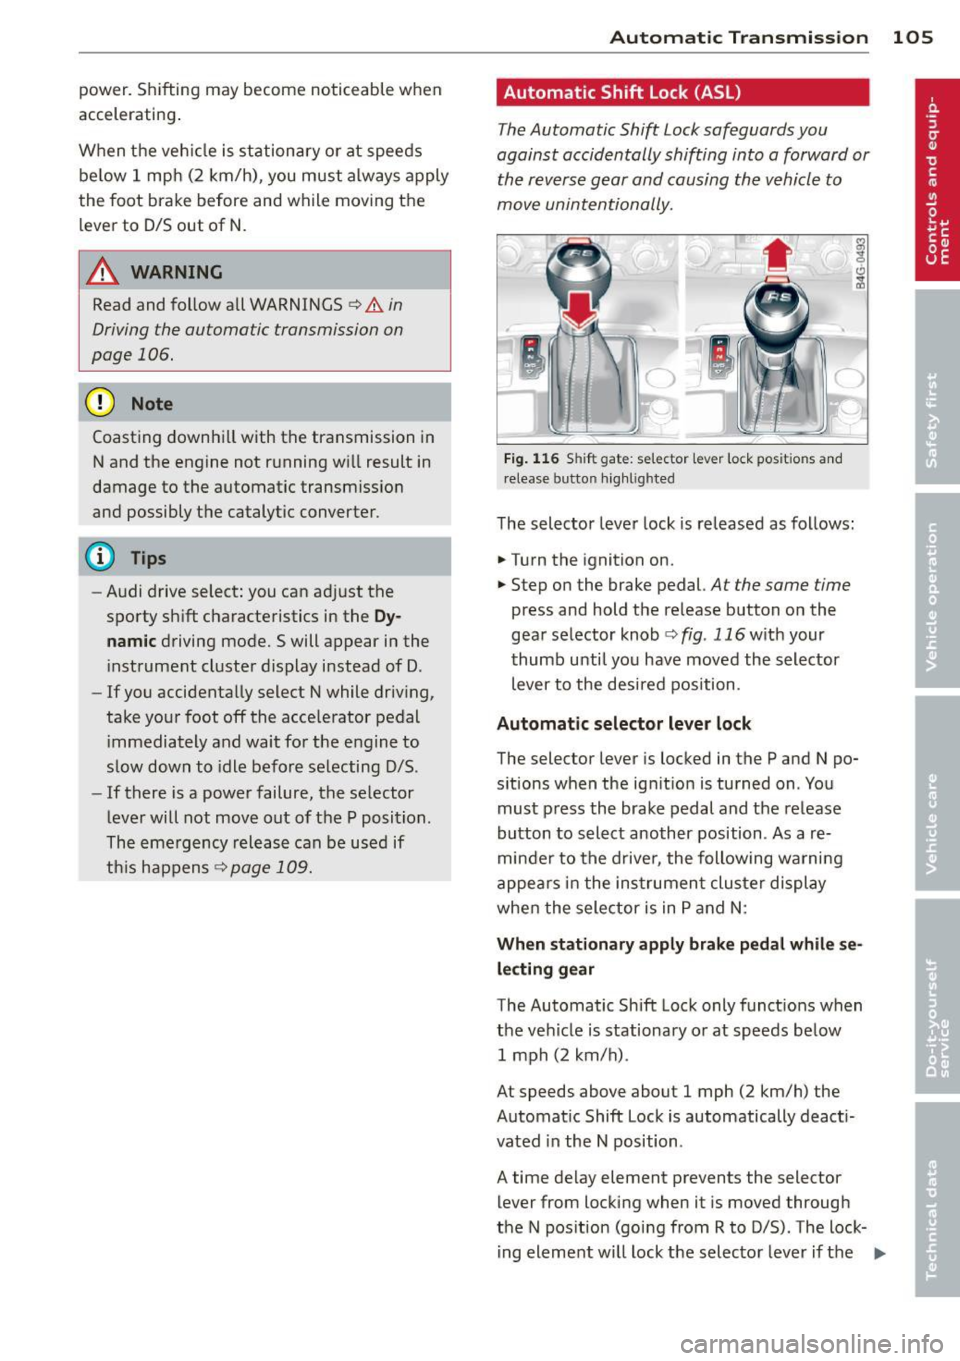
The Automatic Shift Lock safeguards you
against accidentally shifting into a forward or
the reverse gear and causing the vehicle to
move unintentionally.
*
}
Fig. 1 16 Shift gate: selector lever lock positions and
r elease button highlig hted
T he selector leve r lock is released as follows:
"" Turn the ignition on.
"" Step on the brake pedal.
At the same time
press and hold the re lease button on the
gear selector knob
¢fig . 116w ith your
t humb unti l you have moved the selector
lever to the desired position .
Automatic selector leve r lock
The selector lever is locked in the P and N po·
s itions when the ignition is turned on . You
must p ress the brake pedal and the re lease
button to select another position . As a re
minde r to the d rive r, the following warni ng
appe ars i n the ins trumen t clus ter display
whe n the sele ctor is in P and N:
Wh en stationary apply brake pedal while se
lect ing gear
The Automatic Shift Lock only funct ions when
the veh icle is stationa ry o r at speeds below
1 mph (2 km/h) .
At speeds above about 1 mph (2 km/h) the
Automat ic Shift Lock is automatically deact i
vated in the N position .
A time delay element prevents the selector
lever from locking when it is moved through
the N pos ition (go ing from R to D/S) . The lock·
i ng eleme nt will lock the selec to r l ever if the
IIJ,,
Page 110 of 292
108 Automatic Transmission
Manual shift program
Using the manual shift program you can
manually select gears .
,
I f I
I
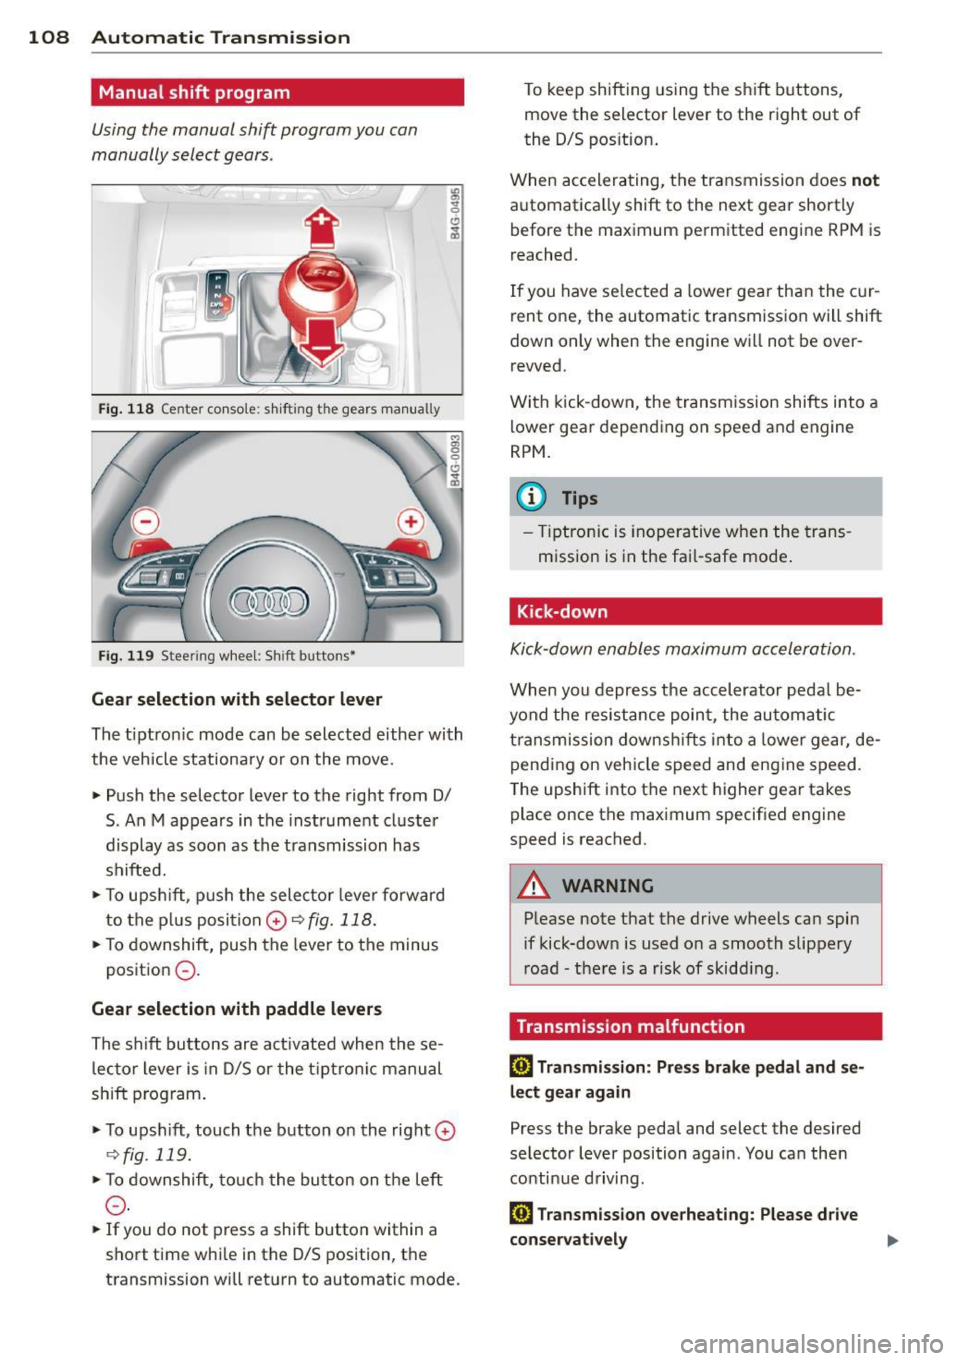
Fi g. 118 Center co nsole: s hiftin g t he gears ma nua lly
Fi g. 119 Stee ring wheel : Sh ift butto ns•
Gear s election w ith selector l ever
The tiptro nic mode can be selected e ither with
the vehicle stationary or on the move.
,.. Push the selector lever to the right from 0/
S. An M appears in the instrument cluster
display as soon as the transmission has
shifted.
,.. To upsh ift, push the selector lever forward
to the pl us posi tion
0 c::::> fig. 118.
,.. To downshift, push the lever to the minus
position
0 -
Gear selection with paddle levers
The shift buttons are act ivated when these
lector lever is in 0/S or the t iptro nic manual
shift p rogram .
,.. To upsh ift, touch the button on the right
0
c::::> fig . 119.
,.. To downshift, touch the button on the left
0 -
... If you do not press a shift button within a
short time whi le in the 0/S posit ion, the
transmission will return to automatic mode . To keep shifting using the sh
ift buttons,
move the selector lever to the right out of
the 0/S position.
When accelerating, the transmission does
not
automat ica lly shift to the next gear shortly
before the maximum permitted engine RPM is
reached.
If you have se lected a lower gear than the c ur
rent one, the automatic transmissio n will shift
down only when the engine will not be over
revved.
With kick-down , the transmission shifts into a
lower gear depending on speed and engine
RPM.
(D Tips
- Tiptron ic is inoperative when the trans
m ission is in the fa il-safe mode .
Kick-down
Kick-down enables maximum acceleration .
When you depress the accelerator pedal be
yond the resistance point , the au tomatic
t ransmission downsh ifts into a lower gear, de
pending on vehicle speed and engine speed .
T he upsh ift into the next higher gear takes
place once the maximum specified engine
speed is reached .
_& WARNING
-
Please note that the drive wheels can spin
if kick-down is used on a smooth slippery
r oad -there is a risk of skidd ing .
Transmission malfunction
[O] Tran smi ssion: Press br ake pedal and s e
lect ge ar again
Press the brake pedal and select the desired
selector lever position again . You ca n the n
continue d riving .
[O] Transmi ssion o verheating: Please d riv e
conse rvat ively