2014 AUDI RS7 SPORTBACK display
[x] Cancel search: displayPage 121 of 292
Parallel parking
Applies to vehicles: with parking system plus and rear
mode
This view may be used when parallel parking
along the side of a street.
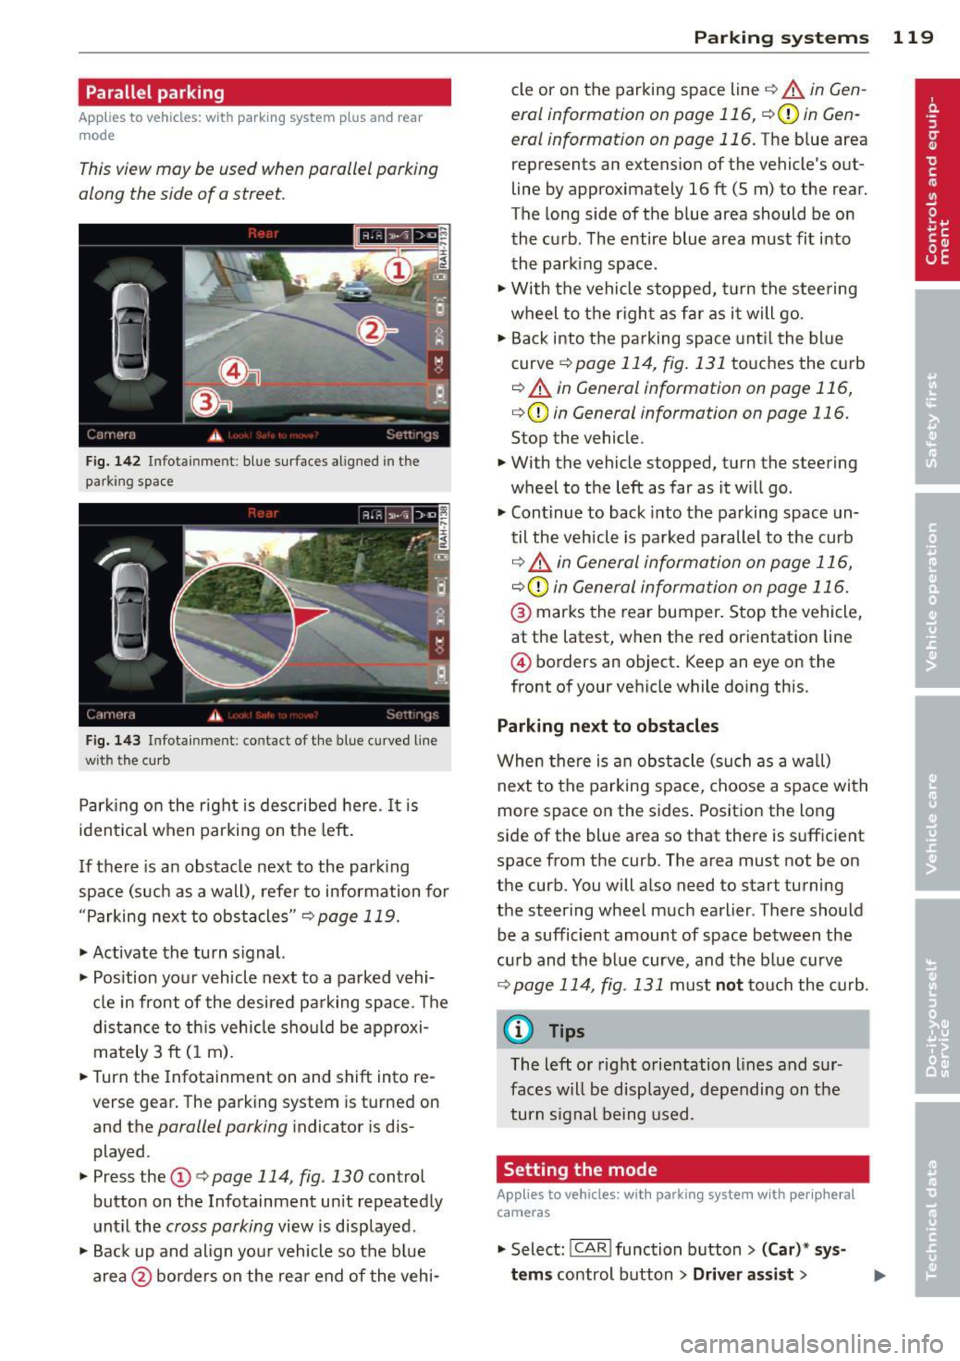
Fig. 1 42 Infotainment: blue su rfaces aligned in the
parking space
F ig. 1 43 Infota inmen t: contact of the blue curved line
wi th th e curb
Park ing on the right is described he re. It is
ident ical when parking on the left .
I f there is an obstacle next to the park ing
space (such as a wall), refer to information for
"Parking next to obstacles"
c::> page 119.
~ Activate the turn s ignal.
~ Position your vehicle next to a parked vehi
cle in front of the desired parking space . T he
distance to th is vehicle should be approxi
mately 3 ft (1 m).
~ Turn the Infotainment on and shift into re
verse gear. The parking system is turned on
and the
parallel parking indicator is dis
played .
~ Press the@¢ page 114 , fig. 130 control
button on the Infotainment un it repeatedly
unt il the
cross parking view is displayed.
~ Backup and align yo ur vehicle so the blue
area @ borders on the rear end of the vehi-
Parking systems 119
cle or on the parking space line c::> A in Gen
eral information on page 116, c::>(I)in Gen
eral information on page 116.
The blue area
represents an extension of the vehicle 's out
line by approximately 16 ft (5 m) to the rear.
The long side of the blue area should be on
the curb . The entire blue area must fit into
th e parking space .
~ With the vehicle stopped, turn the stee ring
wheel to t he righ t as fa r as it will go.
~ Back into the parking space unt il the blue
curve
c::> page 114, fig. 131 to uches the curb
c::> A in General information on page 116,
c::>(D in General information on page 116.
Stop the vehicle.
~ With the vehicle stopped, turn the steering
wheel to the left as far as it w ill go.
~ Continue to back into the parking space un
til the vehicle is parked parallel to the curb
c::> ..&. in General information on page 116,
c::> (Din General information on page 116.
@ marks the rear bumper. Stop the vehicle,
at the latest, when the red orientation line
@ borders an object . Keep an eye on the
front of your vehicle while do ing this .
Parking next to obstacles
When there is an obstacle (such as a w all)
next to the parking space, choose a space with
more space on the sides . Positio n the long
side of the blue area so that there is sufficient
space from the curb. The area must not be on
the curb. You will also need to start turning
the steering wheel much earlier . T here should
be a sufficient amount of space between the
c ur b and the bl ue curve, and the b lue curve
c::> page 114, fig . 131 m ust no t touch the curb.
@ Tips
The left o r right orientation lines and sur
faces w ill be disp layed, depending on the
turn s ignal being used .
Setting the mode
Applies to vehicles: with parking system with peripheral
cameras
~ Select: ! CAR ! function button> (Car) * sy s
tems
control button > Driver assist >
Page 122 of 292
120 Parking systems
Parking aid > Change to front/rear > Auto
or Manual.
Auto -
This view behind the vehicle (Rear
mode) is displayed automatically when you
shift into reverse . This view in front of the ve
hicle
( Front mode) is disp layed automatically
when you shift into the forward gears.
Manual -This view behind the vehicle (Rear
mode) is a lways disp layed when you turn on
the system.
Adjusting the display and the warning tones
Applies to vehicles: with parking system plus/rear view
camera/peripheral cameras
The display and warning tones can be adjust
ed in the Infotainment.
.. Se lect: I CAR ! function button > (Car)* sys
tems
control button > Driver assist > Park
ing aid.
Display
On* -
optical display is shown for the parking
system plus, rear view came ra image is shown
for parking system plus with rear view cam
era*.
Off -when the parking system is switched off,
on ly audib le signals are given.
Warning tones
Front volume -
Volume for the front area
Rear volume -Volume for the rear area
Front frequency -Frequency for the front area
Rear frequency -Frequency for the rear area
Music volume while parking -When the park
ing system is tu rned on, the volume of the au
dio/video source is lowered.
The newly adjusted value is briefly heard from
the signa l gene rator .
(D Tips
-The warning tones can a lso be adjusted
directly from the visual display or the rear v
iew camera* image. Simply press
the
Settings control button.
- Changed settings are activated when the
parking system is switched on again.
- The settings are automatically stored
and assigned to the remote cont rol key
that is in use .
Error messages
Applies to vehicles: with parking system plus/rear view
camera/peripheral cameras
T here is an error in the system if the LED in
the
p, q~ button is blinking and you hear a con
tinuous alarm for a few seconds after switch
ing on the parking system or when the park
ing system is already activated. If the error is
not corrected before you switc h
off the igni
tion, the LED in the
Pwi button will blink the
next t ime you sw itch on the parking system by
shifting into reverse.
Parking system plus
If a sensor is fa ulty, the~ symbol will appear
in front of/behind the vehicle in the Infotain
ment display. If a rear sensor is faulty, only
obstacles that are in areas @ and ® are
shown
Q page 111, fig. 121. If a front sensor
is faulty, only obstacles that are in areas ©
and @are shown.
Peripheral cameras*
There is also a system error if:
- the
i:80 ·• symbol appears in the display and
the corresponding display area is shown in
blue. The camera is not working in this area.
- all segments aro und the vehicles are red or
if no segments are displayed.
Drive to your authorized Audi dealer or au
thorized repa ir facility immed iately to have
the malfunction corrected.
Page 124 of 292
122 Homelink
@ Tips
To open t he ga rage door, p ress the butto n,
but do not press it for longer ten seco nds
or the Homelink modu le w ill switch to
programming mode.
Programming the transmitter
App lies to vehicles: with Home link
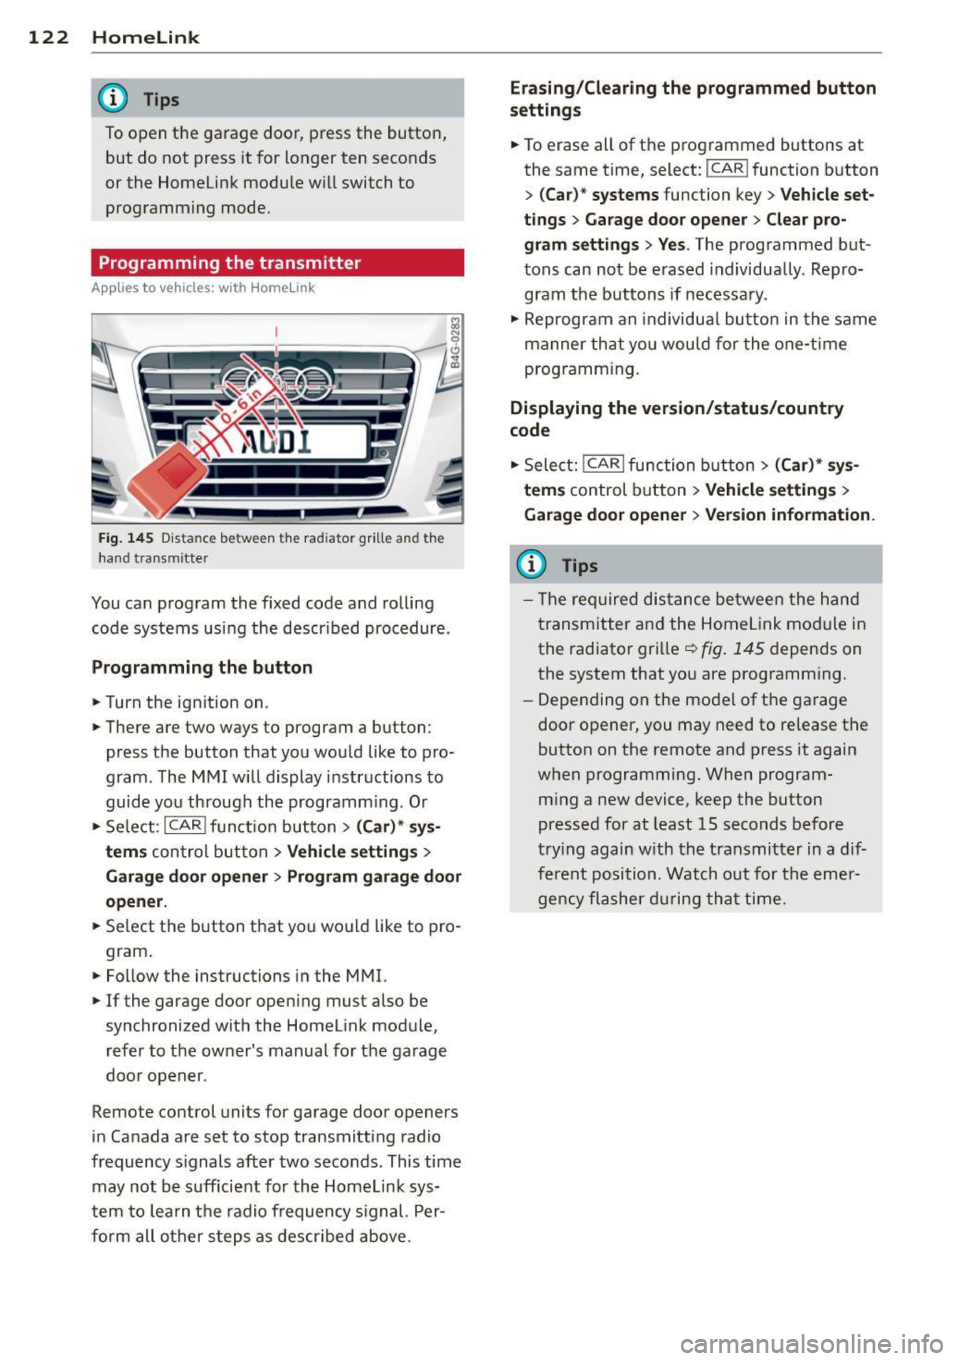
Fig. 145 Dis ta n ce between t he rad iator gr ille and the
hand t ransm itte r
You can prog ram the fixed code and ro lling
code systems us ing the descr ibed procedure .
Programming the button
.. Turn the ign ition on .
.. There are two ways to program a button:
press the button that you wou ld like to pro
gram . The M MI w ill display instructions to
guide yo u through the progr amm ing. Or
.. Se le ct: I CAR I f u ncti on but ton>
(Car) * sys ·
terns
con tro l bu tton > Vehicle settings >
Garage door opener > Program garage door
opener .
.. Se lect t he b utton t hat yo u wo uld like to pro
gram .
.. Fo llow the instructions i n the MMI.
.. If the garage door ope ning must also be
synchronized wit h the Homel ink module,
re fer to the ow ner's manual fo r the ga rage
doo r open er.
Remote control units for garage door openers
in Canada are set to s top transmitting radio
frequency signals after two seconds. This time may not b e sufficient for th e Homel ink sys
tem to lea rn t he radio frequency s ignal. Per
form all o ther step s as descr ibed above.
Erasing/Clearing the programmed button
settings
.. To erase all of t he p rogrammed buttons at
the same time , select: !C A R!function button
>
( Car )* systems function key > Vehicle set
tings
> Garage door opener > Clear pro·
gram settings > Yes .
The prog rammed but
tons can not be erased individua lly. Repro
g ram the b uttons if necessa ry .
.. Reprogr am an individu al bu tton in the same
manner th at you wou ld for the one-t ime
prog ramm in g .
Displaying the version/status/country
code
.. Sele ct: I CAR I func tion button > (Car )* sys
tems
control b utt on > Vehicle settings >
Garage door opener
> Version information.
(D Tips
- T he re qu ired dis tance betwee n the h and
tr ansm itter a nd the Homelink module in
the radiator grill e~
fig . 145 depen ds on
the system that yo u are prog ramm ing .
- Depe nding on the mode l of t he ga ra g e
door o pener, you may need to release t he
button on the rem ote and press it again
when programming . When program·
m ing a new device, keep the button
presse d for at least 15 seconds befor e
tr ying again w ith the t ransmit ter in a dif
fe re nt po sition. Watch out f or th e eme r
ge ncy fl ashe r dur in g tha t time.
Page 147 of 292
If the fron t passenger airbag is turned off, the
PA SSENGER AIR BA G OF F light comes on in
the instrument cluster and stays on.
If the front passenger airbag deploys, the
F ederal Standard requires the airbag to meet
the " low risk" deployment criteria to reduce
the r isk of injury through interaction with the
airbag. "Low r isk" deployment occurs in those
crashes that take place at lower decelerations
as defined in the electronic control un it
c::> page 155, PASSENGER AIR BAG OFF light.
Always remember, a child seat or infant carri
er installed on the front seat may be struck
and knocked out of position by the rap idly in
flating passenger's a irbag i n a frontal colli
sion . The airbag could greatly reduce the ef
fectiveness of t he ch ild restraint and even se
r io usly inju re the child d uring inflat io n.
For this reason, and because the back seat is
the safest place for chi ldren - when properly
restra ined accord ing to their age and size - we
strongly recommend that children always sit in the back seat
c::> page 168, Child Safety.
A WARNING
-
A child in a rearward -facing child seat in
stalled on the front passenger seat will be
ser iously injured and can be killed if the
front airbag inflates - even with an Ad
vanced Airbag System.
- The inflating airbag w ill hit the child seat
or infant carrier w ith great force and w ill
smash the ch ild seat and child against
the backrest, center armrest, door or roof.
- Always install rear-facing child seats on the rear seat.
- If you must install a rearward facing
child seat on the front passenge r seat
because of exceptiona l circumstances
and the
PASSENGER AIR BAG OFF light
does not come on and stay on, immedi
a tely ins tall the rea r-facing chi ld seat in a
rear seating position and have the airbag
system inspected by your Audi dealer.
A irbag system 145
-Forwa rd-facing child seats installed on
the front passenger's seat may interfere
with the dep loyment of the airbag and
cause serious persona l injury to the
child.
A WARNING
If, in except ional circumstances, you must
install a forward-facing child restraint on
the front passenge r's seat:
- Always ma ke sure the forward-facing
seat has been designed and certified by its manufacture r for use on a front seat
with a passenger fron t and s ide a irbag.
- Never put the fo rward-facing child re
s tra int up against or ve ry near the instru
men t panel.
- Always move the passenge r seat into its
rea rmost pos ition in the se at's fore and
aft ad justment range, as fa r away from
the airbag as possible before installing
the forward-fac ing ch ild restra int . The
backrest must be adj usted to an upright
position.
- Make sure that the
PASSENGER AIR BAG
OFF
li ght comes on and stays on all the
time whenever the ignition is switched on .
A WARNING
To reduce the risk of ser ious injury, make
sure that the
PASSENGER AIR BAG OFF
light w ill be displayed whenever a child re
straint is insta lled on the front passenge r
se at and the ignition is sw itched on.
- If the
PASSENGER AIR BAG OFF light
does not s tay on, perform the checks de
scribed
c::> page 154, Monitoring the Ad
vanced Airbag System.
- T ake the chi ld restraint off t he front pas
senger seat and install it prope rly at one
of the rear seat positions i f the
PASSEN
GER AIR BAG OFF
light does not stay on.
- Have the airbag system inspected by
your Aud i dea ler immediately.
•
•
Page 196 of 292
194 Intelligent technology
overheat, premature wear and increased
stopping distance.
- Under certain climatic and operating
condit ions such as passing through wa
ter, driving in heavy ra in or after wash ing
the vehicle, the effect iveness of the
brakes can be reduced. In winter, ice ca n
accumulate on the brake pads, linings ,
discs and d rums . Carefully apply brakes
for a test . B rakes wi ll dry a nd ice coat
ings will be cleaned off after a few c are
f ul brake app lications .
- Driv ing fo r an ex tende d pe riod of time on
salt-covere d roads w ithout us ing yo ur
brakes can also affect braking efficiency.
Clean off accumulated salt coating from
brake discs and pads w ith a few caref ul
brake applicat ions.
- If you damage the front spoiler, or if you
install a different spoiler, be sure the air
flow to the front brakes is not obstruct ed. Otherwise the brake system could
overheat reducing the effectiveness of
the ent ire brake system .
- Failure of one brake c ircuit will impair
the braking capability res ulting in an in
creased stopp ing distance. Avoid driv ing
the vehicle and have it towed to t he near
est Au di dea le r o r q ualified w ork sh o p.
- Never let the vehicle ro ll to a stop w ith
the e ngine shu t off.
- If the brake booster is not working, the
bra ke pedal must be p ressed conside ra
bly harder to make up for the la ck of
booster assistance.
Electro-mechanical
power assist, dynamic
steering
The electro-mechanical power assist helps
the driver when steering .
Power steering adapts electronically based on
the vehicle speed .
Indicator lights and messages
• Steering defective! Stop the vehicle
If this indicato r light turns on and stays on
and t his message appears, the power steering
may have failed.
D o
not con tinue dr iv ing . See your author ized
Audi dealer or other qualified repair facility
for assistance .
'I-lj Steering: Sy stem fault You can continue
driving
If the indicato r light turns on and the mes
sage appea rs, the stee ring may be more diffi
cul t to move o r more sens itive th an usua l. The
stee ring wheel may a lso be at an ang le when
driving straight .
D rive slowly to you r authorized Aud i dea le r or
qualified wo rkshop to have the ma lf u nct ion
corre cted.
(:rij Dynamic st eering: Initializing
If this driver message appears and the indica
tor light is f lashing on the instrument panel,
dynam ic steer ing* is being rei nitia lized . Afte r
sta rting the engine, the stee ring wheel will
move s ligh tly. Re- ini tiali zation mig ht be ne c
essa ry if the stee ring wheel w as moved h ard
to the left and r ight wh ile the vehicle was not
moving . The display goes out as soon as initi
alization is complete.
D rive slowly to you r authorized Audi de aler or
qualified wo rkshop to have the ma lf u nct ion
corrected.
_& WARNING
Have t he dynamic stee ring * system mal
f u nction repa ired as soon as possible by an
a uthorized Audi dea ler or qua lified wor k
shop - risk of acc ident !
(D Tips
If the . or (:rij indicator light on ly stays
on for a short time, yo u may continue driv
i ng.
- The dynamic steering * stab ility systems
are not avai lab le in the event of a system
ma lf u nction.
- For add itiona l information on dynamic
steering *, refer to
c> page 96.
Page 198 of 292
196 Intelligent technology
Basically, energy management consists o f
battery diagnosis, idling current manage
ment
and dynamic energy man agement.
Battery diagnosis
Battery diagnosis continuously dete rm ines
the state of the battery. Sensors determine
battery vo ltage, battery current and battery
temperature. This determines the current
state of charge and the power of the battery.
Idling current management
I dling current management reduces energy
consumption while the vehicle is standing.
With the ignition switched off, it contro ls the
energy s upply to the various e lectrica l compo
nents . Data from battery diagnosis is consid
ered.
D epending on the battery's state of charge,
individual consumers are gradually turned off
to prevent excess ive discharge of the battery
and thus mainta in start ing capability.
Dynamic energy management
While the vehicle is being dr iven, dynamic en
ergy management distributes the energy gen
erated according to the needs of the individu
a l components. It regu lates consumption, so
that more electrical energy is not being used
than is being generated and ensures an opti mal state of charge for the battery.
(D) Tips
-But even energy management cannot
negate the limits of physics. Consider
that the power and life of a battery are
limited .
- If starting ab ility is threatened, the indi
cator light (•) appears ¢
page 16.
What you should know
The highest priority is given to maintaining
starting capability.
The battery is severely taxed in short-distance
driving, in city traffic and during the co ld time
of year. Abu ndant electrical energy is re- quired, but on
ly a little is generated . It is also
critical if the engine is not running and electri
ca l components are turned on. In this in
stance energy is be ing consumed but none is
being generated .
It is in precise ly these situations that you will
notice energy management active ly regu lat
ing the distribution of energy.
Vehicle stands for an extended period
If you do not drive your vehicle over a period
of several days or weeks, e lectrica l compo
nents are gradually cut back or switched off .
This reduces energy consumption and main
ta ins start ing capability over a longer period .
Some of the convenience functions may not
operate, such as the interior l ights or the
power seat adjustme nt. The convenience
funct ions will be available again when you
switch on the ignition and start the eng ine.
With the engine turned off
If you listen to the radio, for examp le, w ith
the engine turned off or use other MMI func
tions, the battery is be ing discharged .
If starting capability is jeopardized due to en
ergy consumption, the following warning ap
pears in the MMI display:
Please start the engine soon or the system
will be turned off.
The warning indicates that the system will be
turned off automatically after 3 minutes . If
you w ish to continue using the functions, you
have to start the eng ine.
With the engine running
Although e lectrical energy is generated when
the vehicle is being driven, the battery can be
come discharged. This happens mostly when
little energy is being generated and a great
deal consumed and the battery's state of
charge is not opt imal.
To bring the energy ba lance back into equili
brium, consumers which requ ire espec ially
large amounts of energy are temporar ily cut
back or sw itched off. Heating systems in .,.
Page 207 of 292
Vehicle care and cleaning 205
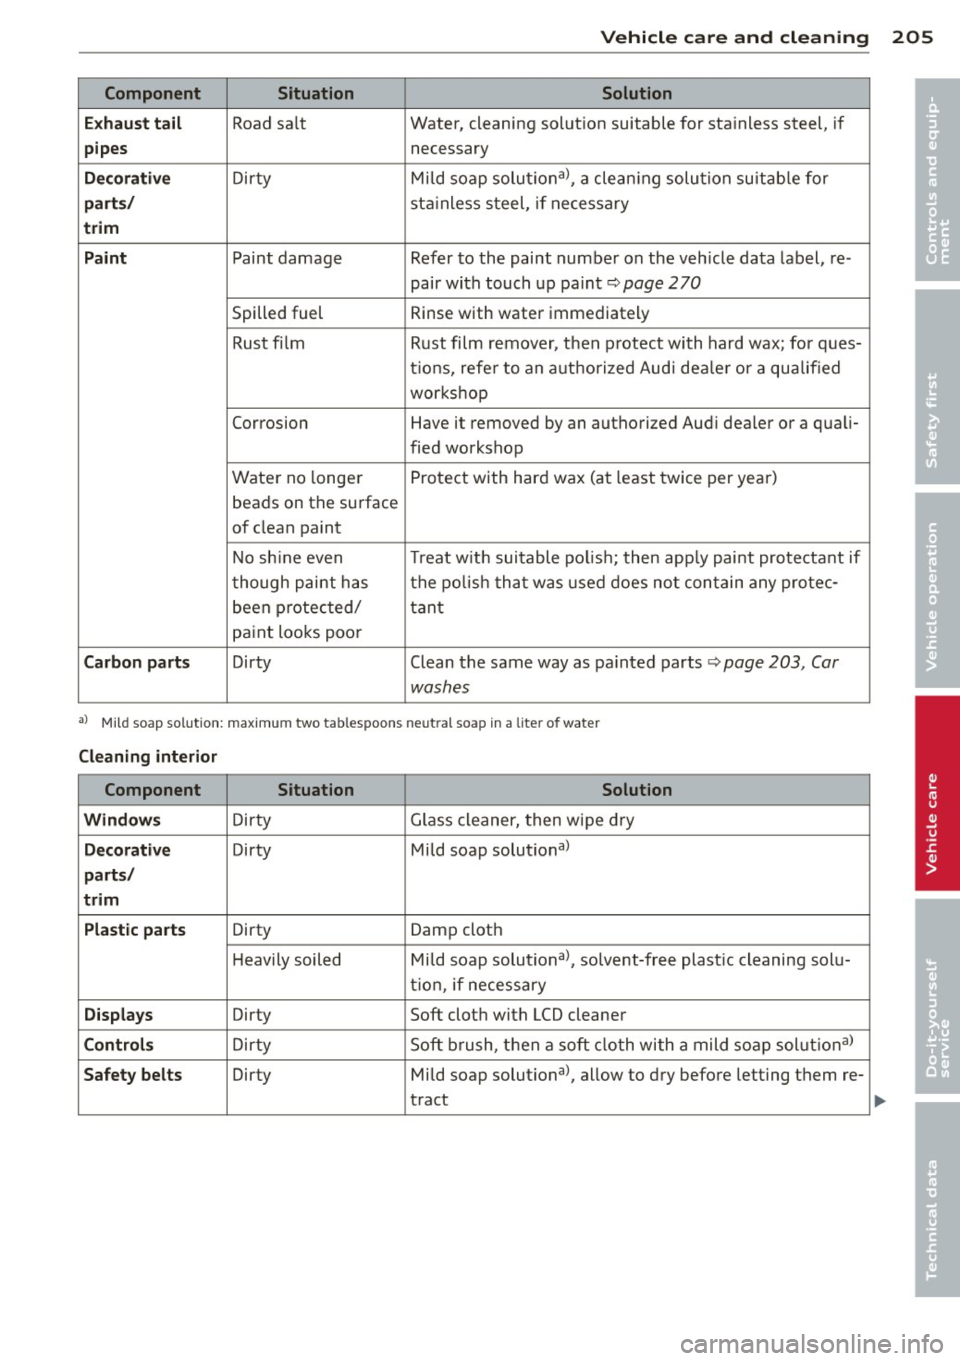
Component Situation Solution
E x haust ta il
Road sa lt Water, cleaning solut
ion suitable for sta inless steel, i f
pipes necessary
Decorative D ir ty Mild soap solutional, a clean ing solu tion suitab le for
parts / stainless s teel, if ne cessa ry
trim
Pa int
Paint damage Refer to the paint numbe r on the veh icle da ta label, re-
pair with touch up pa int
c::> page 270
Spilled fuel Rinse with water
immediately
Rust fi lm Rust film1 remover, t hen p rotect with hard wax; for ques-
ti ons, refe r to an a uth o riz ed Audi dea le r o r a qualified
wor kshop
Corrosion Have it removed by an authorized Aud i dealer o r a qua li-
fied workshop
Wate r no longe r Protect with hard wax (at
least twice per year)
beads on the su rface
of clean paint
N o sh ine even Treat w it h suitable po lis h ; then app ly pai nt pro te cta nt if
t hough p aint h as the polish t hat was use d do es not co ntain any prote c-
been p rotec ted/ tant
pa int looks poo r
Carbon part s Dirty Clean the same way as pa inted parts c::> page 203, Car
washes
al M ild soap sol utio n: max imum two tablespoons neutral soap in a liter of water
Cleaning interior
Component Situation Solution
Windows
D irty Glass cleaner, then wipe dry
Decorative Dirty Mild soap solutional
parts/
trim
Plastic parts
Dirty Damp cloth
H eavily soiled Mi ld soap solutional, solvent-free plast ic cleaning sol u-
t io n, if necessary
Displays Dirty Soft cloth with LCD cleaner
Controls Dir ty Soft
brus.h, then a so ft cloth with a mild so ap sol utio nal
Safety belts Dirty Mild soap solutional, allow to dry before letting them re-
tract
•
•
Page 209 of 292

-Never use abrasive cleaning materials
or alcohol to clean the camera lens.
Th is could cause scratches and cracks .
-Window s
-Remove snow and ice on w indows and
exterior mirrors with a plastic scraper.
To avoid scratches, move the scraper only in one direction and not back and
forth.
- Never remove snow or ice from w in
dows and m irrors using wa rm or hot
wate r because this cou ld cause crac ks
to form.
- To avoid damage to the rear window
defogger, do not apply any stickers on
the heating wires on the inside of the
w indow .
-Dec or ati ve p arts /trim
-Never use chrome care or cleaning
products.
-Paint
-To reduce the risk of scratches, the ve-
hicle must be free of dirt and dust be
fore polishing or waxing.
- To prevent paint damage, do not polish
or wax the veh icle in direct sunlight.
- To reduce the risk of paint damage, do
no t polish away rust film .
-Di splay s
-To avoid scratches, do not use dry
cleaning methods on displays .
-Controls
- Make sure that no flu ids enter the con-
trols, because this cou ld cause dam
age .
-Safet y belts
- Do not remove the safety belts to clean
t hem.
- Never clean safety belts or their com
ponents chemically or with cor ros ive
fluids or solvents and never a llow
sharp objects to come into contact
with the safety belts . This cou ld cause
damage to the belt webbing.
- If the re is damage to the webb ing, the
connections, the retractors or the buck
les, have them rep laced by an author-
V ehicl e ca re a nd cl eanin g 207
ized A udi dealer or a qualified work
shop.
- Te xtile s/Vin yl/ Alcant ara
- Never treat Vinyl/Alcantara w ith leath-
er care products, solvents, floor polish,
shoe polish, stain remover or s imilar
p rod ucts.
- To avoid damage, have stubborn stains
removed by an authorized Aud i deale r
or a qualif ied workshop.
- Never use steam cleaners, brushes,
hard sponges, etc. when cleaning.
- Objects w ith sharp edges such as zip
pers, rivets on clothing or be lts can
cause damage to the surface.
- Open hook and loop fastene rs, for ex
ample on cloth ing, can damage seat
covers. Make sure hook and loop fas
tene rs a re closed.
- Natural leather
- Neve r treat leather w ith solvents, floor
polish, shoe polish, stain remover or
similar products.
- Objects with sharp edges such as zip·
pers, rivets on clothing or be lts can
cause damage to the surface.
- Never use steam cleaners, brushes,
hard sponges, etc. when cleaning.
- To help prevent the leather from fad
ing, do not leave the vehicle in d irect
sunlight for long per iods of t ime. If
leaving the vehicle parked for long pe
riods of time, you should cover the
leather to protect it from d irect sun
light.
(D Tips
- Insects are easier to remove from paint
that has been freshly waxed.
- Regular waxing can prevent rust film
from forming.
•
•