2014 AUDI RS7 SPORTBACK buttons
[x] Cancel search: buttonsPage 11 of 292

(!) Door handle
@
®
©
®
®
(j)
Audi side assist d isplay
Power locking sw itches
Memory function buttons . ... .
Aud i side assist button .. .. .. .
A ir vents with thumbwheel
Control lever for :
- T urn signal and high beam
- Audi act ive lane assist . .. .. .
@ Mu ltifunction steering wheel
with:
- Horn
- Driver's airbag
- Driver information system but-
tons ... ..... ....... ... .. .
- Audio/video , telephone, navi
gation and voice recognition
buttons
- Steering wheel heating . ... .
- Shift padd les ..... ... .. .. .
® Instrument cluster ..... .. .. .
@ H ead-up Display ....... .. .. .
@ Windsh ield washer system
l ever .... .... ...... ... .. .. .
@ Buttons for :
- MM I display
- Reset button for tr ip odome-
ter .. .. ............. .... .
@ Starting the eng ine if there is a
malfunction
~ Knee airbag ........... .... .
@ Steering whee l adjustment, de
pending on equipment:
- mechanical . ............. .
- electrical
@ Leverfo r:
- Cru ise contro l system
- Adaptive cruise cont ro l .. .. .
@ Button for switch ing the Head
up Display on/off , adjusting the
h eight .. ................ . .
@ Instrument illuminat ion ... .. .
@ Eng ine hood release .... .. .. .
@ D ata Link Connector for On
Board Diag nos tics ( OBD II) . .. .
93
37
57
93
46
90
146 23
72
108 10
28
48
26
76
159
73
73
79
8 1
28
47
213
30
In strument s and control s 9
@ Light switch ..... . .. .. ..... .
@ Buttons for :
- All -weathe r lights
- Night vision assistant . .. ... .
- Rear fog lights . .......... .
@ Power exterior mirror adjust-
ment . ... .... .. . .. .. ..... .
@ Rear lid switc h ............. .
@) Power w indows .... ........ .
@ MMI display
@ Emergency flashers
@ G love compar tment ........ .
@ Front passenger's airbag .... .
@ Valet parking feature ....... .
@ Drives (MMI)
@ Buttons/Indicator ligh ts for
- P arking system ........... .
- PASSENG ER AIR BAG OFF ... .
- Rear spoiler .. .. . .. .... ... .
- E lectron ic Stabili zation Con-
trol .. .. .. .. .. . ... ...... .
@) Four-zone automatic climate
control . .. .. .. .. .. ........ .
@ Storage compartment or ash-
tray with cigarette ligh ter .....
@) I STAR T ENGIN E ST OPI button
@ MMI controls
@ 12-volt socket , (upholde r
@ Elec tromechanical pa rking
brake . ... .. .... . ... ...... .
@ Selector lever
(D Tips
44
4 4
100
44
so
38
41
45
61
146
42
110
155
192
191
69
59,59
74
60,60
77
104
- Some of the equipment or features
shown in the genera l ill ustration may be
standard equ ipment on your vehicle or
may be opt ional equ ipment depending
on you r model. Always ask your autho r
ized Aud i dea le r i f you have a quest ion
about your ve hicl e.
- Ope rat ion of the Multi Med ia Interface
(MMI) is described in a separate manua l.
Page 26 of 292
24 Instruments and warning /indicator lights
to ice on the road ¢ & . If the vehi cle is
stationary, o r if you are dr iving at a very
l ow speed, the tempe rat ure shown in the
display might be slightly higher t han the
actua l o utside temperature. This is
ca used by the heat being rad iated from
t h e eng ine.
- You can se lect the un its used for temper
atu re, speed a nd other measurements in
the MMI.
- Fo r informat ion on the a udio/video and
nav iga tion* functions, refer to the sepa
r ate MMI owner's manual.
Operation
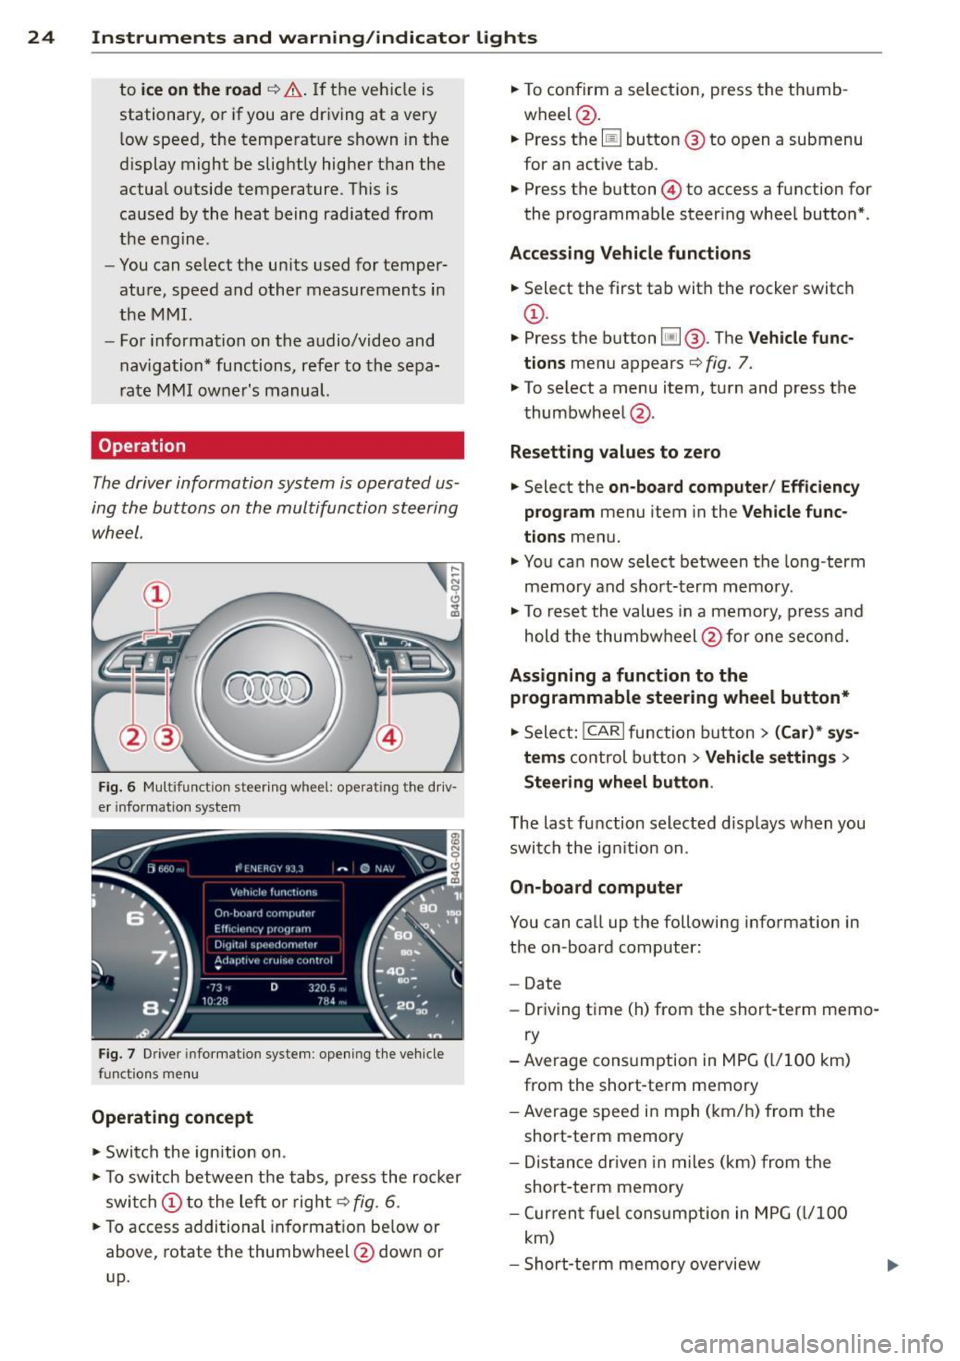
The driver information system is operated us
ing the buttons on the multifunction steering
wheel.
,... ~ N 0 Cl
"' m
Fig. 6 M ultifunction steer ing wheel: operating"the driv
e r in fo rm atio n system
Fi g. 7 Driver infor mat ion syste m: opening t he ve hicle
functio ns me nu
Operating concept
.. Swi tch the ign ition on.
.. To switch between the t abs, press the ro cker
swi tch
(D to the le ft or r ight¢ fig. 6 .
.. To access additional in format io n be low or
above, rotate t he thumbw heel @dow n or
up. ..
To confirm a selec tion, press the th umb
wheel @.
.. Press the
[jJ button @ to o pen a submenu
for an active tab .
.. Press the button@ to access a function for
the programmab le steer ing whee l butto n*.
Acces sing Vehicle functions
.. Select the first ta b with the rocker switc h
(D.
.. Press t he b utton [jj @. The Vehicle func
tions
menu appears¢ fig. 7.
.. To select a menu item, turn and press the
t humbwheel @.
Resett ing values to ze ro
.. Select the on-board computer / Efficiency
program
menu item in the Vehicle func
tions
menu .
.. You ca n now select between the long-term
memory and s ho rt -t erm memory.
.. To res et the valu es in a me mory, press a nd
hold t he thumbw heel @for one se con d.
Assigning a function to the
programmable steering wheel button*
.. Select: !CARI function button> (Car) * sys-
tem s
control button > Vehicle settings >
Steering wheel button .
The last function selected disp lays w hen you
swi tch the ig nition on.
On-board computer
You can ca ll up the followi ng info rmation in
the on-board computer:
- Date
- Dr iving time (h) from the short-term memo-
ry
-Average consumption in MPG ( l/1 00 km)
from the short-te rm memory
- Average spee d in m ph ( km/ h) fr om the
short-te rm memory
- Dis tance driven i n m iles (km) from the
short -te rm memory
- Cur ren t fu el con sumption in MPG ( l/1 00
km)
- Short-te rm memory overview
Page 41 of 292
~ Press and hold the button l"" I for at least
four seconds to store the new open position.
A visual and audio signal will follow.
The settings in the MMI determine if the rear lid can be opened using the handle ¢
page 35.
Opening will be stopped immediately when:
- You press the button
l"" I on the remote con-
trol master key, or
- You press the button
l"" I in the rear lid, or
- You push the handle in the rear lid, or
- You pull the button
l.:::s ! in the driver's door,
or
- When something blocks the rear lid or
makes it difficult for the lid to move.
If you press one of the buttons ~now, the
rear lid will either open or close, depending on
its angle .
Closing will be stopped immediately when:
- You press the button
l"" I in the rear lid, or
- You push the handle in the rear lid, or
- You release the button
l""I on the driver's
door, or
- When something blocks the rear lid or
makes it difficult for the lid to move.
If you press one of the buttons ~now, the
rear lid will either close or open, depending on
its angle .
You can manually stop the automatic open ing/closing of the rear lid. The automatic clos
ing process begins if you push down on the
rear lid.
A WARNING
-After closing the rear lid, always pull up
on it to make sure that it is properly
closed. Otherwise it could open suddenly
when the vehicle is moving .
- To help prevent poisonous exhaust gas
from being drawn into the vehicle, al
ways keep the rear lid closed while driv
ing. Never transport objects larger than
those which fit completely into the lug
gage area, because then the rear lid can
not be fully closed.
Opening and closing 39
- Never leave your vehicle unattended es
pecially with the rear lid left open. A
child could crawl into the car through the luggage compartment and pull the lid
shut, becoming trapped and unable to
get out . To reduce the risk of personal in
jury, never let children play in or around
your vehicle. Always keep the rear lid as
well as the vehicle doors closed when not
in use.
- Never close the rear lid inattentively or
without checking first. Although the
closing force of the rear lid is limited,
you can still seriously injure yourself or
others .
- Always ensure that no one is within
range of the rear lid when it is moving, in
particular close to the hinges and the up
per and lower edges - fingers or hands
can be pinched .
- Never try to interfere with the rear lid or
help it when it is being opened or closed
automatically .
(D Note
The rear lid can bump into objects such as
the garage ceiling when opening and be
come damaged.
(D Tips
-Audio signals are given when you close
the rear lid using the
l a! button in the
driver's door.
- If there is a mechanical problem with au
tomatic closing for the rear lid or there is
an obstruction, it opens again immedi
ately . Check to see why the rear lid could
not be closed before attempting to close
it again .
- The following applies to vehicles equip
ped with the Convenience key* feature: if
the remote control key is left in the lug
gage compartment, luggage compart
ment will automatically unlock itself af
ter you lock the vehicle. This prevents
you from unintentionally locking your
key in the luggage compartment. .,.
Page 43 of 292
![AUDI RS7 SPORTBACK 2014 Owners Manual .. To activate the child safety lock for the left/
right rear door, press the left/right button
Ii]
in the drivers door ¢ fig. 33. The light in the
button w ill turn on.
.. To AUDI RS7 SPORTBACK 2014 Owners Manual .. To activate the child safety lock for the left/
right rear door, press the left/right button
Ii]
in the drivers door ¢ fig. 33. The light in the
button w ill turn on.
.. To](/manual-img/6/57649/w960_57649-42.png)
.. To activate the child safety lock for the left/
right rear door, press the left/right button
Ii]
in the driver's door ¢ fig. 33. The light in the
button w ill turn on.
.. To deactivate the child safety lock for the
left/right rear door, press the left/r ight but
ton
1±1 in the driver's door. The light in the
button turns off.
The follow ing features are switched off:
- The interior door handles in the rear doors,
- The power windows in the rear doors.
I n order to activate the child safety lock on
the left and the right s ide, press the two safe
ty buttons
Ii] in succession.
Power windows
Controls
The driver can control all power windows.
Fig. 34 Section of the driver 's doo r: Cont rols
l(l 0 0 0
"' m
All power window switches are provided with
a two-position function :
Opening the windows
.. Press the switch to the first stop and hold it
until the window reaches the desired posi
tion.
.,. Press the switch br iefly to the
second stop
to automatically open the window.
Closing the windows
.. Pull the switch to the first stop and hold it
until the window reaches the desired posi
t ion.
.. Pull the switch briefly to the
second stop to
automatically close the window .
Opening and closing 41
Power window switches
@ Driver's door
® Passenger's door
© Left rear door
@ Right rear door
.,&_ WARNING
-When you leave your vehicle - even if on
ly briefly - always take the ignit ion key
with you. This applies particularly when children remain in the vehicle. Otherwise
the children could start the engine or op
erate electrical equipment (e.g. power
windows). The power windows are func
tional until the driver's door or passeng
er's doo r has been opened.
- Be careful when closing the w indows.
Check to see that no one is in the way, or
serio us injury could result!
- When locking the vehicle from outside,
the vehicle must be unoccupied since the
windows can no longer be opened in an
emergency .
{D Tips
-When you open the doors, the windows
automatically lower abo ut 10 mm.
- When the window in the driver's or pas
senger's door is complete ly open, it will
raise approximately 25 mm when the
door is opened. The window will lower
again when you close the door.
- After the ignition has been switched off,
the windows can sti ll be opened or
closed for about 10 minutes. The power
windows are not switched off until the
dr iver's door or passenger's door has
been opened .
What to do after a malfunction
The one-touch open and close function must
be reactivated if the battery has been discon
nected.
.. Pull and ho ld the power window switch until
the window is fully closed. .-
Page 59 of 292
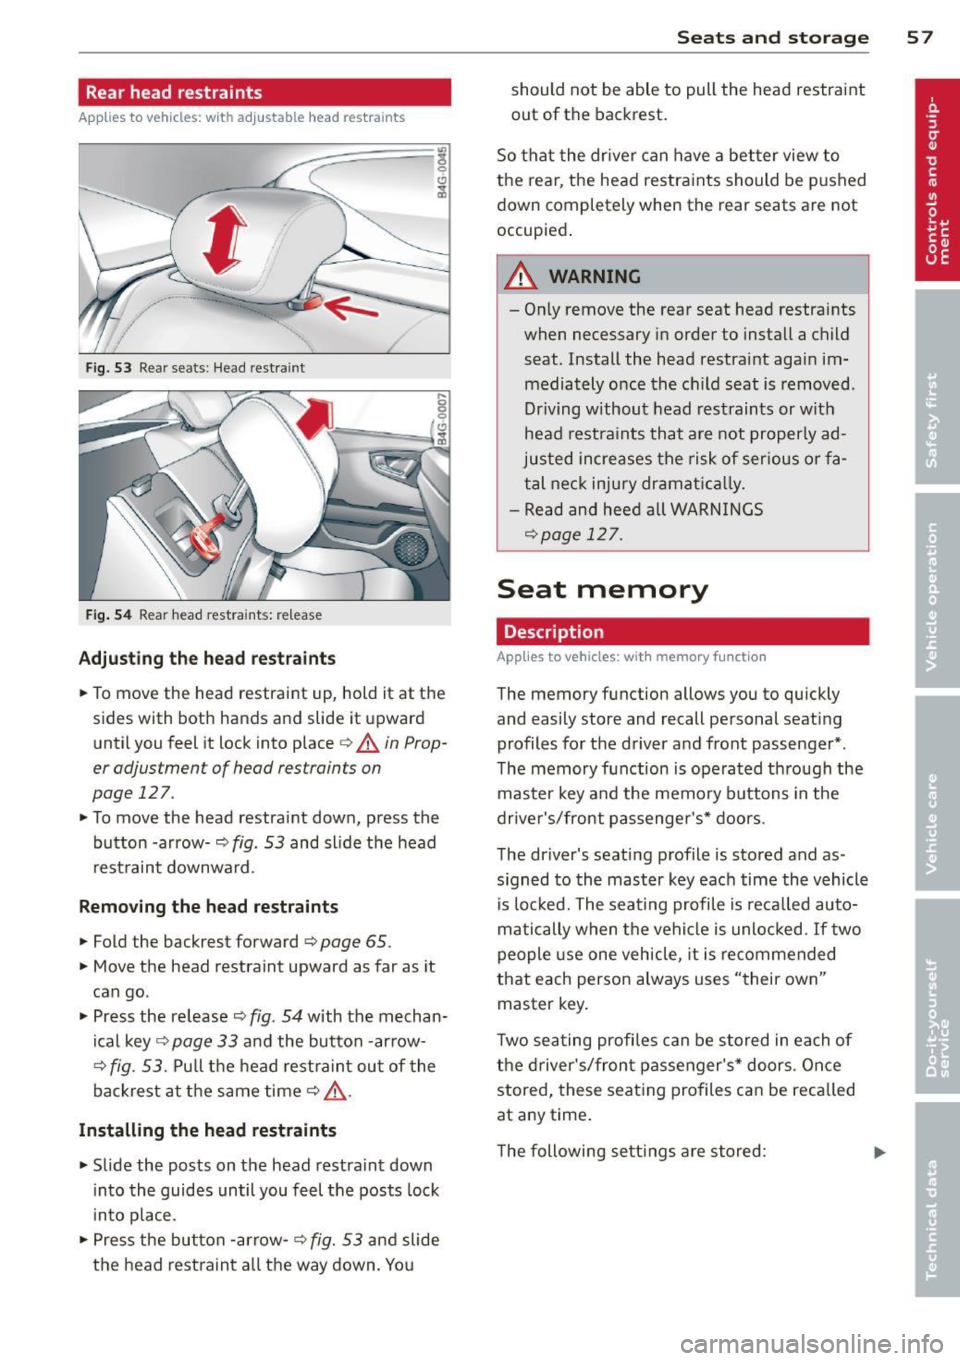
Rear head restraints
Applies to vehicles: with adj ustable head restraints
--
/
Fig. 53 Rear seats: Head restra int
Fig. 54 Rear head restra ints: re lease
Adjusting the head restraints
• To move the head restraint up, hold it at the
sides with both hands and slide it upward
until you feel it lock into place
¢ .&. in Prop
er adjustment of head restraints on
page 127.
• To move the head restraint down, press the
button -arrow-
q fig . 53 and sl ide the head
restraint downward .
Removing the head restraint s
• Fold the backrest forward ¢ page 65 .
• Move the head restraint upward as far as it
can go .
• Press the release¢
fig. 54 with the mechan
ical key ¢
page 33 and the button -arrow-
¢
fig. 53. Pull the head restraint out of the
backrest at the same time
q _&..
Installing the head restraints
• Slide the posts on the head restraint down
into the guides until you feel the posts lock
i nto place .
• Press the button -arrow-
¢ fig. 53 and slide
the head restraint a ll the way down. You
Seats and storage 57
should not be able to pull the head restraint
out of the backrest.
So that the driver can have a better view to
the rear, the head restraints should be pushed
down completely when the rear seats are not
occupied .
A WARNING
-On ly remove the rear seat head restraints
when necessary in order to install a child
seat. Install the head restraint again im mediately once the child seat is removed.
Driving without head restraints or with
head restraints that are not properly ad
justed increases the risk of serious or fa
tal neck injury dramat ically.
- Read and heed all WARNINGS
qpoge 127.
Seat memory
Description
Applies to vehicles: wit h memory function
The memory func tion allows you to quickly
and easily store and recall personal seating
profiles for the driver and front passenger* .
The memory function is operated through the
master key and the memory buttons in the
driver's/front passenger's* doors.
The driver's seating profile is stored and as
s igned to the master key each time the vehicle
is locked. The seating profile is recalled auto
matically when the vehicle is unlocked. If two
people use one vehicle, it is recommended
that each person always uses "their own"
master key.
Two seating profiles can be stored in each of
the driver's/front passenger's* doors. Once
stored, these seating profiles can be recalled
at any time .
The following settings are stored:
Page 60 of 292
58 Seats and storage
Remote Memory button
control master
key
Driver Driver Front
passen- ger
Seat X X X
Stee ring X X
wheel*
Both exterior
X X
rearview mir-
rors*
Remote control key
Applies to vehicles: with memory function
To assign the driver's seat settings to the re
mote control key when locking the vehicle, the
function must be switched on .
• Se lect:
I CAR I funct ion button > (Ca r)* sys
tems
con trol button > Vehicle settings >
Seats > Driver seat > Remote control key >
On.
@ Tips
If you do not want another driver's set
tings to be assigned to the remote contro l
key, switch off the memory function using
the MMI or the
!OFF ! button c::> page 58.
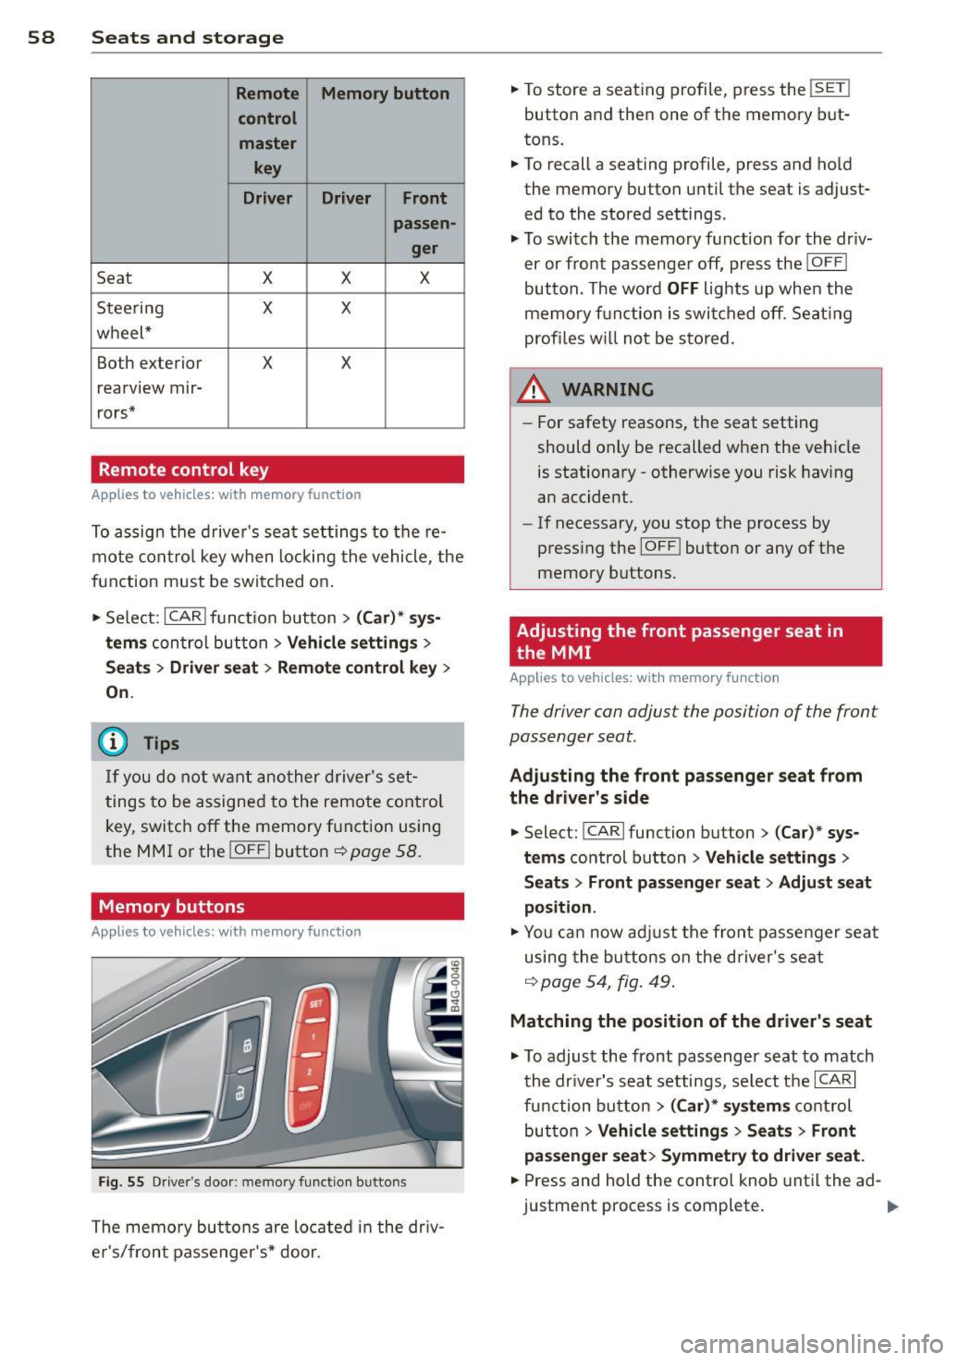
Memory buttons
Applies to vehicles: with memory function
Fig. 55 Driver's door: memory function buttons
The memory buttons are located in the dr iv
e r's/front passenger's* door. •
To store a seat ing profile, press the
!SET !
button and then one of the memory but
tons .
• To recall a seating profile, press and hold
the memory button until the seat is adjust
ed to the stored settings.
• To switch the memory function for the driv
er or front passenge r off, press the
IOFF I
button. The word OFF lights up when the
memory fu nctio n is swi tched off. Seating
profi les wi ll not be stored.
.&, WARNING
- For safety reasons, the seat setting
should only be recalled when the vehicle
is stationary -otherwise you risk having
an accident.
- If necessary, you stop the process by
press ing the
I OF F! button or any of the
memory buttons.
Adjusting the front passenger seat in
. the MMI
Applies to vehicles: with memory function
The driver con adjust the position of the front
passenger seat.
Adjusting the front pas senger seat from
the driver's side
• Select: !CARI function button> (C ar) * sys
tems
control button > Vehicle settings >
Seats> Front passenger seat > Adjust seat
position .
• You can now adjust the front passenger seat
using the buttons on the d river's seat
q poge54 , fig. 49.
Matching the position of the driver's seat
• To adjust the front passenger seat to match
the dr iver's seat settings, select the
ICARI
function button > (Car)* systems control
button
> Vehicle settings > Seats> Front
passenger seat> Symmetry to driver seat.
• Press and hold the control knob until the ad
justment process is complete.
Page 72 of 292
70 Warm and cold
Operation
Applies to vehicles: with four -zone a utomat ic climate control
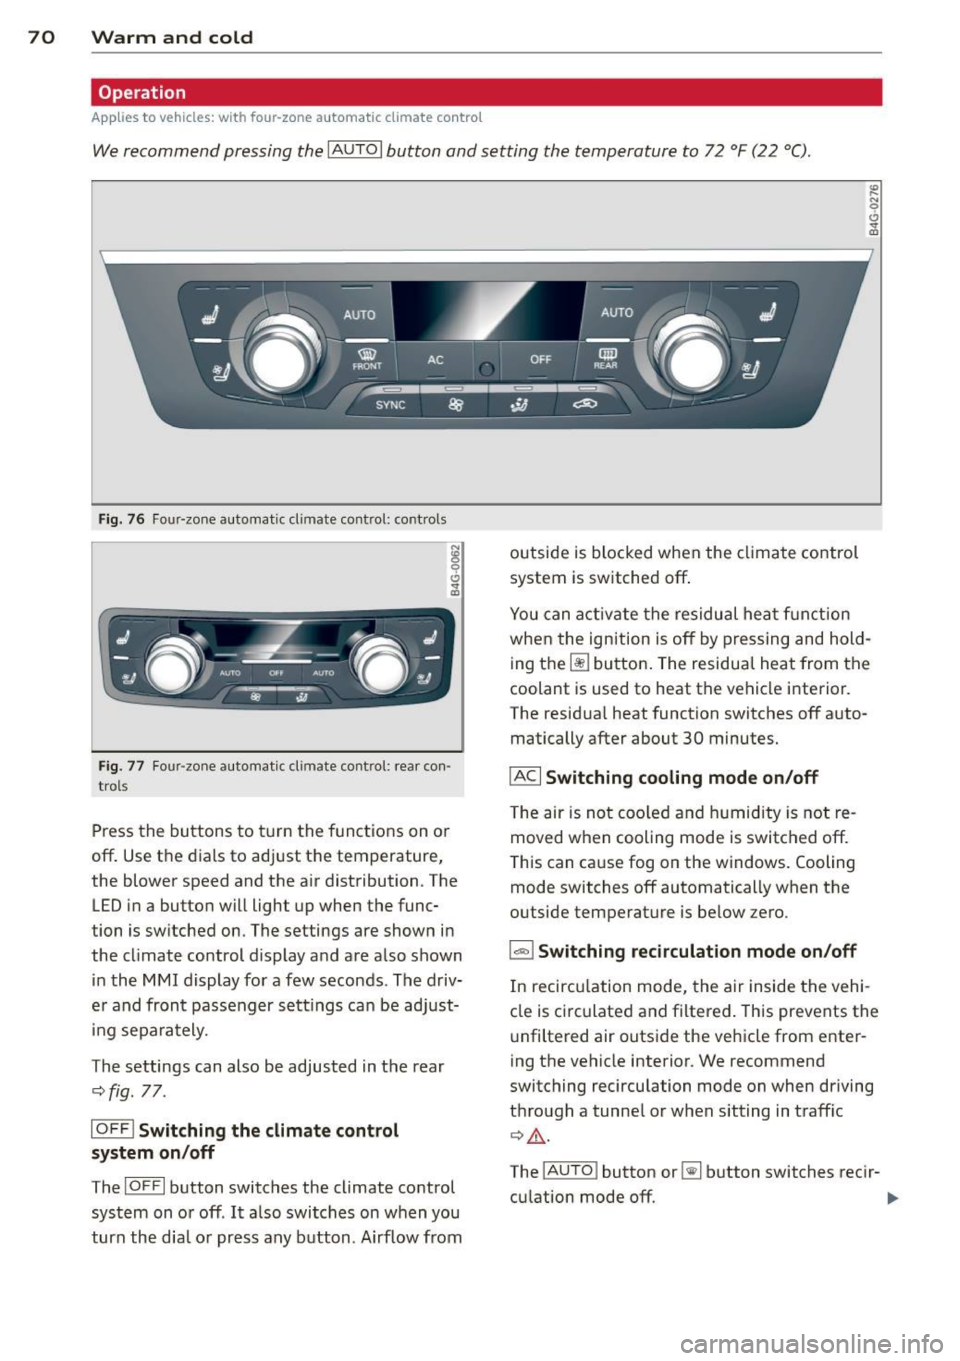
We recommend pressing the IAU TO I button and setting the temperature to 72 °F (22 °C) .
Fig. 76 Four-zone automatic climate control: controls
N :g
9 C)
"" m
Fig . 77 Four -zone automatic climate control: rear con
trols
Press the buttons to turn the functions on or
off . Use the dials to adj ust the temperature,
the blower speed and the a ir distribution. The
LED in a button will light up when the func
tion is switched on. The settings are shown in
the cl imate control display and are a lso shown
in the MMI display for a few seconds . The driv
e r and fron t passenger settings can be adjust
in g separately.
The settings can also be adjusted in the rear
c::>fig. 77.
IOFFl Switching the climate control
system on/off
The IO FFI button switches the climate control
system on or off .
It also switches on w hen you
turn the dia l or press any button . Airflow from outside is
blocked when the climate control
system is switched off.
You can activate the residual heat function
when the ignition is off by pressing and hold
ing the ~ button. The residua l heat from the
coolant is used to heat the vehicle i nterior.
The residua l heat function switches off auto
matically after about 30 minutes.
IACI Switching cooling mode on/off
T he air is not coo led and humidity is not re
moved when cooling mode is switched off.
T his can cause fog on the windows. Cooling
mode switches off automatically when the
outside temperature is be low zero .
1-1 Switching recirculation mode on/off
In recircu lation mode, the air inside the vehi
cle is circulated and filtered . This prevents the
u nfiltered air outside the vehicle from enter
ing the vehicle interior. We recommend
switching recirculation mode on when driving
through a tunne l or when sitting in traff ic
c::> ,&. .
The
! A UT O I button or~ button switches reci r-
cu lation mode off. ..,.
Page 86 of 292
84 Audi adaptive cruise control and braking guard
tachometer ® and is also shown briefly in
the display @¢fig.
91.
• You must also press the brake pedal when
the vehicle is stopped.
Switching adaptive cruise control off
• Push the lever away from you into position
@ until it clicks into place. The message
ACC off appears.
@ Indicator lights
f. j. Adap tive cruise control is switched on . No
vehicles are detected up ahead. The stored
speed is ma intained.
I -A moving vehicle is detected up ahead.
The adaptive cruise control system regulates
the speed and distance to the moving veh icle
ahead and acce lerates/brakes automat ica lly.
Si-Adaptive cruise control is switched on. A
moving vehicle up ahead was detected. You r
vehi cle remains stopped.
I-When automatic braking is not able to
keep enough distance to a previously detected
moving vehicle up ahead, you must take con
trol and brake ¢
page 86, Prompt for driver
intervention.
© Display
If adaptive cruise control is not shown in the
display, you can call it up with the multifunc
tion steering wheel buttons¢
page 23.
Based on the symbols in the display, you can
determ ine if the system is maintaining a dis
tance to the vehicle ahead and what that dis
tance is.
No vehicle -No vehicle ahead was detected .
White vehicle -A vehicle ahead was detected.
Red vehicle -Prompt for the driver to take ac
tion
c:::> page 86.
Both arrows on the scale © indicate the dis
tance to the vehicle ahead. No arrow appears
when the vehicle is on an open road and there
is no object ahead . If an object is detected
ahead, the arrow moves on the scale . T
he green zone on the scale shows the stored
distance. For information on changing the
stored distance, refer to ¢
page 85. If the
distance se lected is too close or may soon be
come too close, the arrows move into the red
zone on the sca le .
_&. WARNING
Improper use of the adaptive cruise con
trol can cause collisions, other accidents
and serious personal injur ies.
- Pressing the
ISET ! button when driv ing at
speeds be low 20 mph (30 km/h), will au
tomatically accelerate the vehicle to 20
mph (30 km/h), which is the minimum
speed that can be set.
© Tips
-If you switch the ignit ion or the adaptive
cruise control off, the set speed is erased
from the system memory.
- Th e electronic stabilizat ion contro l (ESC)
and the anti-s lip-regulat ion (ASR) are au
tomatically turned on when the adaptive
cruise control is turned on. Both systems
cannot be turned off if the adaptive
cruise contro l is turned on.
Changing the speed
Applies to veh icles: w ith Aud i adaptive cruise control
0
f
jJ
0
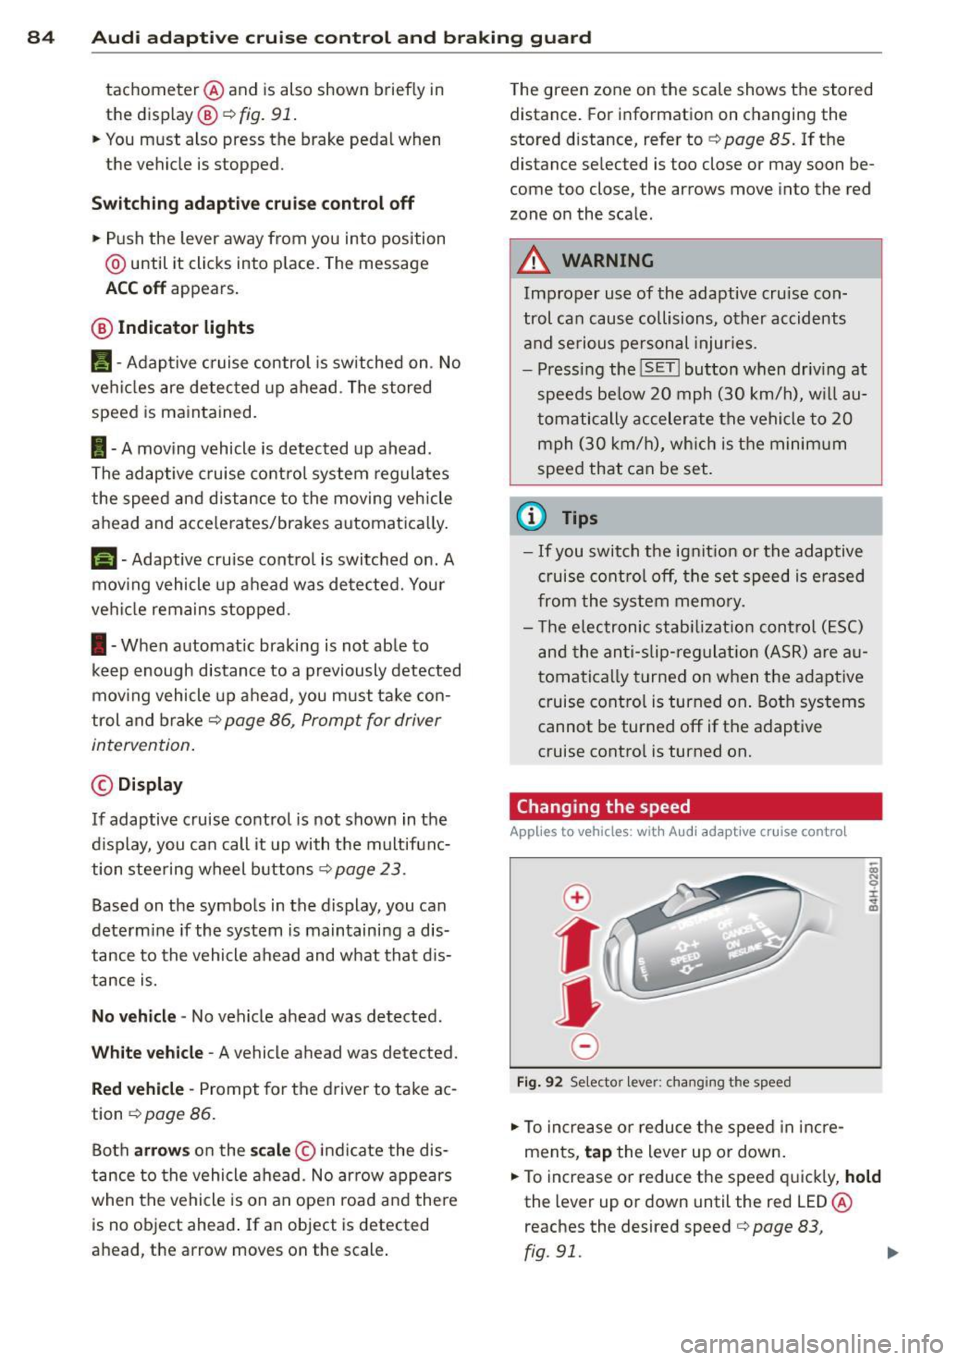
Fi g. 92 Selecto r lever: chang ing t he speed
• To increase or reduce the speed in incre
ments,
tap the lever up or down.
• To increase or reduce the speed quickly,
hold
the lever up or down until the red LED ®
reaches the desired speed
c:::> page 83,
rg . 91. ~