2014 AUDI RS7 SPORTBACK brake light
[x] Cancel search: brake lightPage 201 of 292
Avoid damaging the
vehicle
When you are driving on poor roads, or over
curbs, steep ramps, etc., make certain that
low-lying parts such as spoilers and exhaust
system parts do not bottom out and get dam
aged.
T his is especially true for vehicles with low
slung chassis (sports chassis) * and fully load
ed veh icles .
Driving through water
on roads
Note the following to avoid vehicle damage
when driving through water, for example on
flooded roads:
- T he water must not be any h igher than the
bottom of the veh icle body.
- Do not d rive faster than wa lking speed.
..&, WARNING
After driving through wate r, m ud, slush,
etc., the brakes may be slow to take effect
because o f wet brake rotors and pads . Dry
the brakes first by braking carefully to re
store the full braking effect.
(D Note
- Vehicle components such as the eng ine,
transmission, suspension or e lectrical
system can be severely damaged by driv ing through water.
- Check the depth o f the water before driv
ing through it.
- Do not s top the veh icle, drive in reverse
or switc h the engine off when driving
through water.
- Keep in mind that oncoming vehicles may create waves that raise the water
level and make it too deep for your vehi
cle to drive through safely.
- Avoid driving thro ugh sa lt water because
it can ca use corrosion.
-
Dri vin g and en vironm ent 199
Warming up and
cooling down
By carefully warming up and cooling down
your vehicle, you can help ensure that it is not
overstressed unnecessar ily during sporty dr iv
ing.
When warming up, the vehicle is dr iven at a
maximum engine speed of 6000 RPM in order
to raise the engine o il temperature to a mini
mum of 140
°F (60 °() . The t ires a lso on ly
reach the ir full road holdi ng capabi lity once
they have warmed up.
The cooli ng fan can cont inue to run in your ve
hicle after the engine is switched off . Howev
er, driving the veh icle to coo l it down is pa rti c
ul arly important. Dur ing spo rty driving , the
engine and b rakes, the exhaust system, and
the transmission a ll become extremely hot.
Before you park the vehicle, you should drive
it for a few miles/kilometers at light load in
the low rpm range to allow it to cool down .
Catalytic converter
App lies to vehicles: wi th gaso line e ngi ne
It is very important that your emission con
trol system (catalytic converter) is function
ing properly to ensure that your vehicle is run
ning in an environmentally sound manner.
"' Always use lead-free gasoline c:> page 208,
Fuel supply .
"' Never run the tank down all the way to emp
ty.
"' Never put too much mo to r o il in yo ur eng ine
c:> page 218, Adding engine oil "t:::r..
"' Never try to push -or tow -start you r vehicle .
T he catalytic co nve rter is an efficient "clean
u p" dev ice bui lt into t he exhaus t system of
the ve hicle . The cata lytic converter bu rns
many of the pollutants in the exha ust gas be
fore they are re leased into the atmosphere.
T he exclus ive use of unleaded fuel is c ritical ly
i mportant for the life of the catalyt ic convert -
er and proper functioning of the engine .
Iii>
•
•
Page 206 of 292

204 Vehicle care and cleaning
Rinse the vehicle thoroughly again and let it
air dry. Remove any water residue using a
shammy .
Stubborn deposits such as bird droppings or
tree sap are best removed with plenty of wa
ter and a microfiber cloth.
A WARNING
-Only wash the vehicle when the ignition
is off and follow the instructions from
the car wash operator to reduce the risk
of accidents .
- To reduce the risk of cuts, protect your
self from sharp metal components when
washing the underbody or the inside of
the wheel housings.
- After washing the vehicle, the braking ef
fect may be delayed due to moisture on
the brake rotors or ice in the winter. The
brakes must be dried first with a few
careful brake applications .
(D Note
-If you wash the vehicle in an automatic
car wash, you must fold the exterior mir rors in to reduce the risk of damage to
the mirrors. Power folding exterior mir- rors* must only
be folded in and out us
ing the power folding function.
- To prevent paint damage, do not wash
the vehicle in direct sunlight.
- To reduce the risk of damage to the sur
face, do not use insect removing spong
es, kitchen sponges or similar items.
- Matte finish painted vehicle compo
nents :
- To reduce the risk of damage to the
surface, do not use polishing agents or
hard wax.
- Never use car wash cycles that apply
protective wax.
It can destroy the
matte finish effect.
- Do not place any stickers or magnetic signs on vehicle parts painted with matte finish paint. The paint could be
damaged when the stickers or magnets
are removed.
@) For the sake of the environment
Only wash the vehicle in facilities specially
designed for that purpose. This will reduce
the risk of dirty water contaminated with
oil from entering the sewer system.
Cleaning and care information
When cleaning and caring for individual vehi
cle components, refer to the following table.
The information contained there is simply rec
ommendations. For questions or for compo- nents that are not listed,
refer to an author
ized Audi dealer or a qualified workshop. Also
follow the information found in~& .
Cleaning exterior
Component Situation Solution
Wiper blades
D irty ~ page 49, Cleaning windshield wiper blades
Headlights/
Dirty Soft sponge with a mild soap solutiona>
tail lights
Sensors/
Dirty Sensors: soft cloth with a solvent-free cleaning product
camera lenses Camera lenses: soft cloth with an alcohol-free cleaning
solution
Snow/ice Hand brush/solvent-free de-icing spray
Wheels Road salt
Water
Brake dust Acid-free special
cleaning solution
Page 215 of 292
Checking and filling Engine hood
Releasing the engine hood
The engine hood is released from inside the
vehicle .
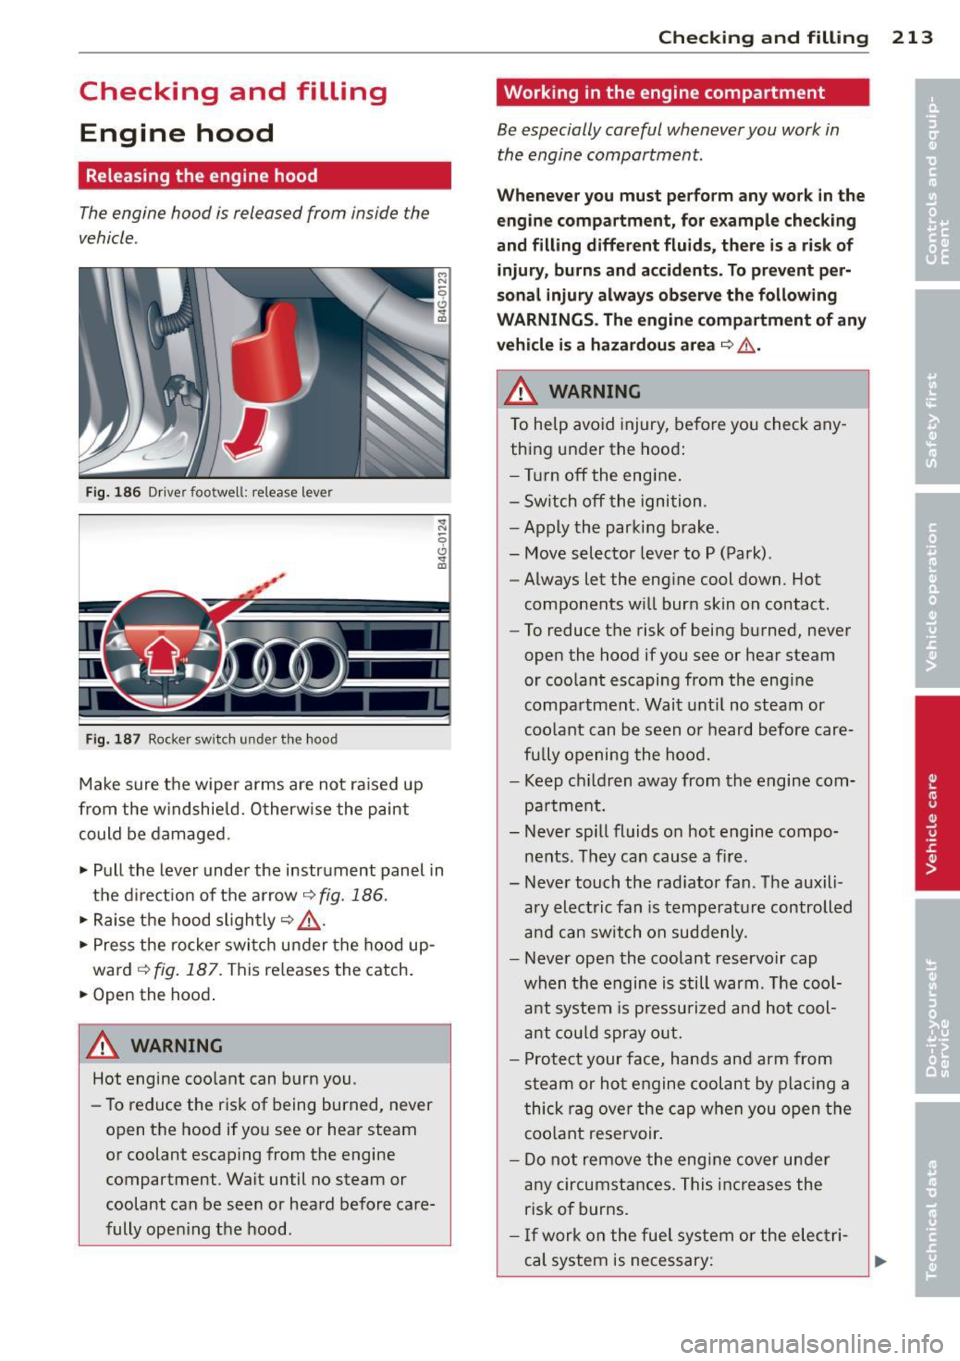
Fig. 186 Dr iver footwell: release lever
Fig. 187 Rocker switch under the hood
Make sure the wiper arms are not raised up
from the w indshield. Otherw ise the paint
could be damaged.
.. Pull the lever under the instrument panel in
the d irect ion of the arrow~
fig. 186.
.. Raise the hood slightly~ &-
.. Press the rocker switch under the hood up
ward
~ fig. 187. This re leases the catch .
.. Open the hood .
A WARNING
Hot engine coo lant can burn you.
- To reduce the r isk of being burned, never
open the hood if you see or hear steam
or coolant escaping from the engine
compartment . Wait until no steam or
coolant can be seen or heard before care
fully opening the hood.
Checkin g and fillin g 213
Working in the engine compartment
Be especially careful whenever you work in
the engine compartment.
W hen ev er y ou must p erform an y wor k in the
en gine com pa rtm ent , for e xample checking
a nd filling diff ere nt fluid s, th ere is a risk of
inju ry, burn s and accid ents. To pr eve nt p er
so nal inju ry always observ e the foll owing
W ARNING S. The engin e compartm ent of any
v e hicle i s a haza rdou s area
~ ,& .
h WARNING
To help avoid injury, before yo u check any
thing under the hood:
- Turn off the engine.
- Sw itch off the ignition.
- Apply the parking brake.
- Move selector leve r to P (Park).
- Always let the engine cool down. Hot
components w ill burn skin on contact .
- To reduce the risk of being burned, never
open the hood if you see or hear steam
or coo lant escaping from the engine
compa rtment. Wait unt il no steam or
coolant can be seen or heard before care
fu lly opening the hood.
- Keep ch ildren away from the engine com
pa rtment.
- Never sp ill fluids on hot engine compo
nents . They can cause a fire .
- Never touch the rad iator fan. The auxili
ary electric fan is temperat ure controlled
and can switch on suddenly .
- Never open the coolant reservoir cap
when the engine is still warm. The cool
ant system is p ressu rized and hot cool
a nt cou ld spray o ut.
- Protect your face, hands and arm from
steam or hot engine coolant by plac ing a
thick rag ove r the cap when you open the
coo lant rese rvoir.
- Do not remove the engine cover under
any circumstances. This inc reases the
ris k of burns.
- If work on the fue l system o r the elec tri
cal system is necessary:
Page 217 of 292
Checking and fillin g 215
Engine compartment
Engine compartment overview
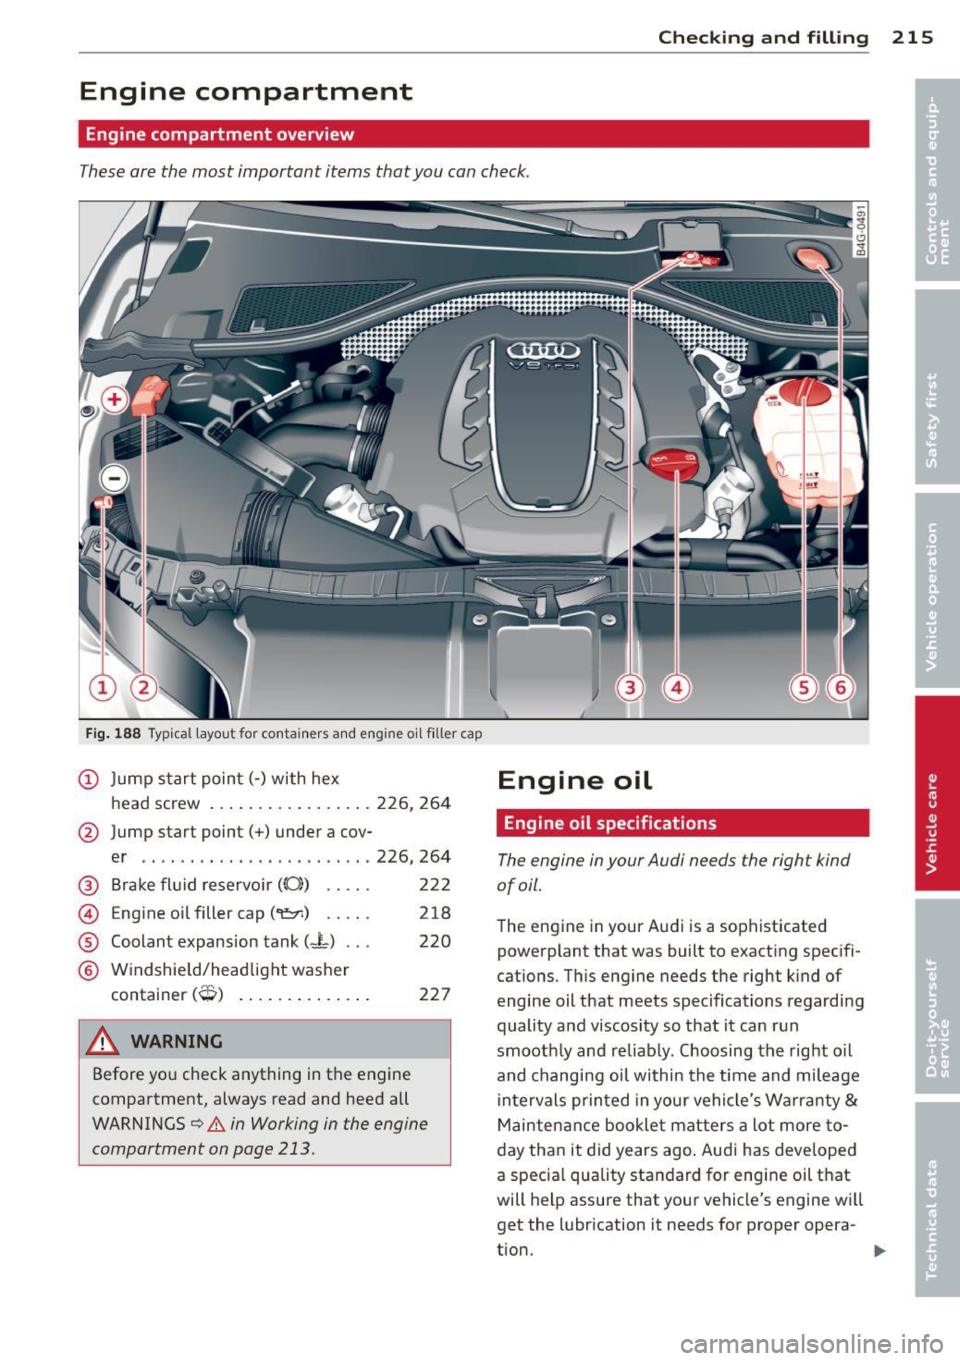
These are the most important items that you can check.
Fig. 188 Typical l ayout for conta iners and engine o il filler cap
@ Jump start poin t(-) with hex
head screw .. .. ..... ... .. .. . 226, 264
@ Jump start point(+) under a cov-
er .. .. ... ..... ...... ...... 226, 264
@ Brake fl uid reservo ir ((0)) . . . . . 22 2
© Engine oil filler cap ("1:::r.) . . . . . 218
® Coolant expansion tank (-L) . . . 220
© W indshield/headlight washer
container
(0) . . . . . . . . . . . . . . 227
_& WARNING
Before you check anything in the engine
compartment, always read and heed all
WARNINGS
Q .&. in Working in the engine
compartment on page 213.
-
Engine oil
Engine oil specifications
The engine in your Audi needs the right kind
of oil.
T he eng ine in your Audi is a sophisticated
powerplant that was built to exacting specifi
cations. This eng ine needs the right k ind of
engine oil that meets specifications regarding
quality and viscosity so that it can r un
smooth ly and reliably. Choosing the right o il
and changi ng oil within the t ime and mileage
in tervals p rin ted in you r vehicle's Wa rranty
&
Maintenance booklet matters a lot more to
day than it did years ago . Audi has deve lope d
a specia l quality sta ndard for engine oil t hat
will help assure that your vehicle's engine w ill
get the lubrication it needs for proper opera
tion.
Page 224 of 292
222 Checking and filling
pressure relief valve in the cap when the en
gine becomes hot.
.&_ WARNING
- The cooling system is under pressure and
can get
very hot. Reduce the risk of
sca lding from hot coolant by following
these steps .
- Turn off the eng ine and a llow it to cool
down.
- Protect your face, hands and arms from
escap ing flu id and steam by cover ing
the cap with a large , thick rag .
- Tu rn the cap slowly and
very carefully
in a counter -clockwise direction while
applying light, downward pressure on
the top of the cap .
- To avo id being burned, do not sp ill an
tifreeze or coolant on the exhaust sys
tem or hot engine parts. Under certain
conditions, the ethylene glycol in en
g ine coolant can catch fire.
- Antifreeze is poisonous. Always store an
t ifreeze in its original container and well
out of the reach of children.
- If you drain the coolant, it must be
caught and safely stored in a proper con
ta iner clearly marked "poison".
(D Note
- Coolant po llutes the environment and
could cause an engine fire. Excess coo l
ant will be forced out through the pres
sure relief valve i n the cap when the en
gine becomes hot .
- If, in an emergency, only water can be
added, the correct ratio between wate r
and antifreeze ~
page 220 must be re
stored as soon as possib le.
@) For the sake of the environment
Dra ined coolant should not be reused . Al
ways dispose of used coolant while
observ
ing all environmental regulations .
Radiator fan
The radiator fan switches on automatically by
itself .
An auxilia ry electric r adiator fan switches on
and off depending on coolan t tempera ture
and other vehicle operat ing condit ions .
After you switch the engine off, the aux iliary
fan can continue running for up to 10 minutes
- even w ith the ignition off . It can even swi tch
on aga in later by itself
c> .&. , if
- the temperature of the engine coo lant rises
due to the heat build-up from the engine in
the engine compartmen t, or
- the engine compartment heats up because
the vehicle is parked in intense sunlight.
.&_ WARNING ,_
- To reduce the risk of personal injury nev
er touch the radiator fan .
- The auxiliary electric fan is temperature
controlled and can sw itch on suddenly
even when the engine is not running .
- The auxiliary radiator fan sw itches on au
tomatically when the engine coo lant
reac hes a certain t emperature and wi ll
continue to run until the coolant temper
a ture drops.
Brake fluid
Checking brake fluid level
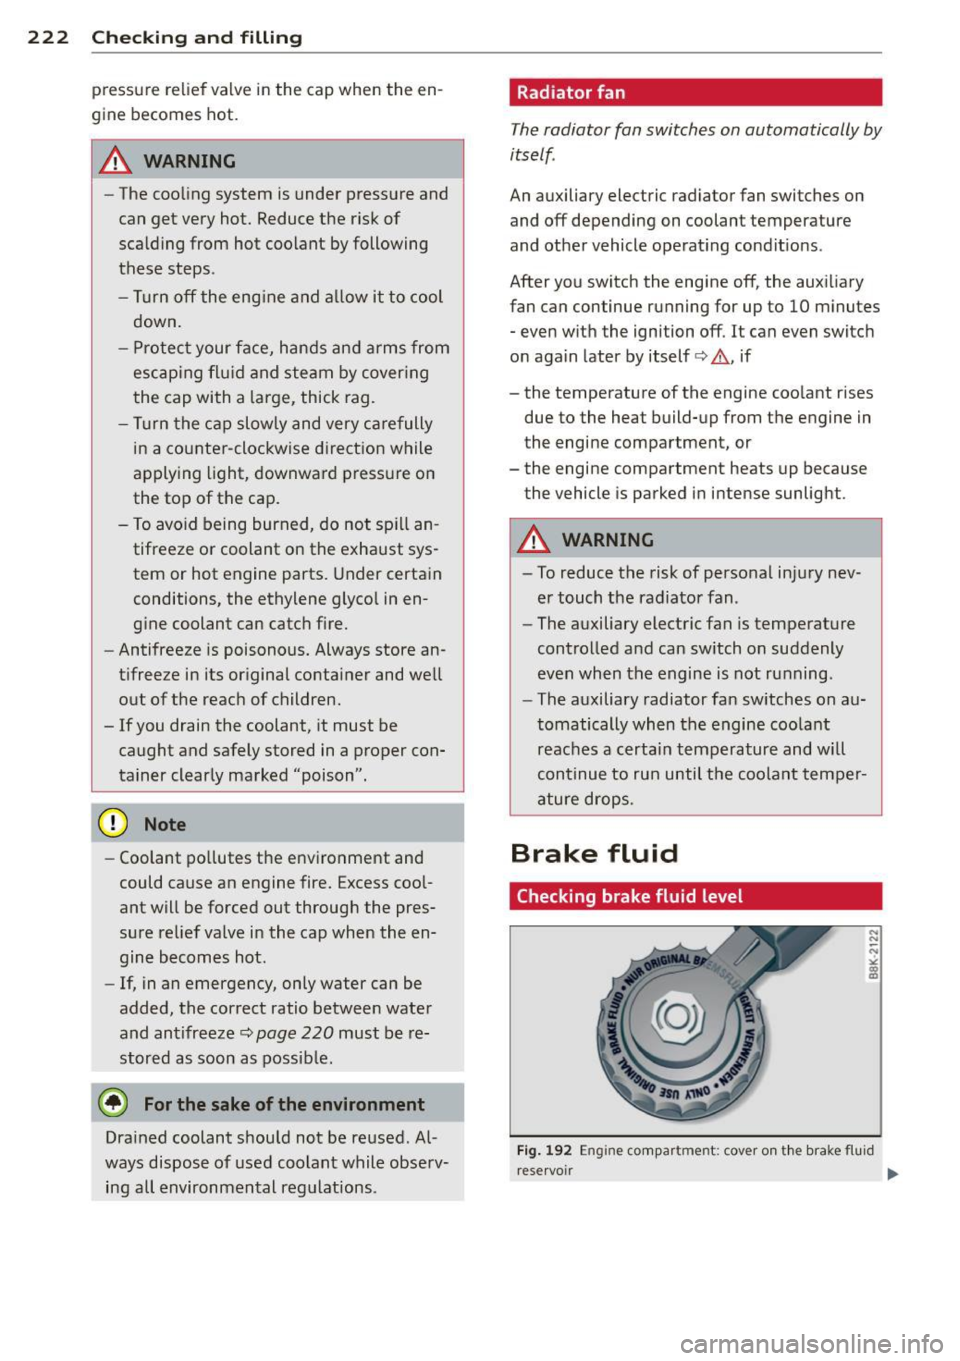
Fi g. 19 2 Engin e compart ment: cover on t he bra ke fluid
re servoir
Ill>
Page 225 of 292
Before you check anything in the engine com
partment,
always r ead and heed all W ARN
ING S ~ A in Working in the engine compart
ment on page 213.
.. Read the brake fluid level from the brake
fluid reservoir ¢
fig. 192, ~ page 215,
fig . 188.
The brake fluid level must be be
tween the "MIN" and "MAX" markings.
The location of the brake fl uid reservoir can be
seen in the engine compartment illustration
¢page 215.
The fluid level may drop slightly after some
time due to the automatic adjustment of the brake pads . This is not cause for alarm .
If the brake fluid level falls considerably be
l ow the "MIN" mark, the brake wa rning/indi
cator light
1111 (U .S . models)/ . (Canadian
models) will come on
~ page 14. Do not con
tinue to operate the vehicle. The comp lete
brake system shou ld be thoroughly checked
by an authorized Audi dealer or other quali
f ied fac ility and the cause corrected . If the
b rake fluid level is too low, the brake warn ing/
i ndicator light w ill illuminate . Contact an au
thor ized Audi dealer
imm ediately .
Changing brake fluid
Have the brake fluid changed by an experi
enced technician .
Brake fluid absorbs moisture from the a ir . If
the water content in the brake fluid is too
hi gh, cor rosion in the brake system may result
after a per iod of t ime . The bo iling po int of the
b rake fluid w ill also decrease considerab ly and
decrease braking performance.
Therefore, the brake flu id must be changed
ev ery two ye ars. A lways use new b rake fluid
which confo rms to Federal Motor Vehicle
Standard "FMVSS
116 DO T 4".
The brake flu id rese rvoi r ca n be difficult to
r each, therefo re , we recommend that yo u
h ave the brake fl uid changed by you r autho r
i zed
Audi de aler . Your dea le r has the correct
Checkin g and fillin g 223
tools, the right brake fl uid and the know -how
to do this for you .
A WARNING
-Brake flu id is poisonous. It must be stor
ed only in the closed or iginal container
out of the reach of children!
- Brake failure can resu lt from o ld or inap
propriate brake f lu id. Observe these pre
cautions:
- Use only b rake fluid tha t meets SA E
spe cificat ion
J 17 03 and conforms to
Federa l Moto r Ve hicl e Standard
116.
Always check with your authorized Audi
dealer to make sure yo u are using the
correct brake fluid. The correct type of
brake f luid is also ind icated on the
brake f luid reservoir .
- The brake fluid must be new. Heavy use
of the brakes ca n cause a vapor lock if
the brake fluid is left i n the system too
long. This can se riously affect the effi
c iency of the b rakes as well as your
safety , T his could result in an accident.
(!) Note
Brake fluid will damage the paint of your
vehicle.
@) For the sake of the environment
Because of the prob lem of proper disposal
of brake fluid as well as the spec ial too ls
r equired and the necessary expertise, we
r ecommend that you have th e brake flu id
changed by you r autho rized Aud i dea le r.
Battery
General information
Under normal operating cond itions, the bat
tery in your Audi does not need any ma inte
nance . With
high outside temperatu res or
lo ng da ily drives we recommend that you have
the e lectrolyte leve l che cked by a se rv ice fa
c il ity. The ele ctroly te leve l should also be
chec ked each t ime the battery is cha rged
~ page 226 . Iii>
•
•
Page 254 of 292
252 What do I do now?
(D Note
Do not use commerc ia lly available tire
sealants . The electrical components of the
tire pressure mon itoring system will no
longer work properly.
@ For the sake of the environment
Used sealant bottles can be dropped off at
a recycl ing facility.
@ Tips
- If sealant has run out, allow it to dry.
Then you can peel it off.
- Have the tire sealant replaced every 4
years at a dea lership.
Preliminary steps
Some preliminary steps ore necessary for tire
repair.
.,. If you have a fla t t ire, park the veh icle as far
as possible from moving traffic.
.,. Apply the
parking brake firmly .
.,. Move the
selector lever to the P position .
.,. Check whether a repair using the Tire Mobili
ty System is possible Q page 251, General
and safety pointers .
.,. Have all passengers leave the vehicle and
stay away from the danger zone
q ,& .
.,. Take the s ealant bottle and the electric air
pump
from the luggage compartment un
der the floor.
.,. Remove the "max . SO mph" (80 km/h) stick
er from the sealant bottle and aff ix it to the
instrument cluster in the driver's view .
A WARNING
-Turn the hazard flashers on and set up
the warning triangle* if you have a flat
tire in moving traffic. In this way you pro
tect you rs elf and other road users .
- Make sure that all passengers are in a
safe place, out of the danger zone (for
example, behind a guard ra il).
-
(D Note
Particular care is necessary if you are mak
ing a tire repa ir on a steep incl ine.
@ Tips
Obey all laws.
Making a tire repair
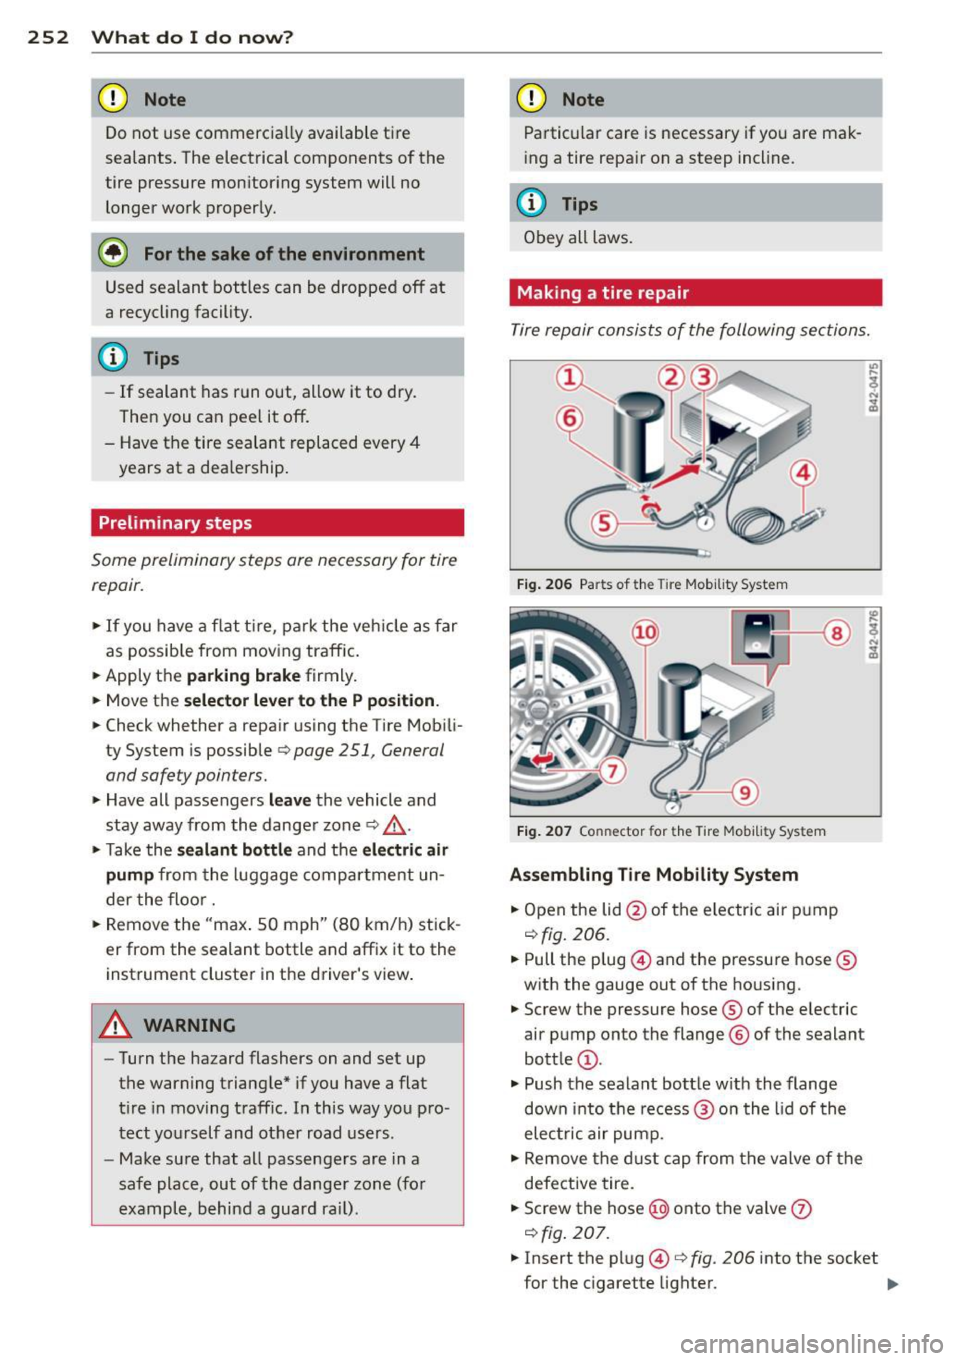
Tire repair consists of the following sections.
Fig. 206 Parts of t he Tire Mob ility System
Fig. 207 Co nn ector for the Tire Mobility Sys tem
Assembling Tire Mobility System
.,. Open the lid @of the electric air pump
qfig. 206.
.,. Pull the plug @and the pressure hose ®
with the gauge out of the housing .
.,. Screw the pressure hose ® of the electric
air pump onto the flange ® of the sealant
bottle @.
.,. Push the sealant bottle w ith the flange
down into the recess@ on the lid of the
electric air pump .
.,. Remove the d ust cap from the valve of the
defective tire .
.,. Screw the hose@) onto the valve
(J)
qfig. 207 .
.,. Insert the plug@¢ fig. 206 into the socket
for the cigarette lighter.
IJJ,
Page 260 of 292
2 58 What do I do now ?
Taking the wheel off/installing a wheel
Follow these instructions step-by-step for
changing the wheel.
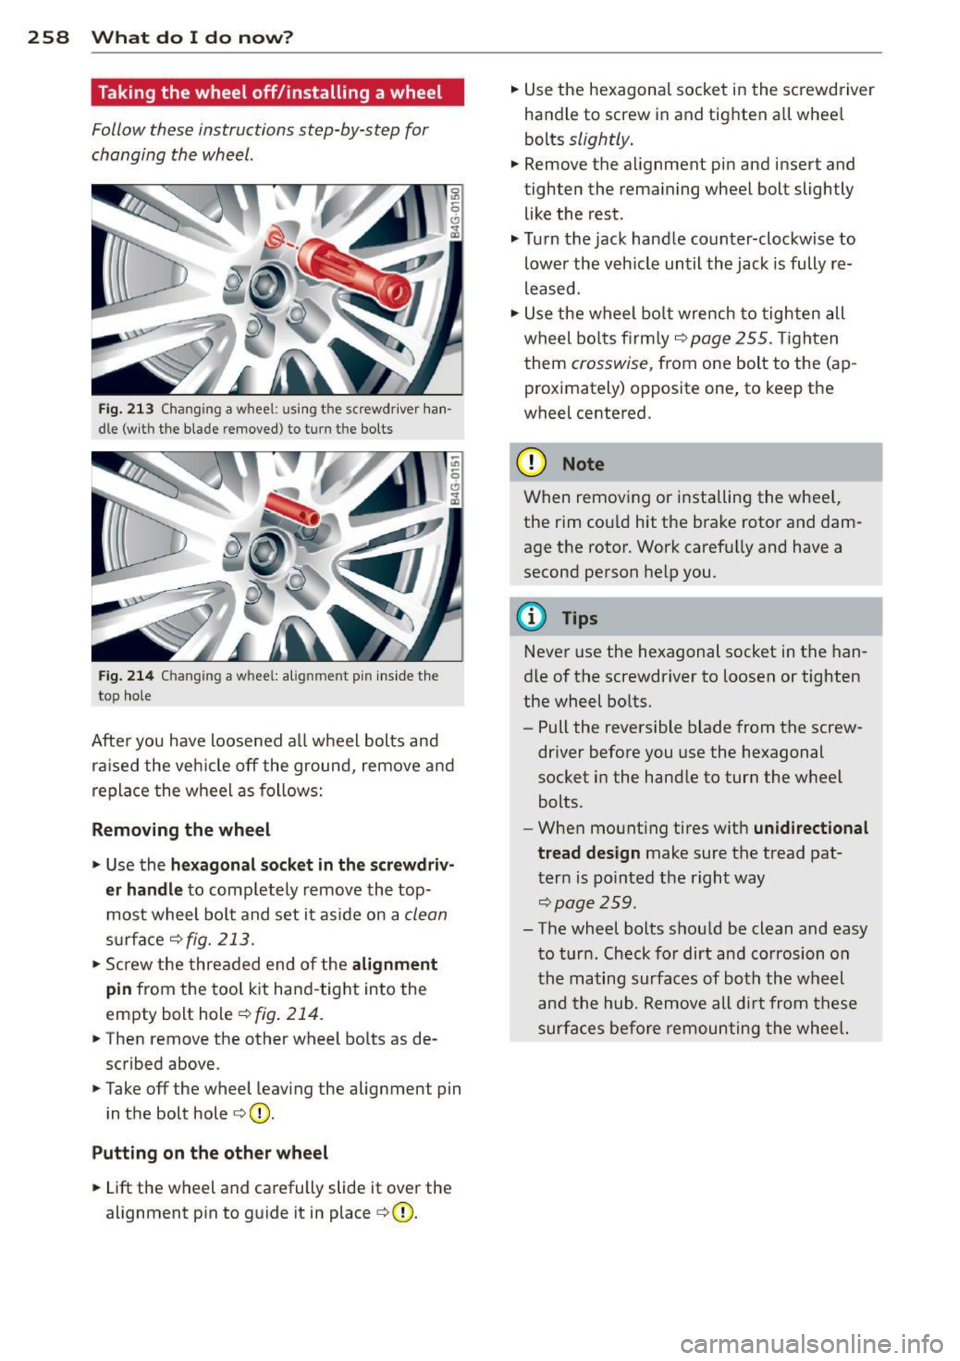
Fig. 213 Changing a whee l: u sing the screwdriver han
dle (w ith the blade removed } to turn t he bolts
Fig . 214 C hanging a w hee l: al ignm en t pi n inside the
top hole
Afte r you have loosened a ll wheel bolts and
raised the vehicle off the ground, remove and
replace the wheel as follows:
Removing the wheel
.. Use the hexagonal socket in the screwdriv
er handle
to comp letely remove the top
most wheel bolt and set it aside on a
clean
surface c:> fig. 213 .
.. Screw the threaded end of the alignment
pin
from the tool kit hand -tight into the
empty bolt hole
c:> fig. 214.
.. The n remove the other wheel bo lts as de
scribed above .
.. Take off the wheel leaving the alignment pin
in the bolt hole
c:> (D .
Putting on the other wheel
.. Lift the wheel and carefully slide it over the
alignment pin to guide it in place
c:>(D.
.. Use the hexagonal socket in the screwdriver
handle to screw in and tighten all whee l
bolts
slightly.
.. Remove the alignment pin and insert and
tighten the remaining wheel bolt slightly like the rest .
.. Turn the jack handle counter-clockwise to
lower the vehicle until the jack is fully re
leased .
.. Use the wheel bolt wrench to tighten all
wheel bolts fir m ly
c:> page 255 . Tighten
them
crosswise, from one bolt to the (ap
proximately) opposite one, to keep the
wheel centered.
(D Note
When remov ing or installing the wheel,
the rim cou ld hit the brake rotor and dam
age the rotor. Work carefu lly and have a
second person help you.
(D Tips
Never use the hexagonal socket in the han
d le of the screwdriver to loosen or tighten
the wheel bolts.
- Pull the reversible blade from the screw
driver before you use the hexagonal
socket in the handle to turn the wheel
bolts.
- When mounting tires w ith
unidirectional
tread design
make sure the tread pat
tern is pointed the right way
c:>page25 9.
-The wheel bolts should be clean and easy
to turn . Check for dirt and corrosion on
the mating surfaces of both the wheel
and the hub. Remove all dirt from these
surfaces before remounting the wheel.