2014 AUDI RS7 SPORTBACK brake light
[x] Cancel search: brake lightPage 86 of 292
84 Audi adaptive cruise control and braking guard
tachometer ® and is also shown briefly in
the display @¢fig.
91.
• You must also press the brake pedal when
the vehicle is stopped.
Switching adaptive cruise control off
• Push the lever away from you into position
@ until it clicks into place. The message
ACC off appears.
@ Indicator lights
f. j. Adap tive cruise control is switched on . No
vehicles are detected up ahead. The stored
speed is ma intained.
I -A moving vehicle is detected up ahead.
The adaptive cruise control system regulates
the speed and distance to the moving veh icle
ahead and acce lerates/brakes automat ica lly.
Si-Adaptive cruise control is switched on. A
moving vehicle up ahead was detected. You r
vehi cle remains stopped.
I-When automatic braking is not able to
keep enough distance to a previously detected
moving vehicle up ahead, you must take con
trol and brake ¢
page 86, Prompt for driver
intervention.
© Display
If adaptive cruise control is not shown in the
display, you can call it up with the multifunc
tion steering wheel buttons¢
page 23.
Based on the symbols in the display, you can
determ ine if the system is maintaining a dis
tance to the vehicle ahead and what that dis
tance is.
No vehicle -No vehicle ahead was detected .
White vehicle -A vehicle ahead was detected.
Red vehicle -Prompt for the driver to take ac
tion
c:::> page 86.
Both arrows on the scale © indicate the dis
tance to the vehicle ahead. No arrow appears
when the vehicle is on an open road and there
is no object ahead . If an object is detected
ahead, the arrow moves on the scale . T
he green zone on the scale shows the stored
distance. For information on changing the
stored distance, refer to ¢
page 85. If the
distance se lected is too close or may soon be
come too close, the arrows move into the red
zone on the sca le .
_&. WARNING
Improper use of the adaptive cruise con
trol can cause collisions, other accidents
and serious personal injur ies.
- Pressing the
ISET ! button when driv ing at
speeds be low 20 mph (30 km/h), will au
tomatically accelerate the vehicle to 20
mph (30 km/h), which is the minimum
speed that can be set.
© Tips
-If you switch the ignit ion or the adaptive
cruise control off, the set speed is erased
from the system memory.
- Th e electronic stabilizat ion contro l (ESC)
and the anti-s lip-regulat ion (ASR) are au
tomatically turned on when the adaptive
cruise control is turned on. Both systems
cannot be turned off if the adaptive
cruise contro l is turned on.
Changing the speed
Applies to veh icles: w ith Aud i adaptive cruise control
0
f
jJ
0
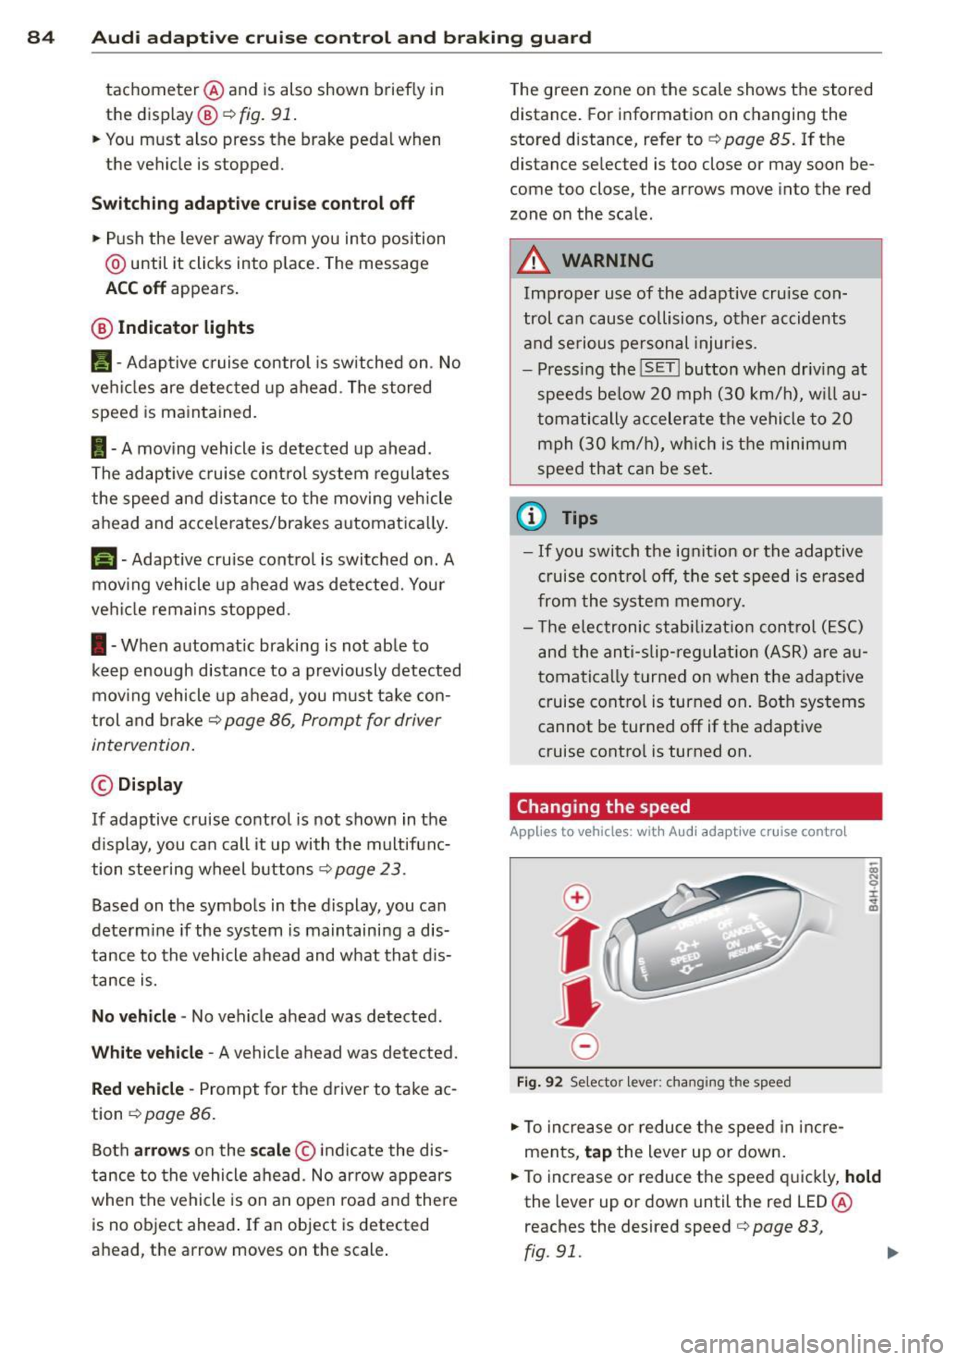
Fi g. 92 Selecto r lever: chang ing t he speed
• To increase or reduce the speed in incre
ments,
tap the lever up or down.
• To increase or reduce the speed quickly,
hold
the lever up or down until the red LED ®
reaches the desired speed
c:::> page 83,
rg . 91. ~
Page 88 of 292

86 Audi adaptive cruise control and braking guard
When approaching a moving vehicle up ahead,
the adaptive cruise control system automati
cally brakes to match that object's speed and
then maintains the stored distance. If the ve
h icle ahead accelerates, adaptive cruise con
trol will also accelerate up to the stored
speed.
The higher the speed , the greater the distance
in yards (meters)
c::> & . The Distance 3 setting
is recommended .
The distances prov ided are spec ified values .
Depending on the driving situation and the
how the vehicle ahead is driving, the actual
d istance may be more or less than these tar
get distances.
The various symbols for the time increments
appear briefly in the information line @
c::> page 83, fig . 91 when you change the set
tings .
~-~- --Distance 1 : This setting corre
sponds to a distance of 92 feet/28 meters
when traveling at 62 mph (100 km/h), or a
time interval of 1 second.
~--~- -Distance 2: This setting corre
sponds to a distance of 118 feet/36 meters
when traveling at 62 mph (100 km/h), or a
time inte rval of 1.3 seconds .
~--- ~-Distance 3: This setting corre
sponds to a distance of 164 feet/SO meters
when traveling at 62 mph (100 km/h), or a
time interval of 1.8 seconds .
~---- ~ Distance 4: This setting corre
sponds to a distance of 210 feet/64 meters
when traveling at 62 mph (100 km/h), or a
time interval of 2.3 seconds .
A WARNING ,. -
Following other vehicles too closely in
creases the risk of collisions and serious
personal inj ury.
- Setting short distances to the traffic
ahead reduces the time and distance
available to bring your vehicle to a safe
stop and makes it even more necessary
to pay close attention to traffic. -
Always obey applicable traffic laws, use
good judgment, and select a safe follow ing d istance for the traff ic, road and
weather conditions.
@ Tips
- Distance 3 is set automatically each time
you switch the ignition on.
- Your standard settings are automatically
stored and assigned to the remote con
trol key being used.
Selecting the driving mode
Applies to veh icles: w ith Audi adaptive cruise co ntrol
.,. Select the desired driving mode in drive se
lect
c::> page 96 .
(D Tips
Your settings are automatically stored and
ass igned to the remote control key being
used.
Prompt for dr iver intervention
Applies to veh icles: w ith Audi adaptive cruise co ntro l
Fig. 95 Instrume nt cluster: req uest fo r drive r inte rven
t ion
In certain situations, the system will prompt
yo u to take action . This could happen, for ex
amp le, if braking by the adap tive cruise con
tro l system is not enough to maintain enough
distance to the veh icle ahead .
T he indicator light
I and the symbol in the
display will war n you abo ut the situat ion
c::>fig. 95 . You wi ll also hear an acoustic signal.
- Press the brake pedal to slow yo ur vehicle
down.
Page 89 of 292

Audi adaptive cruise control and braking guard 87
Audi braking guard
Description
Applies to vehicles: with Audi adaptive cruise control
Fig. 96 Instrument cluster: approach warning
Braking guard uses radar sensors and a video
camera . It also functions within the limits of
the system when adaptive cruise control is
switched off .
What can braking guard do?
When detected in time, the system can assess
situations when a vehicle ahead brakes sud
denly or if your own vehicle is t raveling at a
high speed and approaching a vehicle up
ahead that is moving more slowly . Braking
guard does not react if it cannot detect the
situation.
The system advises you of various situations:
- The
distance warning is given if you are too
close to the vehicle ahead for a long time. If
the vehicle ahead brakes sharply, you will not be able to avoid a collision . The indicator
light
I in the display comes on .
- The
approach warning is given when a de
tected vehicle up ahead in your lane is mov
i ng much more slowly than you are or if it
brakes sharply . When this warning is given,
it may only be possible to avoid a collision
by swerving or braking sharply. The indicator
l ight
I and indicator in the display will warn
you about the danger
c::> fig . 96. You will a lso
hear an acoustic signal.
11 This is not ava ilable in som e coun tri es.
If you do not react fast enough or do not react
at all to the situation, braking guard will inter
vene by braking.
- I f a collision is imminent, the system will
first provide an
acute warning by briefly and
sharply applying the brakes.
- If you do not react to the acute warning,
braking g uard can brake with increasing
force within the limits of the system . This
reduces the vehicle speed in the event of a
collision.
- The system can initiate maximum braking
shortly before a collision
1 ) . Full deceleration
at high speeds occurs only in vehicles with
adaptive cru ise control and side assist (pre
sense plus) .
- If the braking guard senses that you are not
braking hard enough when a collision is im
minent, it can increase the brak ing force .
- The pre sense functions also engage when a
collision is imm inent
c::> page 187 .
Which function s can be controlled?
You can switch braking guard and the dis
tance/approach warning on or off in the MMI
c::> page 88, Settings in the MMI.
A WARNING
Lack of attention can cause collisions, oth
er accidents and serious personal injuries .
The braking guard is an assist system and
cannot prevent a collision by itself. The
driver must always intervene. The driver is
always responsible for braking at the cor
rect time.
- Always pay close attent ion to traffic,
even when the braking guard is switched
on. Be ready to intervene and be ready to
take comp lete control whenever necessa
ry . Always keep the safe and legal dis
tance between your vehicle and vehicles up ahead .
- Braking guard works within limits and
will not respond outside the system lim its, for example when approaching a
Page 106 of 292
104 Automatic Transmission
Automatic
Transmission
tiptronic
Introduction
The automatic transmission is controlled elec
tronically. The transmission upshifts or down
shifts automatically depending on which drive program is selected.
When a
moderate driving style is used, the
transmission selects the most economical driving mode. It will then change up early and
delay the downshifts to give better fuel econ
omy.
The transmission switches to a sporty mode
after a k ick-down or when the driver uses a
sporty driving style characterized by quick ac
celerator pedal movements, heavy accelera
tion, frequent changes in speed and traveling
at the maximum speed.
If desired, the driver can also select the gears
manually (tiptronic mode ) ¢ page 108.
In the tiptronic transmission, power is trans
ferred by a torque converter.
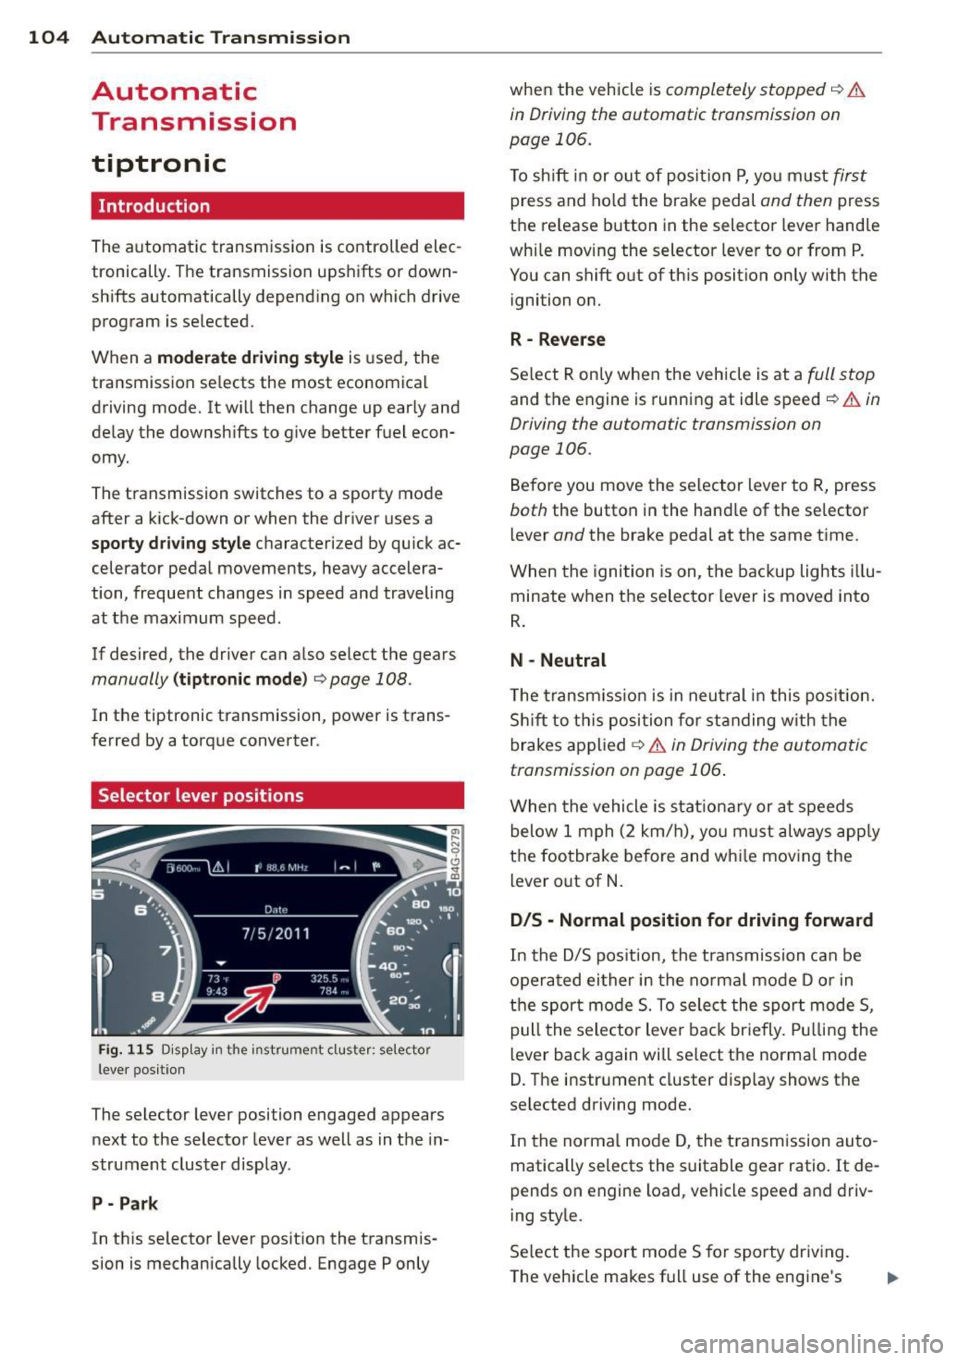
Selector lever positions
Fig . 115 D isp lay in the instrument cluster: selector
leve r pos itio n
The selector lever position engaged appears
next to the selector lever as well as in the in
strument cluster display.
P- Park
In this selector lever position the transmis
sion is mechanically locked. Engage P only when
the vehicle is
completely stopped¢ &
in Driving the automatic transmission on
page 106.
To shift in or out of posit ion P, you must first
press and hold the brake pedal and then press
the re lease button in the selector lever handle
wh ile moving the selector lever to or from P.
You can shift out of this position only with the
ignition on.
R -Reverse
Select R only when the vehicle is at a full stop
and the engine is running at idle speed¢ & in
Driving the automatic transmission on
page 106.
Before you move the selector lever to R, press
both the button in the hand le of the se lector
lever
and the brake pedal at the same time.
When the ignition is on, the backup lights illu
minate when the selector lever is moved into
R.
N -Neutral
Th e transmission is in neutral in this position.
Shift to this position for standing with the
brakes applied
¢ & in Driving the automatic
transmission on page 106 .
When the vehicle is stat ionary or at speeds
below 1 mph (2 km/h), you must always apply
the footbrake before and wh ile moving the
lever out of N.
D/S - Normal position for driving forward
In the D/S position, the transmission can be
operated either in the normal mode D or in
the sport mode 5. To select the sport mode 5,
pull the selector lever back brie fly. Pulling the
lever back again will select the normal mode
D. The instrument cluster disp lay shows the
se lected driving mode.
In the normal mode D, the transm ission auto
matically selects the suitable gear ratio.
It de
pends on engine load, vehicle speed and driv
ing style.
Select the sport mode 5 for sporty driving.
The vehicle makes full use of the engine's
Page 108 of 292
106 Automatic Transmission
lever is left in N (Neutral) for more than ap
proximately 2 second, without the brake ped
a l being pressed .
Release button
The release button on the selector lever pre
vents the lever from being accidentally shifted
into certain positions. Depending on the direc
tion of the shift, the se lector lever locks at d if
ferent positions. The positions are highlighted in the illustration
c:;, fig. 116.
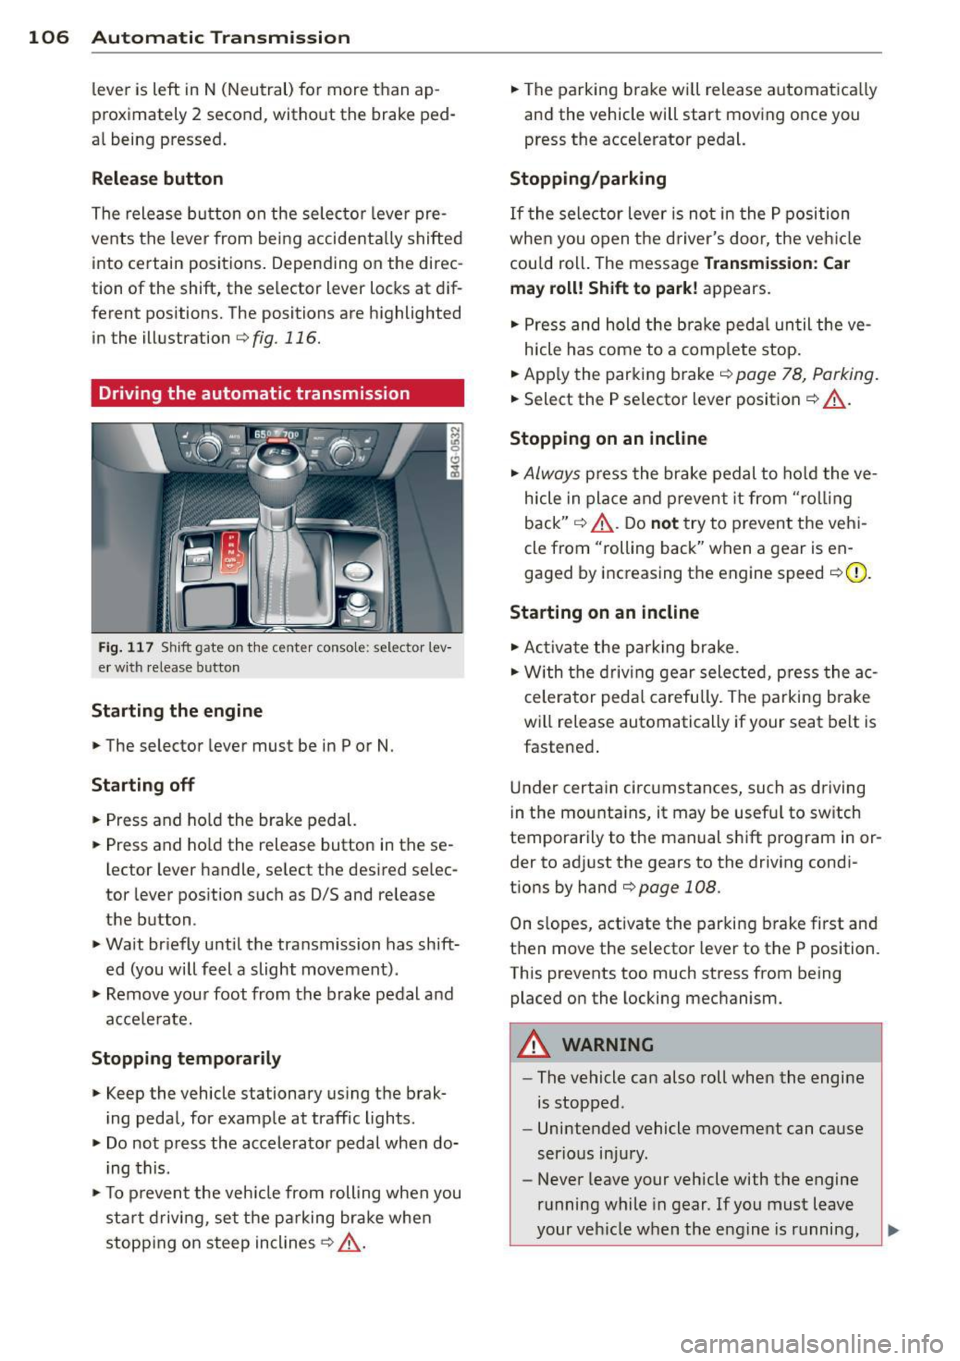
Driving the automatic transmission
Fig. 117 Sh ift gate on the center conso le: selector lev
er w ith release button
Starting the engine
,.. The selector lever must be in P or N.
Starting off
,.. Press and ho ld the brake pedal.
,.. Press and ho ld the release button in these
lector lever handle, se lect the desired se lec
tor lever position such as 0/5 and release
the button .
,.. Wait briefly until the transmission has shift
ed (you will feel a slight movement) .
,.. Remove your foot from the brake pedal and
acce le rate.
Stopping temporarily
,.. Keep the vehicle stationary us ing the brak
ing peda l, for example at traffic lights.
,.. Do not press the accelerator pedal when do
ing this .
,.. To prevent the veh icle from rolling when you
sta rt driving, set the parking brake whe n
stopping on steep inclines
c:;, _& .
,.. The parking brake will release automatica lly
and the vehicle will start moving once you
press the acce lerator pedal.
Stopping/parking
If the sele ctor lever is not in the P position
whe n you open t he driver's door, the veh icle
could roll. The message
Transmission: Car
may roll! Shift to park!
appears.
,.. Press and hold the brake pedal until the ve-
hicle has come to a complete stop.
,.. App ly the parking brake
c::> page 78, Parking.
,.. Select the P selector lever position c:;, _& .
Stopping on an incline
,.. Always press the brake pedal to hold the ve
hicle in place and prevent it from "rol ling
back"
c:;, _& . Do not try to prevent the vehi
cle from "rolling back" when a gear is en
gaged by increasing the engine speed
c::>(D .
Starting on an incline
,.. Activate the parking brake.
,.. With the driving gear selected, press the ac
celerator pedal carefully. The parking brake
will release automatically if your seat belt is
fastened .
Under certain circumstances, such as driving
in the mounta ins, it may be usefu l to sw itch
temporarily to the manual shift program in or
der to adj ust the gears to the driving condi
t ions by hand
c::>page 108 .
On slopes, activate the parking brake first and
then move the selector lever to the P position.
This prevents too much stress from being placed on the locking mechanism.
A WARNING
-
- The vehicle can also roll when the engine
is stopped .
- Unintended vehicle movement can cause
serious injury.
- Never leave your vehicle with the engine
running while in gear . If you must leave
your vehicle when the engine is running,
Page 123 of 292

Homelink
Universal remote
control
General information
Applies to vehicles: with Home link unive rsal remote con
tro l
The Homelink universal remote control can
be programmed with hand-held transmitters
from existing equipment
With Home link, you can control devices such
as the garage door, security systems, house
lights, etc. comfortably from the inside of you
vehicle.
Homelink makes it possible for you to replace
three different remote controls from devices
in your home with one universal remote . This
feature works for most garage door and exte rior door motor signals. Programmi ng the in
d iv idual remote control for your remote con
trol takes place near the center of the radiator
grille. There is a control module attached at
this location .
A one-t ime programming of the sensor must
be performed before you are able to use sys
tems with Homelink.
A WARNING , .,.
- Never use the Homelink transmitter
with any garage door opener that does
have not the safety stop and reverse fea
ture as required by federal safety stand
ards . Th is includes any garage door open
er model manufactured before April 1, 1982.
- A garage door opener which cannot de
tect an object, signaling the door to stop
and reverse does not meet current feder
al safety standards . Us ing a garage door
opener without these features increases
risk of serious injury or death.
- For safety reasons
never release the
parking brake or start the engine while
anyone is standing in front of the vehicle .
- A garage door or an estate gate may sometimes be set in motion when the
H ome link 121
Homelink remote control is being pro
grammed. If the device is repeatedly ac
tivated, this can overstrain motor and
damage its electrical components -an
overheated motor is a fire hazard!
- To avoid possible injuries or property
damage, please always make absolutely
certa in that no persons or objects are lo
cated in the range of motion of any
equipment being ope rated.
(D Tips
- If you would like additional information
on the Home link Universal Transce iver
I
Homel ink compatib le products, or to
purchase other accessories such as the
Homelink Lighting Package, please con
tact Homelink at 1-800-355 -3515 or on
the Internet at www. homelink.com.
- For Declaration of Comp liance to United
States FCC and Ind ustry Canada reg ula
tions~
page 2 76.
- For security reasons, we recommend that
you clear the programmed buttons be
fore selling the vehicle .
Operation
Applies to vehicles: with Homelink
Fig. 144 Headliner : cont rols
Req uirement: The bu ttons must be program
med
~ page 122.
.,. To open the garage door, press the program
med button . The LED @ will light up or
flash.
... To close the garage door , press the button
again .
II>
Page 191 of 292
Intelligent technology Notice about data
recorded by vehicle
control modules
Your vehicle is not equipped with an Event Da
ta Recorder (EDR), installed by some manu
facturers for the express purpose of capturing
data for retrieval after an accident or crash
event. EDR's are sometimes called "crash re
corders".
Some state laws restrict the retr ieval or down
loading of data stored by EDR's that were in
stalled in a vehicle for the express purpose of
retrieving data after an accident or crash
event without the owner's consent.
Although your vehicle is not equipped with an
EDR, it is equipped with a number of electron
ic control modules for various vehicle systems
such as, for examp le, engine function, emis
sion control, as well as for the airbags and
safety belts.
These electronic control modules also record
vehicle-related data during norma l vehicle op
eration for diagnostic and repair purposes.
The recording capacity of the electronic con
trol modules is limited to data (no sound is re
corded) and only a small amount of data is ac
tually recorded over a very limited period of
time and stored when a system fault or other
condition is sensed by a control unit. Some of
the data then stored may relate to vehicle
speed, direction, braking as we ll as restraint
system use and performance in the event of a
crash or other condition. Stored data can only be read and downloaded with special equip
ment.
Electronic Stabilization
Control (ESC)
Description
ESC helps to improve road holding and vehicle
dynamics to help reduce the probability of
skidding and loss of veh icle control. It works
only when the engine is running. ESC detects
Intelligent technology 189
certain difficult driving situations, including
when the vehicle is beginning to spin (yaw)
out of control and helps you to get the veh icle
back under control by se lectively braking the
wheels, and/or reducing engine power and
providing steering ass istance to help hold the
vehicle on the driver's intended course. The in
dicator light
JjJ in the instrument cluster
blinks when ESC is taking action to help you
control the vehicle.
ESC has limitations .
It is important to remem
ber that ESC cannot overcome the laws of
physics.
It will not always be able to help out
under all conditions you may come up against.
For example, ESC may not always be able to
help you master situations where there is a
sudden change in the coefficient of friction of
the road surface. When there is a section of dry road that is suddenly covered with water,
slush or snow, ESC cannot perform the same
way it would on the dry surface. If the vehicle
hydroplanes (rides on a cushion of water in
stead of the road surface), ESC will not be
able to help you steer the vehicle because con
tact with the pavement has been interrupted
and the vehicle cannot be braked or steered .
During fast cornering, particularly on winding
roads, ESC cannot always deal as effectively
with difficult driving situations than at lower
speeds.
Always adjust your speed and driving style to
road, traffic and weather conditions. ESC can
not override the vehicle's physical limits, in
crease the available traction, or keep a vehicle
on the road if road departure is a result of
driver inattention. Instead, ESC improves the
poss ibility of keeping the vehicle under con
trol and on the road dur ing extreme maneu
vers by usin g the driver 's steering inputs to
help keep the vehicle going in the intended di
rection. If you are traveling at a speed that
causes you to run off the road before ESC can
provide any assistance, you may not experi
ence the benefits of ESC.
ESC includes and/or works together with the
anti- lock brake system (ABS), brake assist sys -
tem, anti-slip regu lation (ASR), electronic
Ill>
•
•
Page 196 of 292
194 Intelligent technology
overheat, premature wear and increased
stopping distance.
- Under certain climatic and operating
condit ions such as passing through wa
ter, driving in heavy ra in or after wash ing
the vehicle, the effect iveness of the
brakes can be reduced. In winter, ice ca n
accumulate on the brake pads, linings ,
discs and d rums . Carefully apply brakes
for a test . B rakes wi ll dry a nd ice coat
ings will be cleaned off after a few c are
f ul brake app lications .
- Driv ing fo r an ex tende d pe riod of time on
salt-covere d roads w ithout us ing yo ur
brakes can also affect braking efficiency.
Clean off accumulated salt coating from
brake discs and pads w ith a few caref ul
brake applicat ions.
- If you damage the front spoiler, or if you
install a different spoiler, be sure the air
flow to the front brakes is not obstruct ed. Otherwise the brake system could
overheat reducing the effectiveness of
the ent ire brake system .
- Failure of one brake c ircuit will impair
the braking capability res ulting in an in
creased stopp ing distance. Avoid driv ing
the vehicle and have it towed to t he near
est Au di dea le r o r q ualified w ork sh o p.
- Never let the vehicle ro ll to a stop w ith
the e ngine shu t off.
- If the brake booster is not working, the
bra ke pedal must be p ressed conside ra
bly harder to make up for the la ck of
booster assistance.
Electro-mechanical
power assist, dynamic
steering
The electro-mechanical power assist helps
the driver when steering .
Power steering adapts electronically based on
the vehicle speed .
Indicator lights and messages
• Steering defective! Stop the vehicle
If this indicato r light turns on and stays on
and t his message appears, the power steering
may have failed.
D o
not con tinue dr iv ing . See your author ized
Audi dealer or other qualified repair facility
for assistance .
'I-lj Steering: Sy stem fault You can continue
driving
If the indicato r light turns on and the mes
sage appea rs, the stee ring may be more diffi
cul t to move o r more sens itive th an usua l. The
stee ring wheel may a lso be at an ang le when
driving straight .
D rive slowly to you r authorized Aud i dea le r or
qualified wo rkshop to have the ma lf u nct ion
corre cted.
(:rij Dynamic st eering: Initializing
If this driver message appears and the indica
tor light is f lashing on the instrument panel,
dynam ic steer ing* is being rei nitia lized . Afte r
sta rting the engine, the stee ring wheel will
move s ligh tly. Re- ini tiali zation mig ht be ne c
essa ry if the stee ring wheel w as moved h ard
to the left and r ight wh ile the vehicle was not
moving . The display goes out as soon as initi
alization is complete.
D rive slowly to you r authorized Audi de aler or
qualified wo rkshop to have the ma lf u nct ion
corrected.
_& WARNING
Have t he dynamic stee ring * system mal
f u nction repa ired as soon as possible by an
a uthorized Audi dea ler or qua lified wor k
shop - risk of acc ident !
(D Tips
If the . or (:rij indicator light on ly stays
on for a short time, yo u may continue driv
i ng.
- The dynamic steering * stab ility systems
are not avai lab le in the event of a system
ma lf u nction.
- For add itiona l information on dynamic
steering *, refer to
c> page 96.