2014 AUDI RS7 SPORTBACK door lock
[x] Cancel search: door lockPage 40 of 292
38 Openin g and clo sing
- On a vehicle locked from the outsid e the
power locking system switch is inopera
t ive.
- locked doors make it more difficult for
emergency workers to get into the vehi
cle, which puts lives at risk. Do not leave
anyone beh ind in the vehicle, especially
children.
(D Tips
Your vehicle is locked automatically at a
speed of 9 mph (15 km/h)
c> page 34 . You
can unlock the vehicle again us ing the
open ing function in the power lock ing sys
t e m sw itch .
Emergency locking
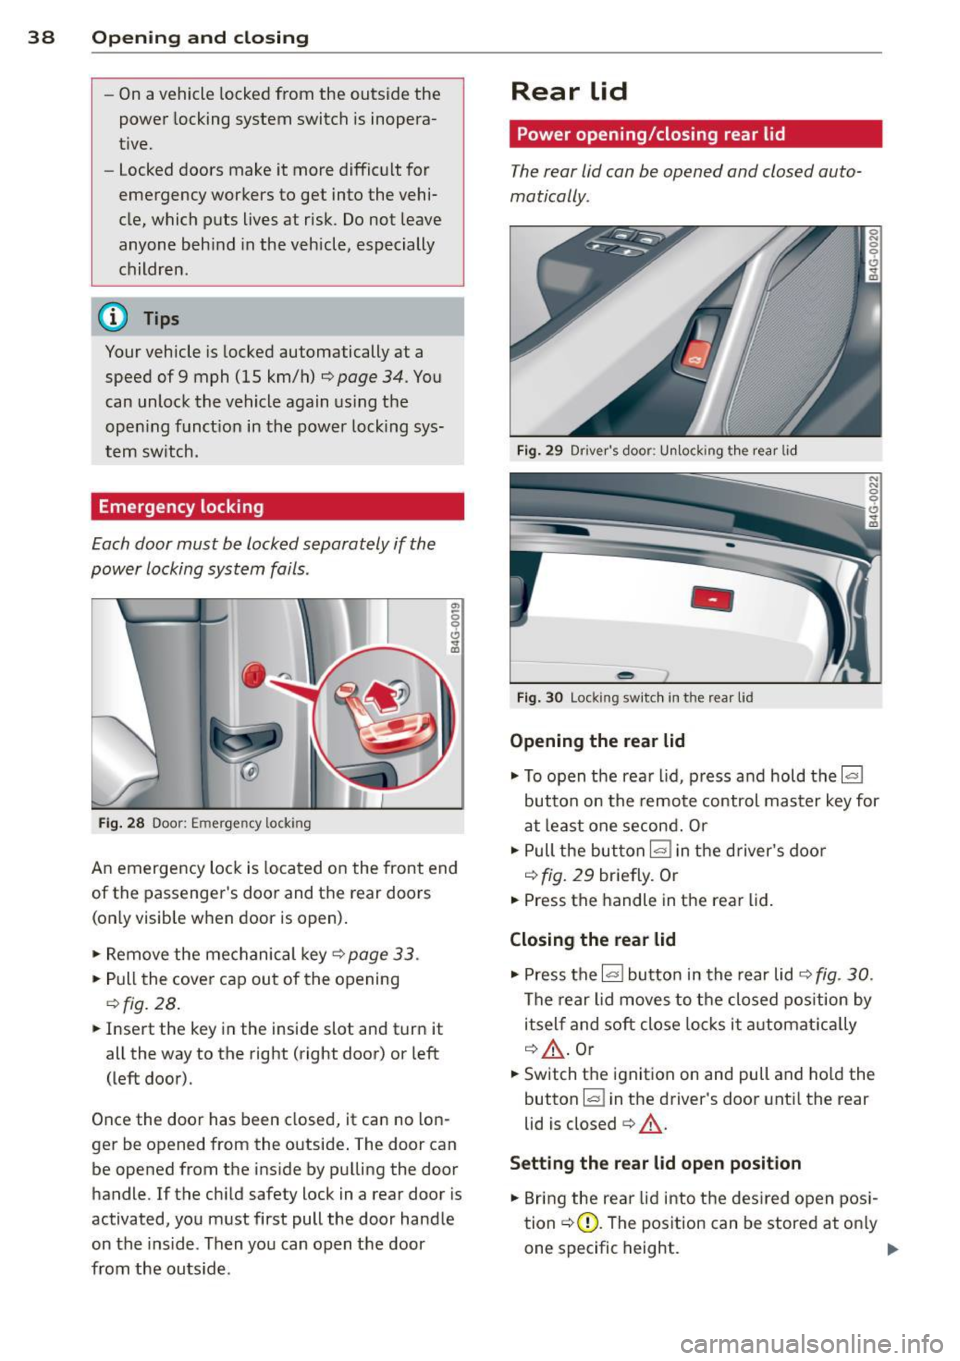
Each door must be locked separately if the
power locking system fails .
Fig. 2 8 Door: Emer gen cy lock ing
"' 0 0 0 .., (D
An emergency loc k is located on the front end
of the passenger's doo r and the rear doors
(on ly visible when doo r is open) .
.,. Remove the mechanical key
c> pag e 33 .
... Pu ll the cover cap out of the opening
i=> fig. 28.
... Insert the key in the inside slot and turn it
all the way to the r ight (right door) or left
(left door).
Once the door has been closed, it can no lon
ger be opened from the outside . T he door can
be opened from the ins ide by pu lling the door
handle. If the ch ild sa fe ty lock in a re ar door i s
act ivated, you must first pull the door hand le
on the inside . Then you can open the door
from the outs ide .
Rear lid
Power opening/closing rear lid
The rea r lid can be opened and closed auto
matically .
Fig. 2 9 Drive r's doo r: Unlock ing th e rea r lid
-
Fi g. 30 Lock ing sw it ch in t he r ear lid
Opening the rear lid
.,. To open t he rea r lid, p ress and hold the lal
button on the remote control master key for
at least one se cond. Or
.,. Pull the but ton
l=I i n the d river's doo r
c> fig. 29 brie fly . Or
... Press th e handle in the rear lid .
Closing the rear lid
"" Press the l=I butto n in the rear lid c> fig . 30 .
The rear lid m oves to t he closed pos ition by
itself and soft close locks it a utomat ically
¢ A .or
... Switch t he ignit ion on and pull and ho ld the
button
l a ! in the driver's door unt il the rear
lid is closed
c> A .
Setting the rear lid open position
... Bring the rea r lid into the des ired open pos i
tion
c> Q). The pos ition can be stored at o nly
one specific height . .,.
Page 41 of 292
~ Press and hold the button l"" I for at least
four seconds to store the new open position.
A visual and audio signal will follow.
The settings in the MMI determine if the rear lid can be opened using the handle ¢
page 35.
Opening will be stopped immediately when:
- You press the button
l"" I on the remote con-
trol master key, or
- You press the button
l"" I in the rear lid, or
- You push the handle in the rear lid, or
- You pull the button
l.:::s ! in the driver's door,
or
- When something blocks the rear lid or
makes it difficult for the lid to move.
If you press one of the buttons ~now, the
rear lid will either open or close, depending on
its angle .
Closing will be stopped immediately when:
- You press the button
l"" I in the rear lid, or
- You push the handle in the rear lid, or
- You release the button
l""I on the driver's
door, or
- When something blocks the rear lid or
makes it difficult for the lid to move.
If you press one of the buttons ~now, the
rear lid will either close or open, depending on
its angle .
You can manually stop the automatic open ing/closing of the rear lid. The automatic clos
ing process begins if you push down on the
rear lid.
A WARNING
-After closing the rear lid, always pull up
on it to make sure that it is properly
closed. Otherwise it could open suddenly
when the vehicle is moving .
- To help prevent poisonous exhaust gas
from being drawn into the vehicle, al
ways keep the rear lid closed while driv
ing. Never transport objects larger than
those which fit completely into the lug
gage area, because then the rear lid can
not be fully closed.
Opening and closing 39
- Never leave your vehicle unattended es
pecially with the rear lid left open. A
child could crawl into the car through the luggage compartment and pull the lid
shut, becoming trapped and unable to
get out . To reduce the risk of personal in
jury, never let children play in or around
your vehicle. Always keep the rear lid as
well as the vehicle doors closed when not
in use.
- Never close the rear lid inattentively or
without checking first. Although the
closing force of the rear lid is limited,
you can still seriously injure yourself or
others .
- Always ensure that no one is within
range of the rear lid when it is moving, in
particular close to the hinges and the up
per and lower edges - fingers or hands
can be pinched .
- Never try to interfere with the rear lid or
help it when it is being opened or closed
automatically .
(D Note
The rear lid can bump into objects such as
the garage ceiling when opening and be
come damaged.
(D Tips
-Audio signals are given when you close
the rear lid using the
l a! button in the
driver's door.
- If there is a mechanical problem with au
tomatic closing for the rear lid or there is
an obstruction, it opens again immedi
ately . Check to see why the rear lid could
not be closed before attempting to close
it again .
- The following applies to vehicles equip
ped with the Convenience key* feature: if
the remote control key is left in the lug
gage compartment, luggage compart
ment will automatically unlock itself af
ter you lock the vehicle. This prevents
you from unintentionally locking your
key in the luggage compartment. .,.
Page 42 of 292
40 Opening and clo sing
- When the vehicle is locked, the rear lid
can be un locked separate ly by pressing
the button ~ on the master key. W hen
the rear lid is closed aga in, it locks auto
matically.
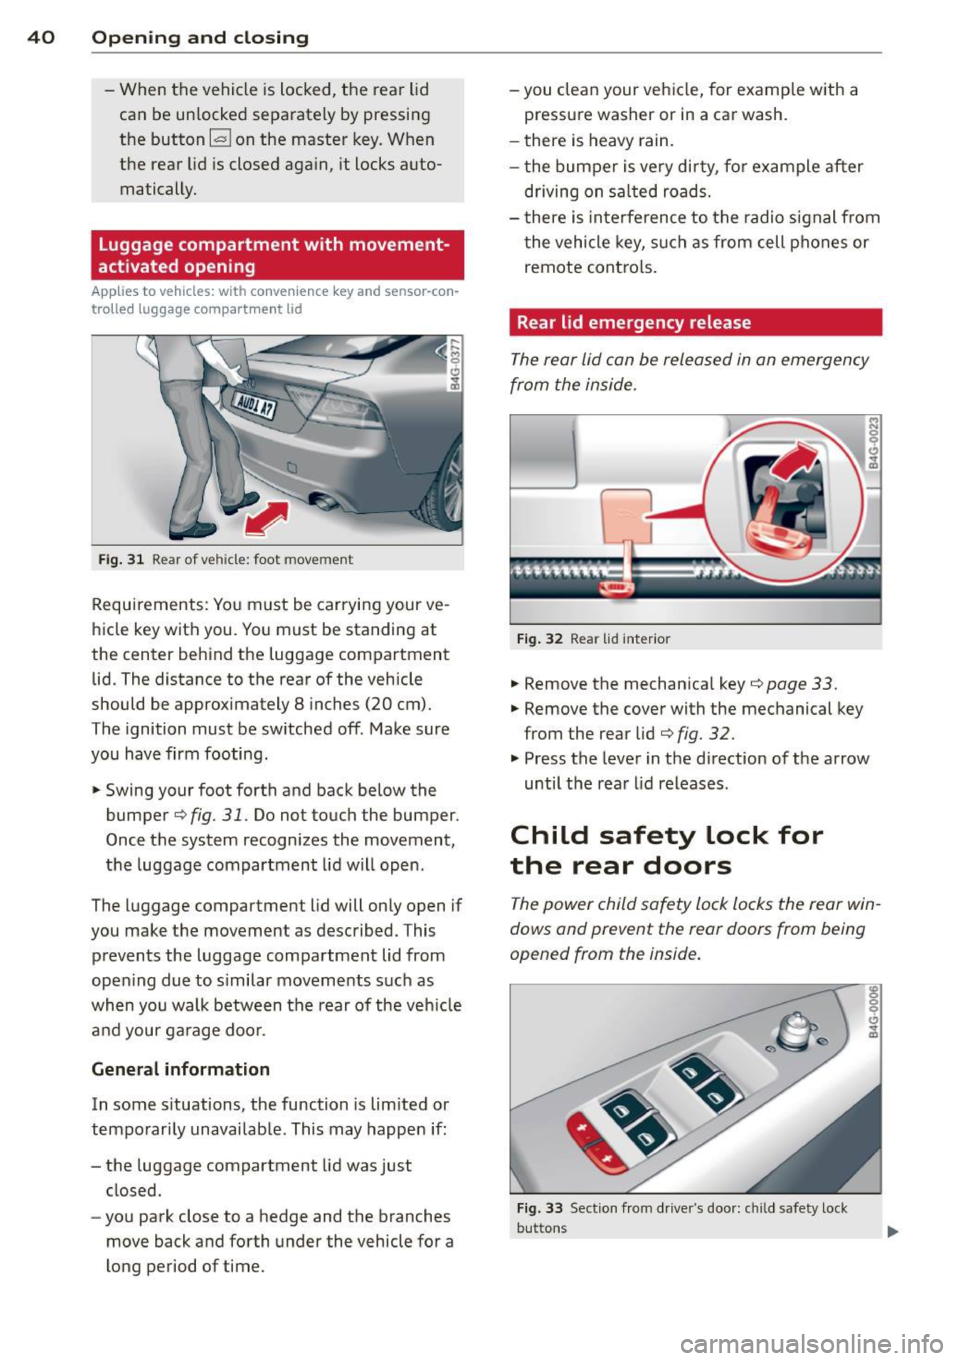
Luggage compartment with movement
activated opening
Applies to vehicles: with convenience key and sensor-con
trolled luggage compartment lid
Fig . 31 R ear of ve hicle: foot move men t
Requirements: You must be carryi ng your ve
hicle key with you. You must be standing at
the center behind the luggage compartment lid. The distance to the rear of the vehicle
should be approximately 8 inches (20 cm).
The ignition must be sw itched off . Make sure
you have firm footing .
,. Swing your foot forth and back below the
bumper
c::;, fig. 31. Do not touch the bumper.
Once the system recognizes the movement,
the luggage compartment lid will open .
The luggage compartment lid will only open if
you make the movemen t as described. This
prevents the luggage compartment lid from
ope ning due to s imilar moveme nts such as
when you walk between the rear of the veh icle
a nd your ga rage doo r.
General information
In some s ituations, the function is lim ited or
tempo rar ily unavailable . This may happen if:
- the luggage compartment lid was just closed.
- yo u park close to a hedge and the branches
move back and forth under the vehicle for a
long period of time. -
you clean your veh icle, for example with a
pressure washer or in a car wash.
- there is heavy rain.
- t he bum per is ve ry di rty, fo r example after
driving on sa lted roads.
- t here i s interference to the radio signal from
t he vehicle key, su ch as from cell phones or
remote contro ls.
Rear lid emergency release
The rear lid can be released in an emergency
from the inside .
Fig. 32 Rea r lid inter io r
,. Remove the mechanica l key c::;, page 33.
,. Remove the cover with the mechanical key
from the rear lid
c::;, fig. 32.
,. Press the lever in the direction of the arrow
until the rea r lid releases .
Child safety Lock for
the rear doors
The power child safety lock locks the rear win
dows and prevent the rear doors from being
opened from th e inside .
Fig. 33 Sect io n fro m driver"s doo r: c hil d safety loc k
but ton s
Page 43 of 292
![AUDI RS7 SPORTBACK 2014 Owners Manual .. To activate the child safety lock for the left/
right rear door, press the left/right button
Ii]
in the drivers door ¢ fig. 33. The light in the
button w ill turn on.
.. To AUDI RS7 SPORTBACK 2014 Owners Manual .. To activate the child safety lock for the left/
right rear door, press the left/right button
Ii]
in the drivers door ¢ fig. 33. The light in the
button w ill turn on.
.. To](/manual-img/6/57649/w960_57649-42.png)
.. To activate the child safety lock for the left/
right rear door, press the left/right button
Ii]
in the driver's door ¢ fig. 33. The light in the
button w ill turn on.
.. To deactivate the child safety lock for the
left/right rear door, press the left/r ight but
ton
1±1 in the driver's door. The light in the
button turns off.
The follow ing features are switched off:
- The interior door handles in the rear doors,
- The power windows in the rear doors.
I n order to activate the child safety lock on
the left and the right s ide, press the two safe
ty buttons
Ii] in succession.
Power windows
Controls
The driver can control all power windows.
Fig. 34 Section of the driver 's doo r: Cont rols
l(l 0 0 0
"' m
All power window switches are provided with
a two-position function :
Opening the windows
.. Press the switch to the first stop and hold it
until the window reaches the desired posi
tion.
.,. Press the switch br iefly to the
second stop
to automatically open the window.
Closing the windows
.. Pull the switch to the first stop and hold it
until the window reaches the desired posi
t ion.
.. Pull the switch briefly to the
second stop to
automatically close the window .
Opening and closing 41
Power window switches
@ Driver's door
® Passenger's door
© Left rear door
@ Right rear door
.,&_ WARNING
-When you leave your vehicle - even if on
ly briefly - always take the ignit ion key
with you. This applies particularly when children remain in the vehicle. Otherwise
the children could start the engine or op
erate electrical equipment (e.g. power
windows). The power windows are func
tional until the driver's door or passeng
er's doo r has been opened.
- Be careful when closing the w indows.
Check to see that no one is in the way, or
serio us injury could result!
- When locking the vehicle from outside,
the vehicle must be unoccupied since the
windows can no longer be opened in an
emergency .
{D Tips
-When you open the doors, the windows
automatically lower abo ut 10 mm.
- When the window in the driver's or pas
senger's door is complete ly open, it will
raise approximately 25 mm when the
door is opened. The window will lower
again when you close the door.
- After the ignition has been switched off,
the windows can sti ll be opened or
closed for about 10 minutes. The power
windows are not switched off until the
dr iver's door or passenger's door has
been opened .
What to do after a malfunction
The one-touch open and close function must
be reactivated if the battery has been discon
nected.
.. Pull and ho ld the power window switch until
the window is fully closed. .-
Page 48 of 292
46 Clear vision
Automatic headlights
You can adjust the following settings in the
Automatic headlights menu:
Headlights a ctivation time -You can adjust if
the head lights switch on
Early , Med. or Late
according to the sensitivity of the light sensor.
Audi adaptive light* -You can switch adaptive
light
On and Off.
Daytime running lights
USA models :
You can switc h the dayt ime run
ning lights
on and off .
Canada models:
The function cannot be
turned off . It is activated automatica lly each
time the ign ition is switched on. This menu
item is shown "greyed out".
Coming home, Leaving home
The coming home function illuminates the
area outside the vehicle when yo u switch the
ignition off and open the driver's door. To turn
the function on, select
Lights when leaving
car > On .
The leaving home function illuminates the
area outside the vehicle when you un lock the
vehicle. To turn the funct ion on, select
Lights
when unlocking car > On .
The coming home and leaving home functions
only operate when it is dark and the light
switch is in the
AUTO pos ition.
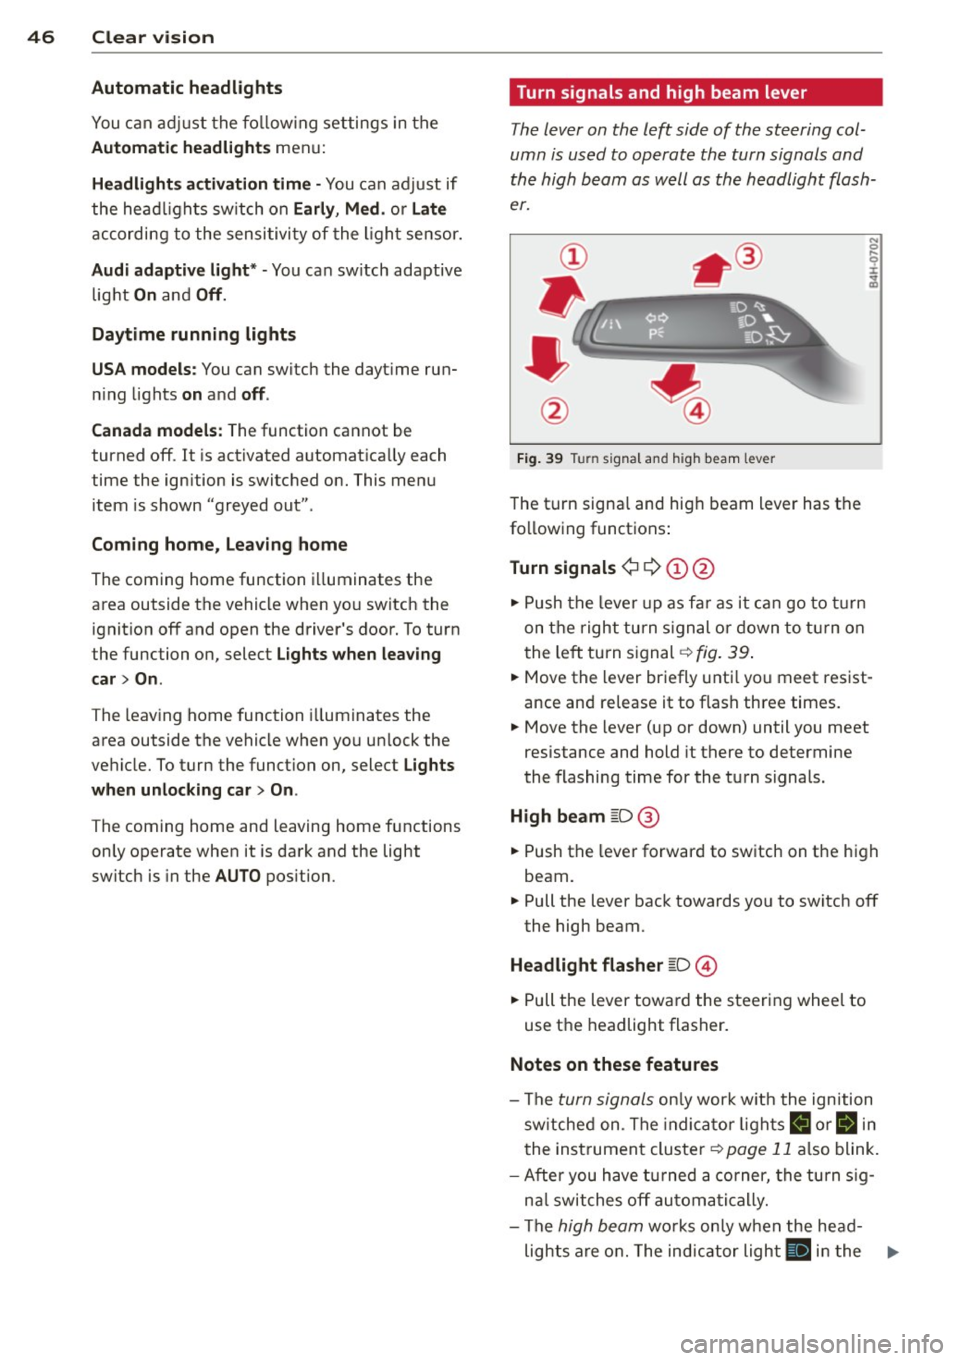
Turn signals and high beam lever
The lever on the left side of the steering col
umn is used to operate the turn signals and
the high beam as well as the headlight flash
er.
Fig. 39 Turn signal and high beam lever
The turn signa l and hig h beam lever has the
following functions:
Turn signals ¢ 9 (D@
.. Push the lever up as far as it can go to turn
on the right turn signal or down to turn on
t he left turn signal ¢
fig. 39.
N 0 ... 'i' :r
~
.. Move the lever briefly until you meet res ist
ance and re lease it to flash three times.
.. Move the lever (up or down) until you meet
resistance and hold it there to determine
the flashing time for the turn signals.
High beam [D @
.. Push the lever forward to switch on the high
beam.
.. Pull the lever back towards yo u to switch off
the high beam.
Headlight flasher [D ©
.. Pull the lever toward the steering whee l to
use the headlight flasher.
Notes on these features
-The turn signals only work w ith the ignition
switched on. The indicato r lights
B or ii in
the instrument cluster¢
page 11 also blink.
- After you have turned a corner, the turn sig-
nal switches off automatically.
- The
high beam works only when the head-
lights are on. The indicator light
II in the ...
Page 49 of 292
instrument cluster illuminates when the
high beams are on.
- The
headlight flasher works only as long as
yo u hold the lever -even if there are no
l ights turned on . The indicator light
El in
the instrument cluster illuminates when you
use the headlight flasher.
A WARNING
Do not use the hig h beam or headlight
flasher if you know that these could blind
oncoming traffic .
Interior lights
Front and rear interior lighting
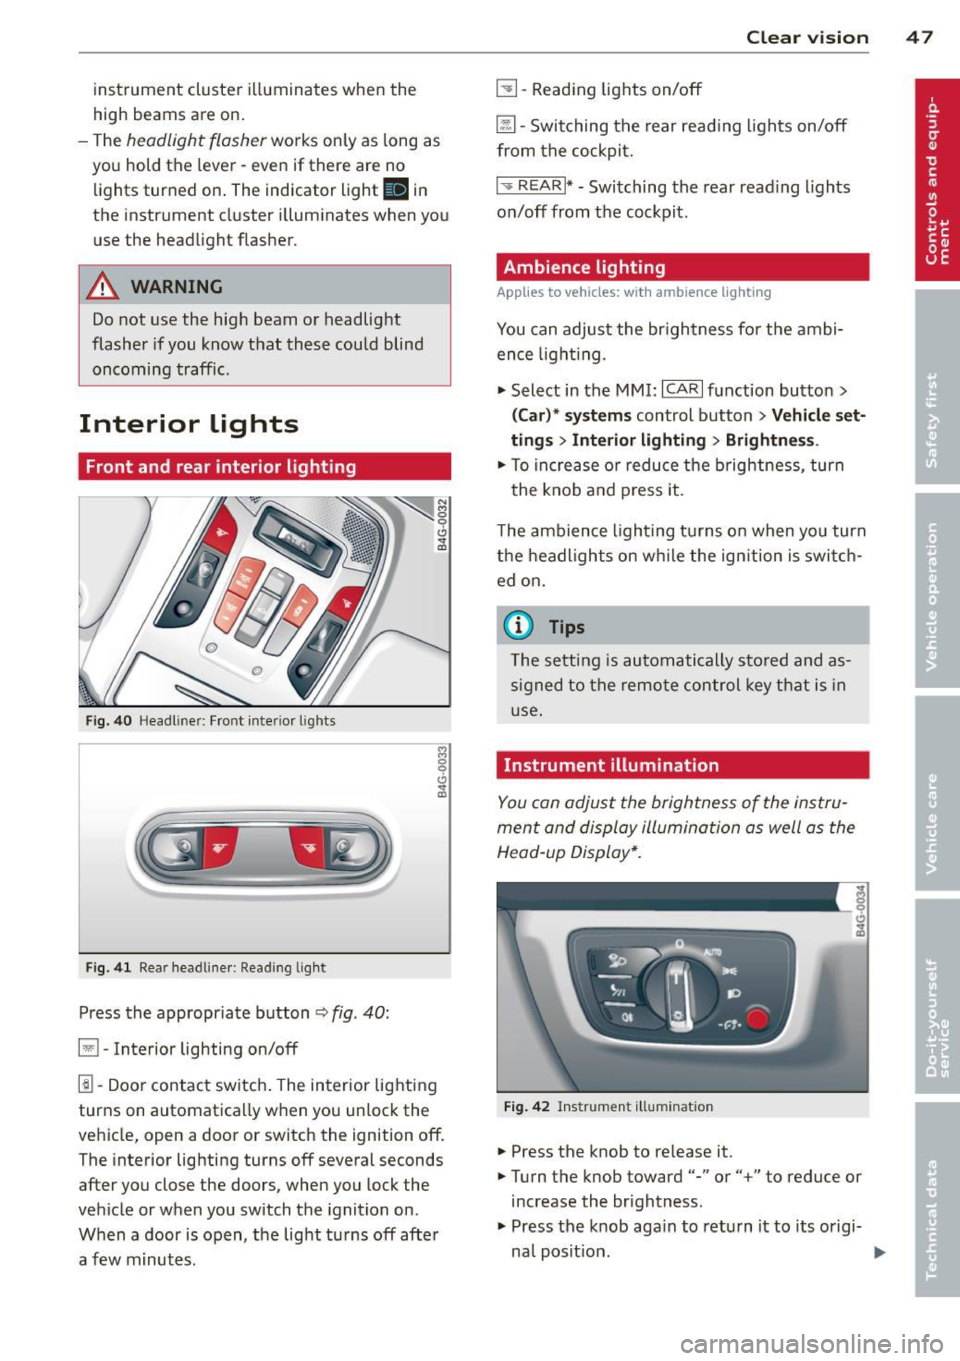
Fig. 40 Headl iner: Front interior l ights
F ig . 41 Rear headl iner: Read ing light
Press the appropriate button ¢ fig. 40:
§1 -Interior lighting on/off
1!1-Door contact switch . The interior lighting
turns on automatica lly when you unlock the
vehicle, open a door or switch the ignition off. The interior lighting turns off several seconds
after you close the doors, when you lock the
vehicle or when you switch the ignition on.
When a door is open, the light tu rns off afte r
a few minutes .
Clear vision 4 7
~ -Reading lights on/off
@ill-Switching the rear reading lights on/off
from the cockpit.
I ',; REARI* -Switching the rear read ing lights
on/off from the cockpit.
Ambience lighting
Applies to veh icles: w ith amb ience lighting
You can adjust the br ightness fo r the ambi
ence light ing.
.,. Select in the MMI:
ICARI function button >
(Car)* systems control button > Vehicle set
ting s
> Interior lighting > Brightnes s.
.,. To increase o r reduce the b rightness , turn
the knob and press it .
The ambience lighting turns on when yo u turn
the headlights on while the ign ition is swi tch
ed on.
(0 Tips
The setting is automatically stored and as
signed to the remote control key that is in
use.
Instrument illumination
You can adjust the brightness of the instru
ment and display illumination as well as the
Head-up Display*.
Fig. 42 Instrument illumina tion
.,. Press the knob to re lease it .
.,. Turn the knob toward"-" or"+" to reduce or
increase the br ightness.
.,. Press the knob aga in to return it to its origi-
na l posit ion .
~
Page 53 of 292

8 - The exterior mirrors fold in. In the MMI,
you can select if the mirrors fold in automati
cally when you lock the vehicle ~
page 35.
Tilt function for the passenger's mirror
To help you see the curb when backing into a
parking space, the surface of the mirror tilts
slightly. The knob must be in the P position
for this to happen.
You can adjust the tilted mirror surface by
turning the knob in the desired direction.
When you move out of reverse and into anoth
er gear, the new mirror position is stored and
assigned to the key you are using.
The mirror goes back into its original position
once you drive forward faster than 9 mph (15
km/h) or switch the ignition off.
.&_ WARNING
- Curved (i.e. convex) mirror surfaces in
crease your field of view. Remember that
vehicles or other objects will appear
smaller and farther away than when seen in a flat mirror.
If you use this mirror to
estimate distances of following vehicles
when changing lanes, you could estimate
incorrectly and cause an accident.
(D Note
-If the mirror housing is moved uninten
tionally (for example, while parking your
vehicle), then you must first fold the mi r
ror electrically. Do not readjust the mir
ror housing manually. You could damage
the motor which controls the mirror.
- If you wash the vehicle in an automatic
car wash, you must fold the exterior mir
rors in to reduce the risk of damage to
the mirrors. Never fold power folding ex
terior mirrors* by hand. Only fold them in and out using the power controls.
@ Tips
-The exterior mirror settings are stored
with the memory function*
~ page S 7.
- If there is a malfunction in the electrical
system, you can still adjust the exterior
Clear vision S 1
mirrors by pressing the edge of the mir
ror.
Dimming the mirrors
Fig. 48 Automatic dimming rea rview mirro r•
Manual anti-glare adjustment
"' Move the small lever (located on the bottom
edge of the mirror) to the rear.
Automatically dimming mirrors*
"'To dim the rearview mirror and both exterior
mirrors, press the@button. The diode @
turns on. The rearview and exterior mirrors
dim automatically when light shines on
them, for example from headlights on ave
hicle to the rear.
&_ WARNING
= Electrolyte fluid can leak from automatic
dimming mirrors if the glass is broken.
Electrolyte fluid can irritate skin, eyes and
respiratory system.
~
- Repeated or prolonged exposure to elec
trolyte can cause irritation to the respira
tory system, especially among people
with asthma or other respiratory condi
tions. Get fresh air immediately by leav
ing the vehicle or, if that is not possible,
open windows and doors all the way.
- If electrolyte gets into the eyes, flush
them thoroughly with large amounts of
clean water for at least 15 minutes·
'
medical attention is recommended.
- If electrolyte contacts skin, flush affect
ed area with clean water for at least 15 minutes and then wash affected area
with soap and water; medical attention
.___ ______ _:_ ____ _:_.::..:..:..._J ....
Page 59 of 292
Rear head restraints
Applies to vehicles: with adj ustable head restraints
--
/
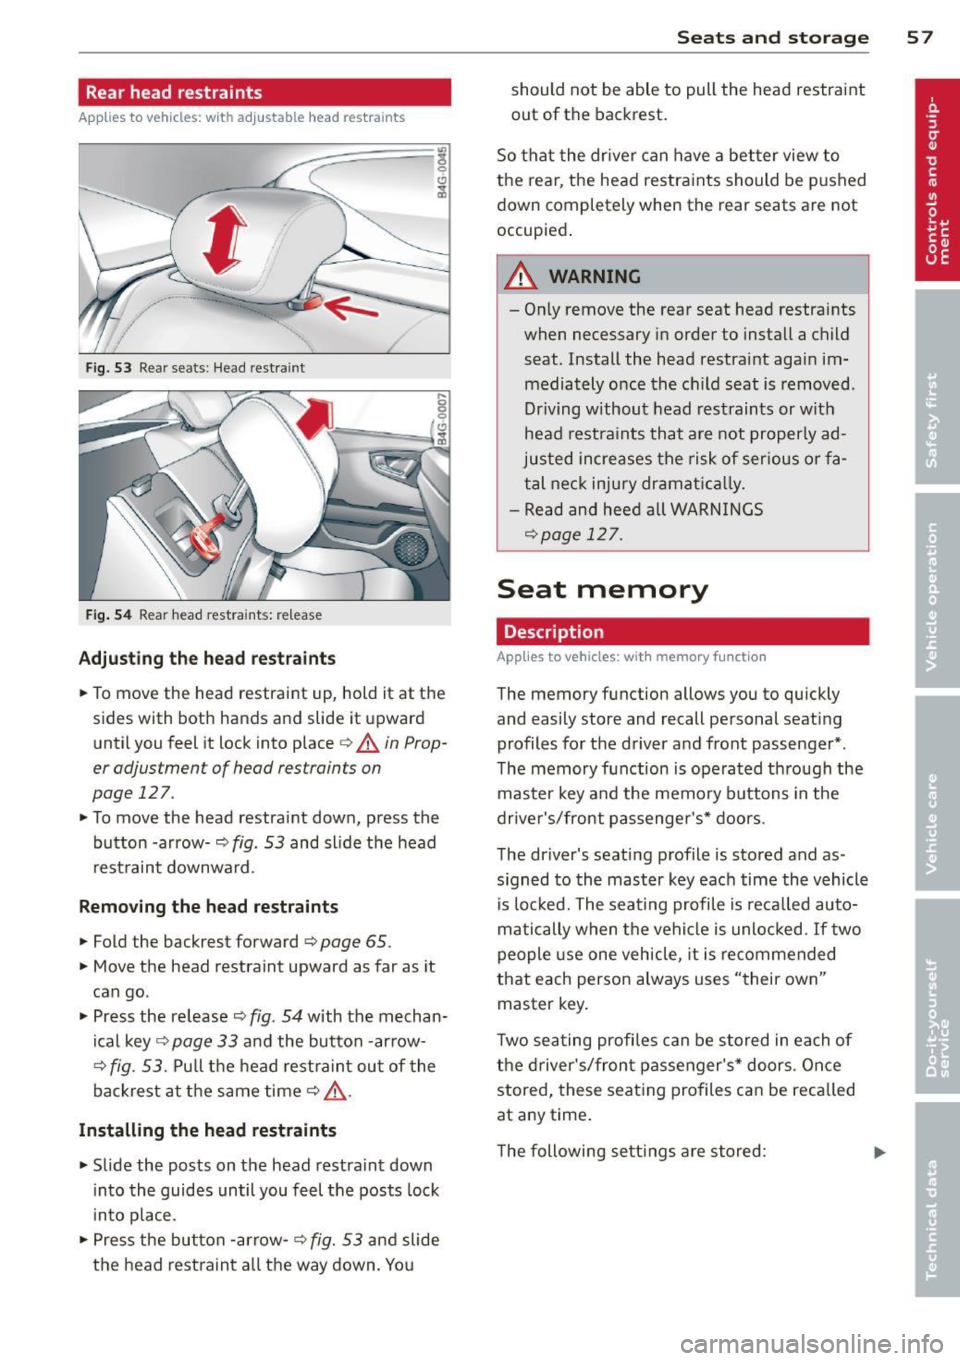
Fig. 53 Rear seats: Head restra int
Fig. 54 Rear head restra ints: re lease
Adjusting the head restraints
• To move the head restraint up, hold it at the
sides with both hands and slide it upward
until you feel it lock into place
¢ .&. in Prop
er adjustment of head restraints on
page 127.
• To move the head restraint down, press the
button -arrow-
q fig . 53 and sl ide the head
restraint downward .
Removing the head restraint s
• Fold the backrest forward ¢ page 65 .
• Move the head restraint upward as far as it
can go .
• Press the release¢
fig. 54 with the mechan
ical key ¢
page 33 and the button -arrow-
¢
fig. 53. Pull the head restraint out of the
backrest at the same time
q _&..
Installing the head restraints
• Slide the posts on the head restraint down
into the guides until you feel the posts lock
i nto place .
• Press the button -arrow-
¢ fig. 53 and slide
the head restraint a ll the way down. You
Seats and storage 57
should not be able to pull the head restraint
out of the backrest.
So that the driver can have a better view to
the rear, the head restraints should be pushed
down completely when the rear seats are not
occupied .
A WARNING
-On ly remove the rear seat head restraints
when necessary in order to install a child
seat. Install the head restraint again im mediately once the child seat is removed.
Driving without head restraints or with
head restraints that are not properly ad
justed increases the risk of serious or fa
tal neck injury dramat ically.
- Read and heed all WARNINGS
qpoge 127.
Seat memory
Description
Applies to vehicles: wit h memory function
The memory func tion allows you to quickly
and easily store and recall personal seating
profiles for the driver and front passenger* .
The memory function is operated through the
master key and the memory buttons in the
driver's/front passenger's* doors.
The driver's seating profile is stored and as
s igned to the master key each time the vehicle
is locked. The seating profile is recalled auto
matically when the vehicle is unlocked. If two
people use one vehicle, it is recommended
that each person always uses "their own"
master key.
Two seating profiles can be stored in each of
the driver's/front passenger's* doors. Once
stored, these seating profiles can be recalled
at any time .
The following settings are stored: