Page 169 of 326

167
Recommendations on storage
Never store bottles of AdBlue® in your
vehicle.
Procedure
F Switch off the ignition and remove the key.
F
F
or access to the AdBlue
® tank, raise the b
oot
carpet
then,
depending on equipment,
l
ift
out
the
spare
wheel
and/or the storage
b
ox. F
W
ithout pressing, turn the black cap a
q
uarter turn anti-clockwise and lift it off.
AdBlue
® freezes at about -11°C and d
eteriorates above 25°C. It is recommended
t
hat
bottles be stored in a cool area and
p
rotected from direct sunlight.
Under
these conditions, the additive can be
k
ept
for
at least a year.
If
the
additive has frozen, can be used once it
h
as
completely thawed out. Before
topping-up, ensure that the vehicle is p
arked on a flat and level sur face.
In
wintry conditions, ensure that the
t
emperature of the vehicle is above -11°C.
O
ther wise, by freezing, the AdBlue
® cannot
be
poured
into
its
tank.
Park
your
vehicle in a
w
armer
area
for
a
few
hours
to
allow the top-up
t
o
be
carried
out.
F
T
urn the blue cap a 6
th of a turn anti-
c
lockwise.
F
L
ift
off
the
cap.
9
Practical information
Page 170 of 326

168
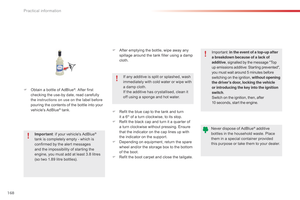
F Obtain a bottle of AdBlue®. After first c
hecking
the
use-by
date,
read carefully
t
he instructions on use on the label before
pouring
the
contents
of
the bottle into your
v
ehicle's
Ad
Blue
® tank.
I
mportant :
if
your vehicle's AdBlue
®
tank
is
completely
empty
-
which
is
c
onfirmed
by
the
alert
messages
a
nd
the
impossibility
of
starting
the
e
ngine,
you
must
add
at
least
3.8
litres
(
so two 1.89
litre
bottles). If
any additive is split or splashed, wash
i
mmediately
w
ith
c
old
w
ater
o
r
w
ipe
w
ith
a
damp cloth.
If the additive has crystallised, clean it
o
ff using a sponge and hot water.Important:
i
n the event of a top-up after
a breakdown because of a lack of
additive , signalled by the message "Top
u
p emissions additive: Starting prevented",
y
ou must wait around 5 minutes before
s
witching
o
n
t
he
i
gnition,
w
ithout opening
the driver's door, locking the vehicle
or introducing the key into the ignition
switch .
Switch on the ignition, then, after
1
0 seconds, start the engine.
Never dispose of AdBlue
® additive b
ottles
in
the
household
waste. Place
t
hem
in
a
special
container provided
t
his
p
urpose
o
r
t
ake
t
hem
t
o
y
our
d
ealer.
F
A
fter
emptying
the
bottle,
wipe
away
any
s
pillage
around
the
tank
filler
using
a
damp
c
loth.
F
R
efit
the
blue
cap
to
the
tank
and
turn
it
a
6
th of a turn clockwise, to its stop.
F
R
efit
the black cap and turn it a quarter of
a
turn
clockwise without pressing. Ensure
t
hat
the indicator on the cap lines up with
t
he
indicator on the support.
F
D
epending on equipment, return the spare
w
heel
and/or the storage box to the bottom
o
f
the
boot.
F
R
efit
the boot carpet and close the tailgate.
Practical information
Page 171 of 326
169
This kit is installed i n t he s torage b ox, u nder t he b
oot floor.
Complete
system
consisting
of
a
compressor
a
nd
a
sealant
cartridge
which
permits
t
emporary repair
of a tyre so that you can
drive
to
the
nearest
garage.
It
is
designed
to
repair
most
punctures
which
c
ould
affect
the
tyre,
located
on
the
tyre
tread
o
r
shoulder.
Temporary pu
ncture r epair k it
Access to the kit
List of tools
These tools are specific to your vehicle and can v
ary according to equipment. Do not use them
f
or other purposes.
1.
1
2 V compressor.
C
ontains a sealant cartridge for the
t
emporary repair of a tyre and can also be
u
sed for adjusting tyre pressures.
2.
T
owing eye.
S
ee the "Towing" section.
9
Practical information
Page 172 of 326
170
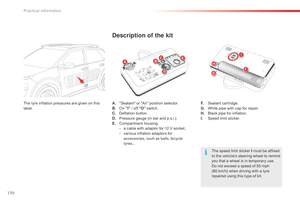
A. "Sealant" or "Air" position selector.
B. on "
I" / off "O" s witch.
C.
D
eflation button.
D.
P
ressure gauge (in bar and p.s.i.).
E.
C
ompartment
h
ousing:
-
a
cable with adaptor for 12 V socket,
-
v
arious inflation adaptors for
a
ccessories, such as balls, bicycle
tyres...
Description of the kit
The speed limit sticker I must be affixed t o the vehicle's steering wheel to remind
y
ou that a wheel is in temporary use.
Do
not exceed a speed of 50 mph
(80
km/h) when driving with a tyre
r
epaired using this type of kit.
F.
S
ealant
c
artridge.
G.
W
hite pipe with cap for repair.
H.
B
lack pipe for inflation.
I.
S
peed limit sticker.
The
tyre
inflation
pressures
are
given
on
this
lab
el.
Practical information
Page 173 of 326
171
1. Sealing
Repair procedure
Avoid removing any foreign bodies which have penetrated into the tyre.F
U
ncoil the white pipe G
f
ully.
F
U
nscrew the cap from the white pipe.
F
C
onnect the white pipe to the valve of the
tyre to be repaired.
F
S
witch off the ignition.
F
T
urn the selector A to the
"sealant"
p
osition.
F
C
heck that the switch B is in
position "O" . F
C
onnect the compressor's electric plug to
t
he vehicle's 12 V socket.
F
S
tart the vehicle and leave the engine
r
unning.
Take care, this product is harmful (e.g.
e
thylene-glycol, colophony...) if swallowed
a
nd causes irritation to the eyes.
Keep this product out of the reach of c
hildren.Do
not start the compressor before
c
onnecting the white pipe to the tyre v
alve: the sealant product would be e
xpelled through the pipe.
9
Practical information
Page 174 of 326

172
F Switch on the compressor by moving t
he switch B to position "I" until the tyre
pressure
reaches 2.0 bars.
T
he sealant is injected into the tyre under
p
ressure; do not disconnect the pipe from
t
he valve during this operation (risk of
sp
lashing).
If
after around 5 to 7 minutes the
p
ressure is not attained, this indicates
t
hat the tyre is not repairable; contact
a
CITROËN dealer or a qualified
w
orkshop for assistance. F
R emove the kit and screw the cap back on t
he white pipe.
T
ake care to avoid staining your vehicle
w
ith traces of fluid. Keep the kit to hand.
F
D
rive immediately for approximately
t
hree miles (five kilometres), at reduced
s
peed (between 15 and 35 mph (20 and
6
0 km/h)), to plug the puncture.
F
S
top to check the repair and the tyre
p
ressure using the kit.
Tyre under-inflation
detection
After repair of the tyre, the warning lamp will remain on until the system is
r
einitialised.
For
more information, refer to the
"
Under-inflation
d
etection"
s
ection.
Practical information
Page 175 of 326

173
2. InflationF Turn the selector A to the "air" position.
F
U
ncoil the black pipe H
f
ully.
F
C
onnect the black pipe to the
v
alve of the wheel. F
C onnect the compressor's electric plug to t
he vehicle's 12 V socket.
F
S
tart the vehicle again and leave the
e
ngine
r
unning.
As
soon as possible, go to a CITROËN
d
ealer or a qualified workshop.
You
must inform the technician that you
h
ave used this kit. After inspection, the
t
echnician will advise you on whether
t
he tyre can be repaired or if it must be
r
eplaced.F
A djust the pressure using the compressor (
to inflate: switch B in position "I";
t
o deflate: switch B in position "O"
and
p
ress button C),
in accordance with the
v
ehicle's
t
yre pressure label (located on the
l
eft hand door aperture).
A
loss of pressure indicates that the
p
uncture has not been fully plugged;
c
ontact a CITROËN dealer or qualified
w
orkshop for assistance.
F
R
emove and stow the kit.
F
D
rive at reduced speed (50 mph [80 km/h]
m
ax) limiting the distance travelled to
a
pproximately 120 miles (200 km).
9
Practical information
Page 176 of 326
174
Removing the cartridge
F Stow the black pipe.
F D etach the angled base from the white
p
ipe.
F
S
upport the compressor vertically.
F
U
nscrew the cartridge from the bottom.Beware
of discharges of fluid.
The
expiry date of the fluid is indicated
o
n the cartridge.
The
sealant cartridge is designed for
s
ingle use; even if only partly used, it
m
ust be replaced.
After
use, do not discard the cartridge
i
nto the environment, take it to an
a
uthorised waste disposal site or a
C
ITROËN dealer.
Do
not forget to obtain a new sealant
c
artridge, available from CITROËN
d
ealers or from a qualified workshop.
Practical information