2013 VOLVO V60 display
[x] Cancel search: displayPage 100 of 422

03 Your driving environment
Wipers and washing
03
98* Option/accessory, for more information, see Introduction.
Windscreen wipers1
Windscreen wipers and windscreen washers.
Rain sensor, on/off
Thumbwheel sensitivity/frequency
Windscreen wipers offMove the stalk switch to position 0 to
switch off the windscreen wipers.
Single sweepRaise the stalk switch and release to
make one sweep.
Intermittent wipingSet the number of sweeps per time
unit with the thumbwheel when inter-
mittent wiping is selected.
Continuous wipingThe wipers sweep at normal speed.
The wipers sweep at high speed.
IMPORTANT
Before activating the wipers during winter -
ensure that the wiper blades are not frozen
in and that any snow or ice on the wind-
screen (and rear window) is scraped away.
IMPORTANT
Use plenty of washer fluid when the wipers
are cleaning the windscreen. The wind-
screen must be wet when the windscreen
wipers are operating.
Service position wiper bladeFor cleaning the windscreen/wiper blades and
replacement of wiper blades see see
page 341 and 361.
Rain sensor*The rain sensor automatically starts the wind-
screen wipers based on how much water it
detects on the windscreen. The sensitivity ofthe rain sensor can be adjusted using the
thumbwheel.
When the rain sensor is activated a light in the
button the rain sensor symbol
is shown
in the right-hand display in the combined
instrument panel.
Activating and setting the sensitivityWhen activating the rain sensor, the car must
be running or the remote control key in position
I or II while the windscreen wiper stalk switch
must be in position 0 or in the position for a
single sweep.
Activate the rain sensor by pressing the button
. The windscreen wipers make one
sweep.
Press the stalk switch up for the wipers to make
an extra sweep.
Turn the thumbwheel upward for higher sensi-
tivity and downward for lower sensitivity. (An
extra sweep is made when the thumbwheel is
turned upward.)
DeactivateDeactivate the rain sensor by pressing the but-
ton
or move the stalk switch down to
another wiper program.
1Replacing the wiper blades see page 341, service position, wiper blade see page 341 and filling washer fluid see page 343.
ProCarManuals.com
Page 101 of 422

03 Your driving environment
Wipers and washing
03
* Option/accessory, for more information, see Introduction.99
The rain sensor is automatically deactivated
when the remote control key is removed from
the ignition switch or five minutes after the
engine has been switched off.
IMPORTANT
The windscreen wipers could start and be
damaged in an automatic car wash. Deac-
tivate the rain sensor while the car is running
or the remote control key is in position I or
II. The symbol in the combined instrument
panel and the lamp in the button go out.
Washing the headlamps and windows
Washing function.
Washing the windscreenMove the stalk switch toward the steering
wheel to start the windscreen and headlamp
washers.
The windscreen wipers will make several more
sweeps and the headlamps are washed once
the stalk switch has been released.
Heated washer nozzles*The washer nozzles are heated automatically
in cold weather to prevent the washer fluid
freezing solid.
High-pressure headlamp washing*High-pressure headlamp washing consumes a
large quantity of washer fluid. To save fluid, the
headlamps are washed automatically at every
fifth windscreen wash cycle.
Reduced washingIf only approx. 1 litre of washer fluid remains in
the reservoir and the message that you should
fill the washer fluid is shown in the combined
instrument panel's display, then the supply of
washer fluid to the headlamps is switched off.
This is in order to prioritise cleaning the wind-
screen and the visibility through it.
Wiping and washing the rear window
Rear window wiper – intermittent wiping
Rear window wiper – continuous speed
Press the stalk switch forward (see the arrow
in the illustration above) to initiate rear window
washing and wiping.
NOTE
The rear window wiper is equipped with
overheating protection which means that
the motor is switched off if it overheats. The
rear window wiper works again after a cool-
ing period (30 seconds or longer, depending
on the heat in the motor and the outside
temperature).
ProCarManuals.com
Page 108 of 422

03 Your driving environment
Compass*
03
106* Option/accessory, for more information, see Introduction.
Operation
Rearview mirror with compass.
The upper right-hand corner of the rearview
mirror has an integrated display that shows the
compass direction in which the front of the car
is pointing. Eight different directions are shown
with English abbreviations:
N (north), NE (north
east), E (east), SE (south east), S (south), SW(south west), W (west) and NW (north west).
The compass is activated automatically when
the car is started or in key position II, see
page 78. To deactivate/activate the compass -
press in the button on the underside of the mir-
ror using a paper clip for example.
CalibrationThe earth is divided into 15 magnetic zones.
The compass is set for the geographic area to
which the car was delivered. The compassshould be calibrated if the car is moved across
several magnetic zones. Proceed as follows:
1. Stop the car in a large open area free from
steel structures and high-voltage power
lines.
2. Start the car.
NOTE
For optimum calibration - switch off all elec-
trical equipment (climate control system,
wipers etc.) and make sure that all doors are
closed.
3. Hold the button on the underside of the
rearview mirror depressed
approx. 6 seconds (using a paper clip for
example) until the character
C is shown.
G030295
Magnetic zones.
4. Hold the button on the underside of the
rearview mirror depressed
approx. 3 seconds. The number of the cur-
rent magnetic zone is shown.
5. Press the button repeatedly until the
required magnetic zone (
1–15) is shown.
See the map of magnetic zones for the
compass.
6. Wait until the display resumes showing the
character
C.
7. Drive slowly in a circle at a speed of no
more than 10 km/h until a compass direc-
tion is shown in the display, indicating that
calibration is complete. Then drive a further
2 circles to fine-tune calibration.
8. Repeat the above procedure as necessary.
ProCarManuals.com
Page 112 of 422

03 Your driving environment
Alcolock*
03
110* Option/accessory, for more information, see Introduction.
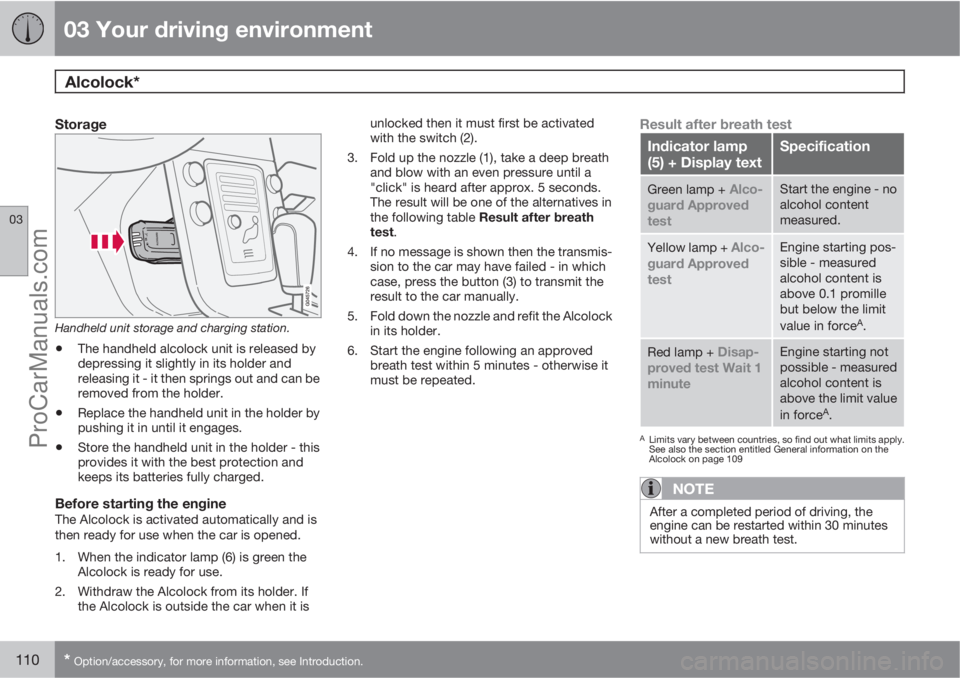
Storage
Handheld unit storage and charging station.
•The handheld alcolock unit is released by
depressing it slightly in its holder and
releasing it - it then springs out and can be
removed from the holder.
•Replace the handheld unit in the holder by
pushing it in until it engages.
•Store the handheld unit in the holder - this
provides it with the best protection and
keeps its batteries fully charged.
Before starting the engineThe Alcolock is activated automatically and is
then ready for use when the car is opened.
1. When the indicator lamp (6) is green the
Alcolock is ready for use.
2. Withdraw the Alcolock from its holder. If
the Alcolock is outside the car when it isunlocked then it must first be activated
with the switch (2).
3. Fold up the nozzle (1), take a deep breath
and blow with an even pressure until a
"click" is heard after approx. 5 seconds.
The result will be one of the alternatives in
the following table Result after breath
test.
4. If no message is shown then the transmis-
sion to the car may have failed - in which
case, press the button (3) to transmit the
result to the car manually.
5. Fold down the nozzle and refit the Alcolock
in its holder.
6. Start the engine following an approved
breath test within 5 minutes - otherwise it
must be repeated.
Result after breath test
Indicator lamp
(5) + Display textSpecification
Green lamp + Alco-
guard Approved
testStart the engine - no
alcohol content
measured.
Yellow lamp + Alco-
guard Approved
testEngine starting pos-
sible - measured
alcohol content is
above 0.1 promille
but below the limit
value in force
A.
Red lamp + Disap-
proved test Wait 1
minuteEngine starting not
possible - measured
alcohol content is
above the limit value
in force
A.
ALimits vary between countries, so find out what limits apply.
See also the section entitled General information on the
Alcolock on page 109
NOTE
After a completed period of driving, the
engine can be restarted within 30 minutes
without a new breath test.
ProCarManuals.com
Page 113 of 422

03 Your driving environment
Alcolock*
03
* Option/accessory, for more information, see Introduction.111 To bear in mind
Before the breath testIn order to obtain correct function and as accu-
rate a measurement result as possible:
•Avoid eating or drinking approx.
5 minutes before the breath test.
•Avoid excess windscreen washing - the
alcohol in the washer fluid may result in an
incorrect measurement result.
Change of driverIn order to ensure that a new breath test is car-
ried out in the event of a change of driver -
depress the switch (2) and the send button (3)
simultaneously for approx. 3 seconds. At
which point the car returns to start inhibition
mode and a new approved breath test is
required before starting the engine.
Calibration and serviceThe Alcolock must be checked and calibrated
at a workshop2 every 12 months.
30 days before recalibration is necessary the
display shows
Alcoguard Calibr. required. If
calibration is not carried out within these 30
days then normal engine starting will be
blocked - only starting with the Bypass func-tion will then be possible, see page 111 sec-
tion Emergency situation.
The message can be cleared by pressing the
send button (3) once. Otherwise it goes out on
its own after approx. 2 minutes but then reap-
pears each time the engine is started - only
recalibration at a workshop
2 can clear the mes-
sage permanently.
Cold or hot weatherThe colder the weather the longer it takes
before the Alcolock is ready for use:
Temperature (ºC)Maximum heat-
ing time (sec-
onds)
+10 to +8510
-5 to +1060
-40 to -5180
At temperatures below -20 ºC or above
+60 ºC the Alcolock requires additional power
supply. The display shows
Alcoguard insert
power cable. In which case, connect the
power supply cable from the glovebox and wait
until indicator lamp (6) is green.In extremely cold weather the heating time can
be reduced by taking the Alcolock indoors.
Emergency situationIn the event of an emergency situation or the
Alcolock is out of order, it is possible to bypass
the Alcolock in order to drive the car.
NOTE
All Bypass activation is logged and saved in
memory, see page 8 in the section, Record-
ing data.
After the Bypass function has been activated
the display shows Alcoguard Bypass
enabled the whole time while driving and can
only be reset by a workshop2.
The Bypass function can be tested without the
error message being logged - in which case,
carry out all the steps without starting the car.
The error message is cleared when the car is
locked.
When the Alcolock is installed, either the
Bypass or Emergency function is selected as
the bypassing option. This setting can be
changed afterwards at a workshop
2.
2An authorised Volvo workshop is recommended.
ProCarManuals.com
Page 114 of 422

03 Your driving environment
Alcolock*
03
112* Option/accessory, for more information, see Introduction.
Activating the Bypass function
•Depress and hold the left-hand stalk
switch OK button and the button for haz-
ard warning flashers simultaneously for
approx. 5 seconds - the display first shows
Bypass activated Wait 1 minute and
then Alcoguard Bypass enabled - after
which the engine can be started.
This function can be activated several times.
The error message shown during driving can
only be cleared at a workshop
2.
Activating the Emergency function
•Depress and hold the left-hand stalk
switch OK button and the button for haz-
ard warning flashers simultaneously for
approx. 5 seconds - the display shows
Alcoguard Bypass enabled and the
engine can be started.
This function can be used once, after which a
reset must be made at a workshop
2.
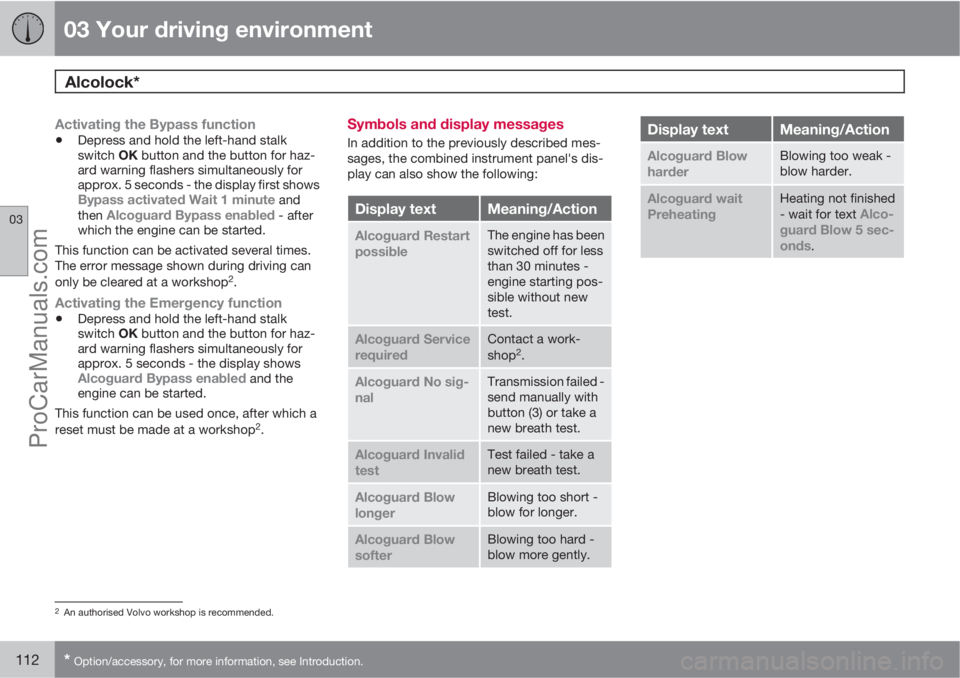
Symbols and display messages
In addition to the previously described mes-
sages, the combined instrument panel's dis-
play can also show the following:
Display textMeaning/Action
Alcoguard Restart
possibleThe engine has been
switched off for less
than 30 minutes -
engine starting pos-
sible without new
test.
Alcoguard Service
requiredContact a work-
shop2.
Alcoguard No sig-
nalTransmission failed -
send manually with
button (3) or take a
new breath test.
Alcoguard Invalid
testTest failed - take a
new breath test.
Alcoguard Blow
longerBlowing too short -
blow for longer.
Alcoguard Blow
softerBlowing too hard -
blow more gently.
Display textMeaning/Action
Alcoguard Blow
harderBlowing too weak -
blow harder.
Alcoguard wait
PreheatingHeating not finished
- wait for text Alco-
guard Blow 5 sec-
onds
.
2An authorised Volvo workshop is recommended.
ProCarManuals.com
Page 118 of 422

03 Your driving environment
Starting the engine
03
116
•Accelerator pedal or brake pedal is
depressed
•The gear selector is moved out of P posi-
tion
•There is less than approx.10 litres left in the
fuel tank
•Active ERS time passes 15 minutes.
When an ERS-started engine is switched off,
all direction indicators illuminate with a con-
stant glow for 3 seconds.
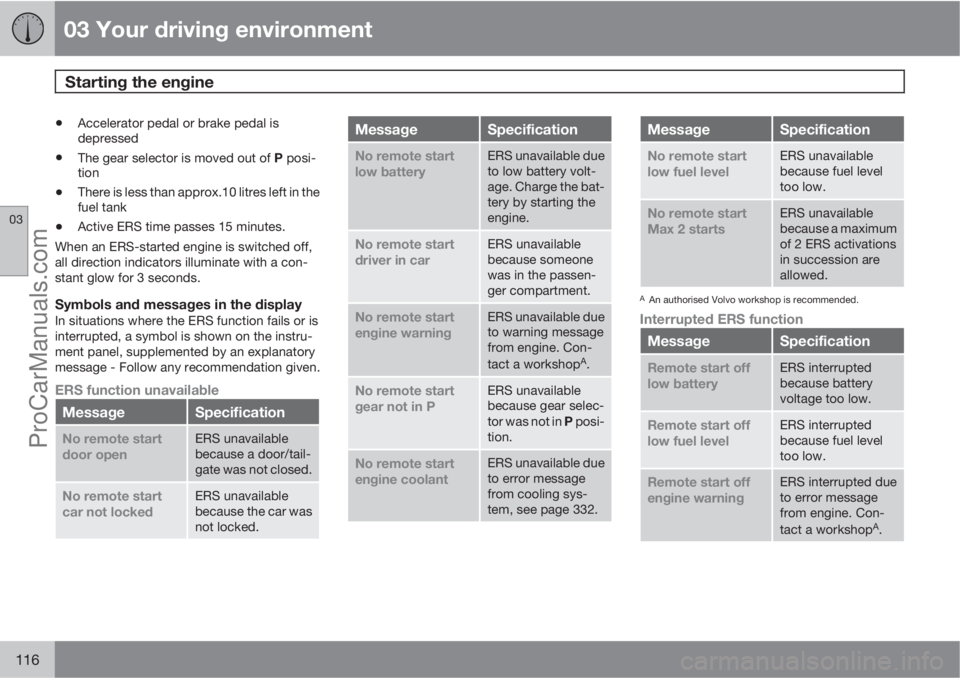
Symbols and messages in the displayIn situations where the ERS function fails or is
interrupted, a symbol is shown on the instru-
ment panel, supplemented by an explanatory
message - Follow any recommendation given.
ERS function unavailable
MessageSpecification
No remote start
door openERS unavailable
because a door/tail-
gate was not closed.
No remote start
car not lockedERS unavailable
because the car was
not locked.
MessageSpecification
No remote start
low batteryERS unavailable due
to low battery volt-
age. Charge the bat-
tery by starting the
engine.
No remote start
driver in carERS unavailable
because someone
was in the passen-
ger compartment.
No remote start
engine warningERS unavailable due
to warning message
from engine. Con-
tact a workshop
A.
No remote start
gear not in PERS unavailable
because gear selec-
tor was not in P posi-
tion.
No remote start
engine coolantERS unavailable due
to error message
from cooling sys-
tem, see page 332.
MessageSpecification
No remote start
low fuel levelERS unavailable
because fuel level
too low.
No remote start
Max 2 startsERS unavailable
because a maximum
of 2 ERS activations
in succession are
allowed.
AAn authorised Volvo workshop is recommended.
Interrupted ERS function
MessageSpecification
Remote start off
low batteryERS interrupted
because battery
voltage too low.
Remote start off
low fuel levelERS interrupted
because fuel level
too low.
Remote start off
engine warningERS interrupted due
to error message
from engine. Con-
tact a workshop
A.
ProCarManuals.com
Page 123 of 422

03 Your driving environment
Gearboxes
03
121
IMPORTANT
The operating temperature of the gearbox is
checked in order to prevent damage to any
of the drive system's components. In the
event of a risk of overheating a warning
symbol illuminates on the instrument panel
combined with a text message - In which
case, follow the recommendation given.
Manual gearbox
Gearshift pattern 5-speed gearbox.
Gearshift pattern 6-speed gearbox.
The 6-speed box is available in two versions -
reverse gear position differs between them.
Look at the actual gearshift pattern imprinted
on the gear lever.
•Depress the clutch pedal fully during each
gear change.
•Take your foot off the clutch pedal between
gear changes.
WARNING
Always apply the parking brake when park-
ing on a slope - leaving the car in gear is not
sufficient to hold the car in all situation.
Gear indicator1
An essential detail in connection with environ-
mental driving is to drive in the right gear and
change gear in time.
The driver is assisted by an indicator - GSI
(Gear Shift Indicator) - which notifies the driver
when it is most advantageous to engage the
next higher or lower gear in order to obtain the
lowest possible fuel consumption. However,
taking into consideration characteristics such
as performance and vibration-free running, it
may be advantageous to change gear at a
higher engine speed.
Indication is made with an up or down arrow in
the combined instrument panel's right-hand
display.
1Only manual gearbox for the D2 model.
ProCarManuals.com