2013 VOLVO V60 tow
[x] Cancel search: towPage 96 of 422

03 Your driving environment
Lighting
03
94* Option/accessory, for more information, see Introduction.
Home safe light duration
Some of the exterior lighting can be kept
switched on to work as home safe lighting after
the car has been locked.
1. Remove the remote control key from the
ignition switch.
2. Move the left-hand stalk switch toward the
steering wheel to the end position and
release it. The function can be activated in
the same way as with main beam flash, see
page 87.
3. Get out of the car and lock the door.
When the function is activated, dipped beam,
parking lamps, door mirror lamps, number
plate lighting, interior roof lamps and courtesy
lighting are switched on.
The length of time for which the home safe
lighting should be kept on can be set in the
menu system MY CAR under Settings
Car
settings
Light settingsHome safe light
duration. For a description of the menu sys-
tem, see page 203.
Approach light duration
Approach lighting is switched on with the
remote control key, see page 45, and is used
to switch on the car's lighting at a distance.
When the function is activated with the remote
control, parking lamps, door mirror lamps,
number plate lighting, interior roof lamps and
courtesy lighting are switched on.
The length of time for which the approach light-
ing should be kept on can be set in the menu
system MY CAR under Settings
Car
settings
Light settingsApproach light
duration. For a description of the menu sys-
tem, see page 203.
Adjusting headlamp pattern
G021151
Headlamp pattern, left-hand traffic.
G021152
Headlamp pattern, right-hand traffic.
The headlamp pattern must be adjusted to
avoid dazzling oncoming motorists and can be
set for right or left-hand traffic. The correct pat-
tern will also better illuminate the verge.
Active Xenon headlamps*The car must be stationary with the engine run-
ning when the headlamp pattern is shifted
between right and left-hand traffic.
1.
Access the menu system MY CAR under
Settings
Car settingsLight
settings.
2.
Select between
Temporary RH trafficand Temporary LH traffic.
For a description of the menu system, see
page 203
ProCarManuals.com
Page 101 of 422

03 Your driving environment
Wipers and washing
03
* Option/accessory, for more information, see Introduction.99
The rain sensor is automatically deactivated
when the remote control key is removed from
the ignition switch or five minutes after the
engine has been switched off.
IMPORTANT
The windscreen wipers could start and be
damaged in an automatic car wash. Deac-
tivate the rain sensor while the car is running
or the remote control key is in position I or
II. The symbol in the combined instrument
panel and the lamp in the button go out.
Washing the headlamps and windows
Washing function.
Washing the windscreenMove the stalk switch toward the steering
wheel to start the windscreen and headlamp
washers.
The windscreen wipers will make several more
sweeps and the headlamps are washed once
the stalk switch has been released.
Heated washer nozzles*The washer nozzles are heated automatically
in cold weather to prevent the washer fluid
freezing solid.
High-pressure headlamp washing*High-pressure headlamp washing consumes a
large quantity of washer fluid. To save fluid, the
headlamps are washed automatically at every
fifth windscreen wash cycle.
Reduced washingIf only approx. 1 litre of washer fluid remains in
the reservoir and the message that you should
fill the washer fluid is shown in the combined
instrument panel's display, then the supply of
washer fluid to the headlamps is switched off.
This is in order to prioritise cleaning the wind-
screen and the visibility through it.
Wiping and washing the rear window
Rear window wiper – intermittent wiping
Rear window wiper – continuous speed
Press the stalk switch forward (see the arrow
in the illustration above) to initiate rear window
washing and wiping.
NOTE
The rear window wiper is equipped with
overheating protection which means that
the motor is switched off if it overheats. The
rear window wiper works again after a cool-
ing period (30 seconds or longer, depending
on the heat in the motor and the outside
temperature).
ProCarManuals.com
Page 107 of 422

03 Your driving environment
Windows, rearview and door mirrors
03
* Option/accessory, for more information, see Introduction.105
The door mirrors and rear window are demis-
ted/defrosted automatically if the car is started
in an outside temperature lower than +9 °C.
Automatic defrosting can be selected in the
menu system MY CAR under Settings
Climate settingsAutomatic rear
defroster. Select between
On or Off. For a
description of the menu system, see
page 203.
Interior rearview mirror
Control for dimming
Manual dimmingBright light from behind could be reflected in
the rearview mirror and dazzle the driver. Usedimming with the dimming control when lights
from behind are distracting:
1. Use dimming by moving the control in
towards the passenger compartment.
2. Return to normal position by moving the
control towards the windscreen.
Automatic dimming*Bright light from behind is automatically
dimmed by the rearview mirror. The control is
not available in mirrors with automatic dim-
ming.
The compass* can only be specified for rear-
view mirrors with automatic dimming, see
page 106.
ProCarManuals.com
Page 115 of 422

03 Your driving environment
Starting the engine
03
* Option/accessory, for more information, see Introduction.113 Petrol and diesel engines
Ignition switch with remote control key extracted/
inserted. and START/STOP ENGINE button.
IMPORTANT
Do not press in the remote control key incor-
rectly turned - Hold the end with the detach-
able key blade, see page 48.
1. Insert the remote control key in the ignition
switch and press it in to its end position.
Note that if the car is equipped with an
alcolock then a breath test must first be
approved before the engine can be started
- see page 109.2.
Hold the clutch pedal fully depressed
1. (For
cars with automatic gearbox - Depress the
brake pedal.)
3.
Press the START/STOP ENGINE button
and then release it.
The starter motor works until the engine starts
or until its overheating protection triggers.
IMPORTANT
If the engine fails to start after 3 attempts -
wait for 3 minutes before making a further
attempt. Starting capacity increases if the
battery is allowed to recover.
WARNING
Never remove the remote control key from
the ignition switch after starting the engine
or when the car is being towed.
WARNING
Always remove the remote control key from
the ignition switch when leaving the car, and
make sure that the key position is 0 - in par-
ticular if there are children in the car. For
information on how this works - see
page 79.
NOTE
The idling speed can be noticeably higher
than normal for certain engine types during
cold starting. This is so that the emissions
system can reach normal operating tem-
perature as quickly as possible, which min-
imises exhaust emissions and protects the
environment.
Keyless drive*Follow steps 2–3 for starting petrol and diesel
engines. For more information on Keyless drive
- see page 53.
NOTE
A prerequisite for the car to start is that one
of the car's remote control keys with the
Keyless drive* function is in the passenger
compartment or cargo area.
WARNING
Never remove the remote control key from
the car while driving or during towing.
Stop the engineTo switch off the engine:
•Press START/STOP ENGINE - the engine
stops.
1If the car is moving then it is enough to press the START/STOP ENGINE button to start the car.
ProCarManuals.com
Page 125 of 422

03 Your driving environment
Gearboxes
03
123
Geartronic – Manual gear positions (+/-)The driver can also change gear manually
using the Geartronic automatic gearbox. The
car engine-brakes when the accelerator pedal
is released.
Manual gearshift mode is obtained by moving
the lever to the side from D position to the end
position at +/–. The information display shifts
the indication from
D to one of the figures 1 –6, which is equivalent to the gear that is
engaged just then, see page 71.
•Move the lever forwards towards + (plus)
to change up a gear and release the lever,
which returns to its rest position between
+ and –.
or
•Pull the lever back towards – (minus) to
change down a gear and release it.
The manual gearshift mode (+/–) can be
selected at any time while driving.
Geartronic automatically shifts down if the
driver allows the speed to decrease lower than
a level suitable for the selected gear, in order
to avoid jerking and stalling.
To return to automatic driving mode:
•Move the lever to the side to the end posi-
tion at D.
NOTE
f the gearbox has a Sport programme then
the gearbox will only become manual after
the lever has been moved forwards or back-
wards in its (-+/–) position. The information
display then shifts the indication from
S to
show which of the gears 1-6 is engaged.
Geartronic - Sport mode (S)2
The Sport programme provides sportier cha-
racteristics and allows higher engine speed for
the gears. At the same time it responds more
quickly to acceleration. During active driving,
the use of a lower gear is prioritised, leading to
a delayed upshift.
Sport mode is obtained by moving the lever to
the side from D position to the end position at
+/–. The information display shifts the indica-
tion from
D to S.
Sport mode can be selected at any time while
driving.
Geartronic - Winter modeIt can be easier to pull away on slippery roads
if 3rd gear is engaged manually.
1. Depress the brake pedal and move the
gear lever from D position to the end posi-tion at +/– - the instrument panel display
shifts the indication from
D to the figure 1.
2. Scroll up to gear 3 by pushing the lever
forward towards + (plus) twice - the display
shifts the indication from
1 to 3.
3. Release the brake and accelerate carefully.
The gearbox "winter mode" means that the car
moves off with a lower engine speed and
reduced engine power on the drive wheels.
Kick-downWhen the accelerator pedal is pressed all the
way to the floor (beyond the position normally
regarded as full acceleration) a lower gear is
immediately engaged. This is known as kick-
down.
If the accelerator is released from the kick-
down position, the gearbox automatically
changes up.
Kick-down is used when maximum accelera-
tion is needed, such as for overtaking.
Safety functionTo prevent overrevving the engine, the gearbox
control program has a protective downshift
inhibitor which prevents the kick-down func-
tion.
2Only models D5 and T6.
ProCarManuals.com
Page 127 of 422

03 Your driving environment
Gearboxes
03
* Option/accessory, for more information, see Introduction.125 Automatic gearbox Powershift*
D: Automatic gear positions. +/–: Manual gear
positions.
Powershift is a 6-stage automatic gearbox that
has double mechanical clutch discs in contrast
to a conventional automatic gearbox. A con-
ventional automatic gearbox has a hydraulic
torque converter instead that transfers power
from engine to gearbox.
Powershift transmission operates in the same
way and has similar controls and functions as
the Geartronic automatic transmission, descri-
bed in the previous section.
Powershift or Geartronic?In the event of uncertainty as to whether or not
the car is equipped with Powershift transmis-sion, this can be verified by checking the des-
ignation on the transmission's label under the
bonnet - see page 370. The designa-
tion ”MPS6” means that it is Powershift – trans-
mission otherwise it is Geartronic automatic
transmission.
HSAThe HSA (Hill Start Assist) function means that
the pressure in the brake system remains for
several seconds while the foot is moved from
the brake pedal to the accelerator pedal before
setting off or reversing uphill.
The temporary braking effect releases after
several seconds or when the driver acceler-
ates.
To bear in mindThe transmission's double clutch has overload
protection that is activated if it becomes too
hot, e.g. if the car is held stationary with the
accelerator pedal on an uphill gradient for a
long time.
Overheated transmission causes the car to
shake and vibrate, and the warning symbol illu-
minates and the information display shows a
message. The transmission can also overheat
during slow driving in queues (10 km/h orslower) on an uphill gradient, or with a trailer
hitched. The transmission cools down when
the car is stationary, with foot brake depressed
and the engine running at idling speed.
Overheating during slow driving in queues can
be avoided by driving in stages: Stop the car
and wait with your foot on the brake pedal until
there is a moderate distance to the traffic
ahead, drive forward a short distance, and then
wait another moment with your foot on the
brake pedal.
IMPORTANT
Use the foot brake to hold the car stationary
on an uphill gradient - do not hold the car
with the accelerator pedal. The gearbox
could then overheat.
For important information regarding Powershift
transmission and towing - see page 304.
Text message and actionIn some situations the display may show a
message at the same time as a symbol is illu-
minated.
ProCarManuals.com
Page 139 of 422

03 Your driving environment
Parking brake
03
137 General
FunctionA faint electric motor noise can be heard when
the electrical parking brake is being applied.
The noise can also be heard during the auto-
matic function checking of the parking brake.
If the car is stationary when the parking brake
is applied then it only acts on the rear wheels.
If it is applied when the car is moving then the
normal foot brake is used, i.e. the brake acts
on all four wheels. Brake function changes over
to the rear wheels when the car is almost sta-
tionary.
Low battery voltageIf the battery voltage is too low then the parking
brake can neither be released nor applied.
Connect a donor battery if the battery voltage
is too low, see page 120.
Applying the parking brake
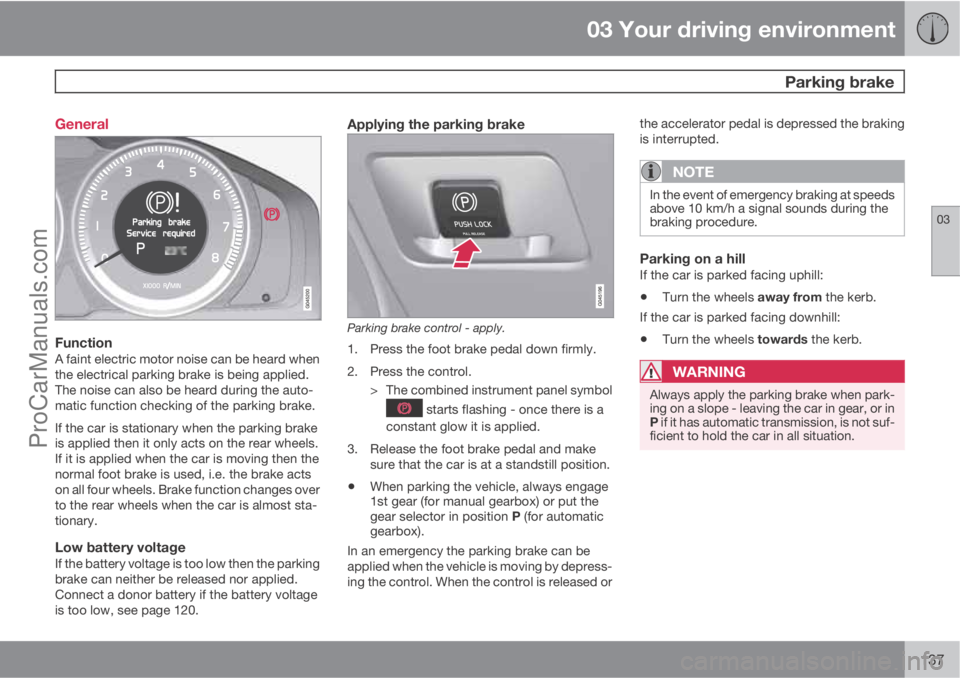
Parking brake control - apply.
1. Press the foot brake pedal down firmly.
2. Press the control.
> The combined instrument panel symbol
starts flashing - once there is a
constant glow it is applied.
3. Release the foot brake pedal and make
sure that the car is at a standstill position.
•When parking the vehicle, always engage
1st gear (for manual gearbox) or put the
gear selector in position P (for automatic
gearbox).
In an emergency the parking brake can be
applied when the vehicle is moving by depress-
ing the control. When the control is released orthe accelerator pedal is depressed the braking
is interrupted.
NOTE
In the event of emergency braking at speeds
above 10 km/h a signal sounds during the
braking procedure.
Parking on a hillIf the car is parked facing uphill:
•Turn the wheels away from the kerb.
If the car is parked facing downhill:
•Turn the wheels towards the kerb.
WARNING
Always apply the parking brake when park-
ing on a slope - leaving the car in gear, or in
P if it has automatic transmission, is not suf-
ficient to hold the car in all situation.
ProCarManuals.com
Page 143 of 422

03 Your driving environment
HomeLink�Ÿ�Ÿ *
03
* Option/accessory, for more information, see Introduction.141 General
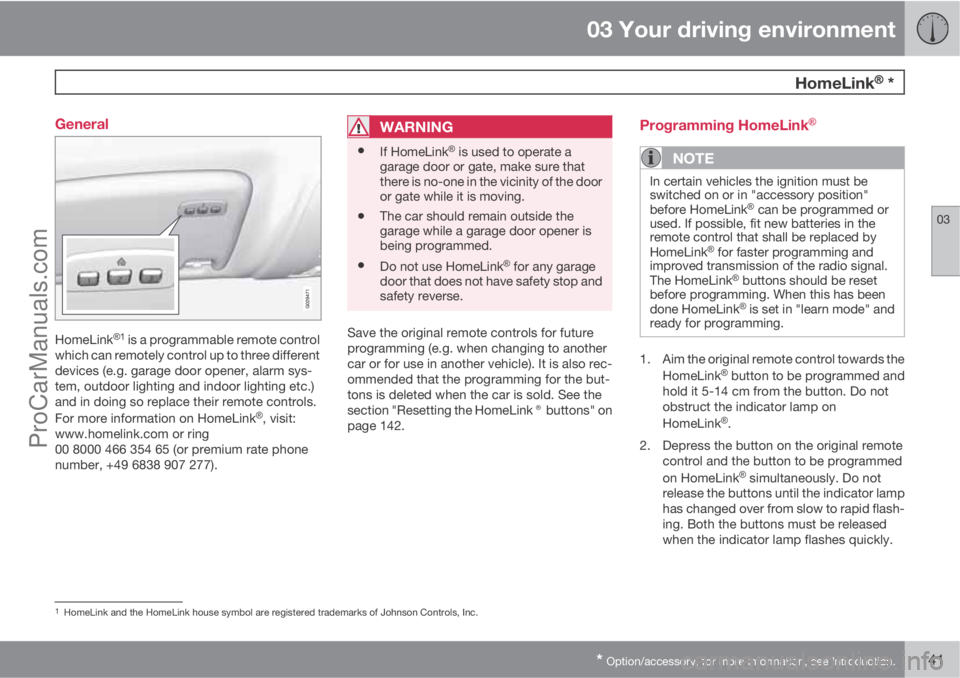
HomeLink�Ÿ1 is a programmable remote control
which can remotely control up to three different
devices (e.g. garage door opener, alarm sys-
tem, outdoor lighting and indoor lighting etc.)
and in doing so replace their remote controls.
For more information on HomeLink
�Ÿ, visit:
www.homelink.com or ring
00 8000 466 354 65 (or premium rate phone
number, +49 6838 907 277).
WARNING
•If HomeLink�Ÿ is used to operate a
garage door or gate, make sure that
there is no-one in the vicinity of the door
or gate while it is moving.
•The car should remain outside the
garage while a garage door opener is
being programmed.
•Do not use HomeLink�Ÿ for any garage
door that does not have safety stop and
safety reverse.
Save the original remote controls for future
programming (e.g. when changing to another
car or for use in another vehicle). It is also rec-
ommended that the programming for the but-
tons is deleted when the car is sold. See the
section "Resetting the HomeLink® buttons" on
page 142.
Programming HomeLink�Ÿ
NOTE
In certain vehicles the ignition must be
switched on or in "accessory position"
before HomeLink
�Ÿ can be programmed or
used. If possible, fit new batteries in the
remote control that shall be replaced by
HomeLink
�Ÿ for faster programming and
improved transmission of the radio signal.
The HomeLink
�Ÿ buttons should be reset
before programming. When this has been
done HomeLink
�Ÿ is set in "learn mode" and
ready for programming.
1. Aim the original remote control towards the
HomeLink�Ÿ button to be programmed and
hold it 5-14 cm from the button. Do not
obstruct the indicator lamp on
HomeLink
�Ÿ.
2. Depress the button on the original remote
control and the button to be programmed
on HomeLink
�Ÿ simultaneously. Do not
release the buttons until the indicator lamp
has changed over from slow to rapid flash-
ing. Both the buttons must be released
when the indicator lamp flashes quickly.
1HomeLink and the HomeLink house symbol are registered trademarks of Johnson Controls, Inc.
ProCarManuals.com