2013 SUZUKI ERTIGA lock
[x] Cancel search: lockPage 56 of 207

Downloaded from www.Manualslib.com manuals search engine 2-41BEFORE DRIVING
60MK0-14E
Transaxle Warning Light
(if equipped)
81A262
This light comes on briefly when the igni-
tion switch is turned to the “ON” position so
you can check the light is working.
If this light comes on when the engine is
running, there is the problem with the auto-
matic transaxle system. Ask your SUZUKI
dealer to have the system inspected.
Immobilizer System Light
80JM122
When the ignition switch is turn to the “ON”
position, this light comes on briefly so you
can check that the light is working. If this
light brinks with the ignition switch is turn to
the “ON”, the engine will not start.
NOTE:
If this light blinks, turn the ignition switch to
the “LOCK” position, then turn it back to
the “ON” position.
If the light still blinks with the ignition switch
turned to the “ON” position, there may be
something wrong with your key or with the
immobilizer system. Ask your SUZUKI
dealer to inspect the system.
Open Door Warning Light
54G391
For vehicles without keyless entry sys-
tem;
This light remains on until all front doors
and the tailgate are completely closed.
If any door (including the tailgate) is
open when the vehicle is moving, a ding
sounds to remind you to close all doors
completely.
For vehicles with keyless entry system;
This light remains on until all doors
(including the tailgate) are completely
closed.
If any door (including the tailgate) is
open when the vehicle is moving, a ding
sounds to remind you to close all doors
completely.
NOTICE
Continuing to drive the vehicle when
the malfunction indicator light is on
or blinking can cause permanent
damage to the vehicle’s emission
control system, and can affect fuel
economy and driveability.
Page 60 of 207

Downloaded from www.Manualslib.com manuals search engine 2-45BEFORE DRIVING
60MK0-14E
Brightness Control
68LM227
When the ignition switch is turned to the
“ON” position, the pointer lights come on.
Your vehicle has a system to automatically
dim the brightness of the instrument panel
lights when the position lights or headlights
are on.
When the position lights and/or headlights
are ON, you can control the meter illumina-
tion intensity.
To increase the brightness of the instru-
ment panel lights, turn the brightness con-
trol knob (1) clockwise.
To reduce the brightness of the instrument
panel lights, turn the brightness control
knob (1) counterclockwise.
60MH025
NOTE:
If you do not turn the brightness control
knob within about 10 seconds of activat-
ing the brightness control display, the
brightness control display will be can-
celed automatically.
When you reconnect the battery, the
brightness of the instrument panel lights
will be reinitialized. Readjust the bright-
ness according to your preference.
(1)
EXAMPLE
WARNING
If you attempt to adjust the display
while driving, you could lose control
of the vehicle.
Do not attempt to adjust the display
while driving.EXAMPLE
(Brightest)
(Initial setting)
(Dimmest)
Page 61 of 207

Downloaded from www.Manualslib.com manuals search engine 2-46
BEFORE DRIVING
60MK0-14E
Information Displaywith tachometer
60MK028
without tachometer
60MK029
(1) Trip meter selector knob
(2) Indicator selector knob
(3) Information display
When the ignition switch is in the “ON”
position, the information display shows the
following information.
Display (A)
Thermometer (if equipped)
Display (B)
(for automatic transaxle vehicle)
Transaxle selector position indicator
Display (C)
Trip meter / Instantaneous fuel consump-
tion / Average fuel consumption / Driving
range
Display (D)
Odometer
Display (E)
Clock
Thermometer (if equipped)When the ignition switch is in the “ON”
position, the display (A) shows the ther-
mometer.
The thermometer indicates the outside
temperature.
68LM258
If the outside temperature nears freezing,
the mark (a) will appear on the display.
NOTE:
The outside temperature indication is not
the actual outside temperature when
driving at low speed, or when stopped.
If there is something wrong with the ther-
mometer, or just after the ignition switch
is turned to the “ON” position, the display
may not indicate the outside tempera-
ture.
(1) (2)(3)
(D)(B) (A)
(C)(E)
EXAMPLE(1)
(2)
(3)(C)
(D)
(E)
EXAMPLE
(a)
EXAMPLE
Page 65 of 207

Downloaded from www.Manualslib.com manuals search engine 2-50
BEFORE DRIVING
60MK0-14E
Odometer
When the ignition switch is in the “ON”
position, the display (D) shows the odome-
ter.
The odometer records the total distance
the vehicle has been driven.
Clock
When the ignition switch is in the “ON”
position, the display (E) shows the time.To change the time indication:
1) Push the trip meter selector knob (1)
and the indicator selector knob (2)
together.
2) To change the hour indication, turn the
indicator selector knob (2) left or right
repeatedly when the hour indication
blinks. To change the hour indication
quickly, turn and hold the indicator
selector knob (2). To set the hour indi-
cation, push the indicator selector knob
(2) and the minute indication will blink.
3) To change the minute indication, turn
the indicator selector knob (2) left or
right repeatedly when the minute indi-
cation blinks. To change the minute
indication quickly, turn and hold the
indicator selector knob (2). To set the
minute indication, push the indicator
selector knob (2).
NOTE:
When you reconnect the negative (–) ter-
minal to the battery, the clock indication will
be reinitialized. Change the indication
again to your preference.
Lighting Control Lever
65D611
NOTICE
Keep track of your odometer reading
and check the maintenance schedule
regularly for required services.
Increased wear or damage to certain
parts can result from failure to per-
form required services at the proper
mileage intervals.
WARNING
If you attempt to adjust the display
while driving, you could lose control
of the vehicle.
Do not attempt to adjust the display
while driving.
WARNING
To avoid possible injury, do not oper-
ate controls by reaching through the
steering wheel.
Page 70 of 207

Downloaded from www.Manualslib.com manuals search engine 2-55BEFORE DRIVING
60MK0-14E
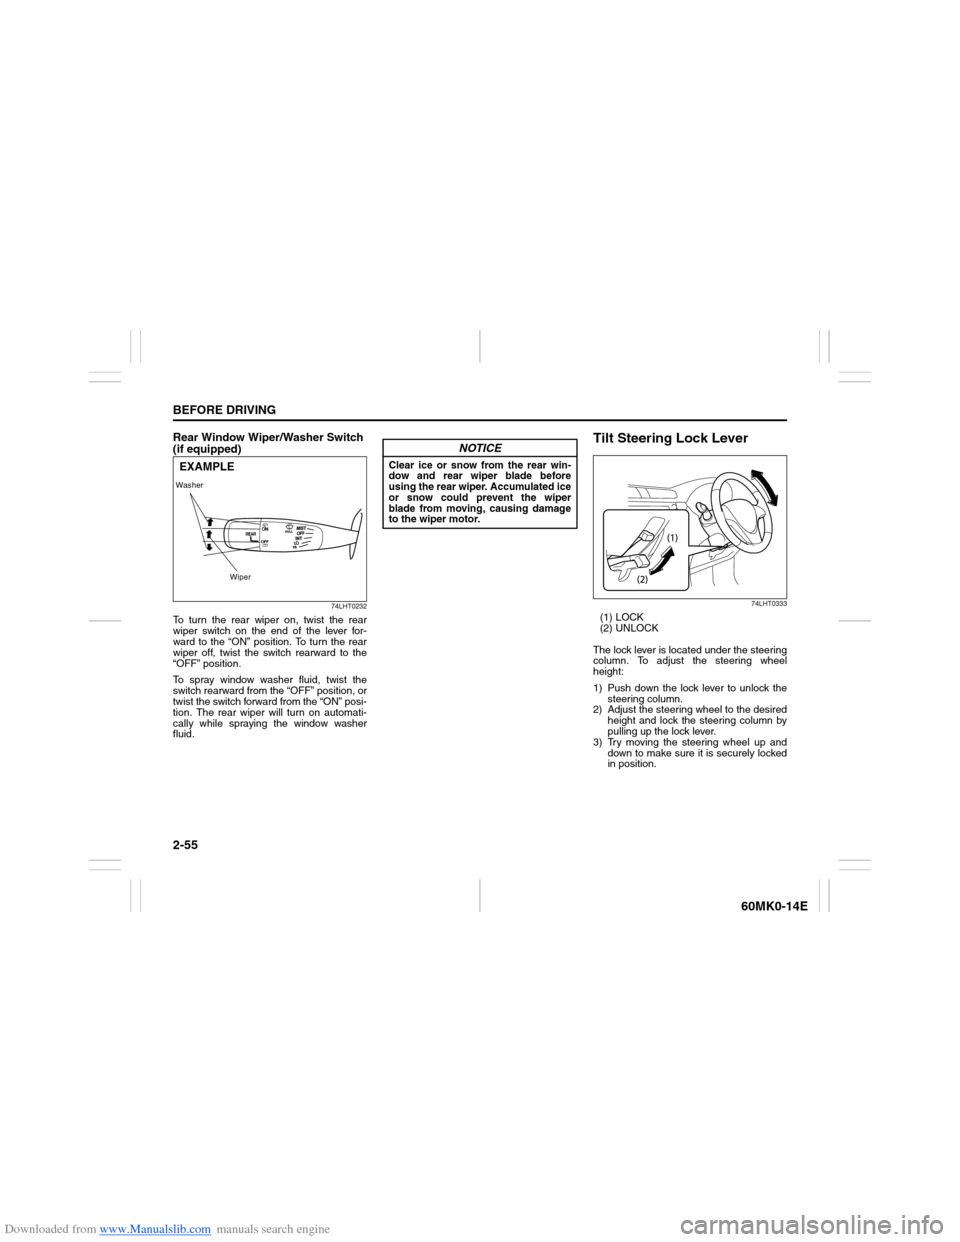
Rear Window Wiper/Washer Switch
(if equipped)
74LHT0232
To turn the rear wiper on, twist the rear
wiper switch on the end of the lever for-
ward to the “ON” position. To turn the rear
wiper off, twist the switch rearward to the
“OFF” position.
To spray window washer fluid, twist the
switch rearward from the “OFF” position, or
twist the switch forward from the “ON” posi-
tion. The rear wiper will turn on automati-
cally while spraying the window washer
fluid.
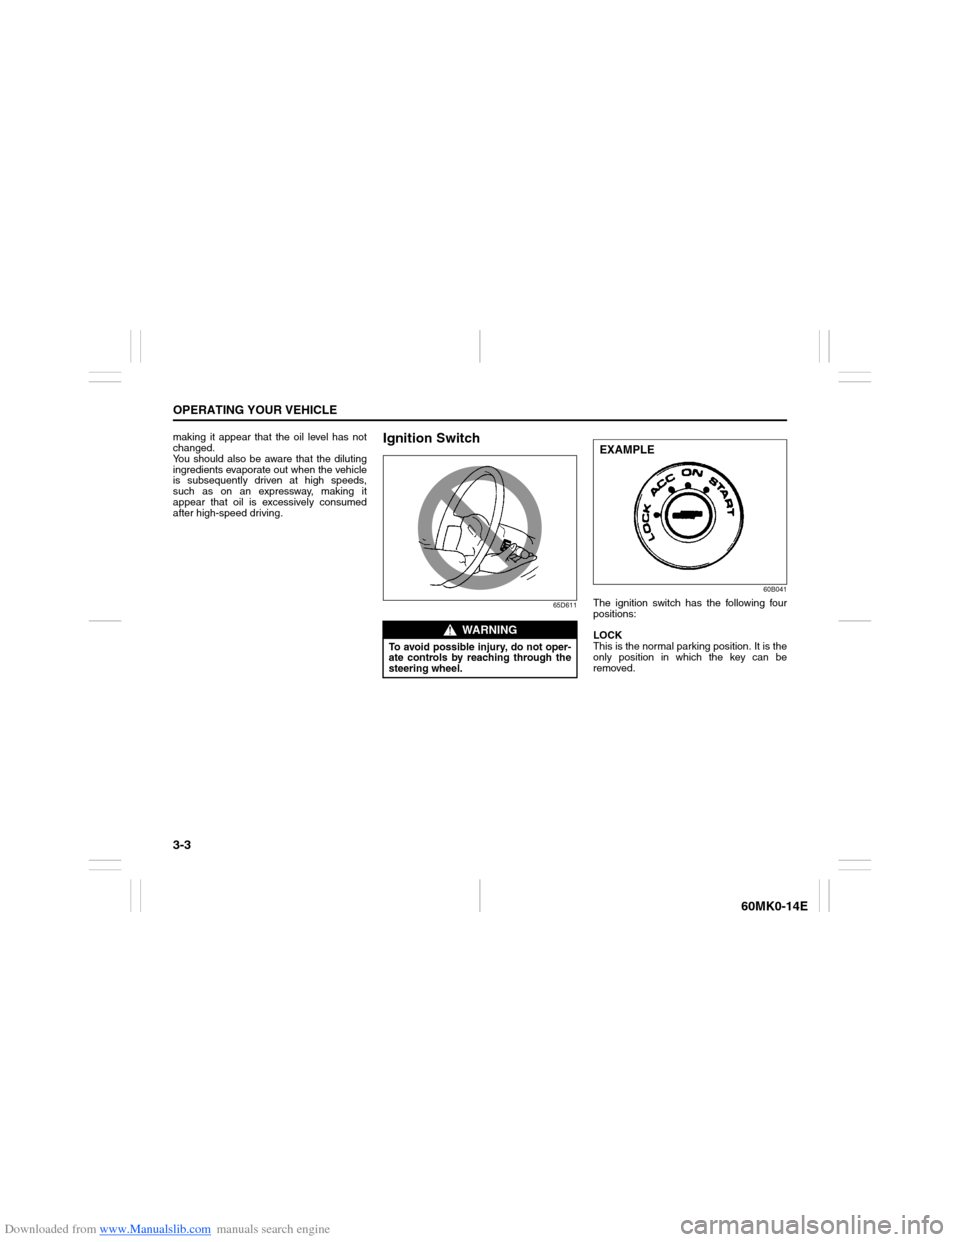
Tilt Steering Lock Lever
74LHT0333
(1) LOCK
(2) UNLOCK
The lock lever is located under the steering
column. To adjust the steering wheel
height:
1) Push down the lock lever to unlock the
steering column.
2) Adjust the steering wheel to the desired
height and lock the steering column by
pulling up the lock lever.
3) Try moving the steering wheel up and
down to make sure it is securely locked
in position.
Washer
WiperEXAMPLE
NOTICE
Clear ice or snow from the rear win-
dow and rear wiper blade before
using the rear wiper. Accumulated ice
or snow could prevent the wiper
blade from moving, causing damage
to the wiper motor.
Page 75 of 207

Downloaded from www.Manualslib.com manuals search engine 3-2
OPERATING YOUR VEHICLE
60MK0-14E
4) Make sure the hood is fully closed and
latched.
5) Check the headlights, turn signal lights,
brake lights and horn for proper opera-
tion.
6) Adjust the seat and head restraint (if
equipped).
7) Check the brake pedal and the parking
brake lever.
8) Adjust the mirrors.
9) Make sure that you and all passengers
have properly fastened your seat belts.
10)Make sure that all warning lights come
on as the key is turned to the “ON” posi-
tion.
11)Check all gauges.
12)Make sure that the BRAKE SYSTEM
WARNING light turns off when the
parking brake is released.
Once a week, or each time you fill your fuel
tank, perform the following under-hood
checks:
1) Engine oil level
2) Coolant level
3) Brake fluid level
4) Battery solution level
5) Windshield washer fluid level
6) Hood latch operation
Pull the hood release handle inside the
vehicle. Make sure that you cannot
open the hood all the way without
releasing the secondary latch. Be sure
to close the hood securely after check-
ing for proper latch operation. See theitem “All latches, hinges and locks” of
“CHASSIS AND BODY” in the “Periodic
Maintenance Schedule” in the
“INSPECTION AND MAINTENANCE”
section for lubrication schedule.
Once a month, or each time you fill your
fuel tank, check the tire pressure using a
tire pressure gauge. Also check the tire
pressure of the spare tire.
Engine Oil ConsumptionIt is normal for the engine to consume
some engine oil during normal vehicle
operation.
The amount of engine oil consumed
depends on the viscosity of the oil, the
quality of the oil and the conditions the
vehicle is driven under.
More oil is consumed during high-speed
driving and when there is frequent acceler-
ation and deceleration. Under high loads,
your engine also will consume more oil.
A new engine also consumes more oil,
since its pistons, piston rings and cylinder
walls have not yet become conditioned.
New engines reach the normal level of oil
consumption only after approximately 5000
km (3000 miles) driving.
Oil consumption:
Max. 1.0 L per 1000 km
(1 Qt. per 600 miles)
When judging the amount of oil consump-
tion, note that the oil may become diluted
and make it difficult to accurately judge the
true oil level.
As an example, if a vehicle is used for
repeated short trips, and consumes a nor-
mal amount of oil, the dipstick may not
show any drop in the oil level at all, even
after 1000 km (600 miles) or more of driv-
ing. This is because the oil is gradually
becoming diluted with fuel or moisture,
WARNING
Make sure the hood is fully closed
and latched before driving. If it is not,
it can fly up unexpectedly during
driving, obstructing your view and
resulting in an accident.
Page 76 of 207

Downloaded from www.Manualslib.com manuals search engine 3-3OPERATING YOUR VEHICLE
60MK0-14E
making it appear that the oil level has not
changed.
You should also be aware that the diluting
ingredients evaporate out when the vehicle
is subsequently driven at high speeds,
such as on an expressway, making it
appear that oil is excessively consumed
after high-speed driving.
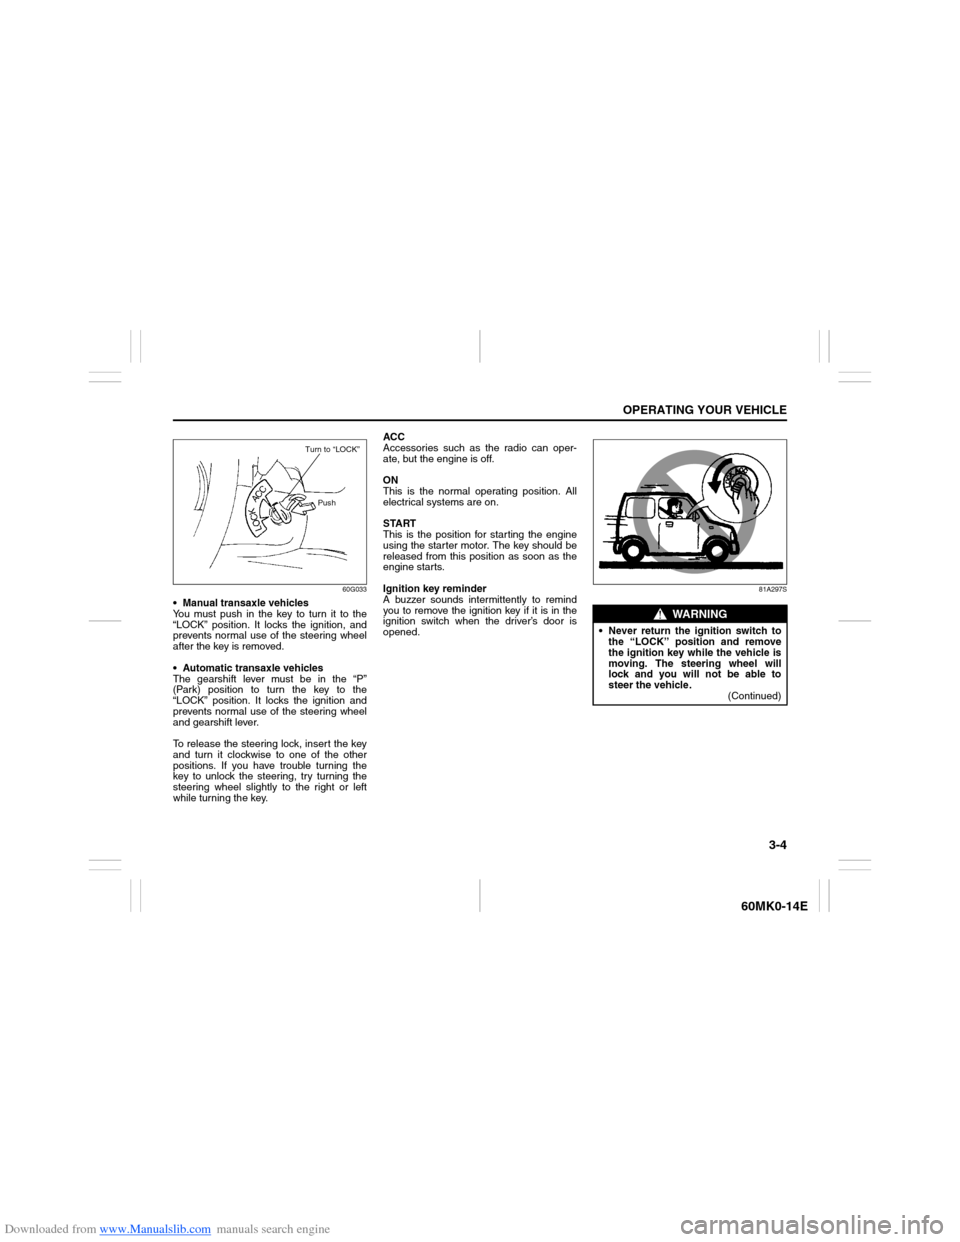
Ignition Switch
65D61160B041
The ignition switch has the following four
positions:
LOCK
This is the normal parking position. It is the
only position in which the key can be
removed.
WARNING
To avoid possible injury, do not oper-
ate controls by reaching through the
steering wheel.
EXAMPLE
Page 77 of 207

Downloaded from www.Manualslib.com manuals search engine 3-4
OPERATING YOUR VEHICLE
60MK0-14E
60G033
Manual transaxle vehicles
You must push in the key to turn it to the
“LOCK” position. It locks the ignition, and
prevents normal use of the steering wheel
after the key is removed.
Automatic transaxle vehicles
The gearshift lever must be in the “P”
(Park) position to turn the key to the
“LOCK” position. It locks the ignition and
prevents normal use of the steering wheel
and gearshift lever.
To release the steering lock, insert the key
and turn it clockwise to one of the other
positions. If you have trouble turning the
key to unlock the steering, try turning the
steering wheel slightly to the right or left
while turning the key.ACC
Accessories such as the radio can oper-
ate, but the engine is off.
ON
This is the normal operating position. All
electrical systems are on.
START
This is the position for starting the engine
using the starter motor. The key should be
released from this position as soon as the
engine starts.
Ignition key reminder
A buzzer sounds intermittently to remind
you to remove the ignition key if it is in the
ignition switch when the driver’s door is
opened.
81A297S
Turn to “LOCK”
Push
WARNING
Never return the ignition switch to
the “LOCK” position and remove
the ignition key while the vehicle is
moving. The steering wheel will
lock and you will not be able to
steer the vehicle.
(Continued)