Page 12 of 207
Downloaded from www.Manualslib.com manuals search engine ILLUSTRATED TABLE OF CONTENTS
60MK0-14E
INSTRUMENT PANEL1. Front Air Bags (if equipped) (P.2-31)
2. Audio (if equipped) (P.5-7)
3. Hazard Warning Switch (P.2-53)
4. Windshield Wiper and Washer Lever
(P.2-53)/Rear Window Wiper and
Washer Switch (if equipped) (P.2-55)
5. Instrument Cluster (P.2-36)
6. Lighting Control Lever (P.2-50)/
Turn Signal Control Lever (P.2-52)
7. Glove Box (P.5-42)
8. Air Conditioning System (P.5-1)
9. Accessory Socket (P.5-41)
10. Universal Serial Bus (USB) Socket
(if equipped) (P.5-42)
11. Remote Audio Controls (if equipped)
(P.5-30)
12. Tilt Steering Lock Lever (P.2-55)
13. Ignition Switch (P.3-3)
14. Engine Hood Release Handle
(P.5-38)
15. Fuse Box (P.7-23)
16. Front Fog Light Switch (if equipped)
(P.2-52)
60MK024
1234516
789
10 12 13 14 15 16
11
EXAMPLE
Page 75 of 207

Downloaded from www.Manualslib.com manuals search engine 3-2
OPERATING YOUR VEHICLE
60MK0-14E
4) Make sure the hood is fully closed and
latched.
5) Check the headlights, turn signal lights,
brake lights and horn for proper opera-
tion.
6) Adjust the seat and head restraint (if
equipped).
7) Check the brake pedal and the parking
brake lever.
8) Adjust the mirrors.
9) Make sure that you and all passengers
have properly fastened your seat belts.
10)Make sure that all warning lights come
on as the key is turned to the “ON” posi-
tion.
11)Check all gauges.
12)Make sure that the BRAKE SYSTEM
WARNING light turns off when the
parking brake is released.
Once a week, or each time you fill your fuel
tank, perform the following under-hood
checks:
1) Engine oil level
2) Coolant level
3) Brake fluid level
4) Battery solution level
5) Windshield washer fluid level
6) Hood latch operation
Pull the hood release handle inside the
vehicle. Make sure that you cannot
open the hood all the way without
releasing the secondary latch. Be sure
to close the hood securely after check-
ing for proper latch operation. See theitem “All latches, hinges and locks” of
“CHASSIS AND BODY” in the “Periodic
Maintenance Schedule” in the
“INSPECTION AND MAINTENANCE”
section for lubrication schedule.
Once a month, or each time you fill your
fuel tank, check the tire pressure using a
tire pressure gauge. Also check the tire
pressure of the spare tire.
Engine Oil ConsumptionIt is normal for the engine to consume
some engine oil during normal vehicle
operation.
The amount of engine oil consumed
depends on the viscosity of the oil, the
quality of the oil and the conditions the
vehicle is driven under.
More oil is consumed during high-speed
driving and when there is frequent acceler-
ation and deceleration. Under high loads,
your engine also will consume more oil.
A new engine also consumes more oil,
since its pistons, piston rings and cylinder
walls have not yet become conditioned.
New engines reach the normal level of oil
consumption only after approximately 5000
km (3000 miles) driving.
Oil consumption:
Max. 1.0 L per 1000 km
(1 Qt. per 600 miles)
When judging the amount of oil consump-
tion, note that the oil may become diluted
and make it difficult to accurately judge the
true oil level.
As an example, if a vehicle is used for
repeated short trips, and consumes a nor-
mal amount of oil, the dipstick may not
show any drop in the oil level at all, even
after 1000 km (600 miles) or more of driv-
ing. This is because the oil is gradually
becoming diluted with fuel or moisture,
WARNING
Make sure the hood is fully closed
and latched before driving. If it is not,
it can fly up unexpectedly during
driving, obstructing your view and
resulting in an accident.
Page 133 of 207
Downloaded from www.Manualslib.com manuals search engine 5-38
OTHER CONTROLS AND EQUIPMENT
60MK0-14E
60MH031
NOTE:
You can also use the cap holder (2) to hold
the fuel filler cap (3) by hooking the groove
(4) when refueling.
To reinstall the fuel filler cap:
1) Turn the cap clockwise until you hear
several clicks.
2) Close the fuel filler door.
Engine Hood
74LHT0533
To open the engine hood:
1) Pull the hood release handle located on
the outboard side of the driver’s side of
the instrument panel. This will disen-
gage the engine hood lock halfway.
WARNING
Fuel is extremely flammable. Do not
smoke when refueling, and make
sure there are no open flames or
sparks in the area.
(2)
(3)(4) (2)
(2)
EXAMPLE
WARNING
If you need to replace the fuel cap,
use a genuine SUZUKI cap. Use of an
improper cap can result in a malfunc-
tion of the fuel system or emission
control system. It may also result in
fuel leakage in the event of an acci-
dent.
EXAMPLE
Page 134 of 207

Downloaded from www.Manualslib.com manuals search engine 5-39OTHER CONTROLS AND EQUIPMENT
60MK0-14E
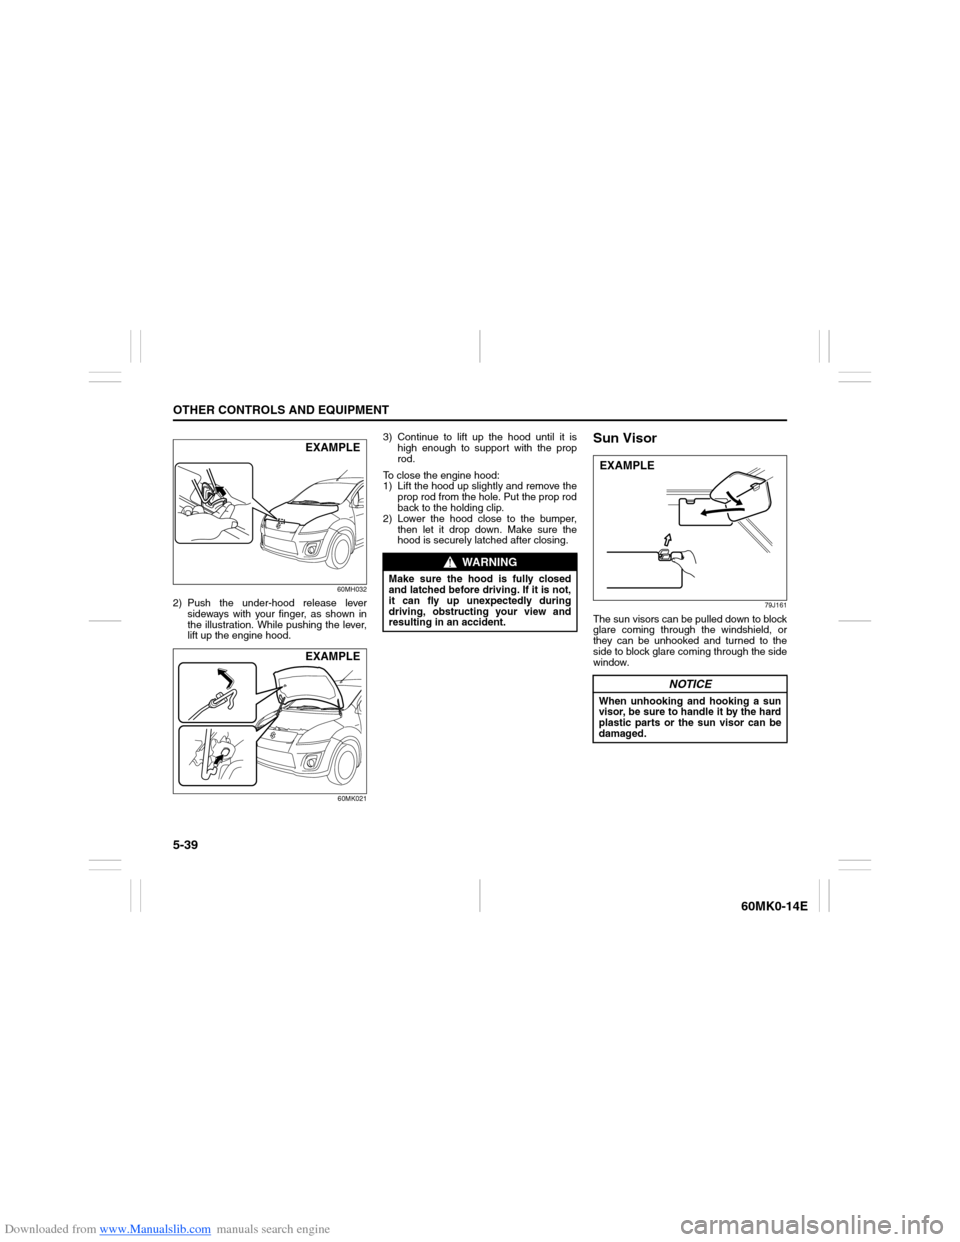
60MH032
2) Push the under-hood release lever
sideways with your finger, as shown in
the illustration. While pushing the lever,
lift up the engine hood.
60MK021
3) Continue to lift up the hood until it is
high enough to support with the prop
rod.
To close the engine hood:
1) Lift the hood up slightly and remove the
prop rod from the hole. Put the prop rod
back to the holding clip.
2) Lower the hood close to the bumper,
then let it drop down. Make sure the
hood is securely latched after closing.
Sun Visor
79J161
The sun visors can be pulled down to block
glare coming through the windshield, or
they can be unhooked and turned to the
side to block glare coming through the side
window.
EXAMPLEEXAMPLE
WARNING
Make sure the hood is fully closed
and latched before driving. If it is not,
it can fly up unexpectedly during
driving, obstructing your view and
resulting in an accident.
NOTICE
When unhooking and hooking a sun
visor, be sure to handle it by the hard
plastic parts or the sun visor can be
damaged.EXAMPLE