2013 SKODA ROOMSTER towing
[x] Cancel search: towingPage 183 of 219

Note■The fire extinguisher must comply with national legal requirements.■Pay attention to the expiration date of the fire extinguisher. Proper functioning
of the fire extinguisher is not assured once it has passed its expiry date.■
The fire extinguisher is part of the scope of delivery in certain countries only.
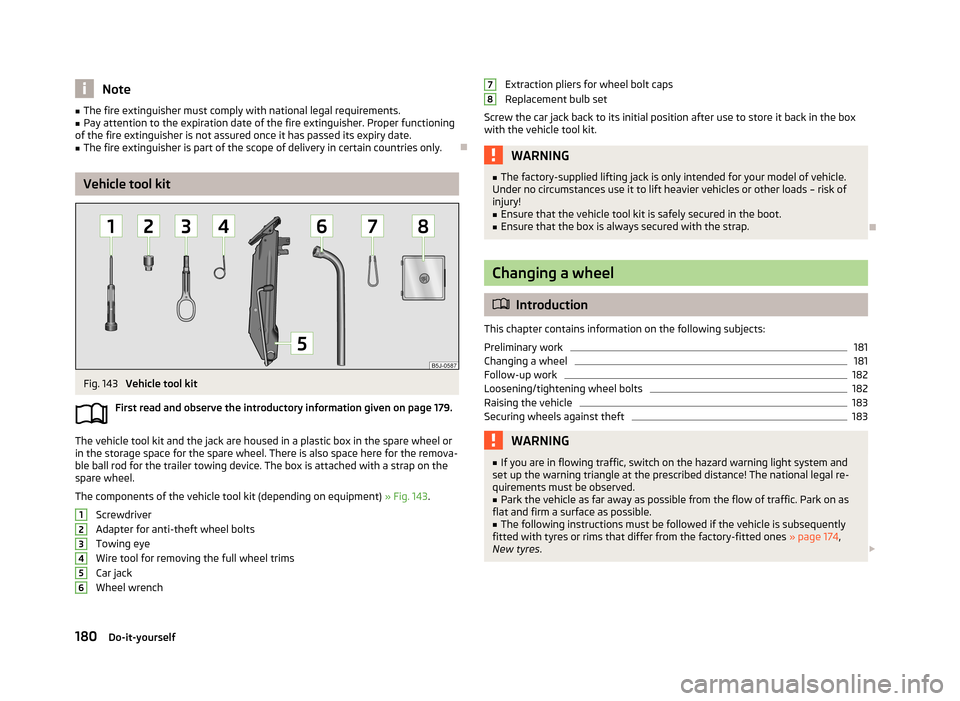
Vehicle tool kit
Fig. 143
Vehicle tool kit
First read and observe the introductory information given on page 179.
The vehicle tool kit and the jack are housed in a plastic box in the spare wheel or
in the storage space for the spare wheel. There is also space here for the remova-
ble ball rod for the trailer towing device. The box is attached with a strap on the spare wheel.
The components of the vehicle tool kit (depending on equipment) » Fig. 143.
Screwdriver
Adapter for anti-theft wheel bolts Towing eye
Wire tool for removing the full wheel trims Car jack
Wheel wrench
123456Extraction pliers for wheel bolt caps
Replacement bulb set
Screw the car jack back to its initial position after use to store it back in the box with the vehicle tool kit.WARNING■ The factory-supplied lifting jack is only intended for your model of vehicle.
Under no circumstances use it to lift heavier vehicles or other loads – risk of
injury!■
Ensure that the vehicle tool kit is safely secured in the boot.
■
Ensure that the box is always secured with the strap.
Changing a wheel
Introduction
This chapter contains information on the following subjects:
Preliminary work
181
Changing a wheel
181
Follow-up work
182
Loosening/tightening wheel bolts
182
Raising the vehicle
183
Securing wheels against theft
183WARNING■ If you are in flowing traffic, switch on the hazard warning light system and
set up the warning triangle at the prescribed distance! The national legal re-
quirements must be observed.■
Park the vehicle as far away as possible from the flow of traffic. Park on as
flat and firm a surface as possible.
■
The following instructions must be followed if the vehicle is subsequently
fitted with tyres or rims that differ from the factory-fitted ones » page 174,
New tyres .
78180Do-it-yourself
Page 191 of 219

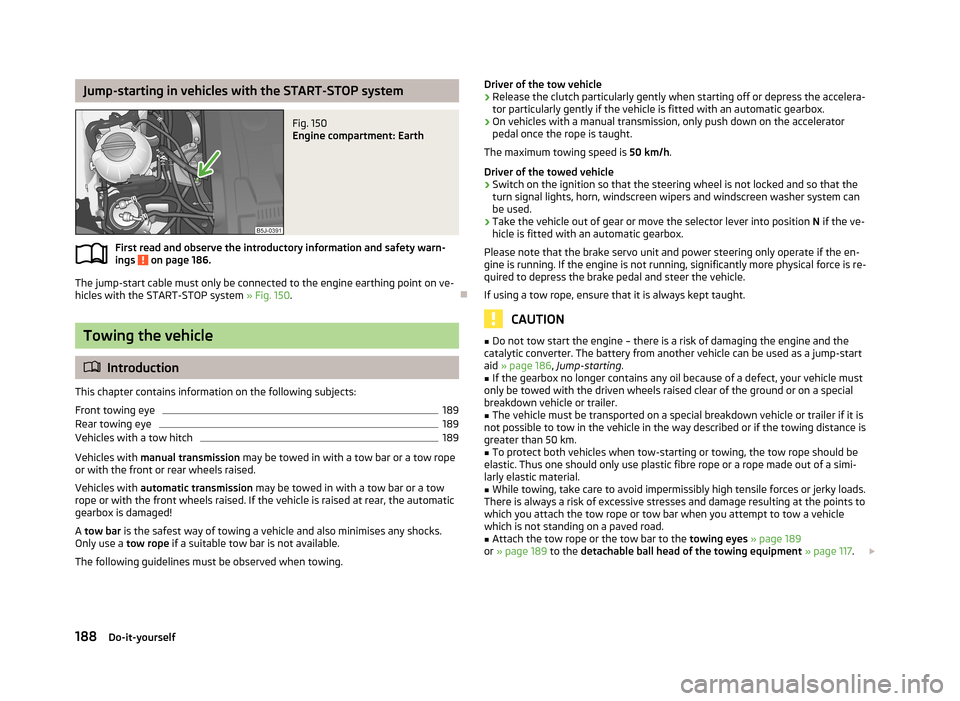
Jump-starting in vehicles with the START-STOP systemFig. 150
Engine compartment: Earth
First read and observe the introductory information and safety warn-ings on page 186.
The jump-start cable must only be connected to the engine earthing point on ve-
hicles with the START-STOP system » Fig. 150.
Towing the vehicle
Introduction
This chapter contains information on the following subjects:
Front towing eye
189
Rear towing eye
189
Vehicles with a tow hitch
189
Vehicles with manual transmission may be towed in with a tow bar or a tow rope
or with the front or rear wheels raised.
Vehicles with automatic transmission may be towed in with a tow bar or a tow
rope or with the front wheels raised. If the vehicle is raised at rear, the automatic
gearbox is damaged!
A tow bar is the safest way of towing a vehicle and also minimises any shocks.
Only use a tow rope if a suitable tow bar is not available.
The following guidelines must be observed when towing.
Driver of the tow vehicle›Release the clutch particularly gently when starting off or depress the accelera-
tor particularly gently if the vehicle is fitted with an automatic gearbox.›
On vehicles with a manual transmission, only push down on the accelerator pedal once the rope is taught.
The maximum towing speed is 50 km/h.
Driver of the towed vehicle
›
Switch on the ignition so that the steering wheel is not locked and so that the turn signal lights, horn, windscreen wipers and windscreen washer system can
be used.
›
Take the vehicle out of gear or move the selector lever into position N if the ve-
hicle is fitted with an automatic gearbox.
Please note that the brake servo unit and power steering only operate if the en-
gine is running. If the engine is not running, significantly more physical force is re-
quired to depress the brake pedal and steer the vehicle.
If using a tow rope, ensure that it is always kept taught.
CAUTION
■ Do not tow start the engine – there is a risk of damaging the engine and the
catalytic converter. The battery from another vehicle can be used as a jump-start
aid » page 186 , Jump-starting .■
If the gearbox no longer contains any oil because of a defect, your vehicle must
only be towed with the driven wheels raised clear of the ground or on a special
breakdown vehicle or trailer.
■
The vehicle must be transported on a special breakdown vehicle or trailer if it is
not possible to tow in the vehicle in the way described or if the towing distance is greater than 50 km.
■
To protect both vehicles when tow-starting or towing, the tow rope should be
elastic. Thus one should only use plastic fibre rope or a rope made out of a simi-
larly elastic material.
■
While towing, take care to avoid impermissibly high tensile forces or jerky loads.
There is always a risk of excessive stresses and damage resulting at the points to
which you attach the tow rope or tow bar when you attempt to tow a vehicle
which is not standing on a paved road.
■
Attach the tow rope or the tow bar to the towing eyes » page 189
or » page 189 to the detachable ball head of the towing equipment » page 117 .
188Do-it-yourself
Page 192 of 219

Note■We recommend using a tow rope from ŠKODA Original Accessories, which is
available from a ŠKODA Partner.■
Towing another vehicle requires a certain amount of practice. Both drivers
should be familiar with the particular points about towing a vehicle. Unskilled
drivers should not attempt to tow in another vehicle or to be towed in.
■
When towing, respect the national legal provisions, especially those which re-
late to the identification of the towing vehicle and the vehicle being towed.
■
The tow rope must not be twisted as it may in certain circumstances result in
the front towing eye being unscrewed out of your vehicle.
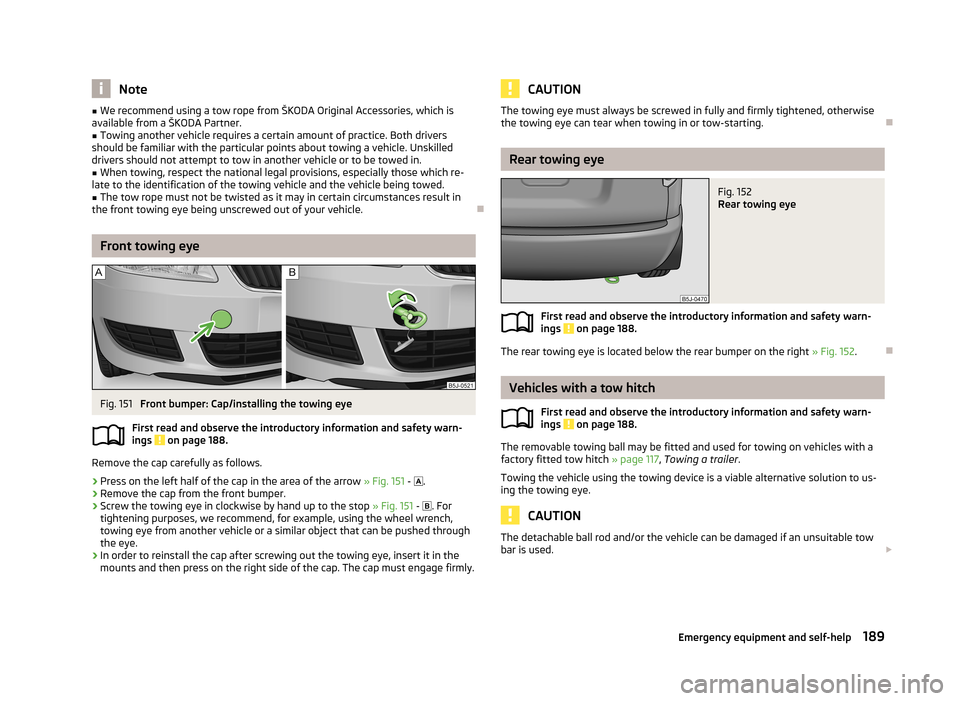
Front towing eye
Fig. 151
Front bumper: Cap/installing the towing eye
First read and observe the introductory information and safety warn- ings
on page 188.
Remove the cap carefully as follows.
›
Press on the left half of the cap in the area of the arrow » Fig. 151 -
.
›
Remove the cap from the front bumper.
›
Screw the towing eye in clockwise by hand up to the stop » Fig. 151 -
. For
tightening purposes, we recommend, for example, using the wheel wrench, towing eye from another vehicle or a similar object that can be pushed through
the eye.
›
In order to reinstall the cap after screwing out the towing eye, insert it in the
mounts and then press on the right side of the cap. The cap must engage firmly.
CAUTIONThe towing eye must always be screwed in fully and firmly tightened, otherwise
the towing eye can tear when towing in or tow-starting.
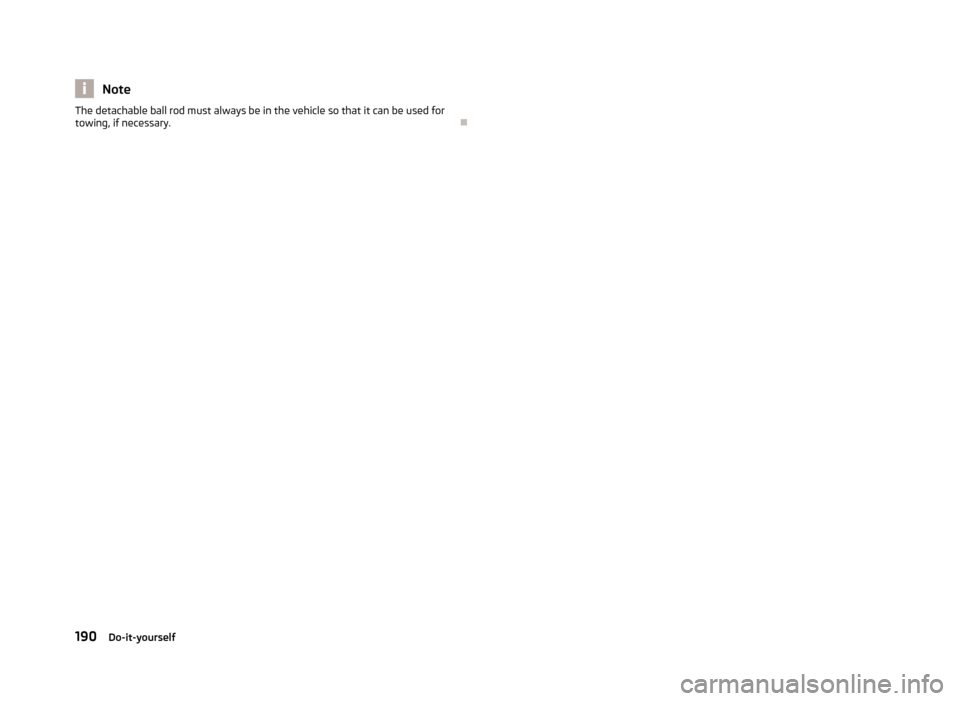
Rear towing eye
Fig. 152
Rear towing eye
First read and observe the introductory information and safety warn- ings on page 188.
The rear towing eye is located below the rear bumper on the right » Fig. 152.
Vehicles with a tow hitch
First read and observe the introductory information and safety warn-
ings
on page 188.
The removable towing ball may be fitted and used for towing on vehicles with a factory fitted tow hitch » page 117, Towing a trailer .
Towing the vehicle using the towing device is a viable alternative solution to us-
ing the towing eye.
CAUTION
The detachable ball rod and/or the vehicle can be damaged if an unsuitable tow bar is used. 189Emergency equipment and self-help
Page 193 of 219

NoteThe detachable ball rod must always be in the vehicle so that it can be used for
towing, if necessary.
190Do-it-yourself
Page 202 of 219

Technical data
Technical data
Vehicle data
Introduction
This chapter contains information on the following subjects:
Vehicle identification data
199
Dimensions
201
Vehicle-specific details per engine type
202
The details given in the vehicle's technical documentation always take prece-
dence over the details in the Owner's Manual.
The listed performance values were determined without performance-reducing
equipment, e.g. air conditioning system.
Vehicle identification data
Fig. 167
Vehicle data sticker/type plate
First read and observe the introductory information given on page 199.
Vehicle data sticker
The vehicle data sticker » Fig. 167 - is located under the floor covering in the
luggage compartment.
The vehicle data sticker contains the following data: Vehicle identification number (VIN)
Vehicle type
Gearbox code/paint number/interior equipment/engine output/engine code Partial vehicle description
Operating weight (in kg)
Fuel consumption (in ltr./100 km) - intra-urban/extra-urban/combined
CO 2 emission levels - combined (in g/km)
Items
5,
6
and
7
on the vehicle data sticker are only valid for some countries.
Type plate
The type plate » Fig. 167 -
is located at the bottom of the B-pillar on the driver's
side.
The type plate lists the following weights:
Maximum permissible gross weight
Maximum permissible towed weight (towing vehicle and trailer)
Maximum permissible front axle load
Maximum permissible rear axle load
Vehicle identification number (VIN)
The vehicle identification number - VIN (vehicle body number) is stamped on the right hand suspension strut dome in the engine compartment. This number is also
located on a sign on the lower left hand edge below the windscreen (together
with a VIN bar code).
Engine number
The engine number (three-digit code letter and serial number) is stamped onto
the engine block.
Operating weight
The specified operating weight is for orientation purposes only. This value repre- sents the minimum operating weight without additional weight-increasing equip- ment such as air conditioning system, spare wheel, or trailer hitch.
1234567891011199Technical data
Page 203 of 219

The operating weight also contains the weight of the driver (75 kg), the weight of
the operating fluids, the tool kit, and a fuel tank filled to 90 % capacity.
It is possible to calculate the approximate loading capacity from the difference
between the permissible total weight and the operating weight »
.
The payload consists of the following components: › Passengers
› All items of luggage and other loads
› Roof load including roof rack system
› Equipment not included in the operating weight
› Trailer drawbar load when towing a trailer (max. 50 kg).
Measuring the fuel consumption and CO 2 emissions according to the ECE
regulations and EU directives The measurement of the intra-urban cycle begins with a cold start of the engine.
Afterwards urban driving is simulated.
In the extra-urban driving cycle, the vehicle is accelerated and decelerated in all
gears, corresponding to daily routine driving conditions. The driving speed varies
between 0 and 120 km/h.
The calculation of the combined fuel consumption considers a weighting of about 37 % for the intra-urban cycle and 63 % for the extra-urban cycle.
WARNINGDo not exceed the specified maximum permissible weights – risk of accident
and damage!
Note
■ If required, you can find out the precise weight of your vehicle at a specialist ga-
rage.■
The fuel consumption and emission values have been determined in accordance
with rules and under conditions set out by legal or technical requirements for de-
termining operational and technical data for motor vehicles.
■
Depending on the range of equipment, style of driving, traffic situation, weather
influences and vehicle condition, consumption values may deviate from the indi-
cated values.
200Technical data
Page 211 of 219

Driving economicallyEconomical gear changing105
Driving through water108
E
Economical and environmentally friendly driving 104
Economical driving Ballast
106
Driving at full throttle105
Idling106
Looking ahead105
Regular maintenance107
Saving energy107
Short distances106
Tyre pressure106
EDL111
Electrical power windows Button in the driver's door
38, 39
Button in the rear door39
Central locking system40
Operational faults40
Electronic Differential Lock111
Electronic immobilizer97
emergency opening the loading door (Praktik)
75
Emergency Changing a wheel
180
Hazard warning light system45
jump-starting187
Jump-starting186
locking of the doors31
Selector lever-unlocking103
Towing the vehicle188
Towing the vehicle using the tow hitch189
Tyre repair184
Unlocking the boot lid38
Emergency equipment Fire extinguisher
179
First aid kit179
Jack180
Vehicle tool kit180
Warning triangle179
Emissions199
Engine Running in
103
Starting and stopping the engine96
Switching off the engine98
Engine compartment159
Brake fluid167
Coolant166
Overview162
Vehicle battery168
Engine oil163
Capacity163
Changing165
Checking164
Replenishing165
Specifications163
Warning light21
Engine revolutions counter11
Environment104
Environmental compatibility107
Environmentally friendly driving104
ESC Function
110
Warning light23
F
Films
152
Fire extinguisher179
First aid kit179
Flashers43
Fog lights44
Folding down the seats
54
Footmats100
see Footmats100
Front airbag134
Front seats52
Fuel157
Diesel159
Fuel gauge11
gauge11
refer to Fuel157
Refuelling157
Unleaded petrol158
Fuel consumption104
Fuses Assignment
191
Colour coding191
Replacing191
G
Gear Recommended gear
13
Gearbox Display messages
19
Gear changing Gear stick
99
General view Cockpit
9
Glow plug system Warning light
24
GSM86
H
Handbrake
99
Hazard warning light system45
Head airbag136
Headlight cleaning system Headlight cleaning system
50
Headlights195
Driving abroad109
Headlight cleaning system50
Headrest Headrest
57
Head restraint56
208Index
Page 214 of 219

Height adjustment130
Inertia reels130
The physical principle of a frontal collision128
Seats Head restraints
56
Heating53
Removing seats55
Seats and stowing52
Selector lever see Using the selector lever
101
Service147
Service display16
Service intervals144
Setting Heating
79
Manual air conditioning system82
Manually dimmed rear-view mirror51
Setting the clock Clock
12
Shifting gears Driving and saving energy
105
Side airbag135
Snow chains178
Spare wheel176
Speedometer11
Speed symbol Refer to Wheels
175
Spoiler148
Stalk Main beam
43
Turn signals43
START-STOP115
Manually activating/deactivating the system116
Operating conditions for the system115
Starting/shutting down the engine115
Starting and stopping the engine96
Starting engine Jump-starting
186
Starting the engine97
Jump-starting187
Starting the engine97
START STOP Information messages
116
Jump-starting188
Steering force assistance95
Steering wheel95
Storage68
Storage compartment Storage compartment on the driver's side
70
Storage compartment on the front passenger side
69
Storage Compartment Lighting
47
Storage compartments68
Flexible storage compartment73
Storage compartment in the front centre console 71
storage pockets on the front seat
70
Stowage compartment beneath the front seat
71
compartment for glasses70
compartments in the doors72
compartments in the luggage73
sun roof48
sunshade48
Sun visors48
Switching lights on and off41
Switching off the engine98
Synthetic leather155
T
Taking care of the vehicle Natural leather
155
Seat belts156
Taking care of your vehicle Automatic car wash system
150
Cavity protection153
Chrome parts152
Cleaning the wheels153
Decorative films152
Door lock cylinders153
Headlight lenses153
High-pressure cleaner150
Plastic parts151
Polishing the paintwork151
Rubber seals152
Taking care of the interior154
Taking care of your vehicle exterior150
Washing149
Washing by hand149
Wash system150
Wax treatment151
Taking care of your vehicles Fabric covers
156
Technical data199
Telephone86
Temporary spare wheel176
the rear seats fold down seat backrest and fold seat fully for- ward
55
Tiptronic102
Tools180
TOP TETHER143
Tourist lights44
Towing188
Towing a trailer117
Towing device Description
117
Drawbar load117
Use and care120
Towing eye Front
189
Rear189
Towing protection36
Traction Control System (ASR)111
Trailer117, 120
Loading120
Towing a trailer121
211Index