2013 SKODA ROOMSTER Headrest
[x] Cancel search: HeadrestPage 59 of 219

Adjusting seats in crosswise directionFig. 41
Locking seats
First read and observe the introductory information given on page 54.
›
Remove the middle seat » page 55, Unlocking and removing seats .
›
Fold the outer seat forwards » page 55, Fold downseat backrest and seat fold
down completely and unlock » Fig. 40 on page 55.
›
Move the folded forward and unlocked seat on the guide towards the middle of
the vehicle up to the stop.
›
Lock the folded seat by pressing seat locks
A
» Fig. 41 in the direction of the
arrow.
Folding the rear seats into the starting position
Fig. 42
Folding the seat backrest back
into positionFirst read and observe the introductory information given on page 54.›
If the seat has been removed, first position it on the guide and lock it in place » Fig. 41 on page 56. Pull the seat upwards to ensure that the seat is
locked correctly.
›
Fold the seat in the horizontal position until it can be heard to click. Check for yourself that the seat can no longer be lifted by pulling it up.
›
Press the lever » Fig. 42 and fold back the seat backrest. Check for yourself that
the seat backrest is engaged by pulling on it.
›
Remove the tongue of the lock from the safety position.
WARNING■ The belt locks must be in their original position after folding back the seat
cushions and backrests - they must be ready to use.■
The seat backrests must be securely latched in position so that no objects
from the luggage compartment can slip into the passenger compartment un-
der sudden braking – there is a risk of injury.
■
When folding the seat backrest always make sure that it has safely locked
into position, this is confirmed by the position and a visible marking on the
cover of the lever.
Head restraints
Introduction
This chapter contains information on the following subjects:
headrest adjust
57
Best protection is achieved if the top edge of the head restraint is at the same
level as the upper part of your head.
The head restraints must be adjusted to match the size of the seat occupant. Cor-
rectly adjusted head restraints together with the seat belts offer effective protec-
tion for the occupants » page 124.
56Operation
Page 60 of 219

WARNING■The head restraints must be correctly adjusted in order to offer effective
protection for the occupants in the event of an accident.■
Never drive with the head restraints removed - risk of injury.
■
If the rear seats are occupied, the rear head restraint must not be in the
lower position.
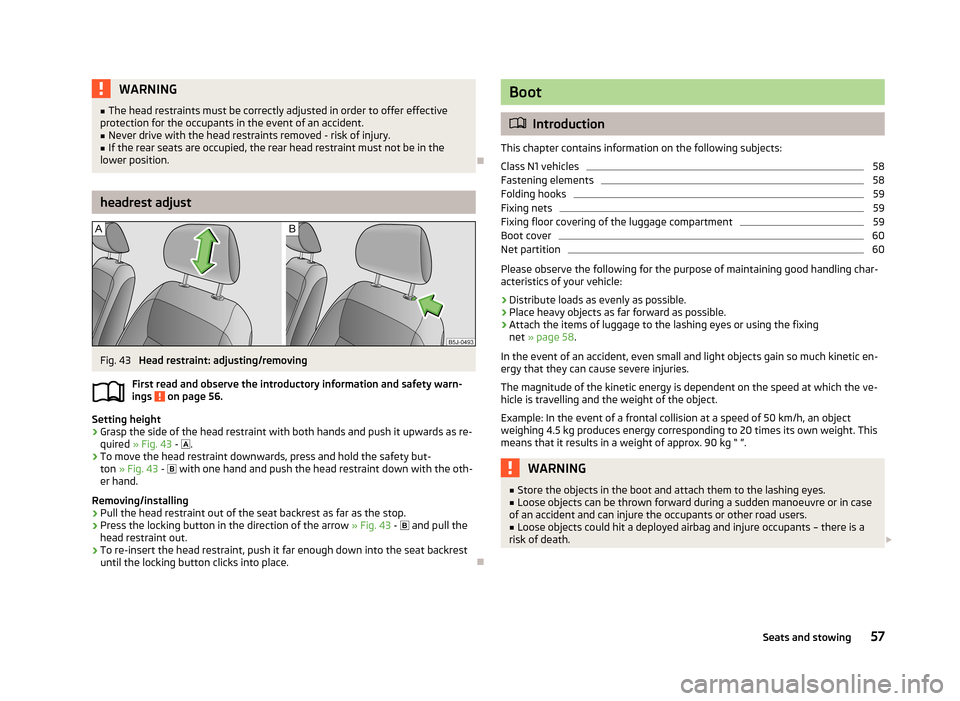
headrest adjust
Fig. 43
Head restraint: adjusting/removing
First read and observe the introductory information and safety warn- ings
on page 56.
Setting height
›
Grasp the side of the head restraint with both hands and push it upwards as re-
quired » Fig. 43 -
.
›
To move the head restraint downwards, press and hold the safety but-
ton » Fig. 43 -
with one hand and push the head restraint down with the oth-
er hand.
Removing/installing
›
Pull the head restraint out of the seat backrest as far as the stop.
›
Press the locking button in the direction of the arrow » Fig. 43 -
and pull the
head restraint out.
›
To re-insert the head restraint, push it far enough down into the seat backrest until the locking button clicks into place.
Boot
Introduction
This chapter contains information on the following subjects:
Class N1 vehicles
58
Fastening elements
58
Folding hooks
59
Fixing nets
59
Fixing floor covering of the luggage compartment
59
Boot cover
60
Net partition
60
Please observe the following for the purpose of maintaining good handling char-
acteristics of your vehicle:
›
Distribute loads as evenly as possible.
›
Place heavy objects as far forward as possible.
›
Attach the items of luggage to the lashing eyes or using the fixing net » page 58 .
In the event of an accident, even small and light objects gain so much kinetic en-
ergy that they can cause severe injuries.
The magnitude of the kinetic energy is dependent on the speed at which the ve-
hicle is travelling and the weight of the object.
Example: In the event of a frontal collision at a speed of 50 km/h, an object
weighing 4.5 kg produces energy corresponding to 20 times its own weight. This
means that it results in a weight of approx. 90 kg “ ”.
WARNING■ Store the objects in the boot and attach them to the lashing eyes.■Loose objects can be thrown forward during a sudden manoeuvre or in case
of an accident and can injure the occupants or other road users.■
Loose objects could hit a deployed airbag and injure occupants – there is a
risk of death.
57Seats and stowing
Page 143 of 219

Use of a child seat on the front passenger seat
Never use a backwards-facing child restraint system on a seat that is protected by an active airbag installed in front of it. This could cause the child severe injury
or even death.Fig. 120
Sticker on the B column on the
front passenger side.
First read and observe the introductory information and safety warn- ings on page 139.
For safety reasons, we recommend that you install child seats on the rear seats
whenever possible.
The following instructions must be followed when using a child seat on the front passenger seat.
› The front passenger airbag must be deactivated if using a rear-facing child
seat »
.
› If possible, adjust the front passenger seat backrest so that it is as vertical, so
as to ensure secure contact between the passenger seat backrest and the back
of the child seat.
› If possible, move the front passenger seat backwards so that there is no con-
tact between the front passenger seat and the child seat behind it.
› With child safety seats in groups 2 or 3, make sure that the loop-around fittings
attached to the child seat headrest is positioned in front of or at the same
height as the loop-around fittings on the B pillar on the passenger side.
› Set the height-adjustable front passenger seat as high up as possible.
› Set the front passenger seat belt as high up as possible.
› Place and fasten the child seat on the seat and the child in the child seat ac-
cording to the specifications in the manufacturer's user manual of the child seat .
WARNING■ The front passenger airbag must be deactivated if using a rear-facing child
seat on the front passenger seat » page 136, Deactivating airbags .■
Never use a rear-facing child seat on the front passenger seat if the passen-
ger airbag is activated. This child safety seat is positioned in the deployment
area of the front passenger airbag. The airbag may cause the child severe, or
even fatal injuries, in the event of it being deployed.
■
This is also clearly stated on the sticker which is located on the B pillar on
the passenger side » Fig. 120. The sticker is visible upon opening the front
passenger door. In some countries, the sticker is affixed to the front passen-
ger sun visor.
■
With child safety seats in groups 2 or 3, make sure that the loop-around fit-
tings attached to the child seat headrest is positioned in front of or at the
same height as the loop-around fittings on the B pillar on the passenger side.
■
As soon as the rear-facing child seat is no longer being used on the passen-
ger seat, the front passenger airbag should be re-activated again.
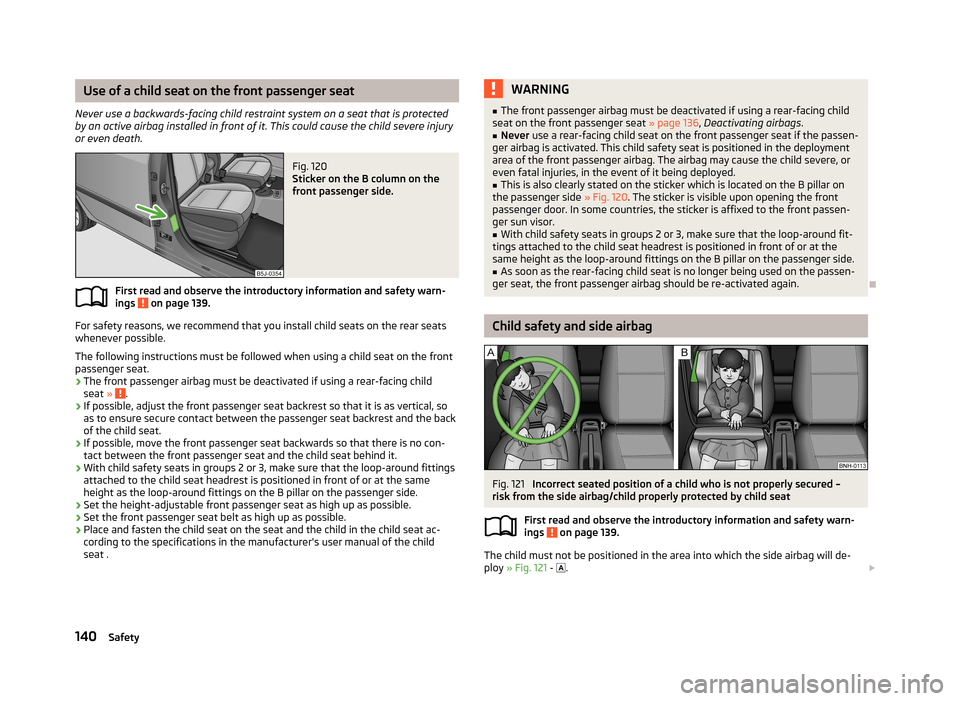
Child safety and side airbag
Fig. 121
Incorrect seated position of a child who is not properly secured –
risk from the side airbag/child properly protected by child seat
First read and observe the introductory information and safety warn-
ings
on page 139.
The child must not be positioned in the area into which the side airbag will de-
ploy » Fig. 121 -
.
140Safety
Page 211 of 219

Driving economicallyEconomical gear changing105
Driving through water108
E
Economical and environmentally friendly driving 104
Economical driving Ballast
106
Driving at full throttle105
Idling106
Looking ahead105
Regular maintenance107
Saving energy107
Short distances106
Tyre pressure106
EDL111
Electrical power windows Button in the driver's door
38, 39
Button in the rear door39
Central locking system40
Operational faults40
Electronic Differential Lock111
Electronic immobilizer97
emergency opening the loading door (Praktik)
75
Emergency Changing a wheel
180
Hazard warning light system45
jump-starting187
Jump-starting186
locking of the doors31
Selector lever-unlocking103
Towing the vehicle188
Towing the vehicle using the tow hitch189
Tyre repair184
Unlocking the boot lid38
Emergency equipment Fire extinguisher
179
First aid kit179
Jack180
Vehicle tool kit180
Warning triangle179
Emissions199
Engine Running in
103
Starting and stopping the engine96
Switching off the engine98
Engine compartment159
Brake fluid167
Coolant166
Overview162
Vehicle battery168
Engine oil163
Capacity163
Changing165
Checking164
Replenishing165
Specifications163
Warning light21
Engine revolutions counter11
Environment104
Environmental compatibility107
Environmentally friendly driving104
ESC Function
110
Warning light23
F
Films
152
Fire extinguisher179
First aid kit179
Flashers43
Fog lights44
Folding down the seats
54
Footmats100
see Footmats100
Front airbag134
Front seats52
Fuel157
Diesel159
Fuel gauge11
gauge11
refer to Fuel157
Refuelling157
Unleaded petrol158
Fuel consumption104
Fuses Assignment
191
Colour coding191
Replacing191
G
Gear Recommended gear
13
Gearbox Display messages
19
Gear changing Gear stick
99
General view Cockpit
9
Glow plug system Warning light
24
GSM86
H
Handbrake
99
Hazard warning light system45
Head airbag136
Headlight cleaning system Headlight cleaning system
50
Headlights195
Driving abroad109
Headlight cleaning system50
Headrest Headrest
57
Head restraint56
208Index