2013 SKODA ROOMSTER battery
[x] Cancel search: batteryPage 7 of 219

Brake fluid167Vehicle battery168
Wheels
172
Tyres and wheel rims
172
Winter operation
178
Do-it-yourself
Emergency equipment and self-help
179
Emergency equipment
179
Changing a wheel
180
Tyre repair
184
Jump-starting
186
Towing the vehicle
188
Fuses and light bulbs
191
Fuses
191
Bulbs
194
Technical data
Technical data
199
Vehicle data
199
Index
4Table of Contents
Page 17 of 219

MemoryFig. 4
Multifunction display
First read and observe the introductory information and safety warn-
ings on page 13.
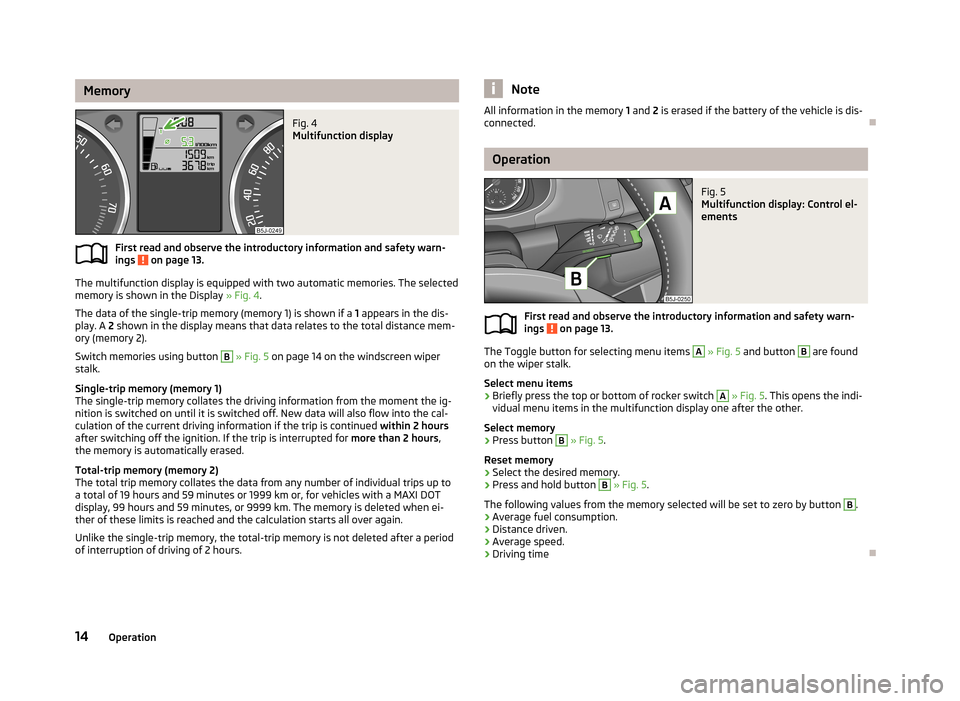
The multifunction display is equipped with two automatic memories. The selected
memory is shown in the Display » Fig. 4.
The data of the single-trip memory (memory 1) is shown if a 1 appears in the dis-
play. A 2 shown in the display means that data relates to the total distance mem-
ory (memory 2).
Switch memories using button
B
» Fig. 5 on page 14 on the windscreen wiper
stalk.
Single-trip memory (memory 1)
The single-trip memory collates the driving information from the moment the ig-
nition is switched on until it is switched off. New data will also flow into the cal-
culation of the current driving information if the trip is continued within 2 hours
after switching off the ignition. If the trip is interrupted for more than 2 hours,
the memory is automatically erased.
Total-trip memory (memory 2)
The total trip memory collates the data from any number of individual trips up to
a total of 19 hours and 59 minutes or 1999 km or, for vehicles with a MAXI DOT
display, 99 hours and 59 minutes, or 9999 km. The memory is deleted when ei-
ther of these limits is reached and the calculation starts all over again.
Unlike the single-trip memory, the total-trip memory is not deleted after a period of interruption of driving of 2 hours.
NoteAll information in the memory 1 and 2 is erased if the battery of the vehicle is dis-
connected.
Operation
Fig. 5
Multifunction display: Control el-
ements
First read and observe the introductory information and safety warn- ings on page 13.
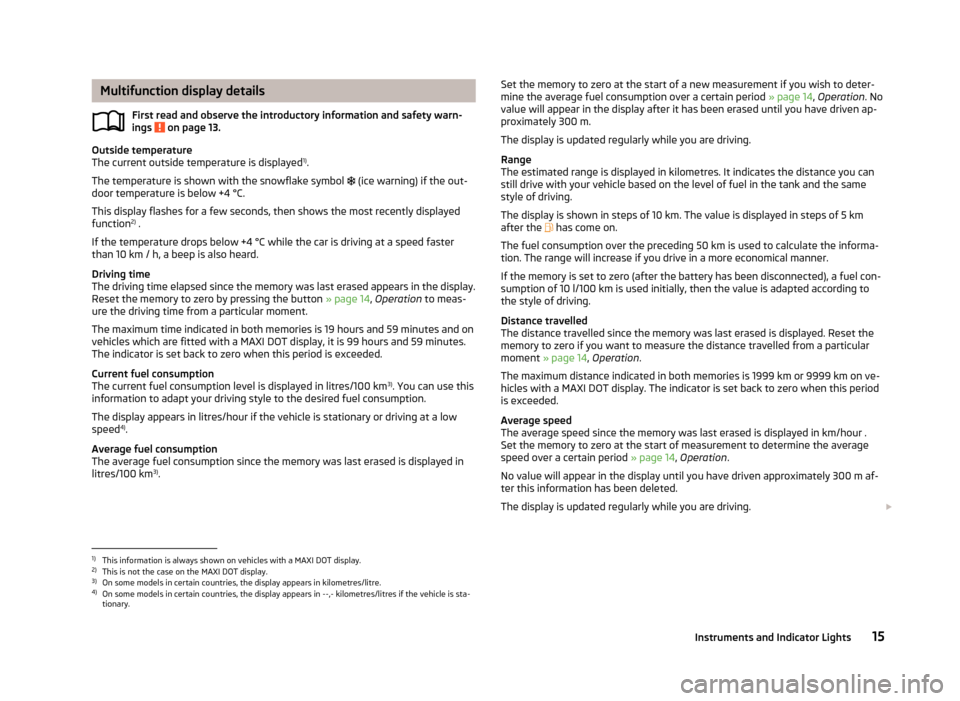
The Toggle button for selecting menu items
A
» Fig. 5 and button
B
are found
on the wiper stalk.
Select menu items
›
Briefly press the top or bottom of rocker switch
A
» Fig. 5 . This opens the indi-
vidual menu items in the multifunction display one after the other.
Select memory
›
Press button
B
» Fig. 5 .
Reset memory
›
Select the desired memory.
›
Press and hold button
B
» Fig. 5 .
The following values from the memory selected will be set to zero by button
B
.
› Average fuel consumption.
› Distance driven.
› Average speed.
› Driving time
14Operation
Page 18 of 219

Multifunction display detailsFirst read and observe the introductory information and safety warn-
ings
on page 13.
Outside temperature
The current outside temperature is displayed 1)
.
The temperature is shown with the snowflake symbol (ice warning) if the out-
door temperature is below +4 °C.
This display flashes for a few seconds, then shows the most recently displayed
function 2)
.
If the temperature drops below +4 °C while the car is driving at a speed faster than 10 km / h, a beep is also heard.
Driving time
The driving time elapsed since the memory was last erased appears in the display.
Reset the memory to zero by pressing the button » page 14, Operation to meas-
ure the driving time from a particular moment.
The maximum time indicated in both memories is 19 hours and 59 minutes and on
vehicles which are fitted with a MAXI DOT display, it is 99 hours and 59 minutes.
The indicator is set back to zero when this period is exceeded.
Current fuel consumption
The current fuel consumption level is displayed in litres/100 km 3)
. You can use this
information to adapt your driving style to the desired fuel consumption.
The display appears in litres/hour if the vehicle is stationary or driving at a lowspeed 4)
.
Average fuel consumption
The average fuel consumption since the memory was last erased is displayed in
litres/100 km 3)
.
Set the memory to zero at the start of a new measurement if you wish to deter-
mine the average fuel consumption over a certain period » page 14, Operation . No
value will appear in the display after it has been erased until you have driven ap-
proximately 300 m.
The display is updated regularly while you are driving.
Range
The estimated range is displayed in kilometres. It indicates the distance you can
still drive with your vehicle based on the level of fuel in the tank and the same
style of driving.
The display is shown in steps of 10 km. The value is displayed in steps of 5 km
after the has come on.
The fuel consumption over the preceding 50 km is used to calculate the informa-
tion. The range will increase if you drive in a more economical manner.
If the memory is set to zero (after the battery has been disconnected), a fuel con- sumption of 10 l/100 km is used initially, then the value is adapted according to
the style of driving.
Distance travelled
The distance travelled since the memory was last erased is displayed. Reset the memory to zero if you want to measure the distance travelled from a particular
moment » page 14 , Operation .
The maximum distance indicated in both memories is 1999 km or 9999 km on ve- hicles with a MAXI DOT display. The indicator is set back to zero when this period
is exceeded.
Average speed
The average speed since the memory was last erased is displayed in km/hour . Set the memory to zero at the start of measurement to determine the average
speed over a certain period » page 14, Operation .
No value will appear in the display until you have driven approximately 300 m af- ter this information has been deleted.
The display is updated regularly while you are driving. 1)
This information is always shown on vehicles with a MAXI DOT display.
2)
This is not the case on the MAXI DOT display.
3)
On some models in certain countries, the display appears in kilometres/litre.
4)
On some models in certain countries, the display appears in --,- kilometres/litres if the vehicle is sta-
tionary.
15Instruments and Indicator Lights
Page 24 of 219

Stop the vehicle, switch off the engine, and check the level of the brake flu-
id » page 167 .
Further information » page 98, Brakes .WARNING■
If you have to stop for technical reasons, then park the vehicle at a safe dis-
tance from the traffic, switch off the engine and activate the hazard warning
light system » page 45.■
The following guidelines should be observed when opening the bonnet and
checking the brake fluid level » page 159, Engine compartment .
■
If the warning light is displayed simultaneously with warning light
» page 24 , Anti-lock brake system (ABS) , do not continue your jour-
ney! Seek help from a specialist garage.
■
A fault to the ABS system or the braking system can increase the vehicle's
braking distance – there is a risk of accident.
Seat belt warning light
First read and observe the introductory information and safety warn-ings
on page 20.
The
indicator light comes on after the ignition is switched on as a reminder for
the driver and front passenger to fasten their seat belt. The indicator light only
goes out once the driver and front passenger have fastened their seat belt.
A steady warning signal sounds at vehicle speeds greater than 20 km/h and the
flashes if the driver and front passenger have not fastened their seat belts.
The warning signal is switched of and the
indicator light is permanently lit if the
driver and front passenger have not fastened their seat belts within the next 90 seconds.
Further information » page 127.
Alternator
First read and observe the introductory information and safety warn-
ings
on page 20.
If the warning light lights up
when the engine is running, the vehicle battery is
not being charged.
Seek help from a specialist garage. The electrical system requires checking.WARNINGIf you have to stop for technical reasons, park the vehicle at a safe distance
from the traffic, switch off the engine and switch on the hazard warning lights
system » page 45 .
CAUTION
Do not continue driving if the warning light (coolant system fault) lights up
in addition to the warning light while you are driving. Stop the engine - there is
a risk of engine damage.
Door open
First read and observe the introductory information and safety warn-
ings
on page 20.
The warning light
comes on if one or several doors are opened or if the boot lid
is opened.
The warning light comes on even when the ignition is switched off. The warning
light lights up for a maximum of 5 minutes.
WARNINGIf you have to stop for technical reasons, park the vehicle at a safe distance
from the traffic, switch off the engine and switch on the hazard warning lights
system » page 45 .
Engine oil
First read and observe the introductory information and safety warn- ings
on page 20.
The warning light lights up red (low oil pressure)
The following message is shown in the MAXI DOT display. Oil pressure: Engine off. Read manual.
21Instruments and Indicator Lights
Page 26 of 219

Power steeringFirst read and observe the introductory information and safety warn-
ings
on page 20.
The warning light comes on for a few seconds when the ignition is switched
on.
If the warning light after switching on the ignition or when driving lights up con-
tinuously, a fault exists in the electrohydraulic power steering. The power steer-
ing operates with reduced steering assist or does not function at all.
Seek help from a specialist garage.
Further information » page 95.
Note
■
If the yellow warning light goes out after starting the engine again and driv-
ing a short distance, it is not necessary to visit a specialist garage.■
If the vehicle battery has been disconnected and reconnected, the yellow warn-
ing light comes on after switching on the ignition. The warning light should go
out after driving a short distance.
■
There is no power-assisted steering support when the vehicle is being towed
without the engine running or when the power-assisted steering is defect. The vehicle is fully steerable however. There is however increased force required to
turn the steering wheel.
Electronic Stability Control (ESC)
First read and observe the introductory information and safety warn-
ings
on page 20.
The warning light flashes
to show that the ESC is currently operating.
If the warning light
comes on immediately after you start the engine, the ESC
might be switched off due to technical reasons. Switch the ignition off and on
again. The ESC is fully functional again if the
warning light does not light up
after you switch the engine back on.
There is a fault in the ESC system if the
warning light lights up.
The following message is shown in the MAXI DOT display.
Fault: Electronic Stability Control (ESC)
Seek help from a specialist garage.
The ESC system cannot be turned off, the » page 111 button only switches the
TCS off, the warning light in the instrument cluster lights up.
As the ESC operates in conjunction with the ABS, the ESP indicator light will also come on if the ABS system fails.
Further information » page 110, Electronic Stability Control (ESC) .
Note
The warning light comes on after the ignition is switched on if the vehicle's
battery has been disconnected and reconnected. The warning light should go out
after the vehicle has driven a short distance.
Traction Control System (ASR)
First read and observe the introductory information and safety warn-
ings
on page 20.
The warning light flashes
to show that the ASR is currently operating.
If the warning light
comes on immediately after starting the engine, the ASR
can be switched off for technical reasons. Switch the ignition off and on again.
The TCS is fully functional again if the
warning light does not light up after you
switch the engine back on.
If the warning light
lights up, there is a fault in the ASR.
The following message is shown in the MAXI DOT display. Fault: Traction control (TCS)
Seek help from a specialist garage.
The fact that the TCS system operates together with the ABS means that the TCS warning light will also come on if the ABS system is not operating properly.
Further information » page 111, Traction Control System (ASR) .
Note
The
warning light comes on after the ignition is switched on if the vehicle's
battery has been disconnected and reconnected. The warning light should go out
after the vehicle has driven a short distance.
23Instruments and Indicator Lights
Page 29 of 219

Airbag systemFirst read and observe the introductory information and safety warn-ings
on page 20.
If the warning light lights up, there is a fault in the airbag system.
The following message is shown in the MAXI DOT display. Fault: Airbag
The operational capability of the airbag system is monitored electronically, even if one of the airbags is switched off.
If a front, side or head airbag or belt tensioner has been switched off using the vehicle system tester:
› The
warning light comes on for around 4 seconds after the ignition is switch-
ed on and then flashes for approximately another 12 seconds at 2 second inter-
vals.
The following message is shown in the MAXI DOT display.
Airbag/belt tensioner deactivated.
If the front passenger's front airbag was switched off using the key-operated
switch on the side of the dash panel on the passenger side:
› The
warning light comes on for around 4 seconds after the ignition has been
switched on.
› switching off the airbag is indicated in the middle of the dash panel by the light-
ing up of the yellow indicator light in display
» page 137 .
WARNINGIf there is a fault, have the airbag system checked immediately by a specialist
garage. Otherwise, there is a risk of the airbag not being activated in the
event of an accident.
Tyre pressures
First read and observe the introductory information and safety warn-
ings
on page 20.
The warning light
lights up, if there is a substantial drop in inflation pressure in
one of the tyres. Check and adjust the pressure in all tyres.
The warning light coming on indicates a fault in the system.
Seek help from a specialist garage.
Further information » page 175, Tyre pressure monitor .
Note
If the battery has been disconnected, the warning light illuminates after the ig-
nition is switched on. The warning light should go out after driving a short dis-
tance.
Windscreen washer fluid level
First read and observe the introductory information and safety warn-ings
on page 20.
If the windscreen washer fluid level is too low, the warning light
comes on.
The following message is shown in the MAXI DOT display. Top up wash fluid!
Top up with liquid » page 162.
Traction control (TCS) switched off
First read and observe the introductory information and safety warn-ings
on page 20.
The ASR is switched off by pressing the button » page 111 and the warning light
illuminates.
The following message is shown in the MAXI DOT display.
Traction control (ASR) deactivated.
Turn signal system
First read and observe the introductory information and safety warn-ings
on page 20.
Either the left
or right
warning light flashes depending on the position of the
turn signal lever.
26Operation
Page 31 of 219

Unlocking and locking
Unlocking and locking
Introduction
This chapter contains information on the following subjects:
Vehicle key
28
Replacing the battery in the remote control key
29
Child safety lock
29
Opening/closing a door
30
Locking/unlocking the vehicle without central locking
30
Emergency locking of the doors
31
Vehicle key
Fig. 8
Key: without/with remote control
First read and observe the introductory information given on page 28.
Two keys are provided with the vehicle. Depending on the equipment, your vehi-
cle can be equipped with keys without radio remote control » Fig. 8 -
or with
radio remote control » Fig. 8 -
.
WARNING■
Always withdraw the key whenever you leave the vehicle - even if it is only
for a short time. This is particularly important if children are left in the vehicle.
The children might otherwise start the engine or operate electrical equipment
(e.g. power windows) – risk of injury!■
Do not withdraw the ignition key from the ignition lock until the vehicle has
come to a stop. The steering lock might otherwise engage unintentionally –
risk of accident!
CAUTION
■ Each key contains electronic components; therefore it must be protected
against moisture and severe shocks.■
Keep the groove of the keys absolutely clean. Impurities (textile fibres, dust,
etc.) have a negative effect on the functionality of the locking cylinder and igni-
tion lock.
■
The operation of the remote control may temporarily be affected by interfer-
ence from transmitters close to the car and which operate in the same frequency
range (e.g. mobile phone, TV transmitter).
■
The battery must be replaced if the central locking does react to the remote
control at less than around 3 metres away » page 29.
Note
If you lose a key, please contact a specialist garage, who will be able to provide
you with a new one.
28Operation
Page 32 of 219

Replacing the battery in the remote control keyFig. 9
Remote control key: Remove cover/remove battery
First read and observe the introductory information given on page 28.
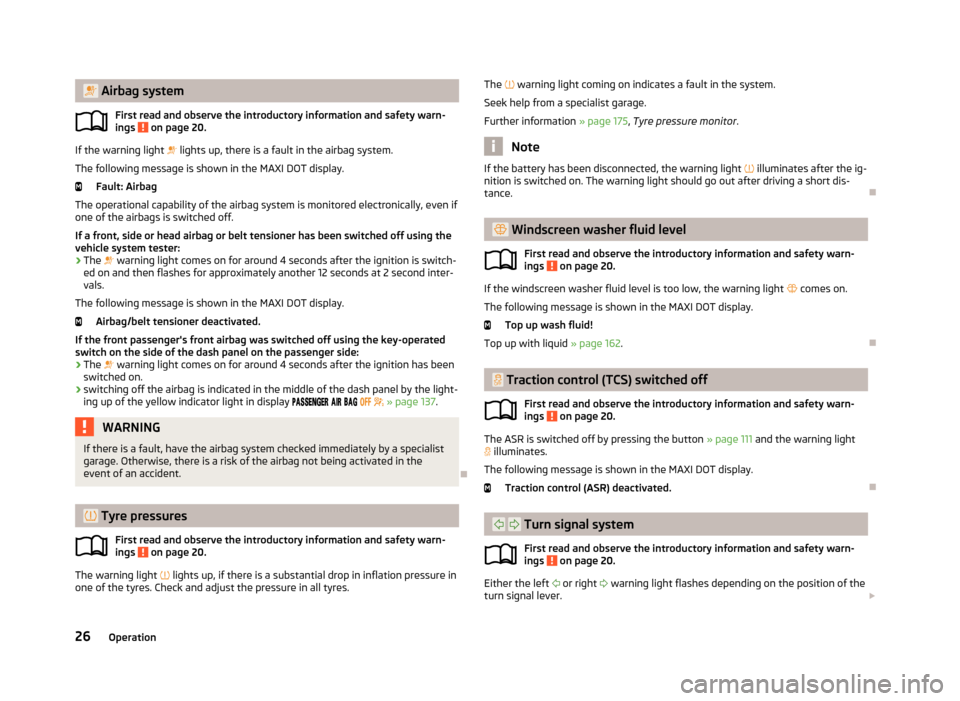
Each remote control key contains a battery located under the cover
A
» Fig. 9 .
The battery needs replacing if red indicator light » Fig. 8 on page 28 -
does not
go on when you press a button on the remote control key. We recommend having
the key batteries replaced by a specialist garage. However, if you would like to re-
place the discharged battery yourself proceed as follows.
›
Flip out the key.
›
Press off the battery cover with your thumb or using a flat screwdriver in the region of arrows
1
» Fig. 9 .
›
Remove the discharged battery from the key by pressing the battery down-
wards in the region of arrow
2
.
›
Insert the new battery. Ensure that the “+” symbol on the battery is facing up-wards. The correct polarity is shown on the battery cover.
›
Place the battery cover on the key and press it down until it clicks into place.
CAUTION
■ Pay attention to the correct polarity when changing the battery.■The replacement battery must have the same specification as the original bat-
tery.
For the sake of the environment
Dispose of the used battery in accordance with national legal provisions.Note■ The system has to be synchronised, if the vehicle cannot be unlocked or locked
with the remote control key after replacing the battery » page 35.■
If a key has an affixed decorative cover, this will be destroyed when the battery
is replaced. A replacement cover can be purchased from a ŠKODA Partner.
Child safety lock
Fig. 10
Child safety lock: Left rear door
First read and observe the introductory information given on page 28.
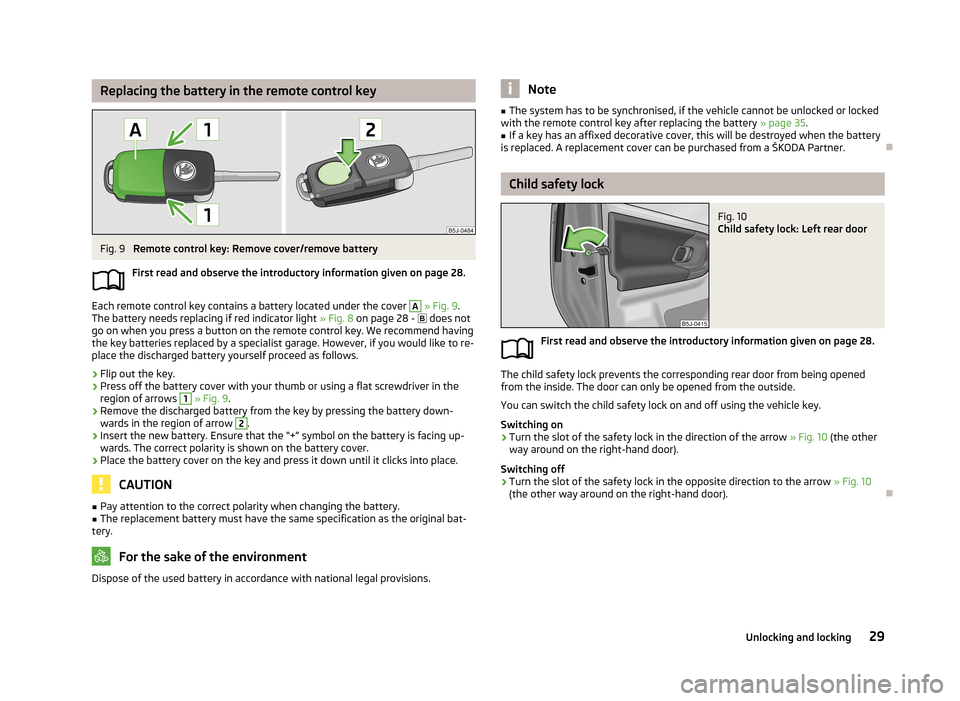
The child safety lock prevents the corresponding rear door from being opened from the inside. The door can only be opened from the outside.
You can switch the child safety lock on and off using the vehicle key.
Switching on
›
Turn the slot of the safety lock in the direction of the arrow » Fig. 10 (the other
way around on the right-hand door).
Switching off
›
Turn the slot of the safety lock in the opposite direction to the arrow » Fig. 10
(the other way around on the right-hand door).
29Unlocking and locking