2013 SKODA ROOMSTER clock
[x] Cancel search: clockPage 192 of 219

Note■We recommend using a tow rope from ŠKODA Original Accessories, which is
available from a ŠKODA Partner.■
Towing another vehicle requires a certain amount of practice. Both drivers
should be familiar with the particular points about towing a vehicle. Unskilled
drivers should not attempt to tow in another vehicle or to be towed in.
■
When towing, respect the national legal provisions, especially those which re-
late to the identification of the towing vehicle and the vehicle being towed.
■
The tow rope must not be twisted as it may in certain circumstances result in
the front towing eye being unscrewed out of your vehicle.
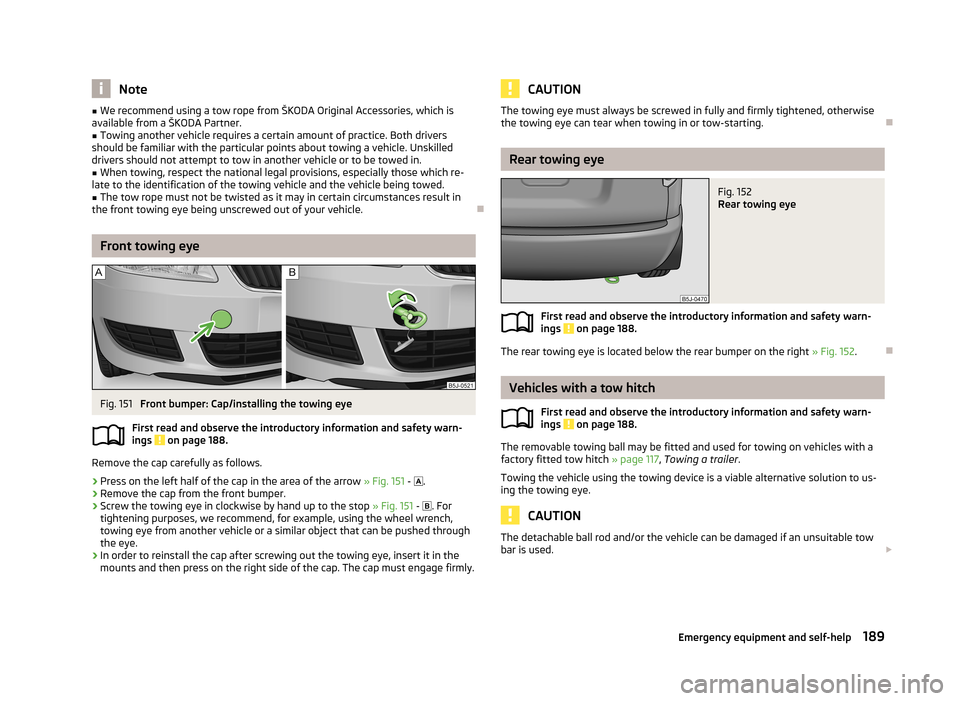
Front towing eye
Fig. 151
Front bumper: Cap/installing the towing eye
First read and observe the introductory information and safety warn- ings
on page 188.
Remove the cap carefully as follows.
›
Press on the left half of the cap in the area of the arrow » Fig. 151 -
.
›
Remove the cap from the front bumper.
›
Screw the towing eye in clockwise by hand up to the stop » Fig. 151 -
. For
tightening purposes, we recommend, for example, using the wheel wrench, towing eye from another vehicle or a similar object that can be pushed through
the eye.
›
In order to reinstall the cap after screwing out the towing eye, insert it in the
mounts and then press on the right side of the cap. The cap must engage firmly.
CAUTIONThe towing eye must always be screwed in fully and firmly tightened, otherwise
the towing eye can tear when towing in or tow-starting.
Rear towing eye
Fig. 152
Rear towing eye
First read and observe the introductory information and safety warn- ings on page 188.
The rear towing eye is located below the rear bumper on the right » Fig. 152.
Vehicles with a tow hitch
First read and observe the introductory information and safety warn-
ings
on page 188.
The removable towing ball may be fitted and used for towing on vehicles with a factory fitted tow hitch » page 117, Towing a trailer .
Towing the vehicle using the towing device is a viable alternative solution to us-
ing the towing eye.
CAUTION
The detachable ball rod and/or the vehicle can be damaged if an unsuitable tow bar is used. 189Emergency equipment and self-help
Page 199 of 219

›Turn the socket with the bulb to the stop in the direction of the arrow
» Fig. 159
and remove it.›
Replace the bulb, insert the connector and new bulb and turn to the stop in the
opposite direction to that of the arrow.
›
Fit the rubber cover
1
.
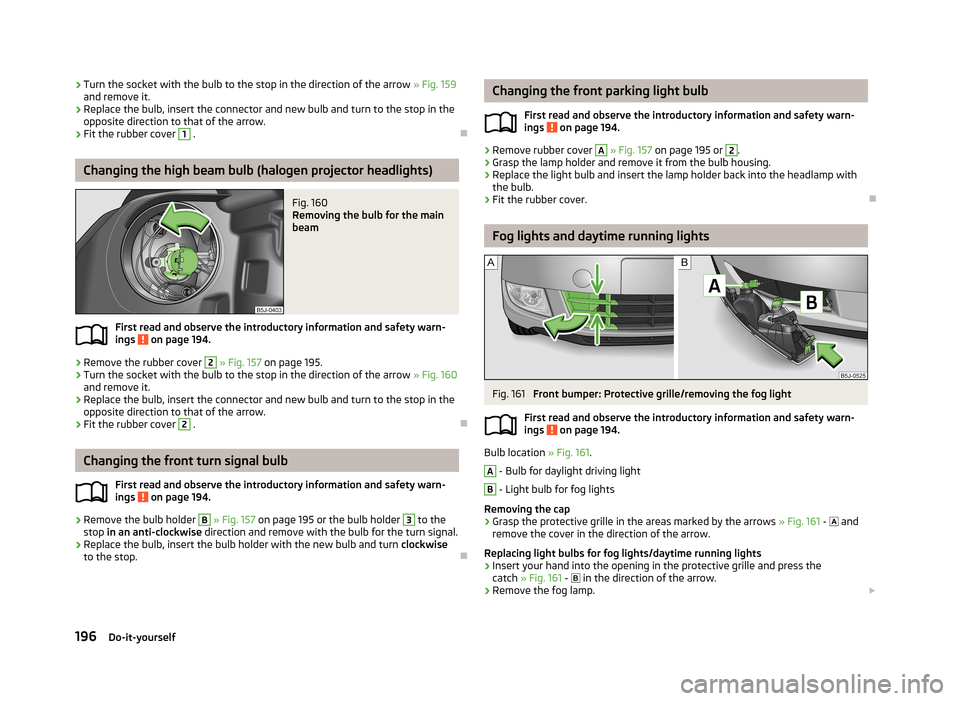
Changing the high beam bulb (halogen projector headlights)
Fig. 160
Removing the bulb for the main
beam
First read and observe the introductory information and safety warn-
ings on page 194.
›
Remove the rubber cover
2
» Fig. 157 on page 195.
›
Turn the socket with the bulb to the stop in the direction of the arrow » Fig. 160
and remove it.
›
Replace the bulb, insert the connector and new bulb and turn to the stop in the
opposite direction to that of the arrow.
›
Fit the rubber cover
2
.
Changing the front turn signal bulb
First read and observe the introductory information and safety warn-ings
on page 194.
›
Remove the bulb holder
B
» Fig. 157 on page 195 or the bulb holder
3
to the
stop in an anti-clockwise direction and remove with the bulb for the turn signal.
›
Replace the bulb, insert the bulb holder with the new bulb and turn clockwise
to the stop.
Changing the front parking light bulb
First read and observe the introductory information and safety warn-
ings
on page 194.
›
Remove rubber cover
A
» Fig. 157 on page 195 or
2
.
›
Grasp the lamp holder and remove it from the bulb housing.
›
Replace the light bulb and insert the lamp holder back into the headlamp with
the bulb.
›
Fit the rubber cover.
Fog lights and daytime running lights
Fig. 161
Front bumper: Protective grille/removing the fog light
First read and observe the introductory information and safety warn-
ings
on page 194.
Bulb location » Fig. 161.
A
- Bulb for daylight driving light
B
- Light bulb for fog lights
Removing the cap
›
Grasp the protective grille in the areas marked by the arrows » Fig. 161 -
and
remove the cover in the direction of the arrow.
Replacing light bulbs for fog lights/daytime running lights
›
Insert your hand into the opening in the protective grille and press the catch » Fig. 161 -
in the direction of the arrow.
›
Remove the fog lamp.
196Do-it-yourself
Page 200 of 219

›Turn the connector with the bulb in
counter-clockwise up to the stop and re-
move.›
Replace the bulb, insert the holder with the new bulb and turn clockwise to the
stop.
›
To re-install the fog light, first of all place the fog light with the lug on the side opposite the licence plate.
›
Press in the fog lamp on the side closest to the licence plate.
›
Insert the cap, beginning with the lug on the side opposite the license plate.
›
Press in the cap on the side facing the license plate. The cap must engage firm-
ly.
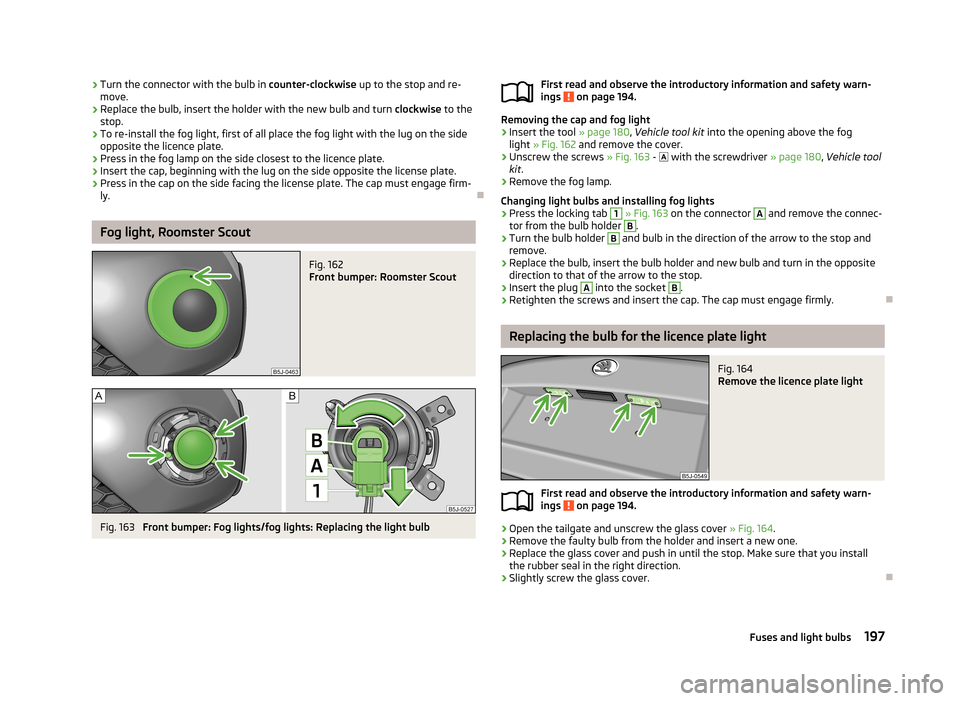
Fog light, Roomster Scout
Fig. 162
Front bumper: Roomster Scout
Fig. 163
Front bumper: Fog lights/fog lights: Replacing the light bulb
First read and observe the introductory information and safety warn-
ings on page 194.
Removing the cap and fog light
›
Insert the tool » page 180, Vehicle tool kit into the opening above the fog
light » Fig. 162 and remove the cover.
›
Unscrew the screws » Fig. 163 - with the screwdriver » page 180, Vehicle tool
kit .
›
Remove the fog lamp.
Changing light bulbs and installing fog lights
›
Press the locking tab
1
» Fig. 163 on the connector
A
and remove the connec-
tor from the bulb holder
B
.
›
Turn the bulb holder
B
and bulb in the direction of the arrow to the stop and
remove.
›
Replace the bulb, insert the bulb holder and new bulb and turn in the opposite direction to that of the arrow to the stop.
›
Insert the plug
A
into the socket
B
.
›
Retighten the screws and insert the cap. The cap must engage firmly.
Replacing the bulb for the licence plate light
Fig. 164
Remove the licence plate light
First read and observe the introductory information and safety warn-ings on page 194.
›
Open the tailgate and unscrew the glass cover » Fig. 164.
›
Remove the faulty bulb from the holder and insert a new one.
›
Replace the glass cover and push in until the stop. Make sure that you install
the rubber seal in the right direction.
›
Slightly screw the glass cover.
197Fuses and light bulbs
Page 201 of 219

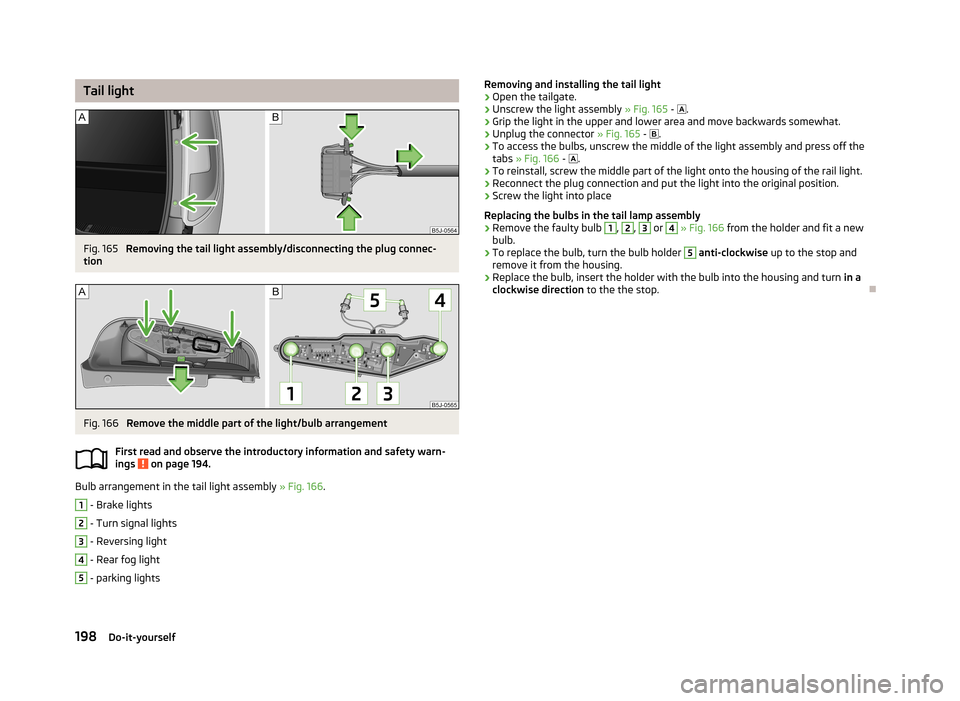
Tail lightFig. 165
Removing the tail light assembly/disconnecting the plug connec-
tion
Fig. 166
Remove the middle part of the light/bulb arrangement
First read and observe the introductory information and safety warn- ings
on page 194.
Bulb arrangement in the tail light assembly » Fig. 166.
1
- Brake lights
2
- Turn signal lights
3
- Reversing light
4
- Rear fog light
5
- parking lights
Removing and installing the tail light›Open the tailgate.›
Unscrew the light assembly » Fig. 165 - .
›
Grip the light in the upper and lower area and move backwards somewhat.
›
Unplug the connector » Fig. 165 - .
›
To access the bulbs, unscrew the middle of the light assembly and press off the
tabs » Fig. 166 - .
›
To reinstall, screw the middle part of the light onto the housing of the rail light.
›
Reconnect the plug connection and put the light into the original position.
›
Screw the light into place
Replacing the bulbs in the tail lamp assembly
›
Remove the faulty bulb
1
,
2
,
3
or
4
» Fig. 166 from the holder and fit a new
bulb.
›
To replace the bulb, turn the bulb holder
5
anti-clockwise up to the stop and
remove it from the housing.
›
Replace the bulb, insert the holder with the bulb into the housing and turn in a
clockwise direction to the the stop.
198Do-it-yourself
Page 210 of 219

Central locking system31
lock33
unlock33
Changing Brake fluid
168
Changing the bulb for fog light (Scout)197
Engine oil165
Fog lights and daytime running lights bulbs196
Front parking light bulb196
Front turn signal bulb196
High beam bulb - halogen projector headlights 195, 196
Low beam and high beam bulb - halogen head- lights
195
Wheels180
Changing a wheel Follow-up work
182
Preliminary work181
Remove and attaching a wheel181
Charging a vehicle battery170
Check Fit ball head properly
119
Checking Battery electrolyte level
170
Brake fluid167
Coolant166
Engine oil164
Oil level164
Windscreen washer fluid162
Children and safety139
Child safety Side airbag
140
Child safety lock29
Child seat Classification
141
ISOFIX141
on the front passenger seat140
TOP TETHER143
Use of child seats141
Use of ISOFIX child seats142
Chrome parts refer to Taking care of your vehicle
152
Cigarette lighter67
Cleaning144
Alcantara155
Covers of electrically heated seats156
Fabrics155
Headlight lenses153
Natural leather155
Plastic parts151
Synthetic leather155
Wheels153
Climatronic83
automatic mode84
Control elements83
Controlling blower85
Defrosting windscreen85
Recirculated air mode84
Setting the temperature84
Clock12
Clothes hook68
Cockpit 12-volt power outlet
67
Ashtray66
Cigarette lighter67
General view9
Lighting46
Storage compartments68
Compartments68
Computer see Multifunction display
13
Convenience turn signal43
Coolant165
Checking166
Display messages22
Replenishing167
Warning light22
Coolant temperature gauge display
11
Correct seated position124
Driver125
Front passenger125
Instructions125
Rear seats125
Counter for distance driven12
Cruise Control System113
Cupholders66
D
DAY LIGHT see Daylight running lights
42
Daylight running lights42
Deactivating an airbag137
Decorative films152
Defrosting rear window47
Delayed locking of the boot lid see Boot lid
37
Diesel refer to Fuel
159
Diesel fuel Operation in winter
159
Diesel particulate filter25
display messages25
Digital clock12
Dipstick164
Display Service interval
16
Distance driven12
Door Child safety lock
29
Closing30
Door open warning light21
Opening30
Doors Emergency locking
31
Driving Abroad
109
Driving through water on streets108
Emissions199
Fuel consumption199
Maximum speed202
207Index
Page 214 of 219

Height adjustment130
Inertia reels130
The physical principle of a frontal collision128
Seats Head restraints
56
Heating53
Removing seats55
Seats and stowing52
Selector lever see Using the selector lever
101
Service147
Service display16
Service intervals144
Setting Heating
79
Manual air conditioning system82
Manually dimmed rear-view mirror51
Setting the clock Clock
12
Shifting gears Driving and saving energy
105
Side airbag135
Snow chains178
Spare wheel176
Speedometer11
Speed symbol Refer to Wheels
175
Spoiler148
Stalk Main beam
43
Turn signals43
START-STOP115
Manually activating/deactivating the system116
Operating conditions for the system115
Starting/shutting down the engine115
Starting and stopping the engine96
Starting engine Jump-starting
186
Starting the engine97
Jump-starting187
Starting the engine97
START STOP Information messages
116
Jump-starting188
Steering force assistance95
Steering wheel95
Storage68
Storage compartment Storage compartment on the driver's side
70
Storage compartment on the front passenger side
69
Storage Compartment Lighting
47
Storage compartments68
Flexible storage compartment73
Storage compartment in the front centre console 71
storage pockets on the front seat
70
Stowage compartment beneath the front seat
71
compartment for glasses70
compartments in the doors72
compartments in the luggage73
sun roof48
sunshade48
Sun visors48
Switching lights on and off41
Switching off the engine98
Synthetic leather155
T
Taking care of the vehicle Natural leather
155
Seat belts156
Taking care of your vehicle Automatic car wash system
150
Cavity protection153
Chrome parts152
Cleaning the wheels153
Decorative films152
Door lock cylinders153
Headlight lenses153
High-pressure cleaner150
Plastic parts151
Polishing the paintwork151
Rubber seals152
Taking care of the interior154
Taking care of your vehicle exterior150
Washing149
Washing by hand149
Wash system150
Wax treatment151
Taking care of your vehicles Fabric covers
156
Technical data199
Telephone86
Temporary spare wheel176
the rear seats fold down seat backrest and fold seat fully for- ward
55
Tiptronic102
Tools180
TOP TETHER143
Tourist lights44
Towing188
Towing a trailer117
Towing device Description
117
Drawbar load117
Use and care120
Towing eye Front
189
Rear189
Towing protection36
Traction Control System (ASR)111
Trailer117, 120
Loading120
Towing a trailer121
211Index