Page 57 of 90
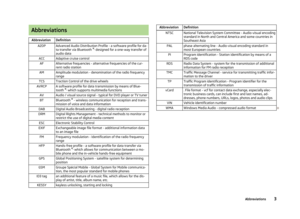
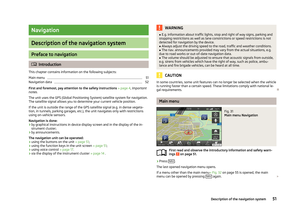
 Columbus Navigation System Manual Introductory informationFig. 32
Map display: Main menu
First read and observe the introductory information given on page 54.
Explanation of graphicMap
Traffic sign symbol » page 56
Current vehicle")
Introductory informationFig. 32
Map display: Main menu
First read and observe the introductory information given on page 54.
Explanation of graphicMap
Traffic sign symbol » page 56
Current vehicle position
Status bar » page 54
POI icons » page 66
›
Press NAV.
The last opened navigation menu opens.
If a menu other than the main menu » Fig. 32 is opened, the main menu can be
opened by pressing NAV
again.
Map display options
First read and observe the introductory information given on page 54.
Switch between different navigation map display modes depending on the con-
text. You can also display an additional window with further navigation informa-
tion.
›
In the navigation main menu, press . There is a list of function keys displayed.
ABCDEList of Function Keys
2D - current vehicle position in the 2D map display
3D - current vehicle position in the 3D map display 3D map with spatial representation of buildings (topographic map)
Destination display (appears after route calculation)
Displays the overview map to the destination. (After calculating the route,
the device displays the route from the vehicle location to the destination. The scale is adjusted to the length of the route.)
Map display with light or dark backgroundSwitches the split screen on/off in the map » page 57
Map operation
First read and observe the introductory information given on page 54.
Moving the map
The map can be moved in any direction by touching it with your finger and drag-
ging it on the screen in the desired direction.
Changing the scale
› with the menu button
2
›
by touching the screen with two fingers and pulling the fingers together or
apart.
Function keys and map display symbols
■ - Context-dependent change in the map orientation
■ 2D map display - the map rotates and the direction of travel arrow
C
» Fig. 32
on page 55 points to the top of screen, or the north is aligned with the top
edge of the screen, and the arrow
C
shows the direction of travel
■ 3D map view -the direction of travel arrow
C
points to the top of the screen
(if the map scale is larger than 100 km, the map is aligned to the north).
■ - Touch to align the map to the position of the vehicle (the function key is
available when you move the map in the vehicle position display)
■ - Touch to align the map to the destination position and/or route display (the
function key is available when you move the map within the destination- or
route display )
Day/nightSplit screen55Description of the navigation system
Page 58 of 90
 Columbus Navigation System Manual ■ - The number located below the symbol indicates the elevation 1)
■ - Touch to increase the map scale for a few seconds before it resets to the
original scale (quick view)
■ - Disp")
■ - The number located below the symbol indicates the elevation 1)
■ - Touch to increase the map scale for a few seconds before it resets to the
original scale (quick view)
■ - Displays the manually set map scale
■ - Displays the automatic map scale
■ - Switches the autozoom on/off during route guidance. Active autozoom is
indicated by a green symbol. If Autozoom is active, the map scale will change
automatically depending on the route travelled (motorway trip: large map scale
- city: small map scale)
The autozoom can be switched off by touching → or off by changing the
map scale. Touching again the (function key highlighted in green) turns the au-
tozoom on again. Autozoom can also be switched on/off in the navigation set-
tings » page 53
Autozoom is only functional when the map is aligned with the vehicle position
(the function key
with the symbol).
Traffic signs
First read and observe the introductory information given on page 54.
The system provides the option to display traffic signs
B
» Fig. 32 on page 55 in
the information display and on the unit screen that are:
› stored in the navigation data of the maps;
› recognised by the camera.
The information given by traffic signs that are recognized by the front camera al- ways takes precedence over stored navigation data.
If the Traffic signs split screen is not switched on, only one traffic sign is dis-
played on the unit screen.
Switching on the traffic sign display function » page 53.
Home address entry
First read and observe the introductory information given on page 54.›
In the navigation main menu, press → Manage memory → Define home ad-
dress .
If the home address has not been entered, an input window is displayed with the following message:
Please select as your home address: your current position or a new address.
The following function keys are displayed:
› Current position
- Entry of the home address via the acquisition of the current
location;
› Address
- Enter the home address in writing » page 60
Description of the adjustment or deletion process of the home address » page 54.
Extra window
Introduction
This chapter contains information on the following subjects:
Menus in the extra window
57
Audio
57
Compass
58
Man.
58
Traffic signs / Traffic
58
GPS
59
Map
59
First and foremost, pay attention to the safety instructions » page 4 , Important
notes .
1)
Display of elevation requires the reception of signals from at least five satellites. Route guidance
must not be running in demo mode.
56Navigation
Page 59 of 90
 Columbus Navigation System Manual Menus in the extra windowFirst read and observe the introductory information given on page 56.
Additional information is displayed in the extra window depending on the context
of the selected menu.
Sw")
Menus in the extra windowFirst read and observe the introductory information given on page 56.
Additional information is displayed in the extra window depending on the context
of the selected menu.
Switching on
›
In the navigation main menu, press NAV
or
›
in the Navigation main menu, press .
→ Split screen
The last opened split screen is displayed.
Switching off
›
In the navigation main menu, press NAV
or
›
in the additional window on
press
or
›
in the Navigation main menu, press .
→ Split screen
Menus in the split screen:
■ Audio - Playback operation of the currently selected audio source » page 57
■ Compass - Displays the current vehicle location in relation to the compass direc-
tions » page 58
■ Man. - Displays the next or following navigation instructions (manoeuvres), the
next POIs or an intersection detail » page 58;
■ Traffic signs - Displays traffic signs that are stored in the navigation data of the
maps or that are recognised by the front camera » page 58
■ GPS - Displays the geographical coordinates of the current vehicle loca-
tion » page 59
■ Map - Map display » page 59.
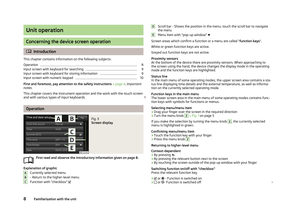
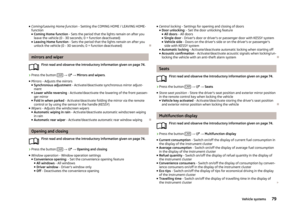
AudioFig. 33
Split screen: Audio
First read and observe the introductory information given on page 56.
In the Audio split screen, the playback of the currently selected audio source can
be operated » page 24.
Function keyActionOperation/PressChanging the station
/Press
playback / pause: the play
function is stopped in the
current position and the
symbol changes to - af-
ter pressing again, the
play function will contin-
ue from this position.Press briefly (within
5 seconds of the start of playback of the track)Plays the previous track
from the startPress briefly (5 seconds after the start of play- back of the track)Plays the current track
from the startPress button for a long period of time a)Fast-reverse of the track
57Description of the navigation system
Page 60 of 90
 Columbus Navigation System Manual Function keyActionOperationPress brieflyPlays the next track from
the startPress button for a long period of time a)Fast-forward of the tracka)
The longer the button is pressed, the faster the f")
Function keyActionOperationPress brieflyPlays the next track from
the startPress button for a long period of time a)Fast-forward of the tracka)
The longer the button is pressed, the faster the fast forward/reverse.
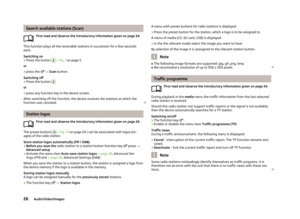
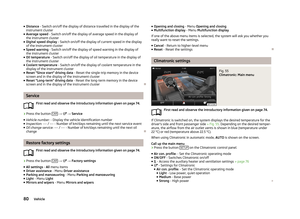
Compass
Fig. 34
Split screen: Compass
First read and observe the introductory information given on page 56.
The
Compass split screen displays the current vehicle position in relation to the
compass.
Man.
Fig. 35
Split screen: Manoeuvre
First read and observe the introductory information given on page 56.
The Man. extra window displays a navigation announcement (manoeuvre).
Displayed information: › When approaching the manoeuvre area (e.g., junction), details of the navigation
instruction are displayed in the split screen. Once you have passed this area, the
unit displays information on the next navigation instructions again;
› The street name and number for the current vehicle position and the three fol-
lowing directions for the navigation instructions, along with street names and numbers;
› Distance and time to the city with the following navigation instruction including
numeric indication of the remaining distance;
› Information about the next points of interest (e.g., fuel stations, car parks).
Traffic signs / Traffic
Fig. 36
Split screen: Traffic signs
First read and observe the introductory information given on page 56.
The
Traffic split screen displays traffic signs.
Up to 3 traffic signs and 3 additional traffic signs can be displayed in the extra window.
If the message No traffic sign available. are displayed in the split screen, the
front camera did not recognise any traffic sign or you are outside the range of the
navigation data.
Further information » page 56.
58Navigation
Page 61 of 90
 Columbus Navigation System Manual GPSFig. 37
Split screen: GPS
First read and observe the introductory information given on page 56.
The GPS split screen displays information on the current geographical position of
the vehicle.
Displ")
GPSFig. 37
Split screen: GPS
First read and observe the introductory information given on page 56.
The GPS split screen displays information on the current geographical position of
the vehicle.
Displayed information
■ - Longitude 1)
■ - Latitude 1)
■ - Elevation 2)
■ Satellites: - Number of received/available satellites
Map
Fig. 38
Split screen: MapFirst read and observe the introductory information given on page 56.
An additional map is displayed on the Map split screen.
Map options
■ - Context-dependent change in the map orientation
■ 2D map display - the map rotates and the direction of travel arrow
C
» Fig. 32
on page 55 points to the top of screen, or the north is aligned with the top
edge of the screen, and the arrow
C
shows the direction of travel
■ 3D map view -the direction of travel arrow
C
points to the top of the screen
(if the map scale is larger than 100 km, the map is aligned to the north).
■ - Route display (the scale of the map is adjusted to the route length)
■ - 2D - current vehicle position in the 2D map display
■ - 3D - current vehicle position in the 3D map display
■ - Displays the manually set map scale
■ - Displays the automatic map scale
■ - Switches on autozoom during route guidance. Active autozoom is indicated
by a green symbol. If Autozoom is active, the map scale will change automatical-
ly depending on the route travelled (motorway trip: large map scale - city: small
map scale)
1)
To view the information on the longitude and latitude of the current vehicle position display requires
the reception of GPS signals from at least three satellites.
2)
Display of elevation requires the reception of GPS signals from at least five satellites. Route guidance must not be running in demo mode.
59Description of the navigation system
Page 62 of 90
 Columbus Navigation System Manual Navigation
Enter new destination
Introduction
This chapter contains information on the following subjects:
Input destination possibilities
60
Address
60
Map
61
First and foremost, pay attention to")
Navigation
Enter new destination
Introduction
This chapter contains information on the following subjects:
Input destination possibilities
60
Address
60
Map
61
First and foremost, pay attention to the safety instructions » page 4 , Important
notes .
Input destination possibilities
Fig. 39
Destination entry options
First read and observe the introductory information given on page 60.
Explanation of graphic
Address » page 60
POI » page 63
in the map » page 61
Select the menu with the option to enter a destination » Fig. 39.
›
In the navigation main menu, press
→ Options →
press
or
ABC› in the Navigation main menu, press .
→ New dest./stopover → Options →
press
or›
in the Navigation main menu, press .
→ Other POIs → Options → .
Make sure that the destination has been entered correctly, for example, by check-
ing that the destination is displayed in the map. Some names of places and other
destinations can occur at several places.
Address
Fig. 40
Destination entry by address
First read and observe the introductory information given on page 60.
Explanation of graphic Country
City / town
Street
Enter building number (the function key is enabled only after the street has
been entered)
Enter junction (the function key is enabled only after the street has been en-
tered)
Return to the higher-level menu
Delete characters in the entry line
Switch to letters » page 9
Switch to special characters
Input a junction (crossroads)
ABCDE60Navigation
Page 63 of 90
 Columbus Navigation System Manual Confirmation of text entered into the entry lineOpen the map display » page 61›
In the navigation main menu, press
→ Options → Address
or
›
in the Navigation main menu, press . ")
Confirmation of text entered into the entry lineOpen the map display » page 61›
In the navigation main menu, press
→ Options → Address
or
›
in the Navigation main menu, press .
→ New dest./stopover → Options →
Address
or
›
in the Navigation main menu, press .
→ Other POIs → Options → Address .
Some address positions are already pre-filled with the data of the last destina-
tion.
The pre-filled positions can be adjusted by touching the item and then adjusting
it in the input screen » page 9.
To start navigation, you need to enter country, city and street.
The information is entered step by step in individual input screens.
When entering the street, instead of a street name, it is possible to select thecentre of the entered city by touching Centre. Then it is no longer necessary to
enter the house number or junction.
When entering the address, the function key Map is displayed on the input
screen » page 9 . When you press the function key, the system opens a screen
with the map » page 61 where you can specify the address more precisely or
check it.
You need to enter both the building number and a further address indicator in the form of a number. The device displays a list of destinations found from combina-
tions of the two numbers.
If the entered house number was not found, a menu opens to clarify the destina-
tion:
■ No house number - Enter an address without a house number and display a
menu with destination details
■ Nearest house number: - Confirmation of the proposed house number
■ Enter junction - Open a menu with junctions with the selected street
If the address is entered correctly, destination details are displayed » page 73.
MapFig. 41
Destination entry in the map
First read and observe the introductory information given on page 60.
›
In the navigation main menu, press
→ Options → On map
or
›
in the Navigation main menu, press .
→ New dest./stopover → Options → On
map
or
›
in the Navigation main menu, press .
→ Other POIs → Options → On map .
Entry on the map is also used for entering the search area for POIs » page 63.
›
In the navigation main menu, press
→ Other POIs → Search area → Select
on map → Edit .
The destination can be entered on the map by using the GPS coordinates or the crosshairs » Fig. 41 .
GPS coordinates
The travel destination can be entered using latitude and longitude (GPS coordi-
nates).
Press the function key with the latitude or longitude value for the point to display a menu with the option to focus in. The reference can be set with the function
key with the symbol
/
. Touch the screen outside the function keys to display
a basic menu for entering points on the map.
61Navigation
Page 64 of 90
 Columbus Navigation System Manual The crosshairs shift to the coordinates entered so that the entered destination
position can be checked.
Crosshairs
The crosshairs indicate the position of the pre-filled address.
Drag the desired des")
The crosshairs shift to the coordinates entered so that the entered destination
position can be checked.
Crosshairs
The crosshairs indicate the position of the pre-filled address.
Drag the desired destination to the centre of the crosshairs on the map with your
finger.
Touch the map with your finger to move the point of contact in the crosshair
while adjusting the latitude and longitude valuesfor the entered point.
The symbol displays the current map scale. This can be changed while the
entry is being made » page 55.
The bottom of the screen displays the address or the longitude and latitude of
the selected item.
Confirm target
Confirm the destination by touching OK. Then the following items are displayed:
■ Store as - Store the destination in the destination memory » page 9
■ Edit - Return to the main menu with the option to input a destination » page 60
■ Route opts. - Display a menu for setting the route parameters » page 53
■ Start - Route calculation starts with subsequent selection of route type and
route guidance or with guidance according to the preferred route type
Map zoom in / out
by pressing the function key
the map goes to full screen display
by pressing the function key
the map is displayed on a split screen along with
the menu for the entry using the GPS coordinates.
Entry of saved destinations
Introduction
This chapter contains information on the following subjects:
My destinations
62
Home address
63
Own destination (vCard)
63First and foremost, pay attention to the safety instructions » page 4 , Important
notes .
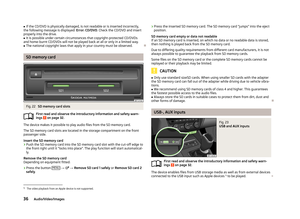
My destinations
Fig. 42
My destinations menu
First read and observe the introductory information given on page 62.
The menu is used to select the type of destinations stored in the unit memo-
ry » Fig. 42 .
›
In the navigation main menu, press
→ Dests. and contacts →
press
or
›
in the Navigation main menu, press .
→ Last destinations →
.
Destinations lists Last destinations
Destination memory (stored destinations and flag destinations)
Favourites
List of contacts with stored addresses 1)
(the phone must be connected via
Bluetooth ®
» page 41 )
Confirm one of the menu items of dests. and contacts to display the following: ■ Find - The function key is displayed if more than 5 entries exist. Touch to start
the search for a destination or a contact by the name stored in the destination
menu » page 9
■ - Detailed information on the destination or contact
1)
This function is only supported by some telephones.
62Navigation