Page 25 of 90
1)
A2DP and AVRCP are Bluetooth®
profiles that support multimedia functions.
23Unit settings
Page 26 of 90
 Columbus Navigation System Manual Audio/Video/Images
Radio
Operation
Introduction
This chapter contains information on the following subjects:
Mainmenu
24
List of available stations
25
Search for radio stations and store
25
Search")
Audio/Video/Images
Radio
Operation
Introduction
This chapter contains information on the following subjects:
Mainmenu
24
List of available stations
25
Search for radio stations and store
25
Search available stations (Scan)
26
Station logos
26
Traffic programme
26
Station information DAB)
27
First and foremost, pay attention to the safety instructions » page 4 , Important
notes .
The device allows analogue radio reception of FM and AM frequency ranges as
well as DAB digital radio reception.
Radio reception DAB allows multiple stations to be transmitted in a single fre-
quency in the form of a so-called ensemble. It also allows for the transmission of
additional data and information (e.g. messages, sport, weather, warnings, etc.).
Note
■ Car parks, tunnels, tall buildings or mountains can interfere with the radio signal
even causing it to fail completely.■
In countries where the RDS function is not supported sufficiently, we recom-
mend turning off the AF and RDS settings. Otherwise, these settings can affect
the functionality of the radio.
■
For vehicles with window antennas, if the windows have foil stuck to them or
metal-coated stickers this may cause you to experience some interference.
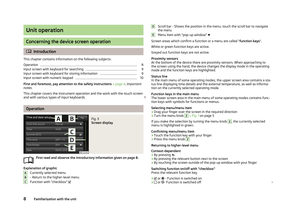
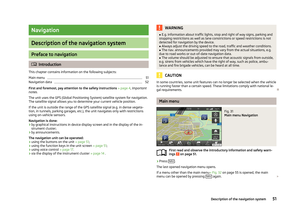
MainmenuFig. 14
Radio: Main menu
First read and observe the introductory information given on page 24.
Information and function keys » Fig. 14
The selected radio station (frequency or identifier)
Station keys
Storage groups of the preset buttons Choice of radio range (FM / AM / DAB)
List of available stations » page 25
manual / semi-automatic station search » page 25
Changing channels either in the list of available stations or the station but-
tons depending on the settings of the menu Arrow buttons: » page 27 ,
Settings
Radio settings
Information for radio station (DAB) » page 27
For each broadcasting range (FM / AM / DAB) there are 18 preset buttons to store
the radio stations. These preset buttons are divided into three memory groups.
Call up the main menu
›
Press the button RADIO.
Choose broadcasting range
›
Press the button RADIO repeatedly.
or
›
Press the function button
D
» Fig. 14 , and select the desired range.
ABCD
24Audio/Video/Images
Page 27 of 90
 Columbus Navigation System Manual Information symbols in the displaySymbolMeaningTraffic information station Traffic information signals are not available or the selected station
is not a traffic information station�")
Information symbols in the displaySymbolMeaningTraffic information station Traffic information signals are not available or the selected station
is not a traffic information station RDS function is switched off (FM) AF Alternative frequency is switched off (FM)
List of available stations
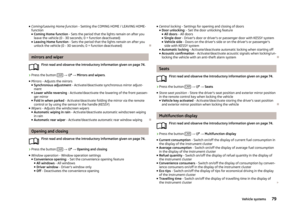
Fig. 15
Example, the list of available stations: FM / DAB
First read and observe the introductory information given on page 24.
All stations with sufficient reception, which is available at the given location, are in the list of available stations. The device examines these stations automatical-
ly.
Show stations list
›
Press the function key in the radio main menu
.
Information symbols in the display
SymbolMeaningRadio station from the list of available stations, which is stored un- der a preset buttonCurrently selected radio stationTraffic information station (e.g.)Type of program being broadcast (FM)SymbolMeaning (e.g.)Type the regional broadcast (FM)Signal is not available (DAB)Radio stations with picture representation (slideshow) (DAB)
Update station list
The station list is continually updated automatically.
Sorting types of radio stations in the station list (FM) › Alphabet
- alphabetical order according to station name
› Group
- Sort by transmitted-type program
Search for radio stations and store
First read and observe the introductory information given on page 24.
A radio station can also be searched and stored under a preset button as follows.
Automatic station search
Automatically set stations are in the list of available stations.
Semi-automatic station search
›
In the radio menu press
.
›
The function key
or
.
The device scans the broadcasting range until the first available station is tuned.
Manual station search
›
In the radio menu press
.
›
The desired station using the function keys with the symbols
/
or adjusted
by moving the slider across the screen.
Store radio stations under a preset button
›
Press and hold the desired station in the list of available stations. (A list of sta- tion keys
B
» Fig. 14 on page 24will be displayed).
›
Press the station button
B
where you want to save the desired station.
or
›
set the desired radio stationmanually or semi-automatically.
›
Press and hold the desired station button
B
until you hear an acoustic signal.
You can switch between memory groups of individual preset buttons using the
function keys
C.
25Radio
Page 28 of 90
 Columbus Navigation System Manual Search available stations (Scan)First read and observe the introductory information given on page 24.
This function plays all the receivable stations in succession for a few seconds
each.
Switching on")
Search available stations (Scan)First read and observe the introductory information given on page 24.
This function plays all the receivable stations in succession for a few seconds
each.
Switching on
›
Press the button
2
» Fig. 1 on page 5
or
›
press the → Scan button.
Switching off
›
Press the button
2
or
›
press any function key in the device screen.
After switching off the function, the device receives the stations at which the
function was canceled.
Station logos
First read and observe the introductory information given on page 24.
The preset buttons
(B
» Fig. 14 on page 24 ) can be associated with logos (im-
ages) of the radio station.
Store station logos automatically (FM / DAB)
›
Before you save the radio station to a station button function key
press →
Advanced setup
›
Activate the menu item Auto-save station logos » page 28 , Advanced Set-
tings (FM) and » page 28 , Advanced Settings (DAB) .
When you save the station to a station button, the station is assigned a logo from the device memory if the logo is available in the memory.
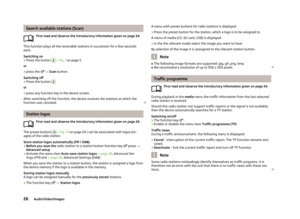
Storing station logos manually
A logo can be assigned manually for the previously stored stations.
›
The function key
→ Station logos
A menu with preset buttons for radio stations is displayed.›
Press the preset button for the station, which a logo is to be assigned to.
A menu of media (CD, SD card, USB) is displayed.
›
In the the relevant madia select the image you want to have.
By selection of the image it is assiagned to the relevant station button.
Note
■ The following image formats are supported: jpg, gif, png, bmp.■We recommend a resolution of up to 500 x 500 pixels.
Traffic programme
First read and observe the introductory information given on page 24.
During playback in the media menu the traffic information from the last selected
radio station is received.
Should this radio station not support traffic reports or the signal is not available,
then the device automatically searches for a TP station.
Switching on/off
›
The function key
.
›
Enable or disable the menu item Traffic programme (TP)
Traffic news
During a traffic announcement, the following menu is displayed:
›
Cancel - interruption of the current traffic report. The TP function remains acti-
vated.
›
Deactivate - Exit the current traffic report and turn off TP function.
Note
Some radio stations misleadingly identify themselves as traffic programs. It is
therefore not an error with the unit that there is no traffic news with these sta-
tions.
26Audio/Video/Images
Page 29 of 90
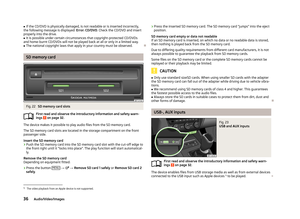
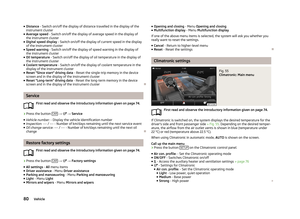
 Columbus Navigation System Manual Station information DAB)Fig. 16
Station information
First read and observe the introductory information given on page 24.
DAB allows the transmission of various additional information. The display op")
Station information DAB)Fig. 16
Station information
First read and observe the introductory information given on page 24.
DAB allows the transmission of various additional information. The display op-
tions for this informationcan be adjusted on the screen in the following menu.
›
Press RADIO
→ DAB
.
■ Preset list - Display only stored DAB stations
■ Station info. - Displays DAB station information, accompanying text (radio text)
and images (e.g., artist name or programme and image type where these are broadcast)
■ Radio text - Displays one radio text
■ Slideshow - Displays one image; the image will switch to full-screen view until
you switch the screen back on by moving your hand towards it.
Note
If you touch the screen in the area where the accompanying text (radio text) is
displayed, the screen will only display this information. If you touch the screen in
the area of the displayed image, only images will be displayed on the screen.
Radio settings
Introduction
This chapter contains information on the following subjects:
Settings
27
Advanced Settings (FM)
28
Advanced Settings (DAB)
28
First and foremost, pay attention to the safety instructions » page 4 , Important
notes .
The basic setting of the radio functions is the same for all broadcast ranges. The
Advanced setup menu is different for FM and DAB. The AM broadcast area does
not have this menu.
Settings
First read and observe the introductory information given on page 27.
›
Press the button RADIO
→
.
Basic setting ■ Sound - Sound setup » page 20, Sound settings
■ Scan - Auto-play all stations in the current frequency band, each station for
around five seconds.
■ Arrow buttons: - Set the station select function in the Radio menu
■ Preset list - only switch preset radio stations - Preset buttons
■ Station list - Switches all radio stations currently in range for the selected fre-
quency band
■ Traffic programme (TP) - Switches traffic programme on/off
■ Delete presets - Deletes the stored stations (preset buttons)
■ - Delete a certain radio station (preset button)
■ Delete all - Deletes the stored stations (preset buttons)
■ Station logos - manual assignment of station logos » page 26
■ Radio text - Switching the text display radio (FM and DAB) on and off
■ Advanced setup - another setting that is different depending on the selected
broadcasting range(FM and DAB)
27Radio
Page 30 of 90
 Columbus Navigation System Manual Advanced Settings (FM)First read and observe the introductory information given on page 27.
Advanced Settings for FM broadcasting range
■ Advanced setup
■ Alternative frequency (AF) - Switching o")
Advanced Settings (FM)First read and observe the introductory information given on page 27.
Advanced Settings for FM broadcasting range
■ Advanced setup
■ Alternative frequency (AF) - Switching on/off the search for alternative fre-
quencies of the station currently being heard, when you turn off AF off is dis-
played on the device screen
■ Radio Data System (RDS) - Switches on/off the RDS function
■ RDS Regional: - Switch on/off the automatic tracking of related regional sta-
tions
■ Fixed - Maintains the selected regional station continuously. When the sig-
nal is lost, another regional station must be set manually.
■ Automatic - Auto-selects the station with the best reception at the mo-
ment. If you lose reception the region, the unit will automatically set anoth-
er available region.
■ Auto-save station logos - Auto save the station logo according to the PI code
of the radio station » page 26
Advanced Settings (DAB)
First read and observe the introductory information given on page 27.
Advanced settings for the DAB broadcasting range
■ Advanced setup
■ DAB traffic announcements - Switch on/off DAB announcements
■ Other DAB announcements - Switch on/off other announcements (e.g., warn-
ings, regional weather, sports reports, financial news)
■ DAB - DAB station tracking - Switch on/off automatic DAB station tracking in
other station groups
■ Automatic DAB - FM switching - Switch on/off auto-switching from DAB to
the FM frequency band if the DAB signal is lost
■ L-Band - Switch on/off the automatic DAB station search in L-band
■ Auto-save station logos - Automatic association of the logo with station de-
tected » page 26
DAB programme tracking
If a DAB station is a member of several sender groups, when the signal is poor,
the same station is searched in a different sender group.
Auto-change DAB -FM
If the DAB signal is poor, the unit will try to find a corresponding FM station for the DAB station you are currently listening to.
For auto-change to work, the DAB and FM stations must send a sender ID.
› While the station is being received on the FM band, (
) is displayed after the
station name. The () marker disappears when the relevant DAB station can be received again .
› If a DAB station is also not available in the FM band due to poor reception, the
device will be switched to mute.
› If you do not want automatic station change (e.g. when driving through tunnels,
when reception may be lost temporarily), you can deactivate this function.
L-band
For the DAB radio reception in different countries, different frequency ranges are used. In some countries the DAB radio reception only in the so-called L-band.
› If you have any problems with the DAB wireless reception it is necessary to en-
sure that the DAB Automatic tuning in L-band is on.
› If no L-band DAB radio reception is possible in the country then it is better to
leave this menu item turned off. The channel scan is therefore faster.
28Audio/Video/Images
Page 31 of 90
 Columbus Navigation System Manual Media
Operation
Introduction
This chapter contains information on the following subjects:
Main menu
29
Title / folder list
30
Track/folder database
30
Playback
31
Media settings
31
First and foremo")
Media
Operation
Introduction
This chapter contains information on the following subjects:
Main menu
29
Title / folder list
30
Track/folder database
30
Playback
31
Media settings
31
First and foremost, pay attention to the safety instructions » page 4 , Important
notes .
You can use the unit to play audio and video files in different formats » page 32,
connect different signal source types, or store audio files in the internal memory
of the Jukebox.
When the signal source has been connected, the device starts to automatically play audio files in alphabetical order.
Types of device operation » page 8 .
› On the device via the operating elements.
› Using the function keys on the device screen.
› Using the Maxi DOT display.
Main menuFig. 17
Media: Main menu
First read and observe the introductory information given on page 29.
Call up the main menu
›
Press the button
MEDIA.
Explanation of graphic Information for the current file (e.g., artist, track title)selected source / display of the album image 1)
(cover art), with only your fin-
ger over the surface of the function key, you can scroll the album list
Display of the playing time / remaining time and the playing time axis is pos- sible within the track (file) by moving the slider or by touching the desired lo-
cation on the time axis
Signal source selection
Track/folder list
Media settings » page 31
Select input source
The function key menu
D
» Fig. 17 .
CD/DVD - Changes to a CD/DVD in the player » page 35
SD card 1 - Changes to a memory card inserted in SD 1 » page 36
SD card 2 - Changes to a memory card inserted in SD 2 » page 36
USB - Changes to a data medium connected to the USB input » page 36
iPod - Changes to an iPod (iPhone, iPad) connected at the USB in-
put » page 36
ABCD1)
So long as this is in the Gracenote ®
database or part of the file is being played (ID3 tag).
29Media
Page 32 of 90
 Columbus Navigation System Manual AUX - Changes to an external audio source connected to the AUX in-
put » page 36
BT audio - Changes to a Bluetooth ®
player » page 35
Jukebox - Changes to the Jukebox » page 34
Title / fo")
AUX - Changes to an external audio source connected to the AUX in-
put » page 36
BT audio - Changes to a Bluetooth ®
player » page 35
Jukebox - Changes to the Jukebox » page 34
Title / folder list
Fig. 18
Track/folder list
First read and observe the introductory information given on page 29.
Menu display
›
The function key .
Explanation of graphic Displays the folder structure, function keys of higher-level folders
Change to track/folder database » page 30
Play the source or folder selected
Play the tracks in the source or folder selected in random order
Repeat playback of the source or folder selected Auto-play function for 10 seconds » page 31
Where the source is SD card 1, SD card 2 or USB 1 , you can change between Fold-
er display or Database display.
It is only possible to change the display of the basic overview of the files/folders
for the source concerned. The status line
A
shows the source currently selected.
ABNote■
In the title / folder list a maximum of 1000 files / folders are displayed alphabet-
ically.■
If the file format is not supported by the unit or the file is damaged and cannot
be played the title / folder list displays a struck-through icon.
Track/folder database
Fig. 19
Track/folder database
First read and observe the introductory information given on page 29.
The unit is capable of classifying files according to the information in the ID3 tag file properties into the various categories of Database.
Explanation of graphic Displays the folder structure, function keys of higher-level foldersChange to track/folder database » page 30
Play the source or folder selected Auto-play function for 10 seconds » page 31
Where the source is SD card 1, SD card 2 or USB 1 , you can change between Fold-
er display or Database display.
It is only possible to change the display of the basic overview of the files/folders
for the source concerned. The status line
A
shows the source currently selected.
By pressing the function key with the symbol is a
Database or a list of titles /
folders displayed in the currently selected track will be played.
AB30Audio/Video/Images


 Columbus Navigation System Manual 1)
A2DP and AVRCP are Bluetooth®
profiles that support multimedia functions.
23Unit settings")