Page 17 of 90
 Columbus Navigation System Manual Buttons and wheels of the Navigation menuButton /
wheel » Fig. 10ActionFunction1PressInterrupt current navigation announcement1Turn upwardsIncrease volume of navigation announcements1Turn downwardsR")
Buttons and wheels of the Navigation menuButton /
wheel » Fig. 10ActionFunction1PressInterrupt current navigation announcement1Turn upwardsIncrease volume of navigation announcements1Turn downwardsReduce volume of navigation announcements2Press brieflyRepeat or clarify the last navigation announcement or confirm a menu item in the list of recent destinations2Turn upwardsShow the option to stop navigation or display the list of recent destinations2Turn downwards3Press brieflyReturn to a previous level in the menu3Press and hold buttonReturn to Main MenuNote■
The buttons and wheels on the multifunction steering wheel will also be lit if
the ignition and the side light are switched on.
Voice control
Introduction
This chapter contains information on the following subjects:
Function requirements
15
Switching on/off
16
Help for voice control
16
Operation
17
not recognizing a voice command
17
Correction possibility of a voice command input
17
Stop/restore voice command input
17
Not in the help voice commands
17
First and foremost, pay attention to the safety instructions » page 4 , Important
notes .
Some equipment functions can be operated using voice commands. Thus, the use
of the device is accelerated and increased comfort while driving.
Voice control can be used in the Radio, Media , Telephone and Navigation menus.
The voice control system can be operated either by the driver or by the front pas-
senger.WARNING■ Please pay attention to the traffic first and foremost! As the driver you are
fully responsible for road safety. Only use the system so that you are in full
control of your vehicle in every traffic situation - risk of accident!■
Do not use the voice control system when under stress or in an emergency.
Your voice commands may not be recognized in such situations. The tele-
phone connection may not be established or the connection may take too
much time to complete. The emergency number should be dialled manually!
Function requirements
First read and observe the introductory information and safety warn-ings
on page 15.
Function requirements for voice control.
The ignition is switched on.
The unit is switched on.
No phone call is in progress.
The parking aid is not active.
15Unit operation
Page 18 of 90
 Columbus Navigation System Manual Requirements for optimum voice command recognition.
› Only give voice commands when the symbol is displayed on the device screen
or in the information display.
› Speak with a normal tone of v")
Requirements for optimum voice command recognition.
› Only give voice commands when the symbol is displayed on the device screen
or in the information display.
› Speak with a normal tone of voice without intonation and excessive pauses.
› Avoid a bad pronunciation.
› Close doors, windows and the sliding roof, in order to prevent external distur-
bances affecting recognition of the voice commands.
› It is recommended to speak louder at higher speeds, so that the tone of your
voice is louder than the increased surrounding noise.
› During voice control, limit additional noise in the vehicle, e.g. passengers talking
at the same time.
CAUTION
For some languages, there is no voice control available. This device indicates this
fact through a text message that is displayed after setting the device languagescreen » page 19 .
Note
■
During voice control, no navigation announcements and traffic announcements
are played.■
Some voice commands must be spelled out when pronouncing depending on
the selected language of communication, such as the Source Selection “ SD” card
one .
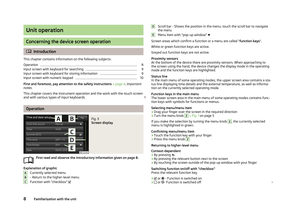
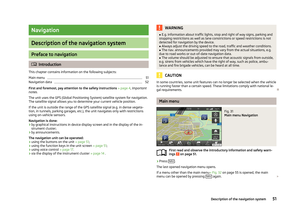
Switching on/off
Fig. 11
Multifunction steering wheel
First read and observe the introductory information and safety warn-
ings on page 15.
Switching on voice control
› Briefly press the button
VOICE on the unit.
› Briefly press the symbol key
1
on the multifunction steering wheel.
Activation of voice control is indicated by an acoustic signal and the device screen
will display a collection of basic voice commands for the current menu.
The menu display as well as the acoustic signal can be enabled or disa-
bled » page 22 .
Switching off voice control › Press the button
VOICE
on the unit for a long time, or press it twice.
› With a long or double press the symbol key
on the multifunction steering
wheel.
› Touch the screen with your fingers (any part of the screen with the exception of
the function key
).
› Press a button on the unit (with the exception of brief pressing of the button
VOICE
).
› Utter the voice command
Cancel voice control.
Help for voice control
First read and observe the introductory information and safety warn-ings
on page 15.
Start introduction
When you give the voice command Start tutorial, the unit plays one of the seven
parts of the voice control tutorial.
Individual parts of the introduction can be called separately by the saying the voice command Introduction part ... and the number 1 through 7.
Help
When you give the voice command Help, the unit displays a menu containing pos-
sible context depedent voice commands. In some cases after repeating the voice command help another part of the help is reproduced with a menu of possible
voice commands.
The help does not contain all possible commands.
16Familiarization with the unit
Page 19 of 90
 Columbus Navigation System Manual OperationFirst read and observe the introductory information and safety warn-
ings
on page 15.
The voice control system can usually be operated through the method “ say what
you see. ”
Speak the")
OperationFirst read and observe the introductory information and safety warn-
ings
on page 15.
The voice control system can usually be operated through the method “ say what
you see. ”
Speak the description of the function keys highlighted in green. For example, the function key select no. can be accessed via the voice command “ select number”.
Voice control settings » page 22.
Icons in the voice control menu
a voice output is played
a voice command is awaited
a voice command entry is stopped » page 17
a voice command is recognized
It is not necessary to wait for the end of message playback when the system is
playing a voice output. The message can be ended by briefly pressing the VOICE
button or the symbol key
on the multifunction steering wheel. This cancels
voice output and causes the system to wait for a new voice command.
not recognizing a voice command
First read and observe the introductory information and safety warn-
ings
on page 15.
If a voice command is not recognised, the system answers with Pardon? and you
can give a new command.
If the system does not recognise the second voice command, the help message is provided again and you can give a new command.
If the system does not recognise the third voice command, the system plays theVoice control cancelled message and the dialogue is ended.
Correction possibility of a voice command input
First read and observe the introductory information and safety warn-ings
on page 15.
A voice command can be corrected, modified or re-entered by pressing the VOICEbutton on the unit or the symbol key
on the multifunction steering wheel.
However, this is only possible if the symbol appears.
You do not have to wait until the voice command is recognized by the system.
Stop/restore voice command input
First read and observe the introductory information and safety warn-ings
on page 15.
In some menus, the procedure for entering voice commands can be stopped by
turning the knob
2
» Fig. 1 on page 5.
The symbol displayed on the unit screen or in the information display then
changes from to
up
.
Restore entry
› by pressing the function key
;
› by pressing the button
VOICE
on the unit;
› Press the symbol key
on the multifunction steering wheel.
Not in the help voice commands
First read and observe the introductory information and safety warn-
ings
on page 15.
Voice commands to call control menus, folders and directories in each menu.
FunctionVoice commandReturn to the higher-level menu
backScroll through the menu / list / di-
rectory
next pageprevious pagefirst pagelast page 17Unit operation
Page 20 of 90
 Columbus Navigation System Manual Voice commands for navigation parametersFunctionVoice commandSwitch navigation announce-
ments on/offTurn on navigation promptsTurn off navigation promptsSwitch navigation guidance assis-
ted by TMC t")
Voice commands for navigation parametersFunctionVoice commandSwitch navigation announce-
ments on/offTurn on navigation promptsTurn off navigation promptsSwitch navigation guidance assis-
ted by TMC traffic messages on or
offTurn on dynamic route
Turn on dynamic navigationTurn off dynamic route
Turn off dynamic navigationSwitch traffic sign display in the
unit screen on/off » page 56Show traffic signs in mapTurn off traffic sign in mapShow or hide lane guidance in the
unit screen » page 69Turn on lane guidanceTurn off lane guidanceShow or hide favourites icons in
the mapView favoritesTurn off favorites
Voice commands for querying route information
FunctionVoice commandInformation concerning distance
to the destinationRemaining distanceInformation concerning time of ar-
rival at destinationArrival timeInformation about the travel time
to the destinationDriving time
Voice commands for the symbols in the Settings menu for map display
SymbolVoice commandMap “2 D ”Map “3 D ”Map with elevationsDestination mapOverview map
Voice commands for the symbols to operate the map display
SymbolVoice commandOrientation zoomPosition mapSymbolVoice commandAutozoomScale ... > Meter | Kilometer | Yards | Miles
e.g. Scale five kilometres
You can define the target address in one step by speaking the city, the street and
the house number. The navigation data must contain the house number.
The house number and a further address supplement in the form of a number canbe said where necessary. The system will then offer the number combination it
has found if the house number and the further address supplement, where ap-
propriate, exists in the street entered.
18Familiarization with the unit
Page 21 of 90
 Columbus Navigation System Manual Unit settings
Setup menu
Introduction
This chapter contains information on the following subjects:
Main menu
19
Sound settings
20
Screen settings
20
Time and date settings
21
Keyboard settings
21
A")
Unit settings
Setup menu
Introduction
This chapter contains information on the following subjects:
Main menu
19
Sound settings
20
Screen settings
20
Time and date settings
21
Keyboard settings
21
Additional keypad language settings
21
Unit settings
21
Voice control settings
22
Restore factory settings
22
Bluetooth ®
settings
22
First and foremost, pay attention to the safety instructions » page 4 , Important
notes .
This chapter covers the basic settings of the device. Additional settings are described in the individual menus ■ Radio » page 27
■ Media » page 31
■ DVD video » page 39
■ Images » page 40
■ Telephone » page 43
■ Navigation » page 52
■ Vehicle system settings » page 74
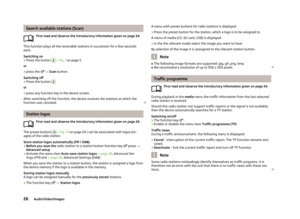
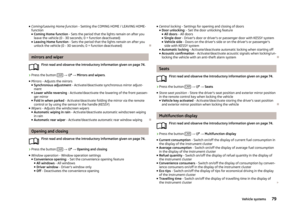
Main menuFig. 12
Unit settings: Main menu
First read and observe the introductory information given on page 19.
Call up the main menu
›
Press Menu
→ the function key with the symbol
Menus in the main menu for unit setup ■ Sound - Sound setup » page 20
■ Screen - Screen settings » page 20
■ Time and date - Time and date settings » page 21
■ Language - Set the unit language 1)
■ Keypad: - Keypad display for text entry » page 21
■ Additional keypad languages - Enables you to enter characters other than
those available for the selected language » page 21
■ Units - Unit settings » page 21
■ Voice control - Voice control settings » page 22
■ Remove SD card 1 safely - Safe removal of the SD card from slot 1
■ Remove SD card 2 safely - Safe removal of the SD card from slot 2
■ Remove USB device safely - Safe removal of USB device
■ Factory settings - Restore to factory settings » page 22
■ Bluetooth - Settings for the Bluetooth ®
function » page 22
■ System information - Displays system information
■ Device part number: ... - Part number of the unit
■ Hardware: ... - Version of the hardware used
■ Software: ... - Version of the software used
■ Navigation database: ... - Version of the navigation data
1)
The correct display of country-specific characters (e.g. ID3 tag information) cannot always be guaran-
teed.
19Unit settings
Page 22 of 90
 Columbus Navigation System Manual ■Gracenote database: ... - Multimedia database version
■ Media codec: ... - Media codec version
■ Update software - manual software upgrade
■ Copyright - Information on licences and copyri")
■Gracenote database: ... - Multimedia database version
■ Media codec: ... - Media codec version
■ Update software - manual software upgrade
■ Copyright - Information on licences and copyrights are only available in English
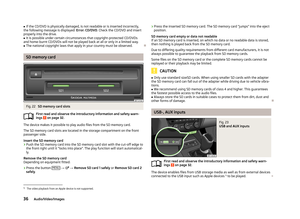
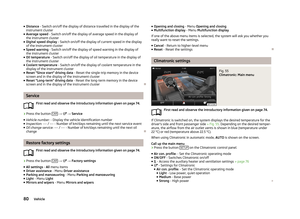
Sound settings
Fig. 13
Sound settings / Balance - fader settings
First read and observe the introductory information given on page 19.
›
Press the button Menu
→
→ Press Sound .
■ Volume - Volume settings
■ Traffic report - Sets the volume for the traffic program alerts (TP)
■ Nav. announcements - Sets the volume of the navigation announcements
■ Voice control - Sets the volume for the voice control
■ Maximum switch-on volume - Sets the maximum volume after switching on
■ Speed-dependent volume adjustment - Speed-dependent volume increase
■ Telephone - Sets the telephone volume
■ iPod volume - Sets the volume for the connected iPod
■ Quiet - Low volume
■ Medium - Medium volume
■ Loud - High volume
■ AUX volume - Sets the volume for the device connected through AUX
■ Quiet - Low volume
■ Medium - Medium volume
■ Loud - High volume
■
Bluetooth audio - Sets the volume of the Bluetooth ®
device connected
■ Quiet - Low volume
■ Medium - Medium volume
■ Loud - High volume
■ Audio lowering: - Setting the reduction of the volume when the park distance
control is active ■ Off - switches off
■ Weak - weak reduction
■ Medium - medium input sensitivity
■ Strong - strong reduction
■ Bass - Mid - Treble - Sets the bass, mid and treble
■ Balance - Fader - Sets the balance between left and right, front and rear
■ Confirmation tone - Switch on/off confirmation tone when a function key is
pressed
■ No navigation sound during call - Switches on or off the navigation prompts
during a telephone conversation
■ Subwoofer - Subwoofer volume settings
■ CANTON advanced setup - Setup of the Canton®
-Sound system
■ Select equaliser sound - Equaliser settings
■ Music - Sound ranges adjusted for listening to music
■ Speech - Subwoofer operation is suppressed to highlight the speech sound
range
■ Sound focus: - Set the sound perception for different zones in the vehicle in-
terior
■ Off - Settings apply to the whole vehicle
■ Front - Optimised setting for the front seat occupants
■ Driver - Optimised setting for the driver
■ CANTON surround - virtual Canton®
-surround system (active during media
playback)
Screen settings
First read and observe the introductory information given on page 19.
›
Press the button Menu
→
→ Screen
20Familiarization with the unit
Page 23 of 90
 Columbus Navigation System Manual ■Switch off screen (in 10 seconds) - Activate/deactivate energy-saving mode for
the display 1)
■ Brightness: - Adjusts the brightness of the screen
■ Brightest - brightest level
■ Brighter")
■Switch off screen (in 10 seconds) - Activate/deactivate energy-saving mode for
the display 1)
■ Brightness: - Adjusts the brightness of the screen
■ Brightest - brightest level
■ Brighter - brighter level
■ Medium - medium level
■ Darker - darker level
■ Darkest - darkest level
■ Confirmation tone - Switch on/off confirmation tone when a function key is
pressed
■ Animation when finger near screen - Switches on or off hiding of the bottom
menu bar
■ Show clock in standby mode - Time and date displayed on the screen when the
ignition is switched on and the unit is switched off
Time and date settings
First read and observe the introductory information given on page 19.
›
Press the button Menu
→
→ Time and date
■ Clock time source: - Type of time settings
■ Manual - Manual setting
■ GPS - Take the values from the GPS signal received
■ Time: - Time settings
■ Summer (DST) - Switches the summer time setting on/off
■ Time zone: - Select the time zone
■ Time format: - Set the time format
■ 12h
■ 24h
■ Date: - Date settings
■ Date format: - Set the date format
■ DD.MM.YYYY - Day - Month - Year
■ YYYY-MM-DD - Year - Month - Day
■ MM-DD-YYYY - Month - Day - Year
Keyboard settings
First read and observe the introductory information given on page 19.›
Press the button Menu
→ → Keypad: .
■ ABC - keys arranged alphabetically
■ QWERTY - Arrangement of the keys as per the QWERTY system (in accordance
with computer keyboard arrangement)
Additional keypad language settings
First read and observe the introductory information given on page 19.
›
Press the button Menu
→
→ Additional keypad languages
In this menu, the keyboard character arrangement for the chosen language can
be selected, and with this the option for fast entry of the characters used in the
selected language.
It is then possible to swap between the languages in the input screen showing a keyboard by pressing.
» page 9
Unit settings
First read and observe the introductory information given on page 19.
›
Press the button Menu
→
→ Units
■ Distance: - Distance units
■ km - Kilometres
■ mi - Miles
■ Speed: - Speed units
■ km/h - Kilometres per hour
■ mph - Miles per hour
1)
If after 10 seconds, the screen is not activated by approaching, touching the screen or operating the
menu button
2
» Fig. 1 on page 5, the screen turns black. You can switch the display back on again
by approaching it with your hand, touching it, or operating the menu knob
2
.
21Unit settings
Page 24 of 90
 Columbus Navigation System Manual ■Temperature: - Temperature units
■ ° - Degrees Celsius
■ ° - Degrees Fahrenheit
■ Volume: - Volume units
■ l - Litres
■ gal (US) - Gallons (US)
■ gal (UK) - Gallons (UK)
�")
■Temperature: - Temperature units
■ ° - Degrees Celsius
■ ° - Degrees Fahrenheit
■ Volume: - Volume units
■ l - Litres
■ gal (US) - Gallons (US)
■ gal (UK) - Gallons (UK)
■ Consumption: - Consumption units
■ l/100km - Litres per 100 kilometres
■ km/l - Kilometres per litre
■ mpg (US) - Miles per gallon (US)
■ mpg (UK) - Miles per gallon (UK)
■ Gas consumption: - Gas consumption units
■ kg/100km - Kilograms per 100 km
■ km/kg - Kilometres per kilogram
■ m³/100km - Cubic metres per 100 kilometres
■ km/m³ - Kilometres per cubic metre
■ Pressure: - Pressure units for tyre pressure
■ kPa - Kilopascal
■ bar - bar
■ psi - Pounds per square inch
Voice control settings
First read and observe the introductory information given on page 19.
›
Press the button Menu
→
→ Voice control
■ Dialogue style: Setting the dialogue style
■ Long - Long dialogue (the system plays complete acoustic messages)
■ Short - Short dialogue (the system shortens some acoustic messages or sub-
stitutes them with an acoustic signal)
■ Display available commands - Switch on/off the menus containing basic voice
commands when voice control is activated
■ Voice control session start tone - Switch on/off the audible signal that is out-
put when voice control is activated
■ Voice control session end tone - Switch on/off the audible signal that is output
when voice control is ended
■ Input tone in voice dialogue - Switch on/off the audible signal that is output to
signal that voice control is waiting for a command
Restore factory settings
First read and observe the introductory information given on page 19.›
Press the button Menu
→ → Factory settings
■ Reset all settings and data
■ Restore factory settings - Reset all factory settings
■ Reset individual settings/data
■ Sound - Restore default settings for sound
■ Radio - Restore default settings for radio
■ Vehicle - Restore default settings for the vehicle systems
■ Telephone - Restore default settings for phone
■ Media - Restore default settings for media
■ Voice control - Restore default settings for voice control
■ Navigation - Restore default settings for navigation
■ System - Restore the system default settings
Bluetooth ®
settings
First read and observe the introductory information given on page 19.
›
Press the button Menu
→
→ Bluetooth
■ Bluetooth - Switch on/off Bluetooth ®
function
■ Visibility: - Switch on/off the visibility of the Bluetooth ®
device for other devices
■ Visible - Visibility is always on
■ Hidden - Visibility is off
■ At start-up - Turns on visibility for 5 minutes after switching on the ignition or
until the driving speed has exceeded 5 km/h
■ Name: - Open the input screen with keyboard - Chang the device name
■ Paired devices - Display the list of paired Bluetooth ®
devices; connect or delete
a paired device; delete the list of paired devices ■ Delete all - Delete all paired Bluetooth ®
devices
■ - Delete the paired Bluetooth ®
device
■ Find devices - Searches for available external devices with enabled Bluetooth ®
functions and activated visibility » page 45
■ Bluetooth audio (A2DP/AVRCP) - Switch on/off the connection option for Blue-
tooth ®
profiles A2DP and AVRCP 1)
22Familiarization with the unit