Page 9 of 90
Call up the main menu›Press the button MENU.
Adjusting volume
First read and observe the introductory information given on page 5.
Increase the volume
›
Turn the knob to the right.
Reduce the volume
›
Turn the knob to the left.
Muting
›
Set the volume to 0 using the knob.
Note
■
The change in volume is displayed on the screen of the unit.■The following symbol appears in the display when the sound is muted : .■
High volumes can cause sound resonance in the vehicle.
■
The car speakers may be damaged if the volume is set too loud or is distorted.
■
The loudspeakers in the vehicle are designed for a power output of the device
of 4x20 W.
■
When equipped with a sound system the speakers are matched for a total pow-
er amplifier output of 570 W.
7Introductory information
Page 10 of 90
 Columbus Navigation System Manual Unit operation
Concerning the device screen operation
Introduction
This chapter contains information on the following subjects: Operation
8
Input screen with keyboard for searching
9
Input screen w")
Unit operation
Concerning the device screen operation
Introduction
This chapter contains information on the following subjects: Operation
8
Input screen with keyboard for searching
9
Input screen with keyboard for storing information
9
Input screen with numeric keypad
10
First and foremost, pay attention to the safety instructions » page 4 , Important
notes .
This chapter covers the instrument operation and the work with the touch screen and with various types of input keyboards.
Operation
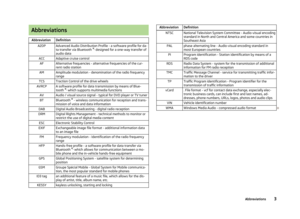
Fig. 3
Screen display
First read and observe the introductory information given on page 8.
Explanation of graphic
Currently selected menu
- Return to the higher-level menu
Function with “checkbox”
ABCScroll bar - Shows the position in the menu; touch the scroll bar to navigate
the menu
Menu item with “pop-up window”
Screen areas which confirm a function or a menu are called “ function keys”.
White or green function keys are active.
Greyed out function keys are not active.
Proximity sensors
At the bottom of the device there are proximity sensors. When approaching to
the screen using the hand, the device changes the display mode in the operating
mode and the function keys are highlighted.
Status line
In the main menu of some operating modes, the upper screen area contains a sta-
tus line displaying time details and the external temperature, as well as informa- tion on the currently selected operating mode.
Function keys in the main menu
The lower screen area in the main menu of some operating modes contains func-
tion keys with symbols for functions or menus.
Selecting menu/menu item
› Drag your finger over the screen in the required direction
› Turn the menu knob 2
» Fig. 1 on page 5
If you make the selection by turning the menu knob
2
, the currently selected
menu is highlighted in green.
Confirming menu/menu item
› Touch the function key with your finger
› Press the menu knob
2
Returning to higher-level menu
Context-dependent
› By pressing
› By pressing the relevant button next to the screen
› By touching the screen outside of the pop-up window with your finger
Switching function on/off with “checkbox” Press the relevant function key
›
or
- Function is switched on
›
or
- Function is switched off
DE8Familiarization with the unit
Page 11 of 90
 Columbus Navigation System Manual Set value› by touching the function keys with the symbols
/ , / , - / +
› Touch or move your finger over the scale
Note
For some menus or menu items, the current setting is display")
Set value› by touching the function keys with the symbols
/ , / , - / +
› Touch or move your finger over the scale
Note
For some menus or menu items, the current setting is displayed, e.g.
Distance:km
or Distance: mi .
Input screen with keyboard for searching
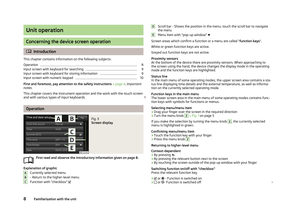
Fig. 4
Input screen for the search
First read and observe the introductory information given on page 8.
The input screen with keypad is used to find entries in the unit memory (e.g.
phone contacts, addresses, etc.).
By pressing the keyboard function key on the input screen the required character
appears in text line
A.
Only those letters or symbols making up a logical entry will be available. Do not
forget to enter a space for terms made up of more than one word, such as Lorem Ipsum. The entries can be entered without special characters (diacritics).
A search of the most relevant terms ensues as soon as letters are entered, so it is
not necessary to enter the entire entry name.
In addition to the text line
A
, the number of matching entries is shown in the
function key
B
.
The numbers 1-99 indicate the quantity of matching entries that were found. If
even more entries were found, ** is indicated instead of a number. If less than 6
entries were found, a list of the found entries opens automatically.
Description of the function keys
- Return to the higher-level menu
- Display the menu with selected contacts, information on the number of rel-
evant contacts
- Delete characters in the entry line
- Toggle upper case to lower case and vice versa
- Menu display with keys in the selected language, including diacrit- ics » page 21
- Switch to numbers and special characters - Switch to special characters
- Switch to letters
- Blank entry
- Confirmation of the text written in the command line or using C
to start
finding a stored entry
Input screen with keyboard for storing information
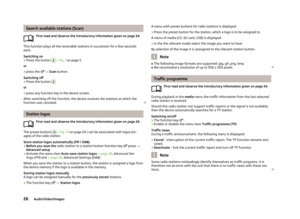
Fig. 5
Input screen for storing
First read and observe the introductory information given on page 8.
For the entry procedure and the description of the function keys, see » page 9,
Input screen with keyboard for searching .
The input screen with keyboard is used for free text entry (e.g. for entering a
name).
If there is already an entry in the text line
A
, it can be edited before storing.
›
The entry is stored in the unit memory by pressing the function key
B
.
›
The function buttons with the symbols are used to move the cursor within
the text line.
9Unit operation
Page 12 of 90
 Columbus Navigation System Manual Input screen with numeric keypadFig. 6
Input screen with numeric keypad
First read and observe the introductory information given on page 8.
The input screen with keypad is used for number input.
")
Input screen with numeric keypadFig. 6
Input screen with numeric keypad
First read and observe the introductory information given on page 8.
The input screen with keypad is used for number input.
- Input screen in the Phone menu » page 48.
- Input screen in the Navigation menu » page 60
Operation through the MAXI DOT display
Introduction
This chapter contains information on the following subjects:
Operate with the control lever buttons
10
Operation with the buttons and wheels on the multifunction steering wheel - Audio
11
Operation with the buttons and wheels on the multifunction steering wheel - Telephone
13
Operation with the buttons and wheels on the multifunction steering wheel -
Navigation
14First and foremost, pay attention to the safety instructions » page 4 , Important
notes .
Some of the device's features are also displayed in the MAXI DOT display 1)
. De-
pending on the equipment, these features can be operated as follows:
■ with the control lever
■ With the buttons and wheels on the multifunction steering wheel
Operate with the control lever buttons
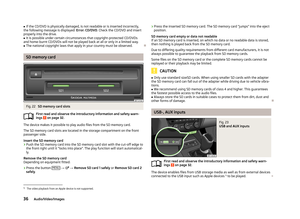
Fig. 7
Buttons on the control lever
First read and observe the introductory information given on page 10.
The separate menus and menu items displayed in the MAXI DOT display can be
operated as follows with the buttons on the control lever.
Press and hold - open main menu
Press briefly - select individual menu items or menus
Press briefly - select menu item or menu
AAB1)
The display in the MAXI DOT is described in the » Manual , chapter Information system
10Familiarization with the unit
Page 13 of 90
 Columbus Navigation System Manual Operation with the buttons and wheels on the multifunction steering wheel - AudioFig. 8
Multifunction steering wheel - Audio menu
First read and observe the introductory information given on page 10.")
Operation with the buttons and wheels on the multifunction steering wheel - AudioFig. 8
Multifunction steering wheel - Audio menu
First read and observe the introductory information given on page 10.
The Maxi DOT display the menu
Audio displayed menu items can be operated
with the buttons / dials on the multifunction steering wheel.
The information shown on the instrument cluster display (depending on the
menu selected)
■ Radio
■ current frequency band of the radio station;
■ currently playing station of receivable radio stations in the given frequency
band if less than 5 are receivable;
■ if more than 5 stations can be received, a list of receivable radio stations is
displayed with an option to choose one of them;
■ TP traffic announcements.
■ Media/DVD video
■ NameButtons and wheels of the Radio or Media menus/DVD videoButton /
wheel
» Fig. 8ActionFunctionRadioMediaDVD video1Press brieflyChange source (change frequency bands and connected sources)1Press and hold buttonSwitch between the Radio and Media or DVD video menus and open the last context status (e.g. the last radio station or track to be played)a)2Press brieflySwitch off/on tone b)Switch off sound and stop track playback or switch on sound and continue track
playback2Turn upwardsIncrease volume of the current source c)2Turn downwardsLower volume of the current sourcec)3
Press briefly
Go to the next saved radio station in
the station list
or go to the station stored in the preset listd)
Interrupt traffic report
Skip to next track a)Skip to next chapter e)
3Press and hold buttonStop traffic reportFast forwarda)
11Unit operation
Page 14 of 90
 Columbus Navigation System Manual Button /wheel
» Fig. 8ActionFunctionRadioMediaDVD video4
Press briefly
Go to the previous stored radio station in the station list
or go to the station stored in the preset list
Interrupt traffic rep")
Button /wheel
» Fig. 8ActionFunctionRadioMediaDVD video4
Press briefly
Go to the previous stored radio station in the station list
or go to the station stored in the preset list
Interrupt traffic reportGo to the previous track when pressed within 5 s from the change of track,
and to the beginning of the track when pressed 5 s after track change a)
Skip to start of chaptere)
4Press and hold buttonStop traffic reportFast rewind5PressStop traffic reportNo function5
Turn upwardsDisplay list of available stations
Scroll upwardsGo to the previous track when pressedwithin 5 s from the change of track,
and to the beginning of the track when pressed 5 s after track change a)
Skip to start of chaptere)
5Turn downwardsDisplay list of available stations
Scroll downwardsSkip to next track a)Skip to next chapter e)6Press brieflyReturn to a previous level in the menu6Press and hold buttonReturn to Main Menua)
Does not apply for AUX.
b)
The sound is turned on again by pressing wheel
2
or turning wheel
2
. Playback of navigation announcements is not turned off.
c)
If the system plays audible messages in voice mode dialogues of the device, the volume of the audible message is affected.
d)
Context-dependent selection.
e)
Applies to DVD video. Operation through the multifunction steering wheel works only if the
Audio menu is selected in the information display of the instrument cluster.
Note■
The buttons and wheels on the multifunction steering wheel will also be lit if
the ignition and the side light are switched on.■
For safety reasons, the video display is switched off at speeds over 5 km/h. The
unit continues to play the soundtrack.
12Familiarization with the unit
Page 15 of 90
 Columbus Navigation System Manual Operation with the buttons and wheels on the multifunction steering wheel - TelephoneFig. 9
Multifunction steering wheel - Phone menu
First read and observe the introductory information given on page")
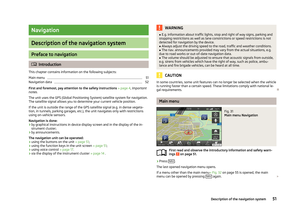
Operation with the buttons and wheels on the multifunction steering wheel - TelephoneFig. 9
Multifunction steering wheel - Phone menu
First read and observe the introductory information given on page 10.›
In the main menu of the instrument cluster information display select the menu
point Telephone
Buttons and wheels of the Phone menuButton / wheel
» Fig. 9ActionFunction1Press brieflyMUTE1Turn upwardsIncrease the volume1Turn downwardsReduce the volume2Press brieflyAccept call, end call, entry in the main menu of the telephone, call list, call the dialled contact2Press and hold buttonReject call, redial last call3Turn up/downCall list, previous/next menu item3Press brieflyConfirm selected menu item4Press brieflyReturn to a previous level on menu4Press and hold buttonReturn to Main MenuFunction of the phone calls in the instrument cluster display
Depending on the context, the following functions can be carried out in the in-strument cluster display:
Incoming call
■ Answer - Answer a call
■ Reject - Reject a call
■ Ignore - Ignore a call
Outgoing call
■ Stop - End a callCurrent call
■ Hang up - End a call
■ Mic. off - Microphone off
■ Mic. on - Microphone on
Symbols in the instrument cluster displaySymbolMeaningCharge status of the telephone battery a)Signal strengtha)
13Unit operation
Page 16 of 90
 Columbus Navigation System Manual SymbolMeaningA phone is connected to the unitMissed calls (if there are several missed calls, the number ofcalls is shown next to the symbol)a)
This function is only supported by some telephones")
SymbolMeaningA phone is connected to the unitMissed calls (if there are several missed calls, the number ofcalls is shown next to the symbol)a)
This function is only supported by some telephones.
Call list
Only the call list can be displayed and used in the instrument cluster display.
The following message appears in the instrument cluster display if there are no
entries in the call list: No entries available.
The following symbols are displayed next to each entry in the call list.SymbolMeaningIncoming callOutgoing callMissed call
Note
■
The buttons and wheels on the multifunction steering wheel will also be lit if
the ignition and the side light are switched on.
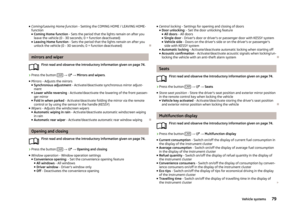
Operation with the buttons and wheels on the multifunction steering wheel - Navigation
Fig. 10
Multifunction steering wheel - Navigation menu
First read and observe the introductory information given on page 10.
›
In the main menu of the instrument cluster information display select the menu
point
Navigation
Navigation is in progress
Graphical navigation instructions and other route and destination information are
displayed.
Navigation is not in progress
A compass/vehicle icon is shown to display the current vehicle position in relation to the compass.
Turn setting wheel 2
» Fig. 10 on the multifunction steering wheel to display the
Last destinations menu.
The menu shows the Home address menu item and a list of recent destinations.
When you select one of the menu items, the destination name and the following
items are displayed:
■ OK - Start navigation
■ Cancel - Return to the Navigation menu – the compass/vehicle symbol will be
displayed
If the home address is not defined when the menu item Home address is selec-
ted, the following message appears: Please enter the home address on the info-
tainment system.
14Familiarization with the unit


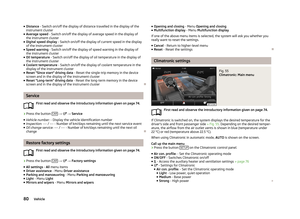


 Columbus Navigation System Manual Call up the main menu›Press the button MENU.
Adjusting volume
First read and observe the introductory information given on page 5.
Increase the volume
›
Turn the knob to the right.
Reduce")