2013 SKODA OCTAVIA change time
[x] Cancel search: change timePage 6 of 57

Introductory information
Important notes
Introduction
This chapter contains information on the following subjects:
Declaration of conformity
4
Component protection
4
These operating instructions describe all possible equipment variants without
identifying them as special equipment, model variants or market-dependent
equipment.
Consequently, this vehicle does not need to contain all of the equipment compo-
nents described in these operating instructions.
The level of equipment of your vehicle refers to your purchase contract of the ve-
hicle. More information is available from the ŠKODA 1)
Partner where you bought
the vehicle.
Please note that these instructions are meant only as an addendum to the infor- mation presented in the Owner's Manual of your vehicle. Therefore, they can be used only in conjunction with the latest manual for this vehicle. For a detailed de-
scription of some functions listed in these instructions, see the Vehicle Manual
for your vehicle.
The illustrations can differ in minor details from your device; they are only inten-
ded for general information.
WARNING■ Concentrate fully at all times on your driving! As the driver you are fully re-
sponsible for the operation of your vehicle.■
Only use the device in a way that you are in full control of your vehicle in ev-
ery traffic situation – there is the risk of accidents!
WARNING (Continued)■ Adjust the volume to ensure that acoustic signals from outside, e.g. sirens
from vehicles which have the right of way, such as police, ambulance and fire
brigade vehicles, can be heard at all time.■
High volumes can cause hearing damage.
Declaration of conformity
First read and observe the introductory information and safety warn-
ings
on page 4.
ŠKODA AUTO a.s. hereby declares that the ŠKODA Infotainment systems meet the
basic requirements and additional provisions of Directive 1999/5/EC.
Component protection First read and observe the introductory information and safety warn-
ings
on page 4.
Some electronic control units are factory-equipped with component protection.
The component protection was developed as a protection mechanism for:
› impairment of factory- or garage-fitted control units after installation in another
vehicle (for example, after a theft);
› impairment of components operated outside of the vehicle;
› the possibility of a legitimate installation or change of control units for repairs
at a ŠKODA 1)
specialist garage.
When component protection is enabled, the following message appears on the display of the device Component theft protection: the infotainment system is
not fully available at present. Please switch on the ignition.
If the component protection does not activate by switching on the ignition,
please contact a ŠKODA specialist garage.
1)
Terms used » manual , chapter Preface.
4Introductory information
Page 10 of 57
Device operation
operate via the device screen
Introduction
This chapter contains information on the following subjects:
Operation
8
Input screen with keyboard
9
Input screen with numeric keyboard
9
First and foremost, pay attention to the safety instructions » page 4 , Important
notes .
This chapter covers the instrument operation and the work with the touch screen and with various types of input keyboards.
Operation
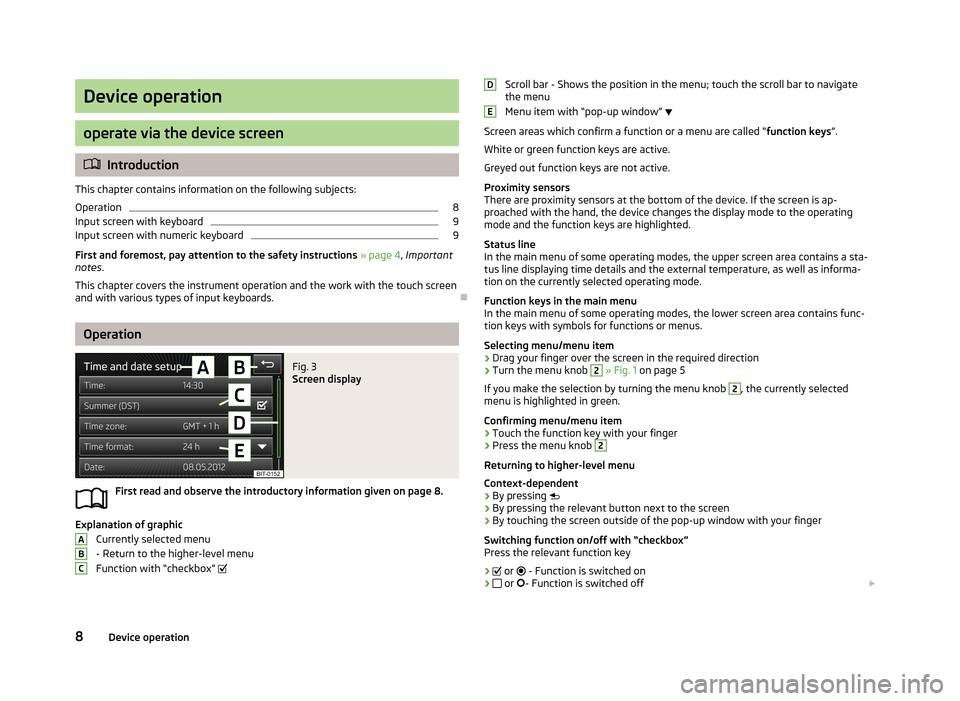
Fig. 3
Screen display
First read and observe the introductory information given on page 8.
Explanation of graphic
Currently selected menu
- Return to the higher-level menu
Function with “checkbox”
ABCScroll bar - Shows the position in the menu; touch the scroll bar to navigate
the menu
Menu item with “pop-up window”
Screen areas which confirm a function or a menu are called “ function keys”.
White or green function keys are active.
Greyed out function keys are not active.
Proximity sensors
There are proximity sensors at the bottom of the device. If the screen is ap- proached with the hand, the device changes the display mode to the operating
mode and the function keys are highlighted.
Status line
In the main menu of some operating modes, the upper screen area contains a sta-
tus line displaying time details and the external temperature, as well as informa- tion on the currently selected operating mode.
Function keys in the main menu
In the main menu of some operating modes, the lower screen area contains func-
tion keys with symbols for functions or menus.
Selecting menu/menu item
› Drag your finger over the screen in the required direction
› Turn the menu knob 2
» Fig. 1 on page 5
If you make the selection by turning the menu knob
2
, the currently selected
menu is highlighted in green.
Confirming menu/menu item
› Touch the function key with your finger
› Press the menu knob
2
Returning to higher-level menu
Context-dependent
› By pressing
› By pressing the relevant button next to the screen
› By touching the screen outside of the pop-up window with your finger
Switching function on/off with “checkbox” Press the relevant function key
›
or
- Function is switched on
›
or
- Function is switched off
DE8Device operation
Page 28 of 57
Media
Operation
Introduction
This chapter contains information on the following subjects:
Main menu
26
Track/folder list
27
Playback
27
Media settings
27
First and foremost, pay attention to the safety instructions » page 4 , Important
notes .
The device allows you to play audio files in various formats » page 28 and to
connect different signal source types.
When the signal source has been connected, the device starts to automatically
play audio files in alphabetical order.
Types of device operation » page 8 .
› On the device with the operating elements.
› Using the function keys on the unit screen
› Via the Maxi DOT display.
Main menu
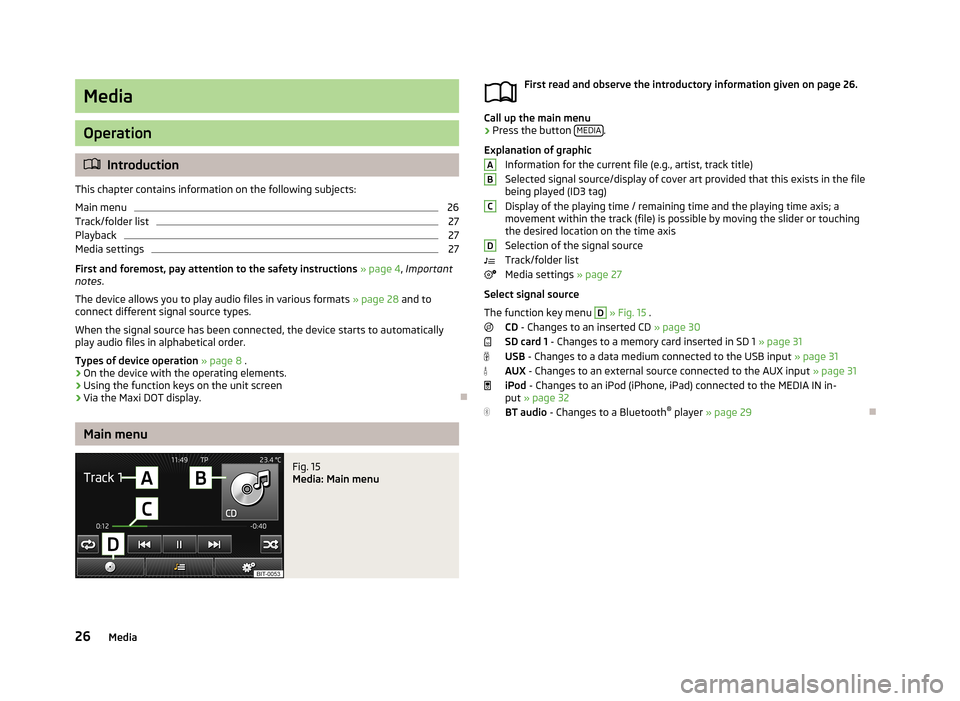
Fig. 15
Media: Main menu
First read and observe the introductory information given on page 26.
Call up the main menu
›
Press the button
MEDIA.
Explanation of graphic Information for the current file (e.g., artist, track title)Selected signal source/display of cover art provided that this exists in the file being played (ID3 tag)
Display of the playing time / remaining time and the playing time axis; a
movement within the track (file) is possible by moving the slider or touching
the desired location on the time axis
Selection of the signal source
Track/folder list
Media settings » page 27
Select signal source
The function key menu
D
» Fig. 15 .
CD - Changes to an inserted CD » page 30
SD card 1 - Changes to a memory card inserted in SD 1 » page 31
USB - Changes to a data medium connected to the USB input » page 31
AUX - Changes to an external source connected to the AUX input » page 31
iPod - Changes to an iPod (iPhone, iPad) connected to the MEDIA IN in-
put » page 32
BT audio - Changes to a Bluetooth ®
player » page 29
ABCD26Media
Page 48 of 57

Range (if the estimated range is less than 300 km, the vehicle starts to ap-
proach the symbol: )
Vehicle representation (the zones of the vehicle are shown in different col- ours, corresponding to any warning messages that occur. The warning mes-
sages are displayed once you touch vehicle)
■ Driving data - Display travel data » Fig. 26
You can display one of three trip memories on the screen:
■ Since start - Driving data for the individual trip
■ Long-term - Long-term driving data
■ Since refuelling - Data since last refuelling
Change between the individual travel data storage locations with
/
.
■ Convenience consumers - Displays up to three devices which use the largest
share of fuel and displays the fuel consumption required to run all conv. con- sumers » Vehicle Owner's Manual , chapter Commercial driving and environmen-
tal compatibility
■ Vehicle status - Displays vehicle status » Fig. 26 or tyre pressure monitoring in-
formation
■ Vehicle status - Displays vehicle status information
■ /
- No message/warning messages relating to vehicle status or number
of messages (if there is only one message, one warning message text is dis-
played)
■ - Display information about the status of the START-STOP system
■ TPMS - function of the tire pressure monitor » Fig. 27
■ SET - Start a new calibration process
Switch between the individual menus with
/
.
Note
For more information on the warning messages concerning the vehicle status and
information on the START-STOP system, see the » Vehicle Owner's Manual .FGAuxiliary heater and ventilationFig. 28
Auxiliary heater: Main menu/set preset time
First read and observe the introductory information given on page 44.
Press the button CAR/SETUP on the Climatronic unit
→
.
Set-up Departure time: Day and time when the vehicle is to be ready foruse » Fig. 28
Heating/ventilation: Set the operating mode Select the preset time, switch off the preset time
Set the preset times 1 to 3 and the duration (10 - 60 minutes)
When the heating or ventilation is running, the windows are highlighted in red or blue
Note
■ Only one preset time can be active. The activated preset time will be deactiva-
ted again after it has started automatically. For the next start, activate one of the preset times.■
In the selection of the day in the preset time, there is an option between Sun-
day and Monday without the specified day. If this setting is made, the vehicle will
be ready for use at the selected time, regardless of the current day.
■
The system in operation switches off on expiration of the operating duration or
can be deactivated by pressing the direct on/off icon or by using the radio re-
mote control.
■
If a different time is set » page 19, time and date settings , the activated preset
time is automatically deactivated. The preset time must be reactivated.
ABCDE46Vehicle systems
Page 50 of 57
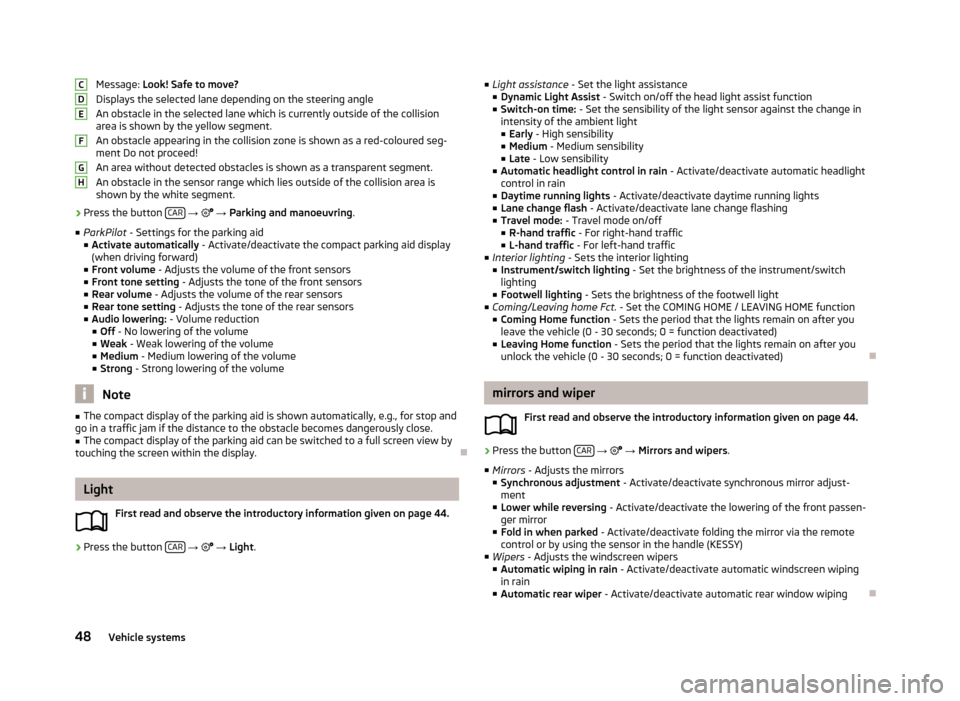
Message: Look! Safe to move?
Displays the selected lane depending on the steering angle An obstacle in the selected lane which is currently outside of the collisionarea is shown by the yellow segment.
An obstacle appearing in the collision zone is shown as a red-coloured seg- ment Do not proceed!
An area without detected obstacles is shown as a transparent segment.
An obstacle in the sensor range which lies outside of the collision area is shown by the white segment.›
Press the button CAR
→ → Parking and manoeuvring .
■ ParkPilot - Settings for the parking aid
■ Activate automatically - Activate/deactivate the compact parking aid display
(when driving forward)
■ Front volume - Adjusts the volume of the front sensors
■ Front tone setting - Adjusts the tone of the front sensors
■ Rear volume - Adjusts the volume of the rear sensors
■ Rear tone setting - Adjusts the tone of the rear sensors
■ Audio lowering: - Volume reduction
■ Off - No lowering of the volume
■ Weak - Weak lowering of the volume
■ Medium - Medium lowering of the volume
■ Strong - Strong lowering of the volume
Note
■
The compact display of the parking aid is shown automatically, e.g., for stop and
go in a traffic jam if the distance to the obstacle becomes dangerously close.■
The compact display of the parking aid can be switched to a full screen view by
touching the screen within the display.
Light
First read and observe the introductory information given on page 44.
›
Press the button CAR
→
→ Light .
CDEFGH
■
Light assistance - Set the light assistance
■ Dynamic Light Assist - Switch on/off the head light assist function
■ Switch-on time: - Set the sensibility of the light sensor against the change in
intensity of the ambient light
■ Early - High sensibility
■ Medium - Medium sensibility
■ Late - Low sensibility
■ Automatic headlight control in rain - Activate/deactivate automatic headlight
control in rain
■ Daytime running lights - Activate/deactivate daytime running lights
■ Lane change flash - Activate/deactivate lane change flashing
■ Travel mode: - Travel mode on/off
■ R-hand traffic - For right-hand traffic
■ L-hand traffic - For left-hand traffic
■ Interior lighting - Sets the interior lighting
■ Instrument/switch lighting - Set the brightness of the instrument/switch
lighting
■ Footwell lighting - Sets the brightness of the footwell light
■ Coming/Leaving home Fct. - Set the COMING HOME / LEAVING HOME function
■ Coming Home function - Sets the period that the lights remain on after you
leave the vehicle (0 - 30 seconds; 0 = function deactivated)
■ Leaving Home function - Sets the period that the lights remain on after you
unlock the vehicle (0 - 30 seconds; 0 = function deactivated)
mirrors and wiper
First read and observe the introductory information given on page 44.
›
Press the button CAR
→
→ Mirrors and wipers .
■ Mirrors - Adjusts the mirrors
■ Synchronous adjustment - Activate/deactivate synchronous mirror adjust-
ment
■ Lower while reversing - Activate/deactivate the lowering of the front passen-
ger mirror
■ Fold in when parked - Activate/deactivate folding the mirror via the remote
control or by using the sensor in the handle (KESSY)
■ Wipers - Adjusts the windscreen wipers
■ Automatic wiping in rain - Activate/deactivate automatic windscreen wiping
in rain
■ Automatic rear wiper - Activate/deactivate automatic rear window wiping
48Vehicle systems
Page 51 of 57
Opening and closingFirst read and observe the introductory information given on page 44.›
Press the button CAR
→ → Opening and closing .
■ Window operation - Window operation settings
■ Conven. opening: - Set the convenience opening feature
■ All windows - All windows
■ Driver window - Driver's window only
■ Off - Deactivates the convenience opening
■ Central locking - Settings for opening and closing of doors
■ Door unlocking: - Set the door unlocking feature
■ All doors - All doors
■ Single door - Driver's door or driver's or passenger door with KESSY system
■ Vehicle side - Doors on the driver's side or on the driver's or passenger's
side with KESSY system
■ Automatic locking - Activate/deactivate automatic locking when starting off
■ Acoustic confirmation - Activate/deactivate acoustic signals when locking/un-
locking the vehicle with an anti-theft alarm system
Seats
First read and observe the introductory information given on page 44.
›
Press the button CAR
→
→ Seats
■ Store seat position - Store the driver's seat position and exterior mirror position
in the remote control key when locking the vehicle
■ Vehicle key activated - Activate/deactivate storing the driver's seat position
and exterior mirror position when locking the vehicle
Multifunction display
First read and observe the introductory information given on page 44.
›
Press the button CAR
→
→ Multifunction display .
■
Current consumption - Switch on/off the display of current fuel consumption in
the display of the instrument cluster
■ Average consumption - Switch on/off the display of average fuel consumption
in the display of the instrument cluster
■ Refuel quantity - Switch on/off the display of refuel quantity in the display of
the instrument cluster
■ Convenience consumers - Switch on/off the display of consumption by conven-
ience consumers on/off in the display of the instrument cluster
■ Eco tips - Switch on/off the display of tips for economical driving in the display
of the instrument cluster
■ Travelling time - Switch on/off the display of travelling time in the display of
the instrument cluster
■ Distance - Switch on/off the display of distance travelled in the display of the
instrument cluster
■ Average speed - Switch on/off the display of average speed in the display of
the instrument cluster
■ Digital speed display - Switch on/off the display of current speed in the display
of the instrument cluster
■ Speed warning - Switch on/off the display of speed warning in the display of
the instrument cluster
■ Oil temperature - Switch on/off the display of oil temperature in the display of
the instrument cluster
■ Coolant temperature - Switch on/off the display of coolant temperature in the
display of the instrument cluster
■ Reset Since start driving data - Reset the single-trip memory in the device
screen and in the display of the instrument cluster
■ Reset Long-term driving data - Reset the long-term memory in the device
screen and in the display of the instrument cluster
Service
First read and observe the introductory information given on page 44.
›
Press the button CAR
→
→ Service .
■ Vehicle no.: - Display the vehicle identification number
■ Inspection: --- / --- - Number of km/days remaining until the next service event
■ Oil change service: --- / --- - Number of km/days remaining until the next oil
change
49Vehicle systems
Page 54 of 57
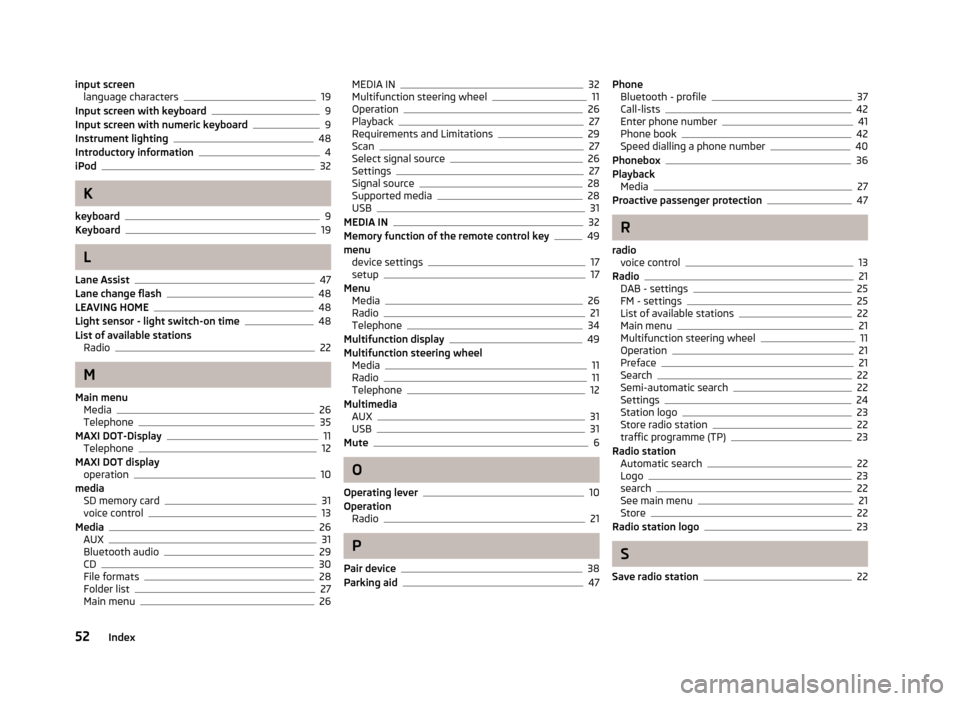
input screenlanguage characters19
Input screen with keyboard9
Input screen with numeric keyboard9
Instrument lighting48
Introductory information4
iPod32
K
keyboard
9
Keyboard19
L
Lane Assist
47
Lane change flash48
LEAVING HOME48
Light sensor - light switch-on time48
List of available stations Radio
22
M
Main menu Media
26
Telephone35
MAXI DOT-Display11
Telephone12
MAXI DOT display operation
10
media SD memory card
31
voice control13
Media26
AUX31
Bluetooth audio29
CD30
File formats28
Folder list27
Main menu26
MEDIA IN32
Multifunction steering wheel11
Operation26
Playback27
Requirements and Limitations29
Scan27
Select signal source26
Settings27
Signal source28
Supported media28
USB31
MEDIA IN32
Memory function of the remote control key49
menu device settings
17
setup17
Menu Media
26
Radio21
Telephone34
Multifunction display49
Multifunction steering wheel Media
11
Radio11
Telephone12
Multimedia AUX
31
USB31
Mute6
O
Operating lever
10
Operation Radio
21
P
Pair device
38
Parking aid47
Phone Bluetooth - profile37
Call-lists42
Enter phone number41
Phone book42
Speed dialling a phone number40
Phonebox36
Playback Media
27
Proactive passenger protection47
R
radio voice control
13
Radio21
DAB - settings25
FM - settings25
List of available stations22
Main menu21
Multifunction steering wheel11
Operation21
Preface21
Search22
Semi-automatic search22
Settings24
Station logo23
Store radio station22
traffic programme (TP)23
Radio station Automatic search
22
Logo23
search22
See main menu21
Store22
Radio station logo23
S
Save radio station
22
52Index
Page 56 of 57

ŠKODA AUTO a.s. pursues a policy of constant product and model development.We trust that you will understand that changes to models in terms of shape,equipment and engineering, may be introduced at any time. The informationabout appearance, performances, dimensions, weight, standards and functions ofthe vehicle is correct at the time of publication. Some equipment might only be
introduced at a later date, or is only offered in certain markets. Information is pro- vided by ŠKODA partners. It is therefore not possible for legal claims to be madebased on the data, illustrations and descriptions contained in this Owner's Man-
ual.Reprinting, duplicating, translating and any other use, either in whole or in part, is
not permitted without the written consent of ŠKODA AUTO a.s..
ŠKODA AUTO a.s. expressly reserves all rights relating to copyright laws.
Subject to change.
Issued by: ŠKODA AUTO a.s.
© ŠKODA AUTO a.s. 2013