Page 9 of 56

8IntroductionGeneral information on operating the unit
Introduction
Note
●Lightly pressing the buttons or briefly pressing the touchscreen is suffi-cient to operate the unit.●
It is possible that not all the functions and function buttons are availa-ble as the software of the unit responds to the specific characteristics ofeach market. A missing function button on the screen is not the result of anerror in the unit.
●
Due to country-specific legislation, certain functions cannot be selectedon the screen when the vehicle is travelling above a certain speed.
●
Using a mobile phone inside the vehicle can cause noise in the speak-ers.
●
There may be restrictions on the use of Bluetooth devices in some coun-tries. Information is available from the local authorities.
●
In some vehicles equipped with a parking distance warning system, thevolume of the audio source is automatically lowered when the gear is en-gaged.
●
If the steering wheel includes the voice control button, this function isnot viable with this radio model, hence it has no functionality whatsoever.
Rotary push knobs and buttons
Rotary/push knobs
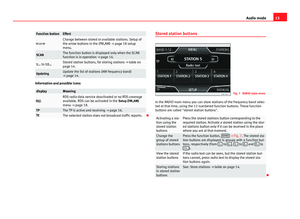
The left-hand rotary/push knob ⇒ Fig. 1
1
is referred to as the volume con-trol or the on/off switch.
The right-hand rotary/push knob ⇒ Fig. 1
4
is referred to as the settingknob.
Infotainment buttons
In these instructions, the unit's buttons are represented with the word “info-tainment button” and their function is shown inside a rectangle (for exam-ple: MEDIA infotainment button ⇒ Fig. 1.
The infotainment buttons are operated by pressing them or holding themdown.
Switching on and off
To switch the unit on or off manually, briefly press the rotary push knob ⇒ Fig. 1
1
.
When the unit is switched on the system starts up. The last active audiosource will be played with the volume set, as long this does not exceed themaximum, predefined switch-on volume ⇒ page 47.
The unit will switch off automatically when the vehicle key is removed. If youturn the unit back on after the engine has been switched off, it will turn offautomatically after approximately 30 minutes (delayed switch-off).
Note
●The unit is linked to the vehicle. It cannot be used in any other vehicle.●
If only the battery has been disconnected from the vehicle, the vehiclemust be started before turning the unit back on.
Page 10 of 56

9IntroductionAdjusting the base volumeeffectuseIncrease the vol-ume.Turn the volume control clockwise or turn the thumbwheel upwards on the multifunction steeringwheel ⇒ Booklet Instruction Manual.
Lower the vol-ume.Turn the volume control anticlockwise or the thumb-wheel downwards on the multifunction steeringwheel.
The volume modification is shown on the screen with a bar. During this timethe unit cannot be operated.
It is possible to preset certain volume settings and adjustments⇒ page 47.
Silence the unit
●
Turn the volume control anticlockwise until you see .
●
OR: Press the MUTE infotainment button or the SILENCE function button⇒ Fig. 31).
While the unit is in silence, the active media source is stopped. is dis-played on the screen.
Note
If the basic playback volume of an audio source has been increased sub-stantially, lower the volume before changing to another audio source.
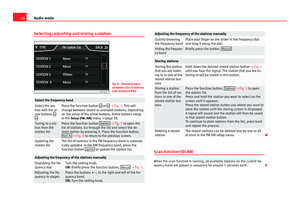
Operating the function buttons on-screenFig. 2
Standard repre-sentation: view of possi-ble function buttons
Fig. 3
Standard repre-sentation: view of possi-ble function buttons
The unit is equipped with a touchscreen ⇒ Fig. 1
3
.
The active areas of the screen that represent a function are called “functionbuttons” and are used by pressing them briefly on the display or holding
1)
According to version
Page 11 of 56

10Introductionthem down. The function buttons are represented in the instructions withthe word “function buttons” and the button symbol - - -.
Function buttons start functions or open submenus. The menu currently se-lected is shown in the submenus title line ⇒ Fig. 2
A
.
The function buttons that appear deactivated (in grey) may not be selectedat that time.
Summary of the indications and function buttonsIndications and func-tion buttonsAction and effectAThe title line shows the menu selected at that timeand, if applicable, other function buttons ⇒ Fig. 2.
BPress to open an additional menu ⇒ Fig. 2.CMove the cursor around the screen by pressinglightly, without resting your finger. Alternatively:Press the desired destination on the screen; thecursor will move to this position ⇒ Fig. 3.
DMove the control around the screen pressing light-ly, without removing your finger ⇒ Fig. 2.BACK Briefly press to return progressively to the mainmenu from a sub-menu, or to undo the changesmade.Pop-up Press briefly to open a pop-up window with addi-tional setup options. To close the pop-up windowbriefly press outside of it or select an option.
Function activated Function deactiva-ted
Some functions or instructions appear to bemarked with a checkbox, and are activated or de-activated by touching them briefly.
OKBriefly press to confirm the data entered or to se-lect.XBriefly press to close a pop-up window or a dataentry screen.+ and –Briefly press to modify the setup progressively.Summary of the indications and function buttonsIndications and func-tion buttonsAction and effectSETTINGSTo activate the setup of the menus and systems.MENUGo to menus selection.
Activating the list entries and searching through the lists
Fig. 4
Standard repre-sentation: setup menulist entries.
Select and activate the list entries with the setting knob or by pressingdirectly on the screen.
●
Search for an element in the list by turning the setting knob: each entryon the list will appear marked, one-by-one, until you find your desired entry.
●
Press the setting knob to activate the selected list entry.
Scrolling through the list
If a list contains more elements than can be viewed on the screen, a scrollbar will be shown on the right of the screen ⇒ Fig. 2
D
.
Page 12 of 56
11Introduction●Moving through a list, line-by-line: turn the setting knob.●
To quickly scan through a long list: Place your finger on the scroll markerand move it downwards over the screen without losing contact. Lift your fin-ger off the screen when you reach the desired position.
Additional information and display options
The information on the screen can vary depending on the settings and maydiffer from the descriptions shown here.
The main screens show the current time and outdoor temperature.
All information is displayed just after fully starting up the infotainment sys-tem.
Page 13 of 56

12Audio modeAudio modeRadio mode
Introduction
Note
●Multi-storey car parks, tunnels, high buildings and mountains can im-pair radio signals.●
Foil or metal-coated stickers attached to the windows may affect recep-tion on vehicles with a window aerial.
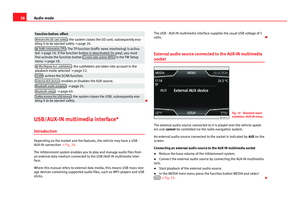
RADIO main menu
Fig. 5
Standard repre-sentation: RADIO mainmenu.
Fig. 6
Standard repre-sentation: list of stationswith a deactivated RDS.
Select frequency band and memory bank
●
Select the frequency band by pressing the RADIO infotainment button orthe function button BAND on the touchscreen.
Radio main menu function buttons
Through the saved station buttons, the station's frequency is displayed, itsname, and, in certain cases, the radio text ⇒ Fig. 5
A
. The station nameand radio text are only displayed if the RDS is available and activated.
Function buttonEffectBANDChange band and stored stations bank.STATIONSOpens the list of stored radio stations available at thattime ⇒ page 14.MANUALAllows you to select the frequency manually ⇒ table onpage 14.SETTINGSOpens the setup menu of the active frequency band (FMor AM) ⇒ page 18.
Page 14 of 56
 ⇒ page 18 setupmenu.
SCANThe function button is displayed only when")
13Audio modeFunction buttonEffect or Change between stored or available stations. Setup ofthe arrow buttons in the (FM,AM) ⇒ page 18 setupmenu.
SCANThe function button is displayed only when the SCANfunction is in operation ⇒ page 14.1... to 12...Stored station buttons, for storing stations ⇒ table onpage 14.UpdatingUpdate the list of stations (AM frequency band)⇒ page 14.
Information and possible icons
displayMeaning RDS radio data service deactivated or no RDS coverageavailable. RDS can be activated in the Setup (FM,AM)menu ⇒ page 18.
TPThe TP is active and receiving ⇒ page 16. The selected station does not broadcast traffic reports.
Stored station buttonsFig. 7
RADIO main menu
In the RADIO main menu you can store stations of the frequency band selec-ted at that time, using the 12 numbered function buttons. These functionbuttons are called "stored station buttons".
Activating a sta-tion using thestored stationbuttons
Press the stored stations button corresponding to therequired station. Activate a stored station using the stor-ed stations button only if it can be received in the placewhere you are at that moment.
Change thegroup of storedstations buttons
Press the function button, BAND ⇒ Fig. 7. The stored sta-tion buttons are displayed in groups with 4 function but-tons, respectively (from 1.. to 4.., 5.. to 8.. and 9.. to12..).
View the storedstation buttonsIf the radio text can be seen, but the stored station but-tons cannot, press radio text to display the stored sta-tion buttons again.
Storing stationsin stored stationbuttons
See: Store stations ⇒ table on page 14.
Page 15 of 56

14Audio modeSelecting, adjusting and storing a stationFig. 8
Standard repre-sentation: list of stationswith activated RDS.
Select the frequency bandSelect the sta-tion with the ar-row buttons
Press the function button or ⇒ Fig. 7. This willchange between stored or available stations, dependingon the setup of the arrow buttons. Arrow buttons setupin the Setup (FM, AM) menu ⇒ page 18.
Tuning to a sta-tion from thestation list
Press the function button Stations ⇒ Fig. 7 to open thelist of stations. Go through the list and select the de-sired station by pressing it. Press the function button,Back ⇒ Fig. 8 to return to the previous screen.
Updating thestation listThe list of stations in the FM frequency band is automat-ically updated. In the AM frequency band, press thefunction button Update to update the station list.
Adjusting the frequency of the stations manuallyDisplaying the fre-quency dialTurn the setting knob.OR: Briefly press the function button, Manual ⇒ Fig. 5.Adjusting the fre-quency in stagesPress the buttons + –, to the right and left of the fre-quency band.OR: Turn the setting knob.
Adjusting the frequency of the stations manuallyQuickly browsingthe frequency bandPlace your finger on the slider in the frequency dialand drag it along the dial.Hiding the frequen-cy bandBriefly press the button, Manual.Storing stationsStoring the stationthat you are listen-ing to in one of thestored station but-tons
Hold down the desired stored station button ⇒ Fig. 5until you hear the signal. The station that you are lis-tening to will be stored in this button.
Storing a stationfrom the list of sta-tions in one of thestored station but-tons
Press the function button, Stations ⇒ Fig. 5 to openthe station list.Press and hold the station you want to select on thescreen until it appears.Press the stored station button you where you want tostore the station until the storing screen is displayed.A signal will sound and the station will then be savedin that stored station button.To continue to store stations from the list, press backand repeat the process.
Deleting a storedstationThe stored stations can be deleted one-by-one or allat once in the FM AM setup menu.
Scan function (SCAN)
When the scan function is running, all available stations on the current fre-quency band are played in sequence for around 5 seconds each.
Page 16 of 56

15Audio modeStart stationscan functionBriefly press the setting knob.OR: Press the function button, Setup and then selectSCAN
End station scanfunctionPress the function button OFF to stop the scan functionon the station you are listening to.OR: Briefly press the setting knob. The scan function al-so ends when you manually select a station using thestored station buttons, or when a traffic report comes in.
Autostore (automatic station storing)
Hold the RADIO button down for approximately 5 seconds to carry out theautostore function for the stations that can be tuned in at the time of run-ning the Autostore. The stations are stored in the stored station buttons (on-ly the first bank of each frequency band is stored).
Note
This function can take several minutes, during which time the radio will re-main muted. In addition, any stored stations assigned previously will be de-leted.
Radio data services RDS
The RDS (Radio Data System) offers additional information in FM such as thevisualisation of the station name, automatic station tracking (AF), text emit-ted by radio (Radio Text ⇒ Fig. 5), traffic reports (TP) and programme type(PTY).
Not all units have RDS, nor do all FM stations offer this service.
Without RDS it is not possible to obtain radio data services.
Note●The broadcasting companies are responsible for the content broadcast.●
Due to infrastructure issues, RDS functions may be limited in certaincountries, and you may not be able to use traffic reports, automatic stationtracking (AF) or programme types (PTY).
●
In some cases the name of the station is too long. This text may beblocked/unblocked by pressing on the station name for 3 seconds. Twoicons will appear (wave + locked) on the right of the screen at mid height.
Station name and automatic station tracking
When the RDS is available, you can view the names of the stations provid-ing this service in the RADIO main menu and in the list of FM stations.
The FM stations send different content under one name (for example, Radio3) in various regional frequencies, provisionally or permanently ⇒ Fig. 5.
When driving, the automatic station tracking automatically changes to thefrequency that provides the best reception of the currently-selected station.However, this can interrupt the regional station currently tuned.
The automatic change of frequencies and automatic station tracking can belinked through the FM setup ⇒ page 18.