Page 153 of 319

151
Seats and storage
WARNING
● Heavy appliances or connectors (for example, adapters) which hang
down directly from the Europlug socket may damage the socket with the
resultant risk of injury.
● Ensure that appliances connected to the socket are secure to prevent
them from being thrown around the vehicle in the event of sharp braking
or an accident. This could result in severe injury or loss of life ⇒ page 16,
Storing objects.
● Never spill liquid over the power socket– there is a risk of death. If
any moisture enters the socket, ensure that it is thoroughly dry before
using.
● Improper use of the sockets or electrical accessories can lead to seri-
ous injuries or cause a fire, with the resultant risk of injury.
● Children must never be left alone in the vehicle with the engine run-
ning. They could cause an accident.
● Appliances connected to the socket do not behave in the same way as
when they are connected to the mains power supply. They may overheat
during use and cause injury.
● When using adapters and extension leads, the childproof safety de-
vice on the 230 volt socket is disconnected and the socket is live. Risk of
injury!.
● Never insert objects which conduct electricity, such as a needle, in
the pins of the 230 volt socket. There is a risk of death.
● Always switch off electrical appliances connected to the socket if the
inverter goes off as a result of overheating. Failure to comply could result
in injuries.CAUTION
● The instructions for handling appliances connected to the socket must
be observed.
● If the power consumption of the appliances connected exceeds 150
watts, the socket inverter will overheat. If the temperature exceeds a certain
value, the inverter will switch off. It may also switch off if the outside tem-
perature is very high, even if the power consumption is normal. The inverter
will switch on again automatically after it has cooled down. Appliances con-
nected to the socket, and which have been left switched on, will automati-
cally come back on ⇒
.
● Do not connect neon lamps to the socket. For technical reasons, these
could break down.
● Do not connect 115 volt appliances to the 230 volt power socket, as
they could be damaged. If you have any queries, please check the manufac-
turer's label for details of the power supply accepted by the appliance.
● With some adapters, for example for laptops, their built-in overload dis-
connection system prevents the equipment from switching on in the event
of an excessive start-up current. In this case, disconnect the adapter from
the power supply and try to reconnect after ten seconds.
Note
● Non-insulated equipment may cause interference to the radio or vehicle
electronics.
● The Europlug socket has a built-in childproof device and only carries live
current when the Europlug is correctly plugged in.
● Some appliances may not operate correctly in the absence of adequate
power (watts).
Safety FirstOperating instructionsPractical TipsTechnical Specifications
Page 154 of 319

152Seats and storage
● In some countries this socket is 115 volts. Therefore the socket should
have a different inverter installed at the factory. You can obtain retrofit kits
from your Technical Service. Do not connect 115 Volt appliances to the
230 Volt socket.
● The use of electrical equipment in the vicinity of the aerial in the rear
window may cause interference to the reception of stations broadcasting in
AM.
Compartments Overview
There are several storage compartments at various points in
the vehicle.
Your vehicle has the following storage compartments:
First-aid kit* Emergency triangle* Glove compartment⇒ page 152Storage compartment in the centre console On-board documentation compartment* Compartments in the door trims⇒ page 153Coat hooks⇒ page 153Rear shelf⇒ page 143Side storage compartment in luggage com-
partment
Some of the compartments listed are only provided in certain models or are
optional extras. Glove compartment
The lockable glove compartment is equipped with a light.
Fig. 126 Glove compart-
ment
Opening the glove compartment
– Pull the handle on the lid in the direction indicated (arrow)
⇒ Fig. 126 and open the lid.
Closing the glove compartment
– Close the lid and push it in until it engages.
If the side lights or headlights are switched on, the light in the glove com-
partment comes on when it is opened.
The lid has separate holders for a pen and a note pad.
WARNING
For safety reasons, the glove compartment must always be closed when
the vehicle is moving. Failure to do so could result in an accident.
Page 155 of 319
153
Seats and storage
Compartments in the door trim
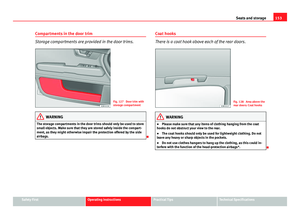
Storage compartments are provided in the door trims.
Fig. 127 Door trim with
storage compartment
WARNING
The storage compartments in the door trims should only be used to store
small objects. Make sure that they are stored safely inside the compart-
ment, as they might otherwise impair the protection offered by the side
airbags.
Coat hooks
There is a coat hook above each of the rear doors.
Fig. 128 Area above the
rear doors: Coat hooks
WARNING
● Please make sure that any items of clothing hanging from the coat
hooks do not obstruct your view to the rear.
● The coat hooks should only be used for lightweight clothing. Do not
leave any heavy or sharp objects in the pockets.
● Do not use clothes hangers to hang up the clothing, as this could in-
terfere with the function of the head-protection airbags*.
Safety FirstOperating instructionsPractical TipsTechnical Specifications
Page 156 of 319
154Seats and storage
Compartments in the front seats*
There is a storage compartment with a lid at the front of
each front seat.
Opening
– Pull the handle to open the compartment.
Closing
– Close the lid and push it in until it engages.
Note
The compartments will hold a maximum weight of 1 kg.
Page 157 of 319

155
Air conditioning
Air conditioning 2C-Climatronic
Description
The air conditioner is designed to automatically keep the
passenger compartment at the temperature you find most
comfortable at all times of the year. Recommended settings:
– Set the temperature to 22 °C (71 °F).
– Press the AUTO
⇒ Fig. 129 button.
The following setting quickly provides a comfortable temperature inside the
vehicle. We therefore recommend you do not modify the setting unless you
find this temperature uncomfortable or where circumstances require as
such.
The air conditioner provides heating and ventilation and also cools and de-
humidifies the air inside the vehicle.
The air conditioner is fully automatic and will constantly maintain the tem-
perature which has been set. To achieve this, the temperature of the air sup-
plied to the interior, the blower speed (volume of air delivery) and the air
distribution are regulated automatically. The system also takes solar radia-
tion into account and, therefore, no subsequent manual readjustments are
required. Therefore, automatic mode ⇒ page 158 should be used for the
comfort of all the passengers in virtually all conditions throughout the year.
Please note the following points: The humidity of the air is automatically reduced when the system cools the
interior of the vehicle. This helps to prevent condensation on the windows.
If the humidity and temperature outside the vehicle are high,
condensation
can drip off the evaporator in the air cooling system and form a pool under-
neath the vehicle. This is normal and does not indicate a leak.
If the outside temperature is low, the blower normally only switches to a
higher speed once the coolant has warmed up sufficiently (this does not ap-
ply to the defrost setting).
In order to achieve maximum engine power, the air conditioner compressor
is temporarily switched off when pulling away from standstill with full throt-
tle.
The compressor also switches off if the coolant temperature is excessively
high to ensure adequate engine cooling under extreme loads.
Pollution filter
The pollution filter (a combined particulate filter and activated charcoal fil-
ter) serves as a barrier against impurities in the outside air, including dust
and pollen.
For the air conditioner to work with maximum efficiency, the pollution filter
element must be replaced at the intervals specified in the Service Plan.
If the vehicle is driven in areas with a high level of air pollution and the filter
is no longer fully effective, it may be necessary to change the filter element
more frequently.
Safety FirstOperating instructionsPractical TipsTechnical Specifications
Page 158 of 319

156Air conditioning
CAUTION
● If you suspect that the air conditioner system is damaged, switch over to
ECON mode to prevent further damage and have the system checked by a
specialised workshop.
● Repairs to the air conditioner require specialist knowledge and special
tools. For this reason, please contact a specialised workshop if the system
is not working properly.
Note
● Keep the air intake slots in front of the windscreen clear of snow, ice and
leaves to ensure unimpaired heating and cooling and to prevent the win-
dows misting over.
● The air from the outlets flows through the passenger compartment and
out through the slots below the rear window. Therefore, do not cover these
slots with items of clothing or other objects.
● The air conditioner operates most effectively with the windows and the
sliding/tilting sunroof* closed. However, if the vehicle has heated up after
standing in the sun for some time, the air inside can be cooled more quickly
by opening the windows briefly.
Page 159 of 319

157
Air conditioning
Controls
This overview will help you become quickly familiar with the controls for the air conditioner.
Fig. 129 Air conditioner controls
The left-hand display shows the temperature selected for the left-hand side
and the right-hand display the temperature for the right-hand side.
The functions can be switched on or off by briefly pressing the buttons. The
diode on the buttons lights up when the function is enabled.
The grille between buttons
and must be kept clear, as the tempera-
ture sensors are located behind the grille.
● Do not cover the grille.
● Do not clean the grille with a vacuum cleaner, as this could damage the
temperature sensors located behind the grille.
Button(s)Meaning
Automatic mode
(left and right)Temperature selection for driver and passenger
sides
Defrost
Manual air recirculation mode
Switches off air cooling
Switches off air conditioner (instead of )
Automatic air recirculation mode (instead of OFF)
Safety FirstOperating instructionsPractical TipsTechnical Specifications
Page 160 of 319

158Air conditioning
Button(s)Meaning
(in the centre)Adjusts blower speed
Air to the windows
Air from the dashboard outlets
Air to the footwells
The , and buttons (which regulate air distribution) can either be
selected individually or in combination.
Automatic mode AUTO
Standard setting for all seasons.
Switching on automatic mode
– It is possible to select interior temperatures from +18 °C (64 °F)
to +29 °C (86 °F).
– Press the AUTO
⇒
Fig. 129 button.
The automatic mode maintains a constant temperature inside the vehicle
and dehumidifies the air. Air temperature, air delivery and air distribution
are regulated automatically to reach the desired interior temperature as
quickly as possible, and then to maintain this temperature. The system au-
tomatically compensates for any variations in the outside temperature and
for the effect of direct sunlight.
The automatic temperature regulation only operates at temperature settings
between +18 °C and +29 °C. If a temperature below +18 °C is selected, LO
appears on the display. If a temperature is selected which is higher than +29 °C, the display will show
HI. In the maximum and minimum settings,
the climate control operates continuously with maximum cooling or heating
output and the temperature is not regulated automatically. The temperature
is not regulated.
Note
By keeping the AUTO button on the driver side pressed for several seconds,
the temperature of the passenger side can be set to the temperature of the
driver side or vice versa. The display indicates the new temperature value.
Selecting the temperature -
+
Separate temperatures can be selected for the driver and
front passenger sides.
– Press the -
or + buttons below the displays
⇒ Fig. 129 until
the desired temperature is selected for the driver side or front
passenger side.
The currently selected temperature setting is shown in the display above
the buttons.
By keeping the AUTO
button on the driver side pressed for several seconds,
the temperature of the passenger side can be set to the temperature of the
driver side or vice versa. The display indicates the new temperature value.
The previous temperature setting can be restored by resetting the display
on the driver or passenger side as required.