Page 97 of 196
 Radio
Mode (2) Media
Mode(3) Cli-mate
Controls (4) Navi-
gation(5) Phone Mode(6) APPS
Uconnect
®
Voice
Command (VR)
ButtonAM")
Ty p e s o fVoiceCom-
mands
Available
Steering Wheel
Buttons to Press: (1) Radio
Mode (2) Media
Mode(3) Cli-mate
Controls (4) Navi-
gation(5) Phone Mode(6) APPS
Uconnect
®
Voice
Command (VR)
ButtonAM/FM
& Satel- lite
Band
Control Media
Devices Control Te m -
perature Control Destina-
tion
Selec-
tion and View - Yelp
®
GENERAL
Uconnect®
Phone Pick
Up Button---- Call Ini-
tiation, Call
Manage- ment,Pre-
format- ted
Voice Text
Reply -
Voice Command Examples – Uconnect® 8.4AN
GENERAL
Anytime “Go to Radio” (Media, Climate, Navigation,
Phone, Apps) – Settings, and Controls are not Voice Command accessible“Cancel”
“Help” (to listen to suggested commands specific to current need“Repeat”
“Launch Yelp
®” – Required 1st voice command to launch Yelp®app
“Yelp®Search” – Required 2nd voice command to
activate app functionality using Steering Wheel Voice Control Button
RADIO
AM/FM “Tune to AM950”, “Tune to 95.5FM (preset 5)
Satellite Band Control “Tune to Satellite Channel 80's on 8”,
Tune to Satellite Channel 32 (preset 4)
MEDIA
Media Devices Control
(Functionality is dependent on compatibility between devices and radio) “Browse” (show) “artist” (albums, music)
“Show paired phones” (devices)
“Play song – Maple Leaf Rag” (artist - Scott Joplin, genre - rock, album - Ragtime Favorites)
“Shuffle” – available with iPod, USB and SD Card
ELECTRONICS
95
Page 98 of 196
 “temperature to
75 degrees” – dual climate zone vehicles
NAVIGATION")
CLIMATE
Temperature Control “Set temperature to 70 degrees” – single climate
zone vehicles
“Set driver” (passenger) “temperature to
75 degrees” – dual climate zone vehicles
NAVIGATION
Destination Selection & View “Navigate to” (Destination) 123 Any Street,
Any town, Any State (any full address)
“Go Home” – destination previously defined by driver
“Repeat guidance” – hear the last navigation prompt “Cancel Route”“View Map”
PHONE
Call Initiation (Requires that
phone has been Bluetooth
®
paired with radio “Dial 123-456-7890” (phone number)
“Call John Smith mobile” (home, office, other) “Redial”
“Show outgoing” (recent) “calls”
Call Management “Search for John Smith” (any contact name in
address book)
“Show (display list) contacts”
Voice Texting (Available during
trial period or if subscribed to
Uconnect
®Access Advantage) Create a text message using Voice Command
Capability“Send a message to John Smith (123-456-7890)”“Show Messages”
“Listen to” (view) “number 4” “Reply”
“Forward text” (message) “to John Smith” (phone type, number)
Voice Text Reply (Radio audibly
recognizes these
18 pre-formatted SMS messages as you speak) Forward one of 18 pre-formatted SMS messages
to incoming calls/text messages: “Yes.”“No.”
“Okay.”
“I can’t talk right now.” “Call me.”
“I’ll call you later.” “I’m on my way.” “Thanks.”
“I’ll be late.”
“I will be minutes late.” “See you in minutes” “Stuck in traffic.”
“Start without me.” “Where are you?”
“Are you there yet?” “I need directions.” “I’m lost.”
“See you later.”
ELECTRONICS
96
Page 99 of 196

APPS
SiriusXM Travel Link
(Traffic function is not voice command accessible within SiriusXM Travel Link “Show Fuel prices”
“Show Current Weather” – provides access to Forecast as well
“Show Weather map” – multiple map formats available“Show Sports”
“Show Movie listings” “Show My favorites”
Yelp® (Yelp
®adds it's own
audible prompts, and response
time varies depending on carrier coverage speed) “Launch Yelp®” – Required 1st voice command
to launch Yelp®app
“Yelp®Search” – Required 2nd voice command
to activate app functionality using
Steering Wheel Voice Control Button
“Hotel” (restaurant, gas station, mail, hospital) – for nearest desired general POI
“Italian restaurants” – for nearest specified POI category
“Hotels” (restaurants, hospitals, Starbucks)
“in Miami” (location) – specified distance POI
STEERING WHEEL AUDIO CONTROLS
• The steering wheel audio controls are
located on the rear surface of the steer-
ing wheel.
Right Switch
•
Press the switch up or down to increase
or decrease the volume.
•Press the button in the center to change
modes AM/FM/CD/SXM.
Left Switch
• Press the switch up or down to search for the next listenable station or select
the next or previous CD track.
• Press the button in the center to select the next preset station (radio) or to change CDs if equipped with a CD Changer.
ELECTRONICS
97
Page 100 of 196

•The EVIC features a driver interactive
display that is located in the instrument
cluster. Pressing the controls on the left
side of the steering wheel a")
ELECTRONIC VEHICLE INFORMATION CENTER (EVIC)
•The EVIC features a driver interactive
display that is located in the instrument
cluster. Pressing the controls on the left
side of the steering wheel allows the
driver to select vehicle information and
Personal Settings. For additional infor-
mation, refer to Programmable Features
in this guide.
•Press and release the UPbutton to
scroll upward through the main menus
(Fuel Economy, Vehicle Info, Tire PSI,
Cruise, Messages, Trip Info, Vehicle
Speed and Turn Menu Off) and sub menus.
•Press and release the DOWNbutton to scroll downward through the main menus
and sub menus.
• Press and release the RIGHTbuttonfor access to main menus, sub menus or to
select a personal setting in the setup menu. Press and hold the RIGHT
button for
two seconds to reset features.
• Press the BACK/LEFTbutton to scroll back to a previous menu or sub menu.
Compass Calibration
• This compass is self-calibrating, which eliminates the need to set the compass manually. When the vehicle is new, the compass may appear erratic and the EVIC
will display “CAL” until the compass is calibrated.
• You may also calibrate the compass by completing one or more 360 degree turns (in an area free from large metal or metallic objects) until the “CAL” message
displayed in the EVIC turns off. The compass will now function normally.
PROGRAMMABLE FEATURES
Programmable Features
• The EVIC can be used to view or change the following settings. Press the UP
or
DOWN
button until System Setup displays, then press the RIGHTbutton.
Scroll through the settings using the UP or DOWN buttons. Press the RIGHT
button to change the setting. Press the BACK/LEFTbutton to scroll back to a
previous menu or sub menu.
• Radio Info • Trip Info
• Fuel Economy Info • Tire Pressure
• Cruise Control Info • Vehicle Info
• Digital Vehicle Speed • Stored Warning Messages
• Stop/Start • Turn Menu OFF
• Screen Setup
ELECTRONICS
98
Page 101 of 196

Uconnect® Access Customer Programmable Features
• The Uconnect
®Access system allows you to access Customer Programmable
feature settings such as Display, Clock, Safety/Assistance, Lights, Doors & Locks,
Heated Seats, Engine Off Operation, Compass Settings, Audio, Phone/ Bluetooth
and SiriusXM Setup through soft-keys.
• Touch the More soft-key to on the bottom of the screen, then touch the Settings soft-key to access the Settings screen. When making a selection, scroll up or down
until the preferred setting is highlighted, then press and release the preferred
setting until a check-mark appears next to the setting, showing that setting has
been selected. The following feature settings are available:
• Display • Clock
• Safety / Assistance • Doors & Locks
• Auto-On Comfort & Remote Start • Engine Off Options
• Compass • Audio
• Phone / Bluetooth • SiriusXM Setup
• Lights
EVIC Reconfigurable Screen Setup
• The following settings allow you to change what information is displayed in the instrument cluster as well as the location that information is displayed.
Digital Speedometer
• Press and release the UP or DOWN arrow button until the Digital display icon ishighlighted in the EVIC. Press and release the RIGHT arrow button to change the
display between km/h and mph.
Vehicle Info (Customer Information Features)
• Press and release the UP or DOWN button until the Vehicle Info icon is highlightedin the EVIC. Press and release the RIGHT button and Coolant Temp will be
displayed. Press the UP or DOWN arrow button to scroll through the following
information sub-menus:• Tire Pressure
• Coolant Temperature
Trip A
• Press and release the UP or DOWN arrow button until the Trip A icon is highlighted in the EVIC. Press and release the RIGHT arrow button to display the Trip A
information.
Trip B
• Press and release the UP or DOWN arrow button until the Trip B icon is highlightedin the EVIC. Press and release the RIGHT arrow button to display the Trip B
information.
ELECTRONICS
99
Page 102 of 196

Fuel Economy
• Press and release the UP or DOWN arrow button until the Fuel Economy icon ishighlighted. Press the RIGHT arrow button and the next screen will display the
following:• Average Fuel Economy/Miles Per Gallon (MPG Bargraph)
• Range To Empty (RTE)
• Current Miles Per Gallon (MPG)
Stop/Start
• Press and release the UP or DOWN arrow button until the Stop/Start icon is highlighted in the EVIC. Press and release the RIGHT arrow button to display the
Stop/Start status.
Trailer Tow
• Press and release the UP or DOWN arrow button until the Trailer Tow icon ishighlighted. Press the RIGHT arrow button and the next screen will display the
following trailer trip information:• Trailer Trip
• Trailer Brake
• Multimeter
Audio
• Press and release the UP or DOWN arrow button until the Audio display icon is highlighted in the EVIC. Press and release the RIGHT arrow button to display the
active source and the audio information.
Screen Setup
• Press and release the UP or DOWN arrow button until the Screen Setup displayicon is highlighted in the EVIC. Press and release the RIGHT arrow button to enter
the Screen Setup sub-menu. The Screen Setup feature allows you to change what
information is displayed in the instrument cluster as well as the location that
information is displayed.
ELECTRONICS
100
Page 103 of 196

• HomeLink®replaces up to three hand-held transmitters that operate devices such
as garage door openers, motorized gates, lighting or home security systems")
UNIVERSAL GARAGE DOOR OPENER (HomeLink®)
• HomeLink®replaces up to three hand-held transmitters that operate devices such
as garage door openers, motorized gates, lighting or home security systems. The
HomeLink
®unit is powered by your vehicles 12 Volt battery.
• The HomeLink
®buttons that are located in the overhead console or sunvisor
designate the three different HomeLink®channels.
• The HomeLink
®indicator is located above the center button.
Before You Begin Programming HomeLink®
• Ensure that your vehicle is parked out- side of the garage before you begin
programming.
•
For efficient programming and accurate
transmission of the radio-frequency
signal, it is recommended that a new
battery be placed in the hand-held
transmitter of the device that is being
programmed to the HomeLink
®system.
• Erase all channels before you begin programming. To erase the channels,
place the ignition switch into the ON/
RUN position, then press and hold the
two outside HomeLink
®buttons (I and III) for up to 20 seconds or until the red
indicator flashes.
NOTE:
Erasing all channels should only be performed when programming HomeLink
®for
the first time. Do not erase channels when programming additional buttons.
• If you have any problems, or require assistance, please call toll-free 1–800–355– 3515 or, on the Internet at www.HomeLink.com for information or assistance.
Programming A Rolling Code
NOTE:
For programming Garage Door Openers that were manufactured after 1995. These
Garage Door Openers can be identified by the “LEARN” or “TRAIN” button located
where the hanging antenna is attached to the Garage Door Opener. It is NOT the
button that is normally used to open and close the door. The name and color of the
button may vary by manufacturer.
1. Place the ignition switch into the ON/RUN position.
2. Place the hand-held transmitter 1 to 3 in (3 to 8 cm) away from the HomeLink
®
button you wish to program while keeping the HomeLink®indicator light in view.
ELECTRONICS
101
Page 104 of 196

3. Simultaneously press and hold both the Homelink®button you want to program
and the hand-held transmitter button.
4. Continue to hold buttons until the EVIC display changes from “CHANNEL # TRAINING” to “CHANNEL # TRAINED”, then release both buttons.
NOTE:
If the EVIC displays “DID NOT TRAIN” repeat from Step 2.
5.
At the garage door opener motor (in the garage), locate the “LEARN” or “TRAINING”
button. This can usually be found where the hanging antenna wire is attached to the
garage door opener motor. Firmly press and release the “LEARN” or “TRAINING”
button.
NOTE:
You have 30 seconds in which to initiate the next step after the LEARN button has
been pressed.
6.
Return to the vehicle and press the programmed HomeLink®button twice (holding
the button for two seconds each time). The EVIC will display “CHANNEL #
TRANSMIT”. If the garage door opener/device activates, programming is complete.
NOTE:
If the device does not activate, press the button a third time (for two seconds) to
complete the training.
7. To program the remaining two HomeLink
®buttons, repeat each step for each
remaining button. DO NOT erase the channels.
Programming A Non-Rolling Code
NOTE:
For programming Garage Door Openers manufactured before 1995.
1. Turn the ignition switch to the ON/RUN position.
2. Place the hand-held transmitter 1 to 3 in (3 to 8 cm) away from the HomeLink
®
button you wish to program while keeping the HomeLink®indicator light in view.
3. Simultaneously press and hold both the HomeLink
®button you want to program
and the hand-held transmitter button.
4. Continue to hold buttons until the EVIC display changes from “CHANNEL # TRAINING” to “CHANNEL # TRAINED”, then release both buttons.
5.
Press and hold the programmed HomeLink®button and observe the indicator light.
NOTE:
If the EVIC displays “DID NOT TRAIN” repeat from Step 2.
• To program the two remaining HomeLink
®buttons, repeat each step for each
remaining button. DO NOT erase the channels.
ELECTRONICS
102
 1
1 2
2 3
3 4
4 5
5 6
6 7
7 8
8 9
9 10
10 11
11 12
12 13
13 14
14 15
15 16
16 17
17 18
18 19
19 20
20 21
21 22
22 23
23 24
24 25
25 26
26 27
27 28
28 29
29 30
30 31
31 32
32 33
33 34
34 35
35 36
36 37
37 38
38 39
39 40
40 41
41 42
42 43
43 44
44 45
45 46
46 47
47 48
48 49
49 50
50 51
51 52
52 53
53 54
54 55
55 56
56 57
57 58
58 59
59 60
60 61
61 62
62 63
63 64
64 65
65 66
66 67
67 68
68 69
69 70
70 71
71 72
72 73
73 74
74 75
75 76
76 77
77 78
78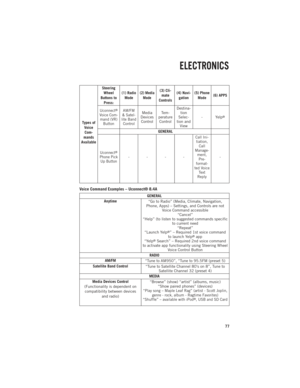 79
79 80
80 81
81 82
82 83
83 84
84 85
85 86
86 87
87 88
88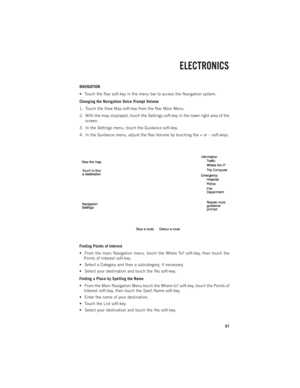 89
89 90
90 91
91 92
92 93
93 94
94 95
95 96
96 97
97 98
98 99
99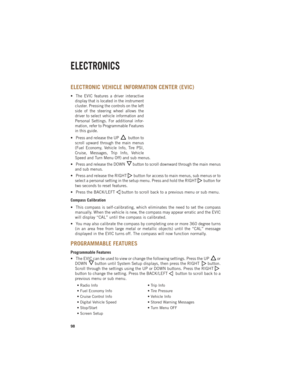 100
100 101
101 102
102 103
103 104
104 105
105 106
106 107
107 108
108 109
109 110
110 111
111 112
112 113
113 114
114 115
115 116
116 117
117 118
118 119
119 120
120 121
121 122
122 123
123 124
124 125
125 126
126 127
127 128
128 129
129 130
130 131
131 132
132 133
133 134
134 135
135 136
136 137
137 138
138 139
139 140
140 141
141 142
142 143
143 144
144 145
145 146
146 147
147 148
148 149
149 150
150 151
151 152
152 153
153 154
154 155
155 156
156 157
157 158
158 159
159 160
160 161
161 162
162 163
163 164
164 165
165 166
166 167
167 168
168 169
169 170
170 171
171 172
172 173
173 174
174 175
175 176
176 177
177 178
178 179
179 180
180 181
181 182
182 183
183 184
184 185
185 186
186 187
187 188
188 189
189 190
190 191
191 192
192 193
193 194
194 195
195