Page 9 of 26
01
03
02
hEADLIG hT CONTROL SWITCh
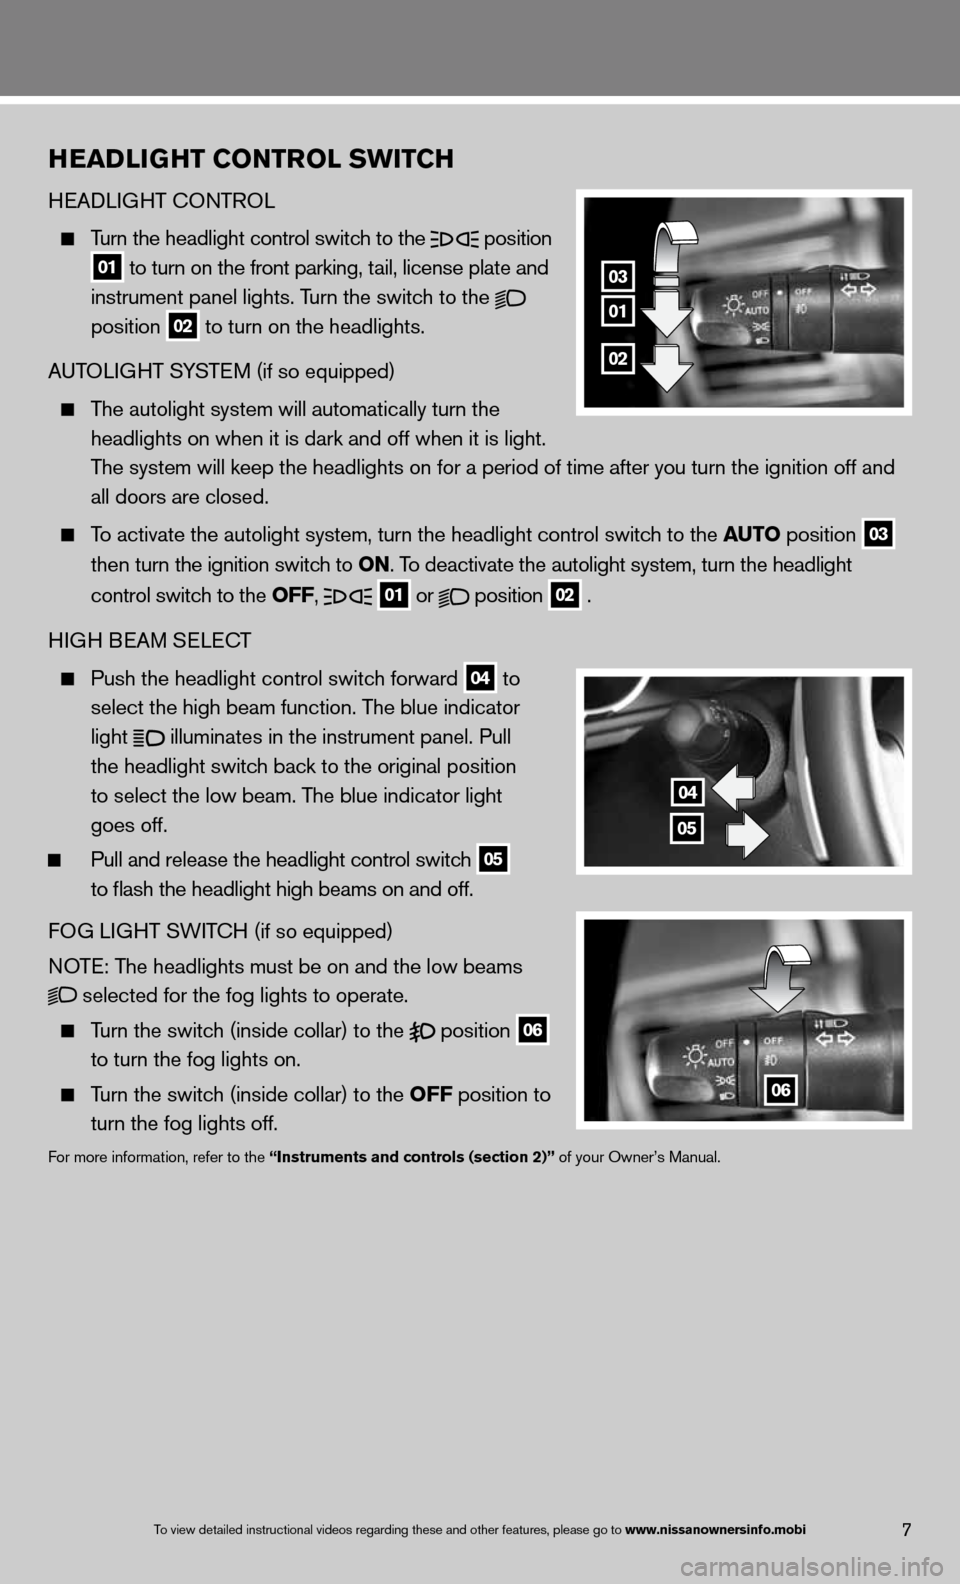
H eAd LiGHT c OnTROL
Turn the headlight control switch to the
position
01 to turn on the front parking, tail, license plate and
instrument panel lights. Turn the switch to the
position
02 to turn on the headlights.
A uTOLi GHT SYSTe M (if so equipped)
The autolight system will automatically turn the
headlights on when it is dark and off when it is light.
The system will keep the headlights on for a period of time after you tur\
n the ignition off and
all doors are closed.
To activate the autolight system, turn the headlight control switch to the AUTO position
03
then turn the ignition switch to ON. To deactivate the autolight system, turn the headlight
control switch to the OFF,
01 or
position
02 .
H iGH B eAM S eLec T
Push the headlight control switch forward
04 to
select the high beam function. The blue indicator
light
illuminates in the instrument panel. Pull
the headlight switch back to the original position
to select the low beam. The blue indicator light
goes off.
Pull and release the headlight control switch
05
to flash the headlight high beams on and off.
fOG Li GHT SW iTc H (if so equipped)
n OTe: The headlights must be on and the low beams
selected for the fog lights to operate.
Turn the switch (inside collar) to the
position
06
to turn the fog lights on.
Turn the switch (inside collar)
to the OFF position to
turn the fog lights off.
for more information, refer to the “Instruments and controls (section 2)” of your Owner’s Manual.
7
04
05
06
To view detailed in\fstructional videos\f regarding these a\fnd other features\f \fplease go to www.nissanownersin\hfo.mobi
Page 10 of 26
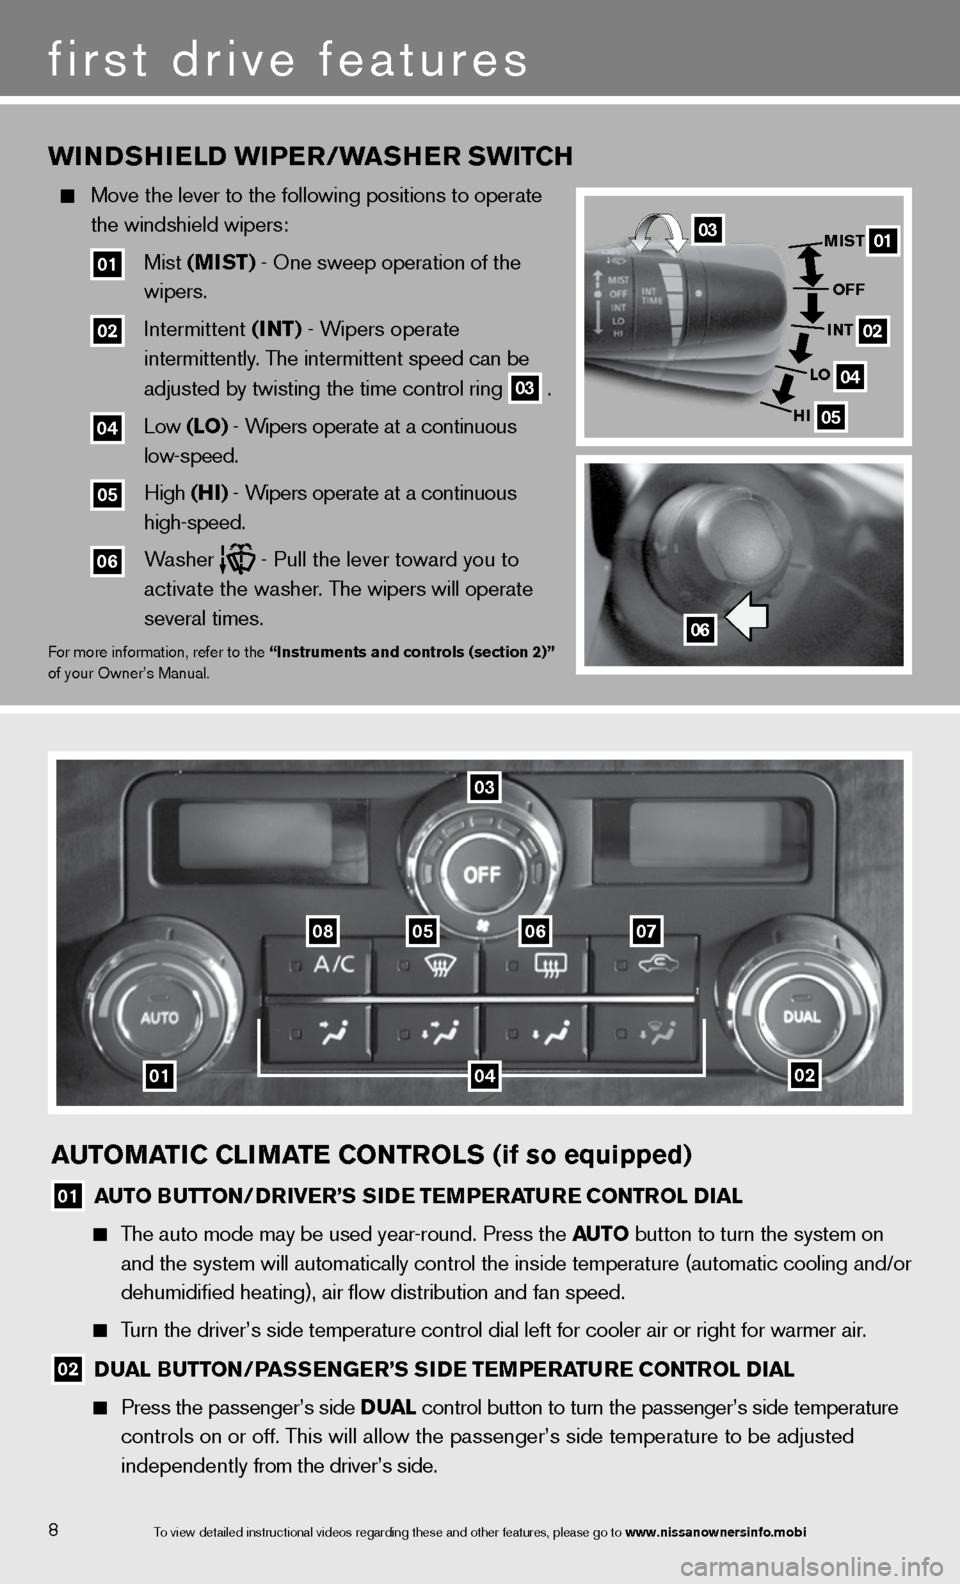
AUTOMATIC CLIMATE CONTROLS (if so equipped)
01 AUTO BUTTON/DRIvER’S SIDE TEMPERATURE CONTROL DIAL
The auto mode may be used year-round. Press the AUTO button to turn the system on
and the system will automatically control the inside temperature (autom\
atic cooling and/or
dehumidified heating), air flow distribution and fan speed.
Turn the driver’s side temperature control dial left for cooler air or\
right for warmer air.
02 DUAL BUTTON/PASSENGER’S SIDE TEMPERATURE CONTROL DIAL
Press the passenger’s side D UAL control button to turn the passenger’s side temperature
controls on or off. This will allow the passenger’s side temperature to be adjusted
independently from the driver’s side.
8
first drive features
To view detailed in\fstructional videos\f regarding these a\fnd other features\f \fplease go to www.nissanownersin\hfo.mobi
WINDShIELD WIPER/WAShER SWITC h
Move the lever to the following positions to operate
the windshield wipers:
01 Mist (MIST) - One sweep operation of the
wipers.
02 intermittent (INT) - Wipers operate
intermittently. The intermittent speed can be
adjusted by twisting the time control ring
03 .
04 Low (LO) - Wipers operate at a continuous
low-speed.
05 High (hI) - Wipers operate at a continuous
high-speed.
06 Washer - Pull the lever toward you to
activate the washer. The wipers will operate
several times.
f or more information, refer to the “Instruments and controls (section 2)”
of your Owner’s Manual.06
01
02
04
05
MIST
OFF
INT
LO
hI03
0102
08050607
03
04
Page 11 of 26
9
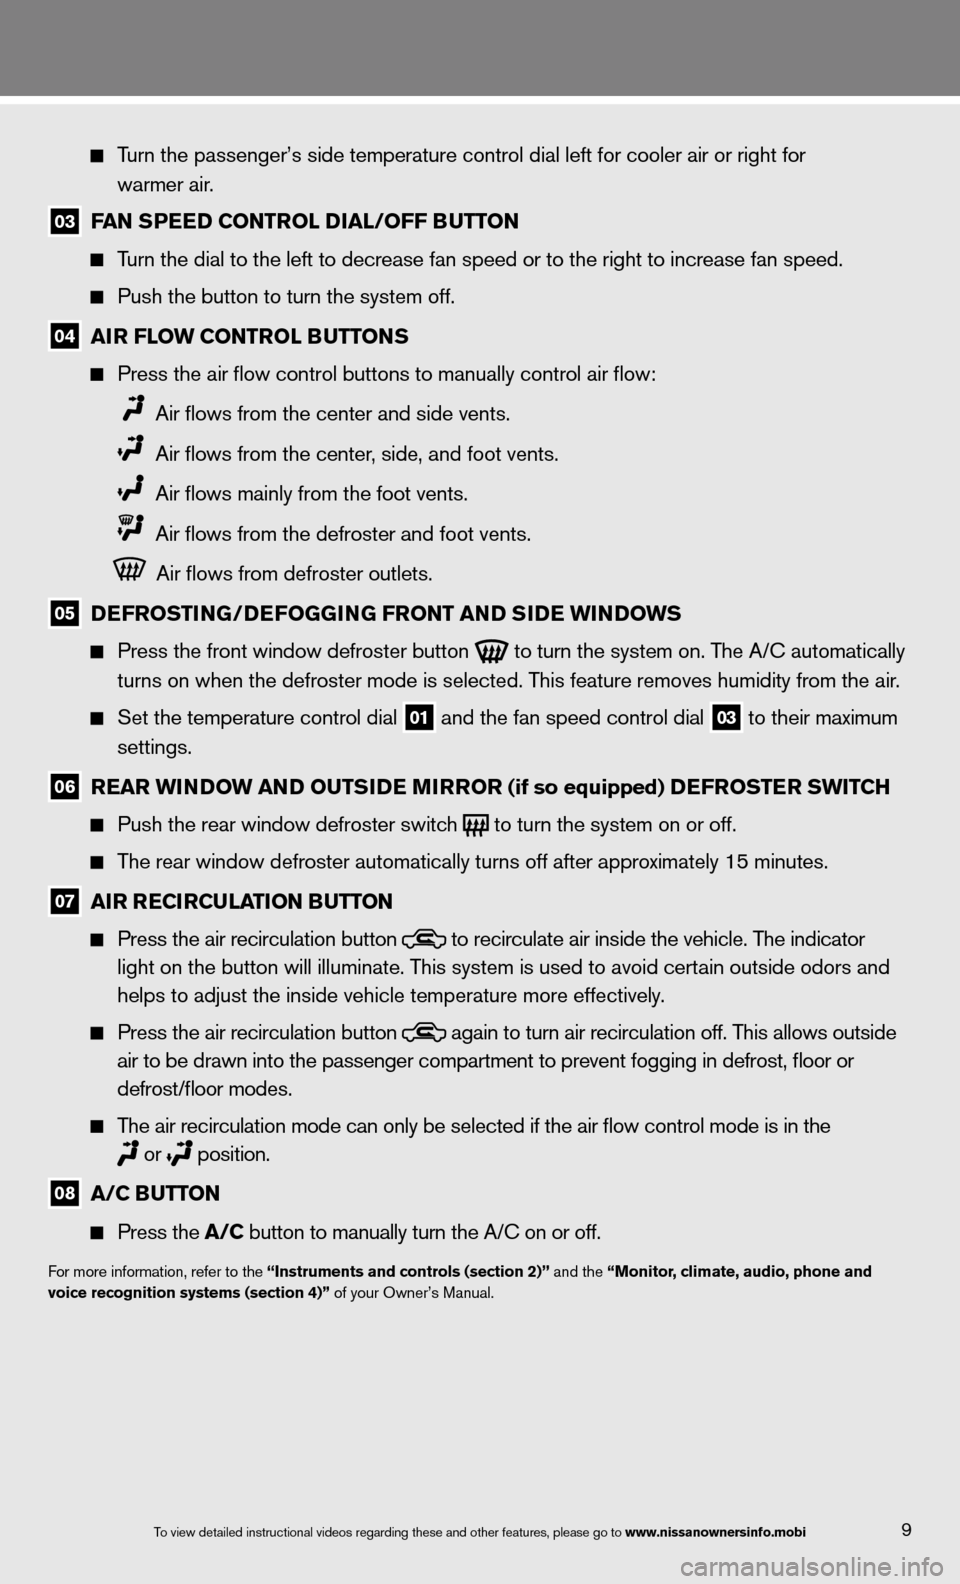
Turn the passenger’s side temperature control dial left for cooler air\
or right for
warmer air.
03 FAN SPEED CONTROL DIAL/OFF BUTTON
Turn the dial to the left to decrease fan speed or to the right to increa\
se fan speed.
Push the button to turn the system off.
04 AIR FLOW CONTROL BUTTONS
Press the air flow control buttons to manually control air flow:
Air flows from the center and side vents.
Air flows from the center, side, and foot vents.
Air flows mainly from the foot vents.
Air flows from the defroster and foot vents.
Air flows from defroster outlets.
05 DEFROSTING/DEFOGGING FRONT AND SIDE WINDOWS
Press the front window defroster button
to turn the system on. The A/c automatically
turns on when the defroster mode is selected. This feature removes humidity from the air.
Set the temperature control dial
01 and the fan speed control dial 03 to their maximum
settings.
06 REAR WINDOW AND OUTSIDE MIRROR (if so equipped) DEFROSTER SWITCh
Push the rear window defroster switch
to turn the system on or off.
The rear window defroster automatically turns off after approximately 15 minutes.
07 AIR RECIRCULATION BUTTON
Press the air recirculation button
to recirculate air inside the vehicle. The indicator
light on the button will illuminate. This system is used to avoid certain outside odors and
helps to adjust the inside vehicle temperature more effectively.
Press the air recirculation button
again to turn air recirculation off. This allows outside
air to be drawn into the passenger compartment to prevent fogging in def\
rost, floor or
defrost/floor modes.
The air recirculation mode can only be selected if the air flow control\
mode is in the
or
position.
08 A/C BUTTON
Press the A/C button to manually turn the A/c on or off.
for more information, refer to the “Instruments and controls (section 2)” and the “Monitor, climate, audio, phone and
voice recognition systems (section 4)” of your Owner’s Manual.
To view detailed in\fstructional videos\f regarding these a\fnd other features\f \fplease go to www.nissanownersin\hfo.mobi
Page 12 of 26
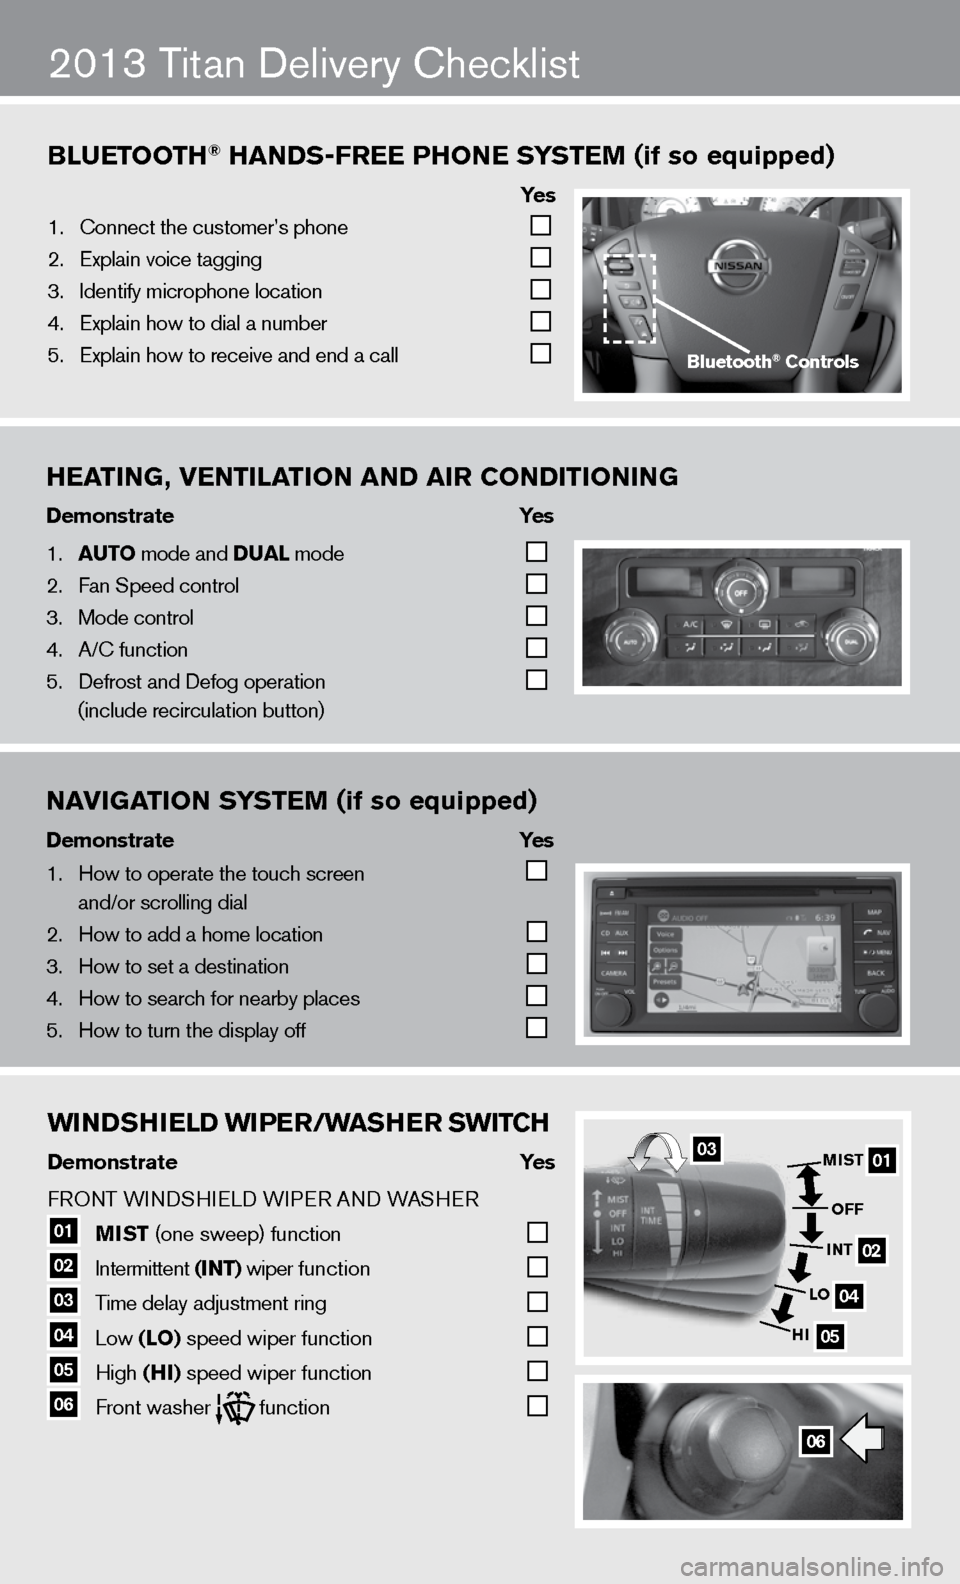
WINDShIELD WIPER/WAShER SWITCh
Demonstrate Yes
f RO nT W indSHieL d W iPeR A nd WASHeR
01 MIST
(one sweep) function
02 intermittent
(INT) wiper function
03 Time delay adjustment ring
04 Low
(LO) speed wiper function
05 High
(hI) speed wiper function 06 front washer function
Bluetooth\f han\bs-free Phone s
ystem (if so equipped)
ye s
1. \bonnect the custome\fr’s phone
2. Explain voice tagg\fing
3. Identify microphone \flocation
4. Explain how to dia\fl a number
5. Explain how to rec\feive and end a cal\fl
2013 Titan delivery checklist
heating, Ventilation an\b air Con\bitioning
\bemonstrate yes
1. auto mode and \bual mode
2. Fan Speed control
3. Mode control
4. A/\b function
5. Defrost and Defog o\fperation
(include recircula\ftion button)
na
Vigation s ystem (if so equipped)
\bemonstrate yes
1. How to operate the\f touch screen
and/or scrolling d\fial
2. How to add a home \flocation
3. How to set a desti\fnation
4. How to search for n\fearby places
5. How to turn the di\fsplay off
06
01
02
04
05
MIST
OFF
INT
LO
hI03
Bluetooth\f Controls
WINDShIELD WIPER/WAShER SWITC h
Demonstrate Yes
f RO nT W indSHieL d W iPeR A nd WASHeR
01 MIST
(one sweep) function
02 intermittent
(INT) wiper function
03 Time delay adjustment ring
04 Low
(LO) speed wiper function
05 High
(hI) speed wiper function 06 front washer function
Bluetooth\f han\bs-free Phone s
ystem (if so equipped)
ye s
1. \bonnect the custome\fr’s phone
2. Explain voice tagg\fing
3. Identify microphone \flocation
4. Explain how to dia\fl a number
5. Explain how to rec\feive and end a cal\fl
2013 Titan delivery checklist
heating, Ventilation an\b air Con\bitioning
\bemonstrate yes
1. auto mode and \bual mode
2. Fan Speed control
3. Mode control
4. A/\b function
5. Defrost and Defog o\fperation
(include recircula\ftion button)
na
Vigation s ystem (if so equipped)
\bemonstrate yes
1. How to operate the\f touch screen
and/or scrolling d\fial
2. How to add a home \flocation
3. How to set a desti\fnation
4. How to search for n\fearby places
5. How to turn the di\fsplay off
06
01
02
04
05
MIST
OFF
INT
LO
hI03
Bluetooth\f Controls
Page 13 of 26
ON
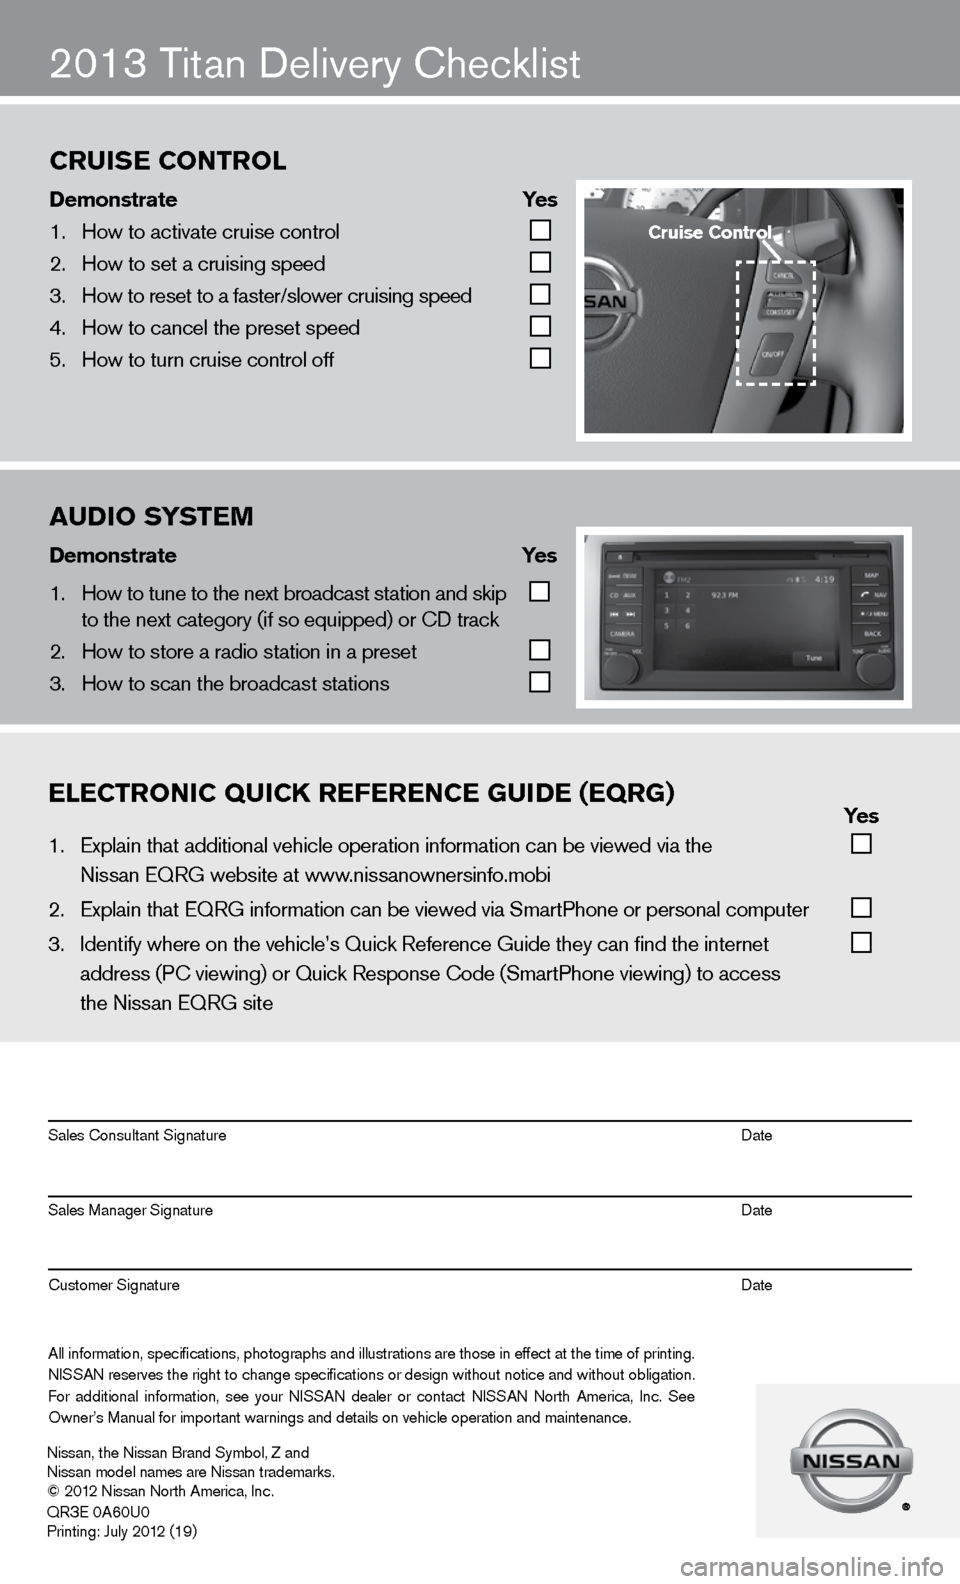
2013 Titan delivery checklist
eleCtroniC QuiCK referenCe gui\be (eQrg) yes
1. Explain that addit\fional vehicle oper\fation information c\fan be viewed via t\fhe
Nissan EQRG websit\fe at www.nissanownersinfo.mo\fbi
2. Explain that EQRG \finformation can be \fviewed via SmartPh\fone or personal co\fmputer
3. Identify where on th\fe vehicle’s Quick \fReference Guide the\fy can find the inter\fnet
address (P\b viewing\f) or Quick Respons\fe \bode (SmartPhone \fviewing) to access\f
the Nissan EQRG si\fte
All information\f specifications\f photographs and illustrations are those in effect at the time of printing.
NISSAN reserves the right to change specifications or design without notice and without obligation.
For additional information\f see your NISSAN dealer or contact NISSAN North America\f Inc. See
Owner’s Manual for \fimportant warnings\f and details on ve\fhicle operation an\fd maintenance. Sales \bonsultant Si\fgnature Date
Sales Manager Sign\fature Date
\bustomer Signature Date
Nissan\f the Nissan \fBrand Symbol\f Z and
Nissan model names\f are Nissan tradem\farks.
© 2012 Nissan North Ame\frica\f Inc.
QR
3E 0A60U0
Printing: July 2012 (19)
au\bio system
\bemonstrate yes
1. How to tune to the\f next broadcast st\fation and skip
to the next catego\fry (if so equipped) \for \bD track
2. How to store a rad\fio station in a pr\feset
3. How to scan the br\foadcast stations
Cruise Control
\bemonstrate yes
1. How to activate cr\fuise control
2. How to set a cruis\fing speed
3. How to reset to a \ffaster/slower cruis\fing speed
4. How to cancel the \fpreset speed
5. How to turn cruise\f control off
Cruise Control
Page 14 of 26
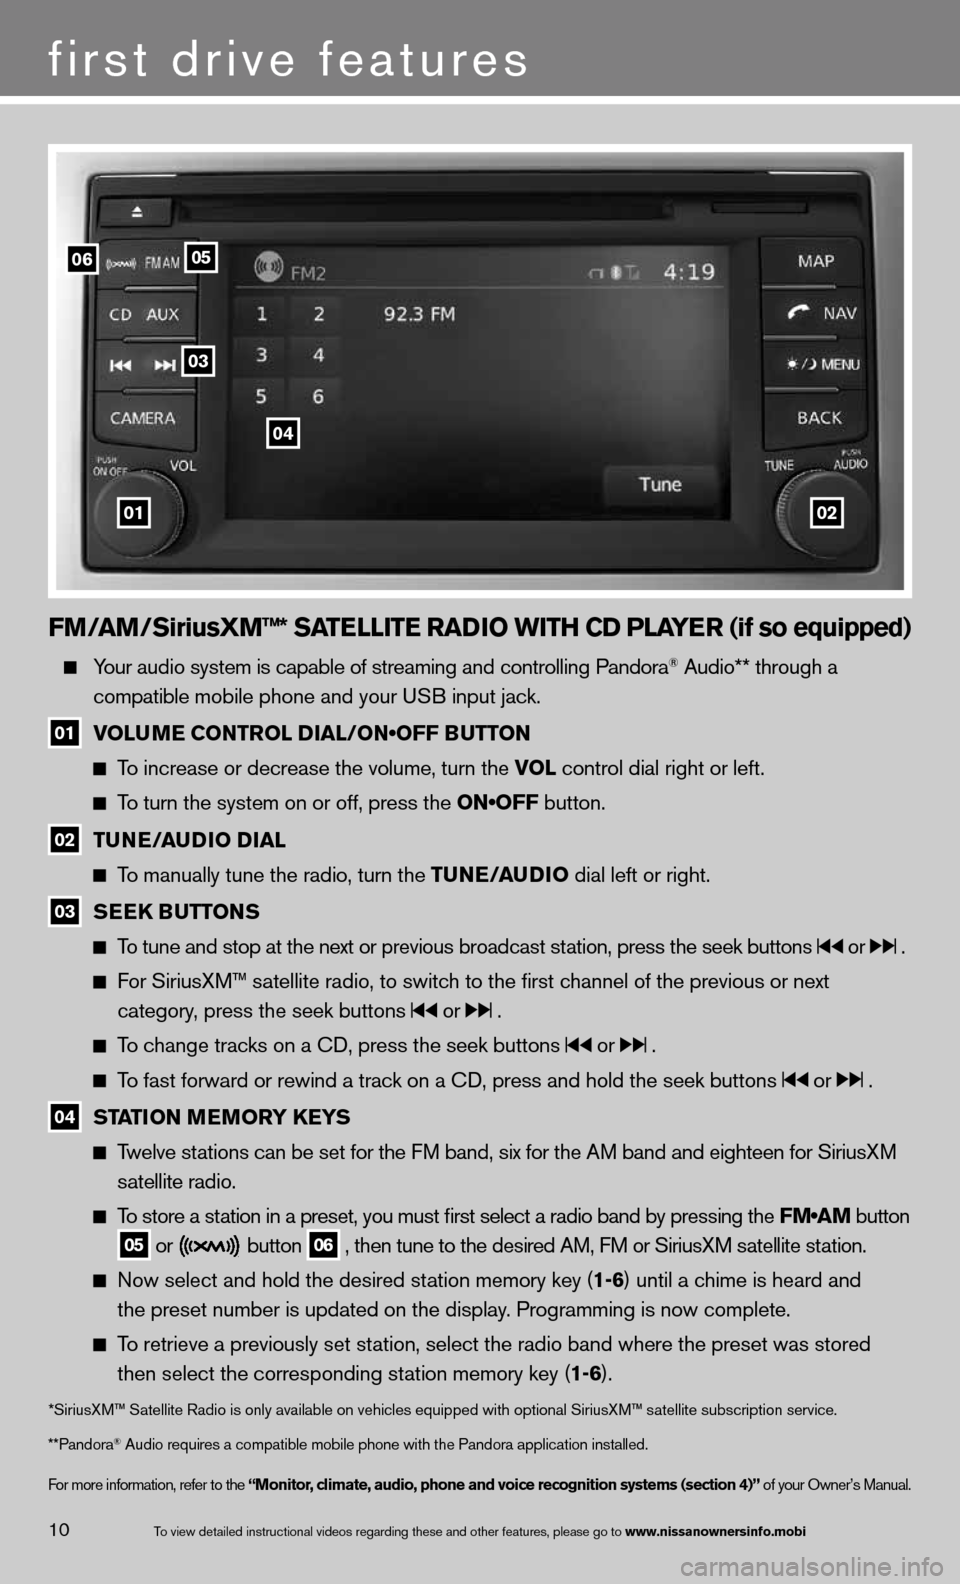
FM/AM/SiriusXM™* SATELLITE RADIO WITh CD PLAYER (if so equipped)
Your audio system is capable of streaming and controlling Pandora® Audio** through a
compatible mobile phone and your u SB input jack.
01 VOLUME CONTROL DIAL/ON•OFF BUTTON
To increase or decrease the volume, turn the vOL control dial right or left.
To turn the system on or off, press the ON•OFF button.
02 TUNE/AUDIO DIAL
To manually tune the radio, turn the TUNE/AUDIO dial left or right.
03 SEEk
BUTTONS
To tune and stop at the next or previous broadcast station, press the seek buttons or .
For SiriusXM™ satellite radio, to switch to the first channel of the previous or next
category, press the seek buttons
or .
To change tracks on a cd, press the seek buttons or .
To fast forward or rewind a track on a cd, press and hold the seek buttons or .
04 STATION MEMORY k
EYS
Twelve stations can be set for the FM band, six for the AM band and eighteen for SiriusXM
satellite radio.
To store a station in a preset, you must first select a radio band by pressing the \
FM•AM button
05 or button
06 , then tune to the desired AM, f
M or SiriusXM satellite station.
now select and hold the desired station memory key (1-6) until a chime is heard and
the preset number is updated on the display. Programming is now complete.
To retrieve a previously set station, select the radio band where the preset was stored
then select the corresponding station memory key (1-6).
*SiriusXM™ Satellite Radio is only available on vehicles equipped with optional Siri\
usXM™ satellite subscription service.
**Pandora
® Audio requires a \fcompatible mobile \fphone with the Pan\fdora application i\fnstalled.
for more information, refer to the “Monitor, climate, audio, phone and voice recognition systems (section 4)” of your Owner’s Manual.
first drive features
10To view detailed in\fstructional videos\f regarding these a\fnd other features\f \fplease go to www.nissanownersin\hfo.mobi
0102
06
03
04
05
Page 15 of 26
11To view detailed in\fstructional videos\f regarding these a\fnd other features\f \fplease go to www.nissanownersin\hfo.mobi
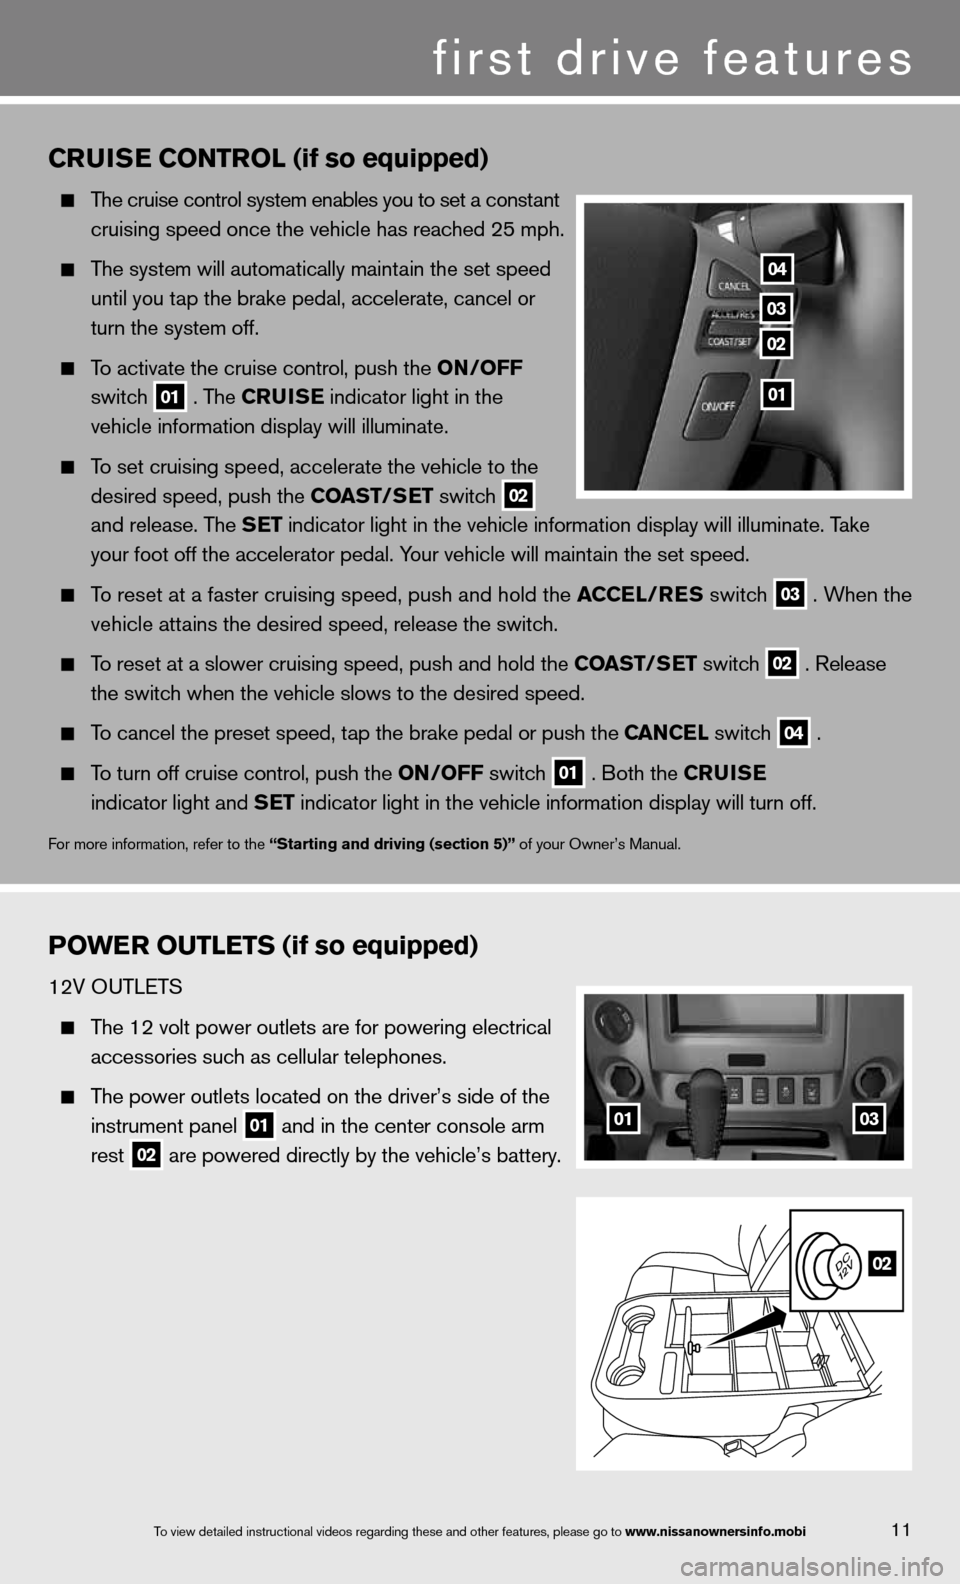
CRUISE CONTROL (if so equipped)
The cruise control system enables you to set a constant
cruising speed once the vehicle has reached 25 mph.
The system will automatically maintain the set speed
until you tap the brake pedal, accelerate, cancel or
turn the system off.
To activate the cruise control, push the ON/OFF
switch
01 . The CRUISE
indicator light in the
vehicle information display will illuminate.
To set cruising speed, accelerate the vehicle to the
desired speed, push the COAST/SET switch
02
and release. The SET indicator light in the vehicle information display will illuminate. Take
your foot off the accelerator pedal. Your vehicle will maintain the set speed.
To reset at a faster cruising speed, push and hold the ACCEL/RES switch
03 . When the
vehicle attains the desired speed, release the switch.
To reset at a slower cruising speed, push and hold the COAST/SET switch
02 . Release
the switch when the vehicle slows to the desired speed.
To cancel the preset speed, tap the brake pedal or push the CANCEL switch
04 .
To turn off cruise control, push the ON/OFF switch
01 . Both the CRUISE
indicator light and SET indicator light in the vehicle information display will turn off.
for more information, refer to the “Starting and driving (section 5)” of your Owner’s Manual.
POWER OUTLETS (if so equipped)
12V OuTLeTS
The 12 volt power outlets are for powering electrical
accessories such as cellular telephones.
The power outlets located on the driver’s side of the
instrument panel
01 and in the center console arm
rest
02 are powered directly by the vehicle’s battery.
04
03
02
01
0103
02
first drive features
Page 16 of 26
12To view detailed in\fstructional videos\f regarding these a\fnd other features\f \fplease go to www.nissanownersin\hfo.mobi
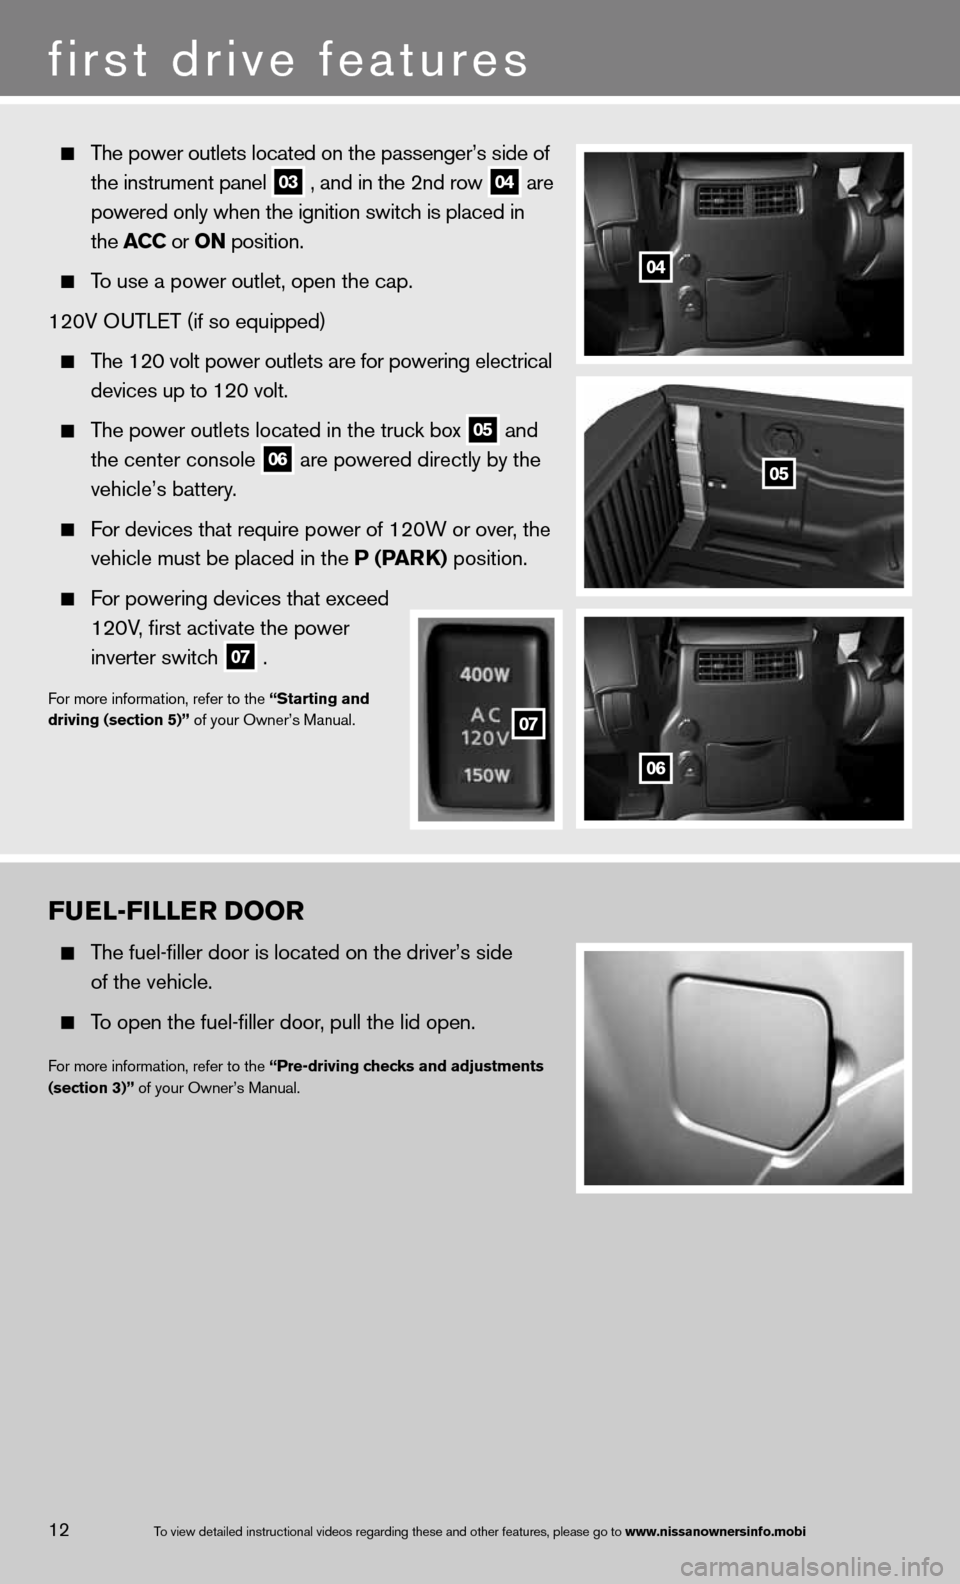
FUEL-FILLER DOOR
The fuel-filler door is located on the driver’s side
of the vehicle.
To open the fuel-filler door, pull the lid open.
for more information, refer to the “Pre-driving checks and adjustments
(section 3)” of your Owner’s Manual.
The power outlets located on the passenger’s side of
the instrument panel
03 , and in the 2nd row
04 are
powered only when the ignition switch is placed in
the ACC or ON position.
To use a power outlet, open the cap.
120V O uTLeT (if so equipped)
The 120 volt power outlets are for powering electrical
devices up to 120 volt.
The power outlets located in the truck box
05 and
the center console
06 are powered directly by the
vehicle’s battery.
f or devices that require power of 120W or over, the
vehicle must be placed in the P (PAR k) position.
For powering devices that exceed
120V, first activate the power
inverter switch
07 .
f
or more information, refer to the “Starting and
driving (section 5)” of your Owner’s Manual.
04
05
06
07
07
first drive features