Page 9 of 24
TURNING THE ENGINE OFF
For a c ontinuously Variable Transmission, apply the brake pedal, move the shift lever to the
P (P
arK)
position, apply the parking brake and press the ignition switch.
For a manual transmission, apply the brake pedal, place the vehicle in 1s\
t gear, apply the parking brake and push the ignition.
For more information, refer to the “Starting and driving (section 5)” of your Owner’s Manual.
Hea DliGHT C o NT rol SW i TCH
HEADLIGHT cONTROL
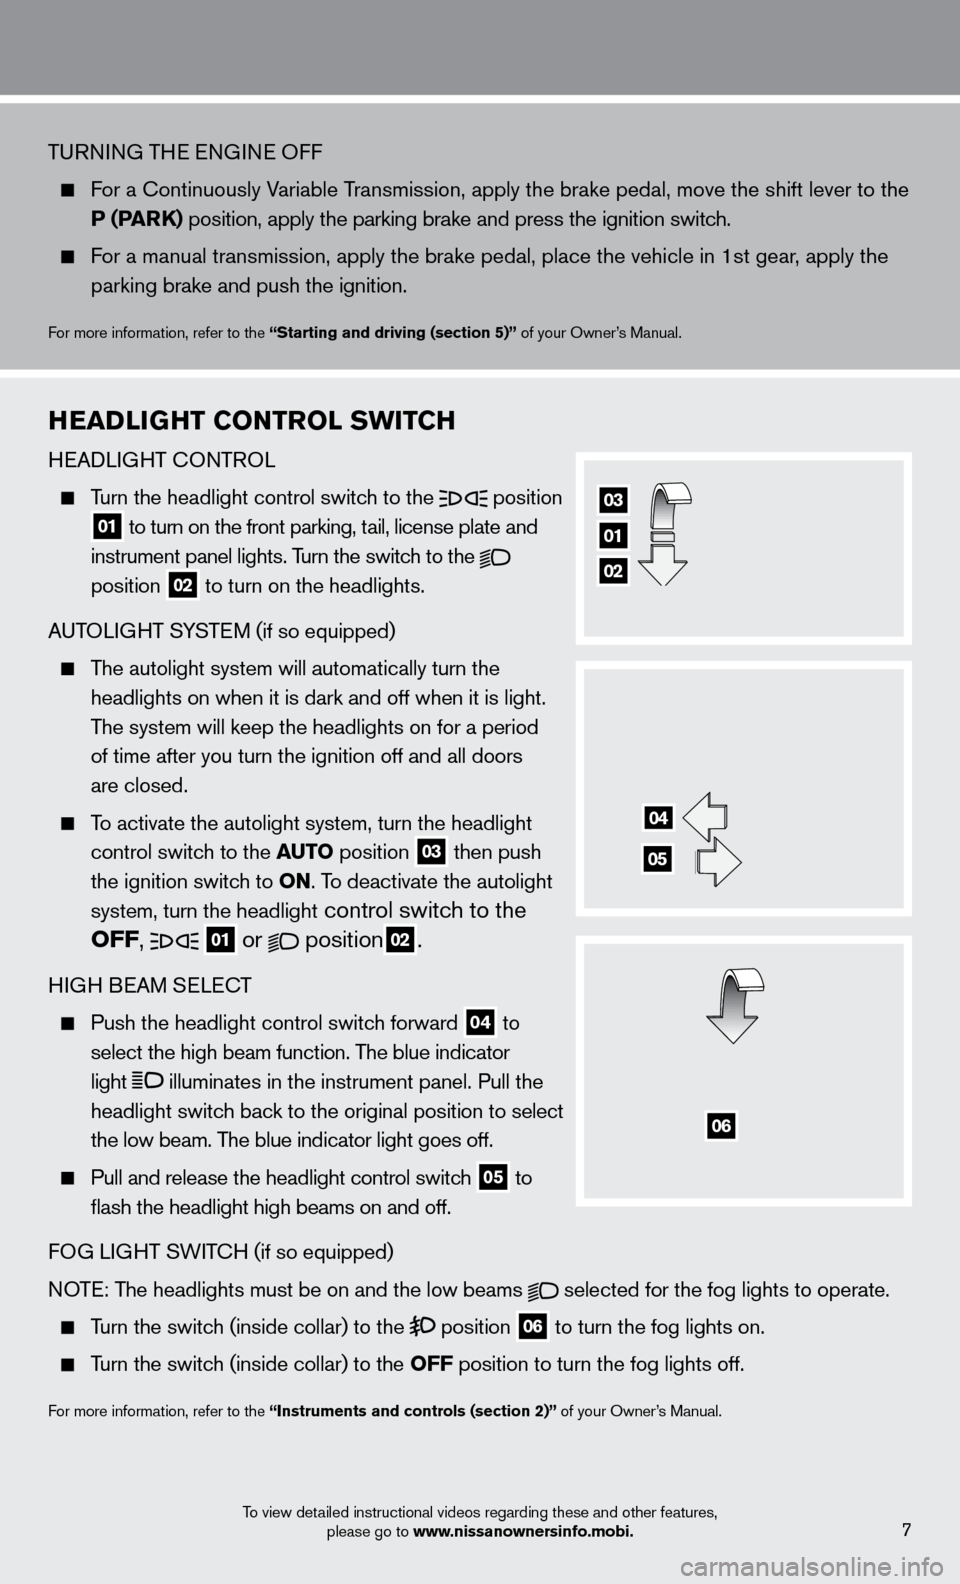
Turn the headlight control switch to the
position
01 to turn on the front parking, tail, license plate and
instrument panel lights. Turn the switch to the
position 02 to turn on the headlights.
AUTOLIGHT SYSTEM (if so equipped)
The autolight system will automatically turn the headlights on when it is dark and off when it is light.
The system will keep the headlights on for a period
of time after you turn the ignition off and all doors
are closed.
To activate the autolight system, turn the headlight control switch to the au
To position 03 then push
the ignition switch to
o
N. To deactivate the autolight
system, turn the headlight
control switch to the
o
FF,
01 or position02.
HIGH BEAM SELEcT
Push the headlight control switc h forward
04 to
select the high beam function. The blue indicator
light
illuminates in the instrument panel. Pull the
headlight switch back to the original position to select
the low beam. The blue indicator light goes off.
Pull and release the headlight control switc h
05 to
flash the headlight high beams on and off.
FOG LIGHT SWIT
cH (if so equipped)
N
OTE: The headlights must be on and the low beams
selected for the fog lights to operate.
Turn the switch (inside collar) to the position
06 to turn the fog lights on.
Turn the switch (inside collar)
to the
o FF position to turn the fog lights off.
For more information, refer to the “instruments and controls (section 2)” of your Owner’s Manual.
To view detailed instructional videos regarding these and other features,
please go to www.nissanownersinfo.mobi.
01
02
7
03
06
04
05
Page 10 of 24
0102
03
WiNDSHielD W iP er a ND Wa SHe r SW i TCH
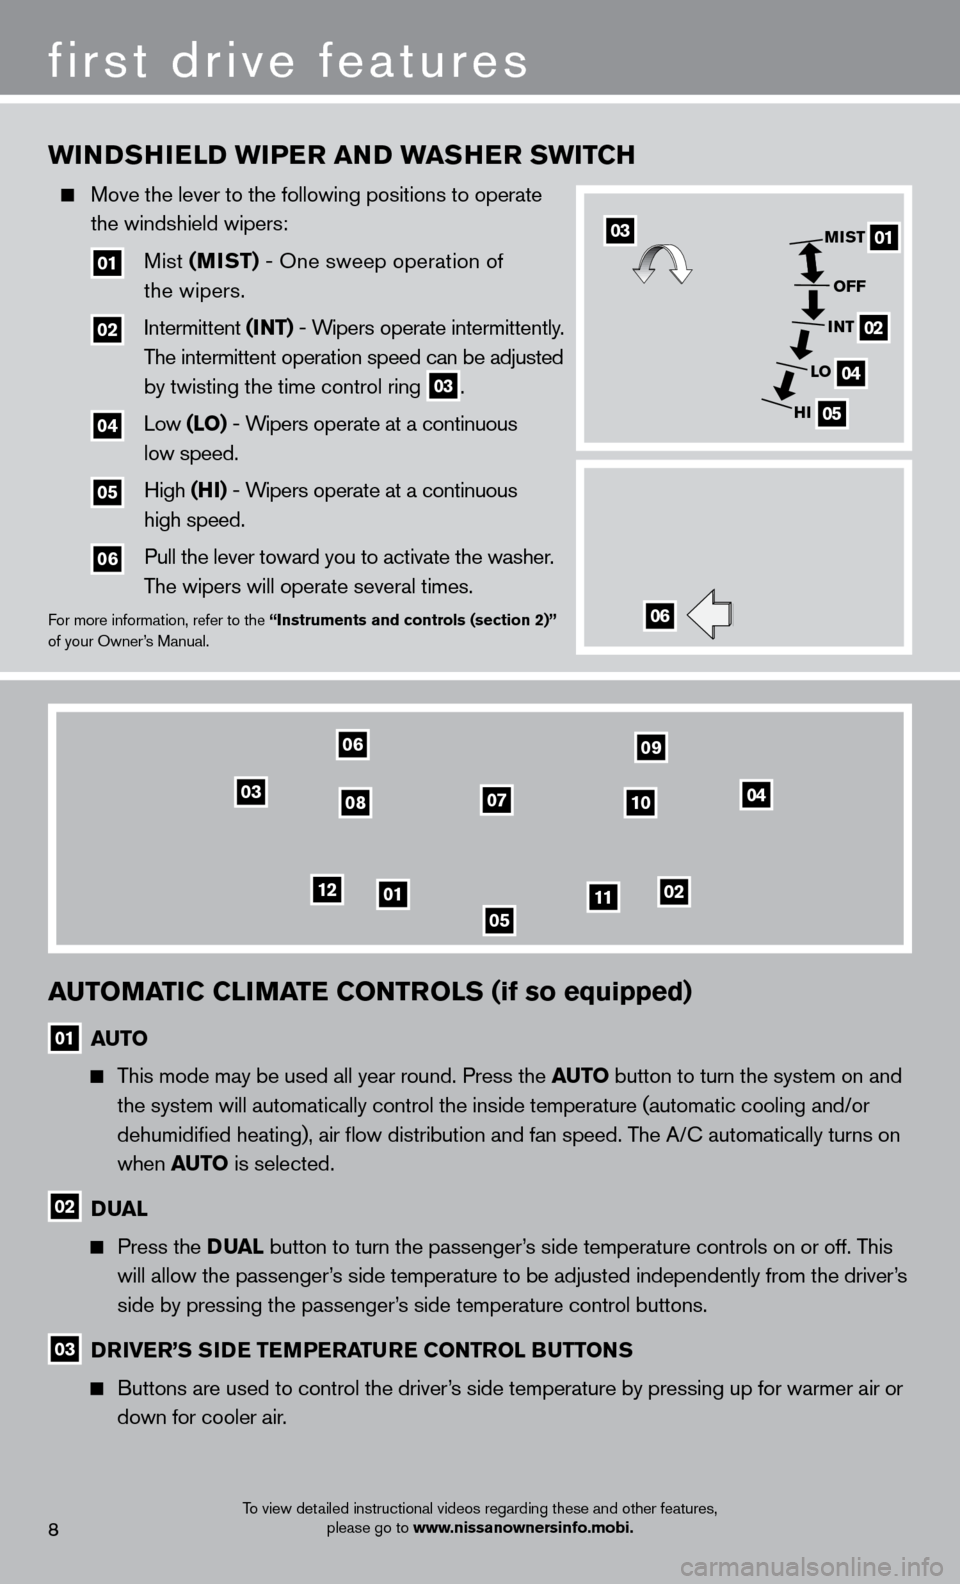
Move the lever to the following positions to operate
the windshield wipers:
01 Mist (MiST) - One sweep operation of
the wipers.
02 Intermittent ( iNT) - Wipers operate intermittently.
T
he intermittent operation speed can be adjusted
by twisting the time control ring 03.
04 Low ( lo ) - Wipers operate at a continuous
low speed.
05 High (Hi ) - Wipers operate at a continuous
high speed.
06 Pull the lever toward you to activate the washer.
T
he wipers will operate several times.
For more information, refer to the “instruments and controls (section 2)”
of your Owner ’s Manual.
To view detailed instructional videos regarding these and other features, please go to www.nissanownersinfo.mobi.
01
02
04
05
MiST
o
FF
iNT
lo
H
i03
06
auTo M aT iC C liM aT e C o NT rol S (if so equipped)
01 auTo
This mode may be used all year round. Press the auTo button to turn the system on and
the system will automatically control the inside temperature (automatic\
cooling and/or
dehumidified heating), air flow distribution and fan speed. The A/
c automatically turns on
when
a
u T
o
is selected.
02 Dual
Press the Du al button to turn the passenger’s side temperature controls on or off. This
will allow the passenger’s side temperature to be adjusted independently from the driver’s
side by pressing the passenger’s side temperature control buttons.
03 Driver ’S SiDe T eM P eraT ure C o NT rol Bu TTo NS
Buttons are used to control the driver’s side temperature by pressing up for warmer air or
down for cooler air.
05
04
06
0708
09
10
1112
8
first drive features
Page 11 of 24
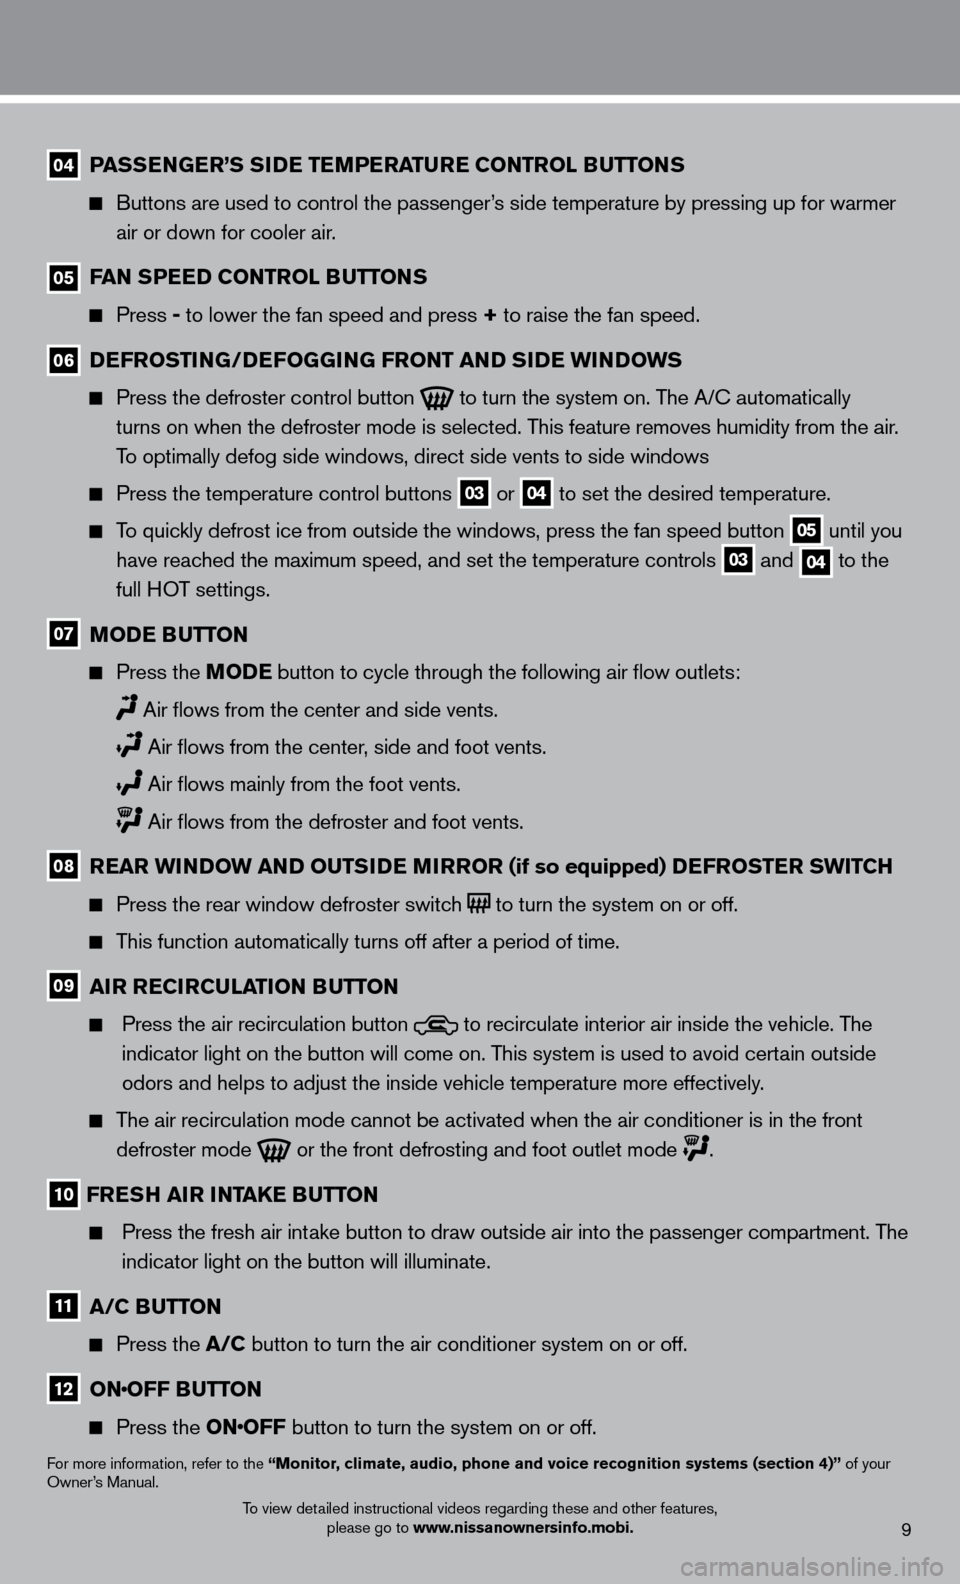
04 PaSSeN Ge r ’S SiDe T eM P eraT ure C o NT rol Bu TTo NS
Buttons are used to control the passenger
’s side temperature by pressing up for warmer
air or down for cooler air.
05 Fa N SP eeD C o NT rol Bu TTo NS
Press - to lower the fan speed and press + to raise the fan speed.
06 DeF ro ST iN G/DeFo GGiN G F ro NT a ND SiDe W iN DoWS
Press the defroster control button to turn the system on. The A/c automatically
turns on when the defroster mode is selected. T his feature removes humidity from the air.
To optimally defog side windows, direct side vents to side windows
Press the temperature control buttons 03 or 04 to set the desired temperature.
To quickly defrost ice from outside the windows, press the fan speed button 05 until you
have reached the maximum speed, and set the temperature controls
03 and 04 to the
full HOT settings.
07 Mo De Bu TTo N
Press the
Mo De button to cycle through the following air flow outlets:
Air flows from the center and side vents.
Air flows from the center, side and foot vents.
Air flows mainly from the foot vents.
Air flows from the defroster and foot vents.
08 rear W iN DoW a ND ou TSiDe Mi rror (if so equipped) DeF ro ST er SW i TCH
Press the rear window defroster switc
h to turn the system on or off.
This function automatically turns off after a period of time.
09 air reC irC ulaT io N Bu TTo N
Press the air recirculation button to recirculate interior air inside the vehicle. The
indicator light on the button will come on. This system is used to avoid certain outside
odors and helps to adjust the inside vehicle temperature more effectivel\
y.
The air recirculation mode cannot be activated when the air conditioner i\
s in the front defroster mode
or the front defrosting and foot outlet mode .
10 F reS H air iNTa Ke Bu TTo N
Press the fresh air int ake button to draw outside air into the passenger compartment. The
indicator light on the button will illuminate.
11 a /C Bu TTo N
Press the
a /C button to turn the air conditioner system on or off.
12 o NoFF Bu
TTo N
Press the o NoFF button to turn the system on or off.
For more information, refer to the “Monitor, climate, audio, phone and voice recognition systems (section 4)” of your
Owner’s Manual.
9To view detailed instructional videos regarding these and other features,
please go to www.nissanownersinfo.mobi.
Page 12 of 24
FM/aM/SiriusXM™* SaTelli T e ra Di o W i TH CD P laY er
(if so equipped)
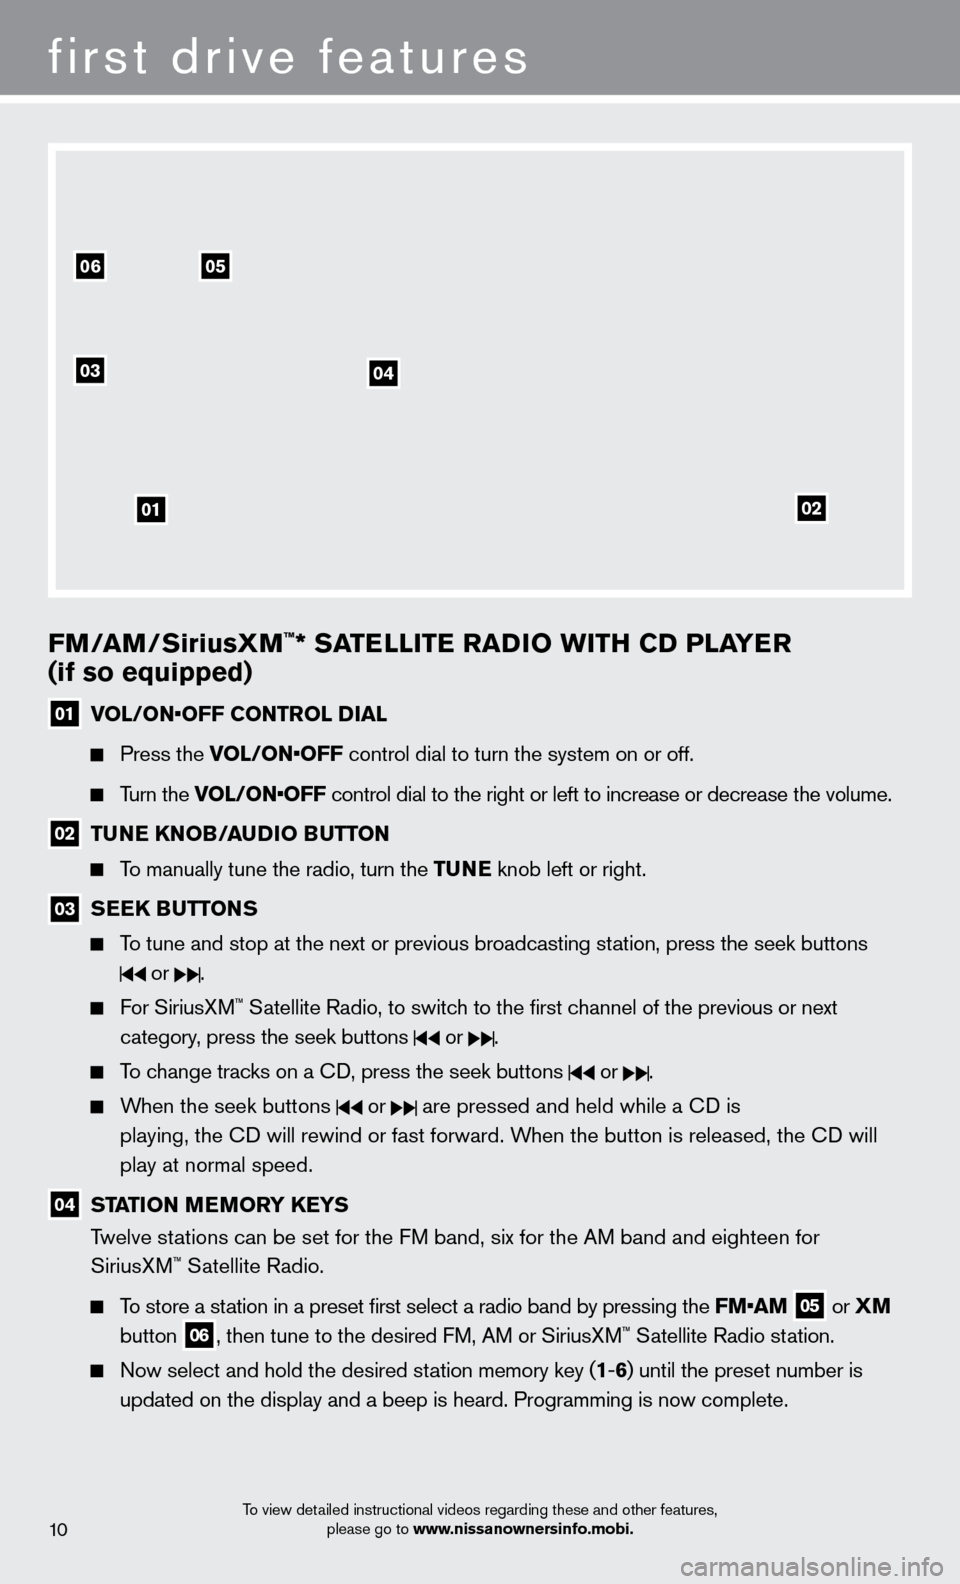
01 vol / o N• o FF C o NT rol Dial
Press the vol / o N• o FF control dial to turn the system on or off.
Turn the vol / o N• o FF control dial to the right or left to increase or decrease the volume.
02 TuNe KNo B/a uDi o Bu TTo N
To manually tune the radio, turn the T uNe knob left or right.
03 S ee K B uT ToNS
To tune and stop at the next or previous broadcasting station, press the seek buttons
or .
For SiriusXM™ Satellite Radio, to switch to the first channel of the previous or next
category
, press the seek buttons
or .
To change tracks on a cD, press the seek buttons or .
When the seek buttons or are pressed and held while a cD is
playing, the
c
D will rewind or fast forward. W
hen the button is released, the c
D will
play at normal speed.
04 STaT io N MeMorY Ke YS
T welve stations can be set for the FM band, six for the AM band and eighteen for
SiriusXM
™ Satellite Radio.
To store a station in a preset first select a radio band by pressing the FM•a M
05 or
XM
button 06, then tune to the desired FM, AM or SiriusXM™ Satellite Radio station.
Now select and hold the desired st ation memory key (1-6 ) until the preset number is
updated on the display and a beep is heard. Programming is now complete.\
To view detailed instructional videos regarding these and other features, please go to www.nissanownersinfo.mobi.
first drive features
0506
03
01
04
02
10
Page 13 of 24
9
To retrieve a previously set station, select the radio band where the preset was stored
then press the corresponding st
ation memory key (1-6 ).
*SiriusXM™ Satellite Radio is only available on vehicles equipped with optional Siri\
usXM™ Satellite Radio subscription service.
For more information, refer to the “Monitor, climate, audio, phone and voice recognition systems (section 4)” of your
Owner’s Manual.
To view detailed instructional videos regarding these and other features, please go to www.nissanownersinfo.mobi.
CruiSe C o NT rol (if so equipped)
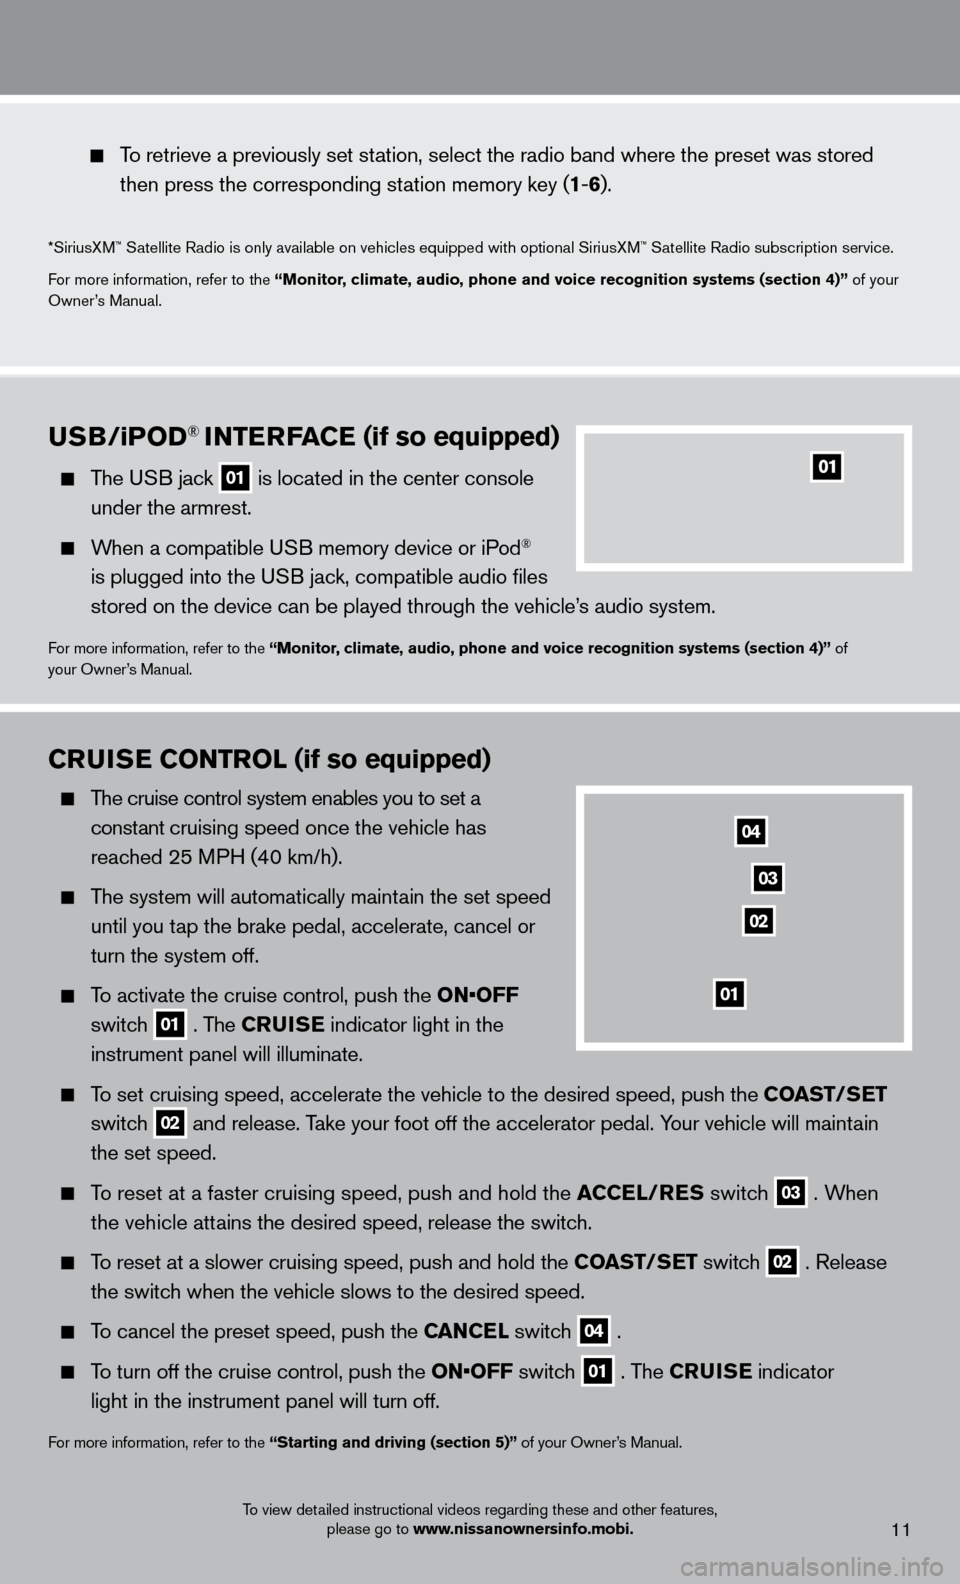
The cruise control system enables you to set a
constant cruising speed once the vehicle has
reached 25 MPH (40 km/h).
The system will automatically maintain the set speed
until you t
ap the brake pedal, accelerate, cancel or
turn the system off.
To activate the cruise control, push the o N• o FF
switc
h
01 . The Crui S e
indicator light in the
instrument panel will illuminate.
To set cruising speed, accelerate the vehicle to the desired speed, push \
the C oa ST/Se T
switc
h
02 and release. Take your foot off the accelerator pedal. Your vehicle will maintain
the set speed.
To reset at a faster cruising speed, push and hold the aC Cel/ re S switch
03 . When
t
he vehicle attains the desired speed, release the switch.
To reset at a slower cruising speed, push and hold the C oa ST/Se T switch
02 . Release
the switc
h when the vehicle slows to the desired speed.
To cancel the preset speed, push the Ca NC el switch
04 .
To turn off the cruise control, push the
o N• o FF switch
01 . The Crui S e indicator
light in the instrument panel will turn off.
For more information, refer to the “Starting and driving (section 5)” of your Owner’s Manual.
01
04
02
03
11
uSB/ iPo D® iNTerFaC e (if so equipped)
The USB jack
01 is located in the center console
under the armrest.
When a compatible USB memory device or iPod®
is plugged into the USB jack, compatible audio files
stored on the device can be played through the vehicle’s audio system.
For more information, refer to the “Monitor, climate, audio, phone and voice recognition systems (section 4)” of
your Owner’s Manual.
Page 14 of 24
Fuel-Filler Door
The fuel-filler door release is located to the left of the
steering wheel below the instrument panel.
To open the fuel-filler door, pull the release 01.
The fuel-filler door is located on the right, rear side of
the vehicle.
For more information, refer to the “Pre-driving checks and adjustments
(section 3)” of your Owner’s Manual.
01
To view detailed instructional videos regarding these and other features,
please go to www.nissanownersinfo.mobi.
first drive features
12
Page 15 of 24
system guide
11
BlueTooTH® HaNDS-Free PHo Ne SYST eM (if so equipped)
With an overhead microphone and sound
t
ransmitted through the audio system speakers,
the Bluetooth® Hands-free Phone System utilizes
Bluetooth® wireless technology and voice recognition
to provide hands-free cellular phone communication.
A cellular telephone should not be used while driving
so full attention may be given to vehicle operation.
*
SYSTEM OPERATING TIPS
close all windows. Surrounding noises may interfere
with system operation and performance.
Press the button on the steering wheel to activate
voice recognition.
Wait until after the tone sounds and the face
icon on the display changes before speaking
a command.
Begin speaking a command within 3.5 seconds of the tone.
*Some jurisdictions prohibit the use of cellular telephones while drivin\
g.
To view detailed instructional videos regarding these and other features, please go to www.nissanownersinfo.mobi.
13
TriP CoMP u T er
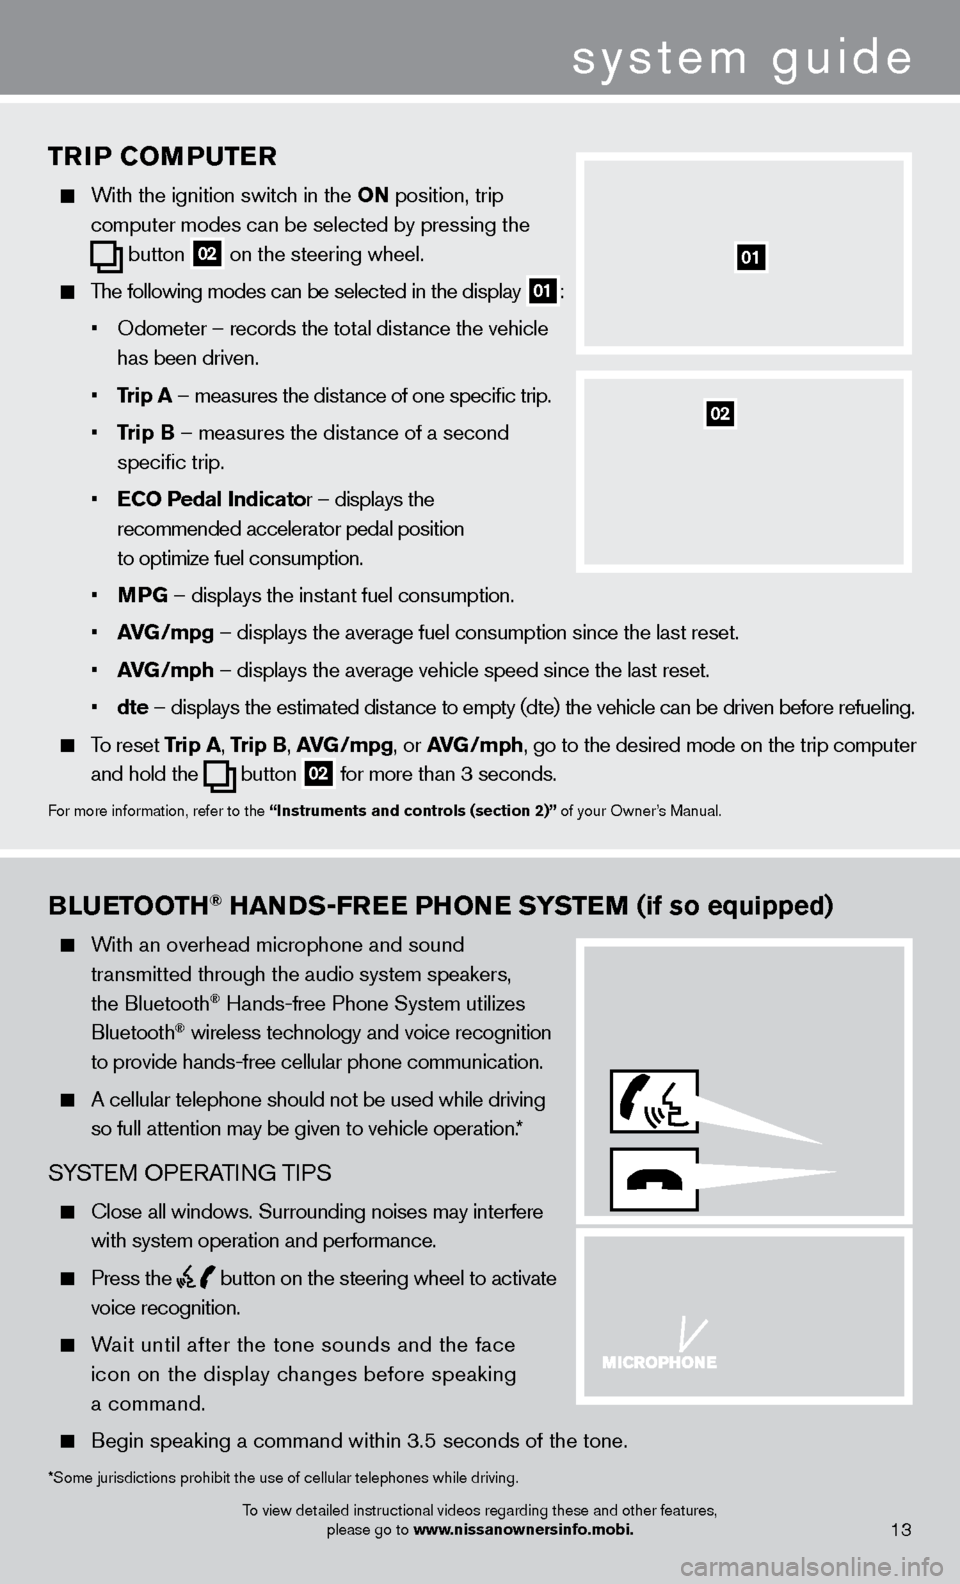
With the ignition switch in the o N position, trip
computer modes
can be selected by pressing the
button
02 on the steering wheel.
The following modes can be selected in the display 01:
•
Odometer – records the tot
al distance the vehicle
has been driven.
•
T
rip
a
– measures the distance of one specific trip.
•
T
rip B – measures the distance of a second
specific trip.
•
e
C
o
Pedal
i
ndicator – displays the
recommended accelerator pedal position
to optimize fuel consumption.
•
M
PG – displays the instant fuel consumption.
•
av
G
/mpg – displays the average fuel consumption since the last reset.
•
av
G
/mph – displays the average vehicle speed since the last reset.
•
dte –
displays the estimated dist
ance to empty (dte) the vehicle can be driven before refueling.
To reset Trip a , Trip B, a vG /mpg, or avG /mph, go to the desired mode on the trip computer
and hold the
button 02 for more than 3 seconds.
For more information, refer to the “instruments and controls (section 2)” of your Owner’s Manual.
01
02
Page 16 of 24
To view detailed instructional videos regarding these and other features, please go to www.nissanownersinfo.mobi.
Speak in a clear and natural voice without pausing between words.
Look straight ahead and avoid speaking too loudly or too softly .
To go back to the previous command, say “Go back” or “c orrection.”
To cancel a voice recognition session, simply wait 5 seconds, say “ c ancel” or “Quit,” or press
and hold the
button for 5 seconds.
To interrupt the system voice and give a command quickly, press the button.
When speaking Phonebook names, please be aware some phones require the la\
st name to be
spoken before the first name. For example, “Michael Smith” may be spoken as “Smith Michael”.
To increase or decrease the volume of the voice prompts, push the volume \
control switches
+ or - on the steering wheel or turn the control dial on the audio system while\
the audio
system is responding.
If the Voice Recognition system does not recognize your voice commands, train th\
e system using the Voice Adaptation Mode. See your Owner’s Manual for detailed information.
Some commands are not available while the vehicle is in motion.
The “Help” command can be used to hear a list of available commands\
at any time.
Please refer to the cellular phone manufacturer ’s Owner’s Manual for detailed information
regarding your Bluetooth® phone.
For recommended phones and detailed instructions, please visit www.nissanusa.com/bluetooth.
BlueTooTH® SYST eM W i THou T Na viG aT io N (if so equipped)
cONNEcTING PRO c EDURE
NOTE: The vehicle must be stationary when connecting the phone.
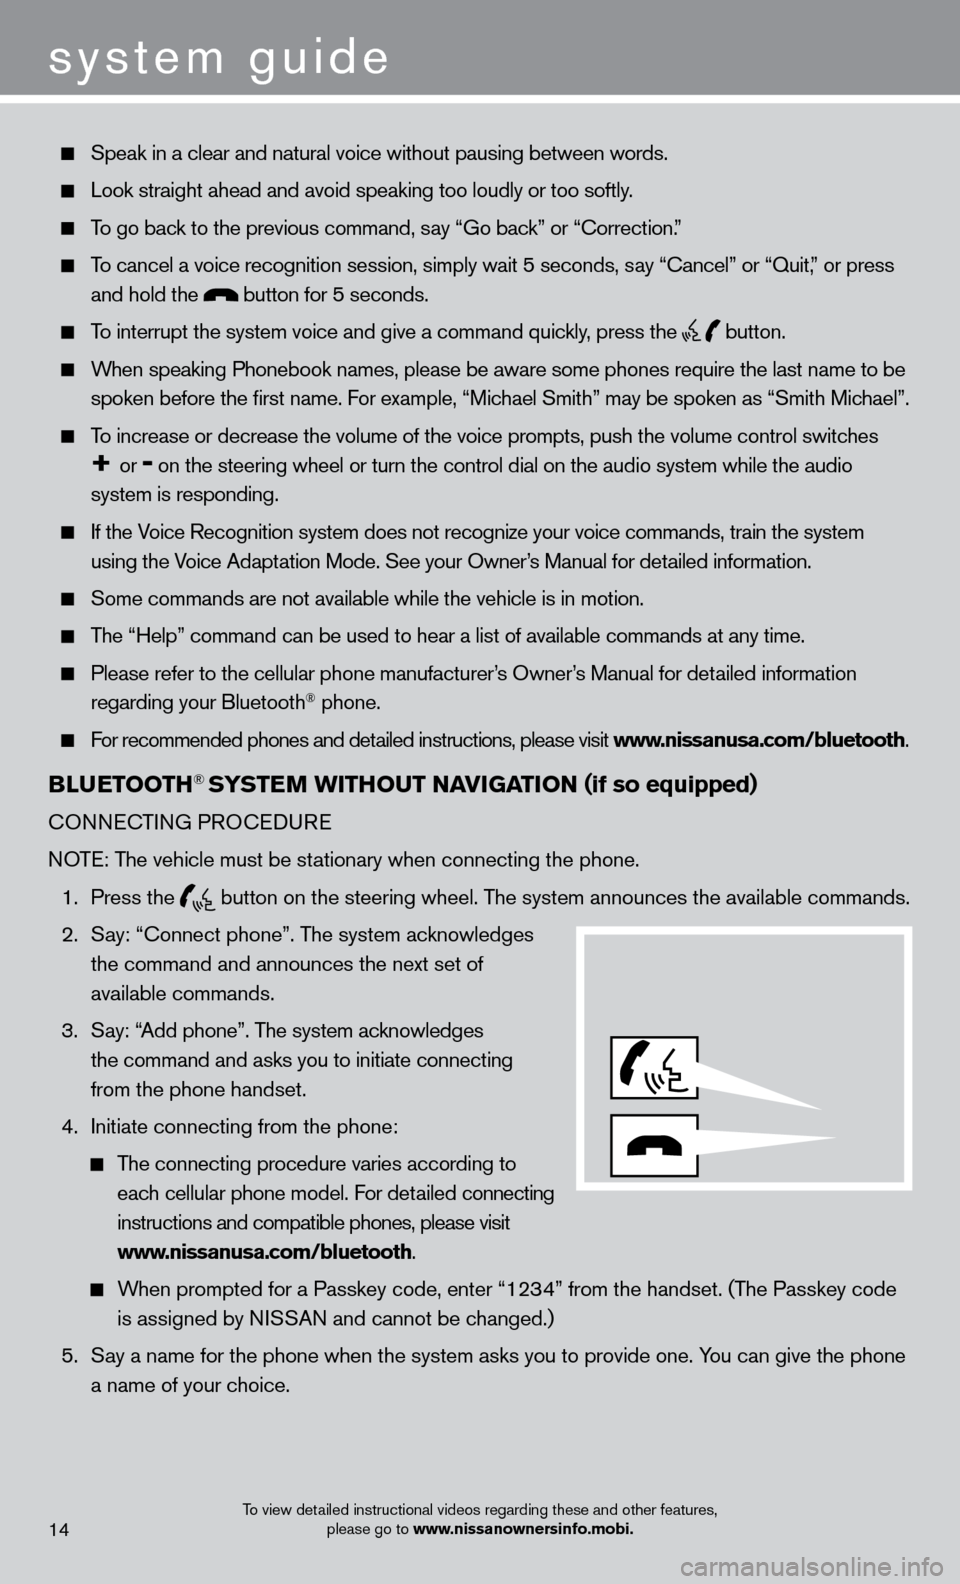
1.
Press the
button on the steering wheel. The system announces the available commands.
2.
S
ay: “
c
onnect phone”. The system acknowledges
the command and announces the next set of
available commands.
3.
S
ay: “Add phone”. The system acknowledges
the command and asks you to initiate connecting
from the phone handset.
4.
Initiate connecting from the phone:
The connecting procedure varies according to each cellular phone model. For detailed connecting
instructions and compatible phones, please visit
www.nissanusa.com/bluetooth.
When prompted for a Passkey code, enter “1234” from the handset. (The Passkey code is assigned by NISSAN and cannot be changed.)
5.
S
ay a name for the phone when the system asks you to provide one. You can give the phone
a name of your choice.
14
system guide