2013 NISSAN SENTRA instrument panel
[x] Cancel search: instrument panelPage 4 of 24
Drive MoDe
NORMAL
Normal drive mode is recommended for normal
everyday driving, and is the default mode of
your vehicle.
E
c O
EcO drive mode is recommended for maximum fuel economy . Performance may be reduced.
• Press the e
C
o button
01 on the instrument panel to activate.
• The
e
C
o
drive indicator light illuminates on the instrument panel.
SPORT
The SPORT drive mode is recommended for an enhanced performance feel. Fuel econ\
omy may be reduced.
• Press the SP
or
T button
02 on the instrument panel to activate.
• SP
or
T drive indicator light illuminates on the instrument panel.
For more information, refer to the “Starting and driving (section 5)” of your Owner’s Manual.
new system features
NaviG aT io N SYST eM (if so equipped)
Your Navigation System can calculate a route from the current location to\
a preferred destination.
T
he real-time map display and turn-by-turn voice guidance will lead you a\
long the route.
The Navigation System will continually update your vehicle’s position. If you have deviated
from the original route, it will recalculate the route from your current\
location.
For more information, refer to your Navigation System Owner’s Manual.
To view detailed instructional videos regarding these and other features, please go to www.nissanownersinfo.mobi.2
0102
Page 9 of 24
TURNING THE ENGINE OFF
For a c ontinuously Variable Transmission, apply the brake pedal, move the shift lever to the
P (P
arK)
position, apply the parking brake and press the ignition switch.
For a manual transmission, apply the brake pedal, place the vehicle in 1s\
t gear, apply the parking brake and push the ignition.
For more information, refer to the “Starting and driving (section 5)” of your Owner’s Manual.
Hea DliGHT C o NT rol SW i TCH
HEADLIGHT cONTROL
Turn the headlight control switch to the
position
01 to turn on the front parking, tail, license plate and
instrument panel lights. Turn the switch to the
position 02 to turn on the headlights.
AUTOLIGHT SYSTEM (if so equipped)
The autolight system will automatically turn the headlights on when it is dark and off when it is light.
The system will keep the headlights on for a period
of time after you turn the ignition off and all doors
are closed.
To activate the autolight system, turn the headlight control switch to the au
To position 03 then push
the ignition switch to
o
N. To deactivate the autolight
system, turn the headlight
control switch to the
o
FF,
01 or position02.
HIGH BEAM SELEcT
Push the headlight control switc h forward
04 to
select the high beam function. The blue indicator
light
illuminates in the instrument panel. Pull the
headlight switch back to the original position to select
the low beam. The blue indicator light goes off.
Pull and release the headlight control switc h
05 to
flash the headlight high beams on and off.
FOG LIGHT SWIT
cH (if so equipped)
N
OTE: The headlights must be on and the low beams
selected for the fog lights to operate.
Turn the switch (inside collar) to the position
06 to turn the fog lights on.
Turn the switch (inside collar)
to the
o FF position to turn the fog lights off.
For more information, refer to the “instruments and controls (section 2)” of your Owner’s Manual.
To view detailed instructional videos regarding these and other features,
please go to www.nissanownersinfo.mobi.
01
02
7
03
06
04
05
Page 13 of 24
9
To retrieve a previously set station, select the radio band where the preset was stored
then press the corresponding st
ation memory key (1-6 ).
*SiriusXM™ Satellite Radio is only available on vehicles equipped with optional Siri\
usXM™ Satellite Radio subscription service.
For more information, refer to the “Monitor, climate, audio, phone and voice recognition systems (section 4)” of your
Owner’s Manual.
To view detailed instructional videos regarding these and other features, please go to www.nissanownersinfo.mobi.
CruiSe C o NT rol (if so equipped)
The cruise control system enables you to set a
constant cruising speed once the vehicle has
reached 25 MPH (40 km/h).
The system will automatically maintain the set speed
until you t
ap the brake pedal, accelerate, cancel or
turn the system off.
To activate the cruise control, push the o N• o FF
switc
h
01 . The Crui S e
indicator light in the
instrument panel will illuminate.
To set cruising speed, accelerate the vehicle to the desired speed, push \
the C oa ST/Se T
switc
h
02 and release. Take your foot off the accelerator pedal. Your vehicle will maintain
the set speed.
To reset at a faster cruising speed, push and hold the aC Cel/ re S switch
03 . When
t
he vehicle attains the desired speed, release the switch.
To reset at a slower cruising speed, push and hold the C oa ST/Se T switch
02 . Release
the switc
h when the vehicle slows to the desired speed.
To cancel the preset speed, push the Ca NC el switch
04 .
To turn off the cruise control, push the
o N• o FF switch
01 . The Crui S e indicator
light in the instrument panel will turn off.
For more information, refer to the “Starting and driving (section 5)” of your Owner’s Manual.
01
04
02
03
11
uSB/ iPo D® iNTerFaC e (if so equipped)
The USB jack
01 is located in the center console
under the armrest.
When a compatible USB memory device or iPod®
is plugged into the USB jack, compatible audio files
stored on the device can be played through the vehicle’s audio system.
For more information, refer to the “Monitor, climate, audio, phone and voice recognition systems (section 4)” of
your Owner’s Manual.
Page 14 of 24
Fuel-Filler Door
The fuel-filler door release is located to the left of the
steering wheel below the instrument panel.
To open the fuel-filler door, pull the release 01.
The fuel-filler door is located on the right, rear side of
the vehicle.
For more information, refer to the “Pre-driving checks and adjustments
(section 3)” of your Owner’s Manual.
01
To view detailed instructional videos regarding these and other features,
please go to www.nissanownersinfo.mobi.
first drive features
12
Page 18 of 24
system guide
To view detailed instructional videos regarding these and other features, please go to www.nissanownersinfo.mobi.
BlueTooTH® SYSTeM W i TH Na viG aT io N (if so equipped)
Send and receive predefined or custom text mess ages* through you vehicle’s
Bluetooth® system.
Bluetooth® Streaming Audio allows you to use a compatible Bluetooth® phone to play
audio files on your device. Your compatible cellular phone can be connected to the vehicle’s
audio system allowing audio files to play through the vehicle’s speakers.
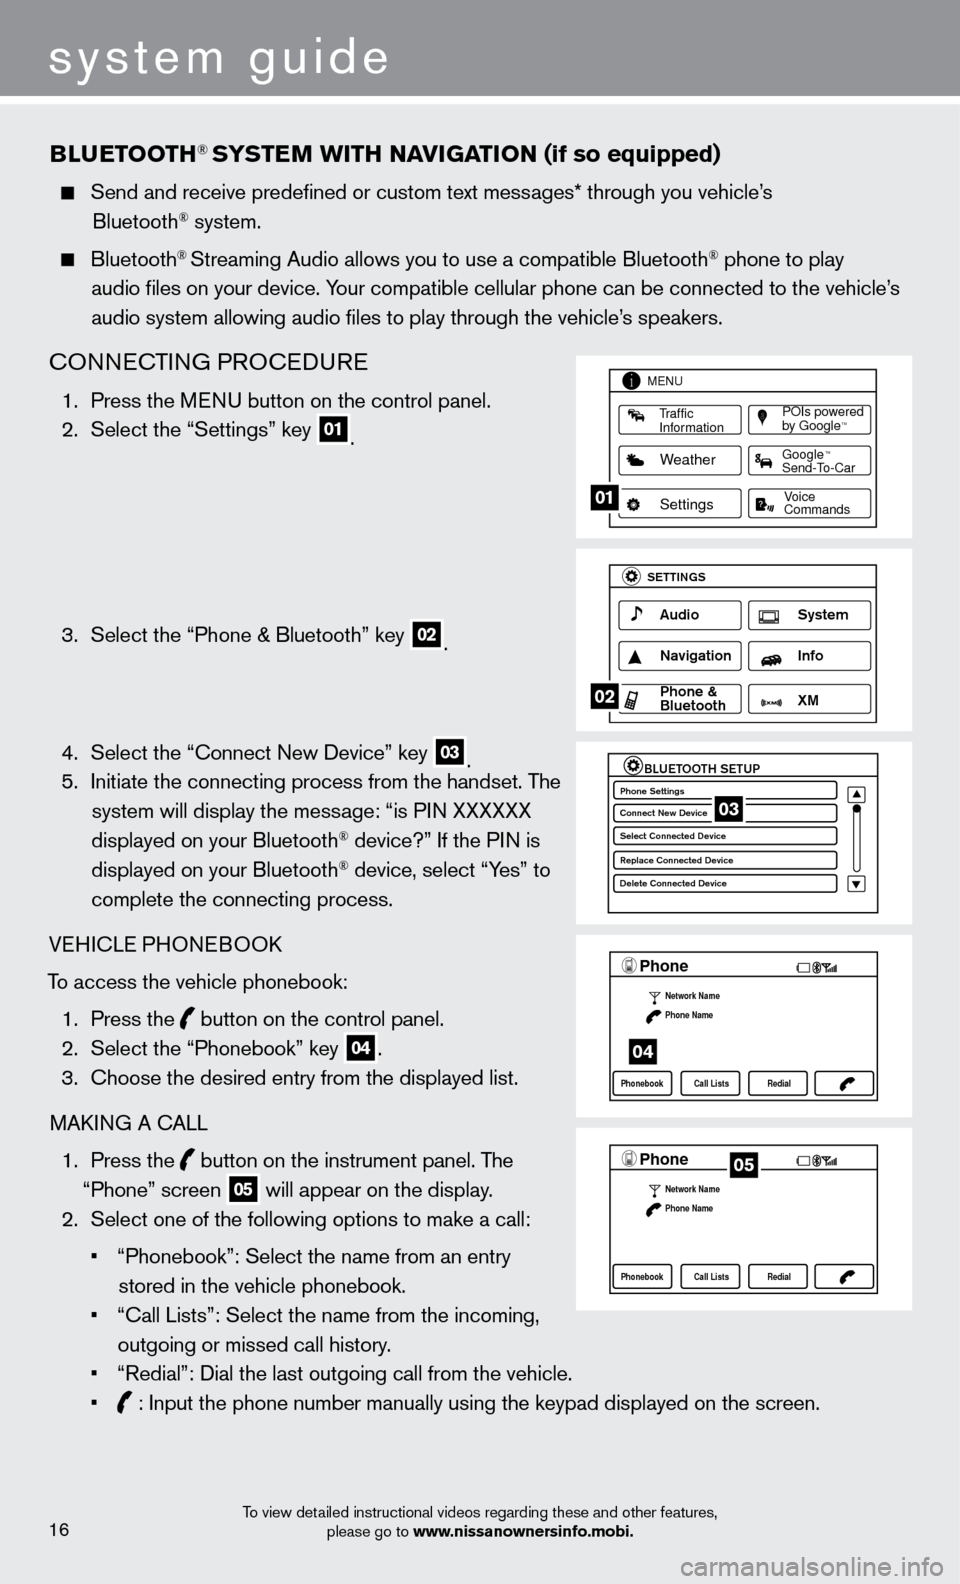
cONNEcTING PRO c EDURE
1. Press the M ENU button on the control panel.
2.
Select the “Settings” key 01.
3.
Select the “Phone & Bluetooth” key 02.
4.
Select the “
c
onnect New Device” key
03. 5.
Initiate the connecting process from the handset. T he
system will display the message: “is PIN XXXXXX
displayed on your Bluetooth
® device?” If the PIN is
displayed on your Bluetooth® device, select “Yes” to
complete the connecting process.
VEHI
c
LE PHONEBOO
k
T
o access the vehicle phonebook:
1.
Press the button on the control panel.
2.
Select the “Phonebook” key 04.
3.
c
hoose the desired entry from the displayed list.
MA
k
I
NG A
c
ALL
1.
Press the
button on the instrument panel. The
“Phone” screen 05 will appear on the display.
2.
Select one of the following options to make a call:
•
“Phonebook”: Select the name from an entry
stored in the vehicle phonebook.
•
“
c
all Lists”: Select the name from the incoming,
outgoing or missed call history.
•
“Redial”: Dial the last outgoing call from the vehicle.
•
: Input the phone number manually using the keypad displayed on the scre\
en.
LHA2253 1A
Traffic
Information
MENU
Weather
Settings
Commands Voice
POIs powered
by GoogleTM
TM
Send-To-Car Google
01
LHA2248 1A
Audio
SETTINGS
Navigation Info
XM S\fstem
\bhone &
Bluetooth
02
LHA2265 1A
BLUETOOTH SETUPPhone Settings
Conne\ft New De\bi\fe
Sele\ft Conne\fted De\bi\C\fe
Repla\fe Conne\fted De\C\bi\fe
Delete Conne\fted De\bi\C\fe03
LHA22971A
Phone
Network Name
Phone Name
Phonebook Call Lists Redial
04
LHA2297 1A
Phone
Network Name
Phone Name
Phonebook Call Lists Redial05
16