2013 NISSAN GT-R ignition
[x] Cancel search: ignitionPage 234 of 346
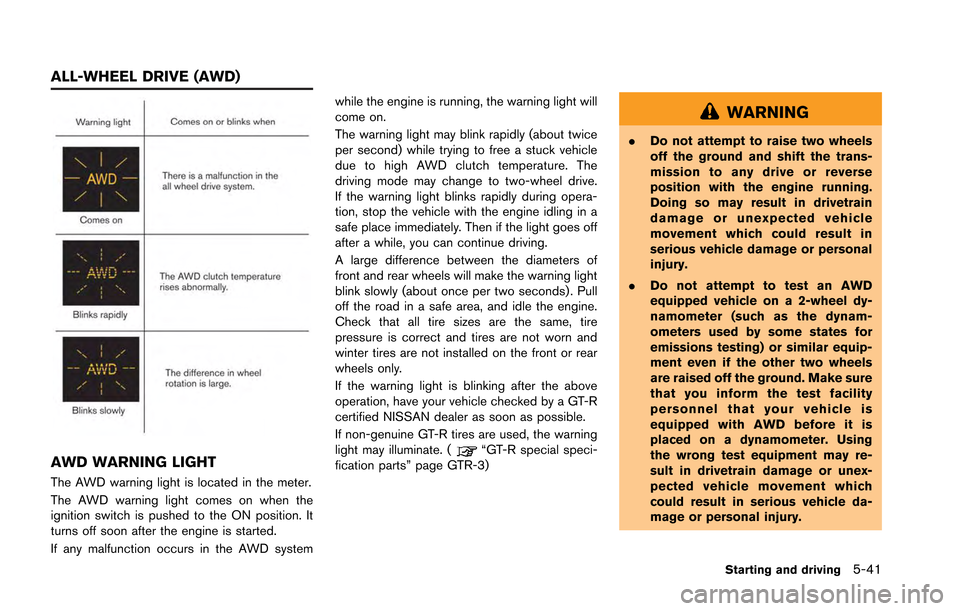
AWD WARNING LIGHT
The AWD warning light is located in the meter.
The AWD warning light comes on when the
ignition switch is pushed to the ON position. It
turns off soon after the engine is started.
If any malfunction occurs in the AWD systemwhile the engine is running, the warning light will
come on.
The warning light may blink rapidly (about twice
per second) while trying to free a stuck vehicle
due to high AWD clutch temperature. The
driving mode may change to two-wheel drive.
If the warning light blinks rapidly during opera-
tion, stop the vehicle with the engine idling in a
safe place immediately. Then if the light goes off
after a while, you can continue driving.
A large difference between the diameters of
front and rear wheels will make the warning light
blink slowly (about once per two seconds) . Pull
off the road in a safe area, and idle the engine.
Check that all tire sizes are the same, tire
pressure is correct and tires are not worn and
winter tires are not installed on the front or rear
wheels only.
If the warning light is blinking after the above
operation, have your vehicle checked by a GT-R
certified NISSAN dealer as soon as possible.
If non-genuine GT-R tires are used, the warning
light may illuminate. (
“GT-R special speci-
fication parts” page GTR-3)
WARNING
. Do not attempt to raise two wheels
off the ground and shift the trans-
mission to any drive or reverse
position with the engine running.
Doing so may result in drivetrain
damage or unexpected vehicle
movement which could result in
serious vehicle damage or personal
injury.
. Do not attempt to test an AWD
equipped vehicle on a 2-wheel dy-
namometer (such as the dynam-
ometers used by some states for
emissions testing) or similar equip-
ment even if the other two wheels
are raised off the ground. Make sure
that you inform the test facility
personnel that your vehicle is
equipped with AWD before it is
placed on a dynamometer. Using
the wrong test equipment may re-
sult in drivetrain damage or unex-
pected vehicle movement which
could result in serious vehicle da-
mage or personal injury.
Starting and driving5-41
ALL-WHEEL DRIVE (AWD)
Page 236 of 346
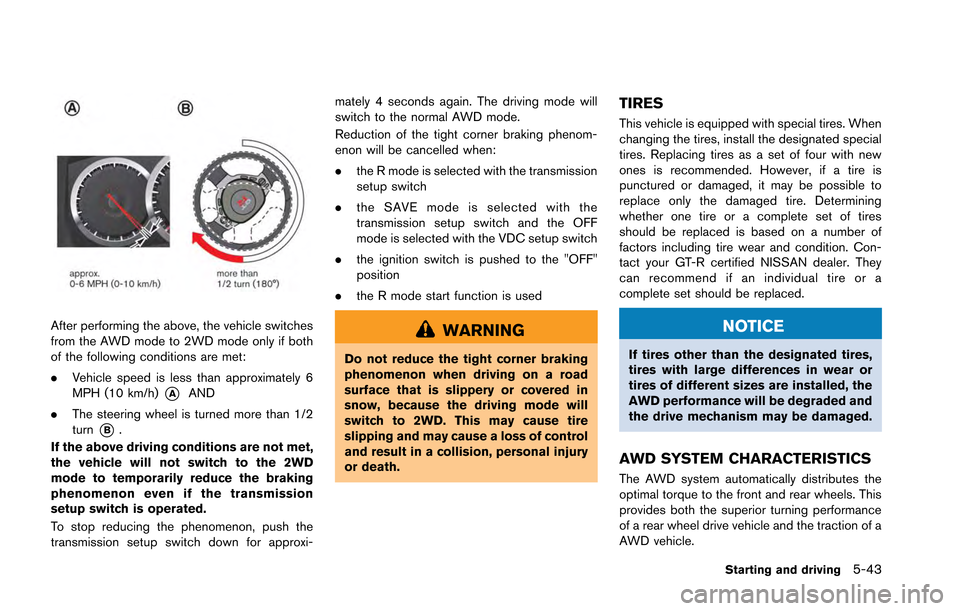
After performing the above, the vehicle switches
from the AWD mode to 2WD mode only if both
of the following conditions are met:
.Vehicle speed is less than approximately 6
MPH (10 km/h)
*AAND
. The steering wheel is turned more than 1/2
turn
*B.
If the above driving conditions are not met,
the vehicle will not switch to the 2WD
mode to temporarily reduce the braking
phenomenon even if the transmission
setup switch is operated.
To stop reducing the phenomenon, push the
transmission setup switch down for approxi- mately 4 seconds again. The driving mode will
switch to the normal AWD mode.
Reduction of the tight corner braking phenom-
enon will be cancelled when:
.
the R mode is selected with the transmission
setup switch
. the SAVE mode is selected with the
transmission setup switch and the OFF
mode is selected with the VDC setup switch
. the ignition switch is pushed to the "OFF"
position
. the R mode start function is used
WARNING
Do not reduce the tight corner braking
phenomenon when driving on a road
surface that is slippery or covered in
snow, because the driving mode will
switch to 2WD. This may cause tire
slipping and may cause a loss of control
and result in a collision, personal injury
or death.
TIRES
This vehicle is equipped with special tires. When
changing the tires, install the designated special
tires. Replacing tires as a set of four with new
ones is recommended. However, if a tire is
punctured or damaged, it may be possible to
replace only the damaged tire. Determining
whether one tire or a complete set of tires
should be replaced is based on a number of
factors including tire wear and condition. Con-
tact your GT-R certified NISSAN dealer. They
can recommend if an individual tire or a
complete set should be replaced.
NOTICE
If tires other than the designated tires,
tires with large differences in wear or
tires of different sizes are installed, the
AWD performance will be degraded and
the drive mechanism may be damaged.
AWD SYSTEM CHARACTERISTICS
The AWD system automatically distributes the
optimal torque to the front and rear wheels. This
provides both the superior turning performance
of a rear wheel drive vehicle and the traction of a
AWD vehicle.
Starting and driving5-43
Page 239 of 346
5-46Starting and driving
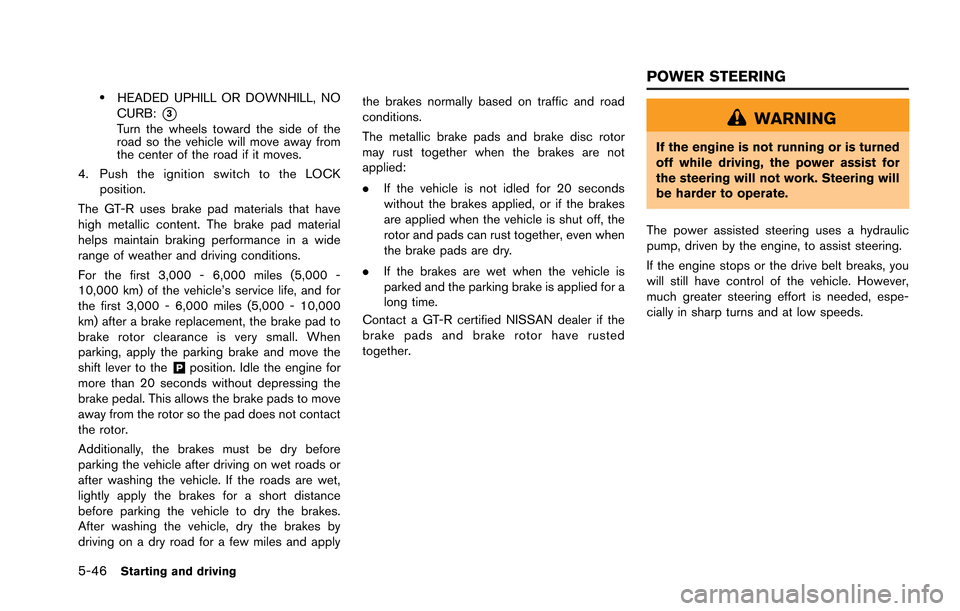
.HEADED UPHILL OR DOWNHILL, NO
CURB:
*3Turn the wheels toward the side of the
road so the vehicle will move away from
the center of the road if it moves.
4. Push the ignition switch to the LOCK position.
The GT-R uses brake pad materials that have
high metallic content. The brake pad material
helps maintain braking performance in a wide
range of weather and driving conditions.
For the first 3,000 - 6,000 miles (5,000 -
10,000 km) of the vehicle’s service life, and for
the first 3,000 - 6,000 miles (5,000 - 10,000
km) after a brake replacement, the brake pad to
brake rotor clearance is very small. When
parking, apply the parking brake and move the
shift lever to the
&Pposition. Idle the engine for
more than 20 seconds without depressing the
brake pedal. This allows the brake pads to move
away from the rotor so the pad does not contact
the rotor.
Additionally, the brakes must be dry before
parking the vehicle after driving on wet roads or
after washing the vehicle. If the roads are wet,
lightly apply the brakes for a short distance
before parking the vehicle to dry the brakes.
After washing the vehicle, dry the brakes by
driving on a dry road for a few miles and apply the brakes normally based on traffic and road
conditions.
The metallic brake pads and brake disc rotor
may rust together when the brakes are not
applied:
.
If the vehicle is not idled for 20 seconds
without the brakes applied, or if the brakes
are applied when the vehicle is shut off, the
rotor and pads can rust together, even when
the brake pads are dry.
. If the brakes are wet when the vehicle is
parked and the parking brake is applied for a
long time.
Contact a GT-R certified NISSAN dealer if the
brake pads and brake rotor have rusted
together.
WARNING
If the engine is not running or is turned
off while driving, the power assist for
the steering will not work. Steering will
be harder to operate.
The power assisted steering uses a hydraulic
pump, driven by the engine, to assist steering.
If the engine stops or the drive belt breaks, you
will still have control of the vehicle. However,
much greater steering effort is needed, espe-
cially in sharp turns and at low speeds.
POWER STEERING
Page 242 of 346
The Vehicle Dynamic Control (VDC) system
uses various sensors to monitor driver inputs
and vehicle motion. Under certain driving con-
ditions, the VDC system helps to perform the
following functions.
.Controls brake pressure to reduce wheel
slip on one slipping drive wheel so power is
transferred to a non slipping drive wheel on
the same axle.
. Controls brake pressure and engine output
to reduce drive wheel slip based on vehicle
speed (traction control function) .
. Controls brake pressure at individual wheels
and engine output to help the driver maintain
control of the vehicle in the following
conditions:
— understeer (vehicle tends to not follow
the steered path despite increased
steering input)
— oversteer (vehicle tends to spin due to certain road or driving conditions) .
The VDC system can help the driver to maintain
control of the vehicle, but it cannot prevent loss
of vehicle control in all driving situations.
When the VDC system operates, the VDC
warning light
in the instrument panel flashes
so note the following: .
The road may be slippery or the system may
determine some action is required to help
keep the vehicle on the steered path.
. You may feel a pulsation in the brake pedal
and hear a noise or vibration from under the
hood. This is normal and indicates that the
VDC system is working properly.
. Adjust your speed and driving to the road
conditions.
. The VDC mode can be changed using the
VDC setup switch. (
“VDC, transmis-
sion and suspension setup switches” page
5-24)
(
“Vehicle Dynamic Control (VDC) warning
light” page 2-30,“Vehicle Dynamic Con-
trol (VDC) off indicator light” page 2-31)
If a malfunction occurs in the system, the VDC
warning light
illuminates in the instrument
panel. The VDC system automatically turns off.
The VDC setup switch is used to turn off the
VDC system. The VDC off indicator
illuminates to indicate the VDC system is off.
When the VDC setup switch is used to turn off
the system, the VDC system still operates to
prevent one drive wheel from slipping by
transferring power to a non slipping drive wheel.
The VDC warning light
flashes if this
occurs. All other VDC functions are off and the VDC warning light
will not flash. The VDC
system is automatically reset to on when the
ignition switch is placed in the off position then
back to the on position.
(
“Vehicle Dynamic Control (VDC) warning
light” page 2-30,“Vehicle Dynamic Con-
trol (VDC) off indicator light” page 2-31)
The computer has a built-in diagnostic feature
that tests the system each time you start the
engine and move the vehicle forward or in
reverse at a slow speed. When the self-test
occurs, you may hear a “clunk” noise and/or feel
a pulsation in the brake pedal. This is normal and
is not an indication of a malfunction.
WARNING
. The VDC system is designed to help
the driver maintain stability but
does not prevent accidents due to
abrupt steering operation at high
speeds or by careless or dangerous
driving techniques. Reduce vehicle
speed and be especially careful
when driving and cornering on slip-
pery surfaces and always drive care-
fully.
. Do not modify the vehicle’s suspen-
sion. If suspension parts such as
Starting and driving5-49
VEHICLE DYNAMIC CONTROL (VDC)
SYSTEM
Page 249 of 346
6-2In case of emergency
In the event of a roadside emergency, Roadside
Assistance Service is available to you. Please
refer to your Warranty Information Booklet (U.S.)
or Warranty & Roadside Assistance Information
Booklet (Canada) for details.To shut off the engine in an emergency situation
while driving, perform the following procedure:
.Rapidly push the push-button ignition switch
3 consecutive times in less than 1.5
seconds, or
. Push and hold the push-button ignition
switch for more than 2 seconds.TIRE PRESSURE MONITORING
SYSTEM (TPMS)
This vehicle is equipped with the Tire Pressure
Monitoring System (TPMS) . It monitors tire
pressure of all tires. When the low tire pressure
warning light is lit, one or more of your tires is
significantly under-inflated. If the vehicle is being
driven with low tire pressure, the TPMS will
activate and warn you of it by the low tire
pressure warning light (in the instrument panel)
or the LOW PRESSURE information screen (on
the display) . This system will activate only when
the vehicle is driven at speeds above 16 MPH
(25 km/h). (
“Low tire pressure warning
light” page 2-26) (“Tire Pressure Monitor-
ing System (TPMS)” page 5-4)
WARNING
. If the low tire pressure warning light
illuminates or LOW PRESSURE in-
formation is displayed on the moni-
tor screen while driving, avoid
sudden steering maneuvers or
abrupt braking, reduce vehicle
speed, pull off the road to a safe
location and stop the vehicle as
soon as possible. Driving with un-
der-inflated tires may permanently
ROADSIDE ASSISTANCE
PROGRAM EMERGENCY ENGINE SHUT OFF FLAT TIRE
Page 253 of 346
6-6In case of emergency
WARNING
Always follow the instructions below.
Failure to do so could result in damage
to the charging system and cause
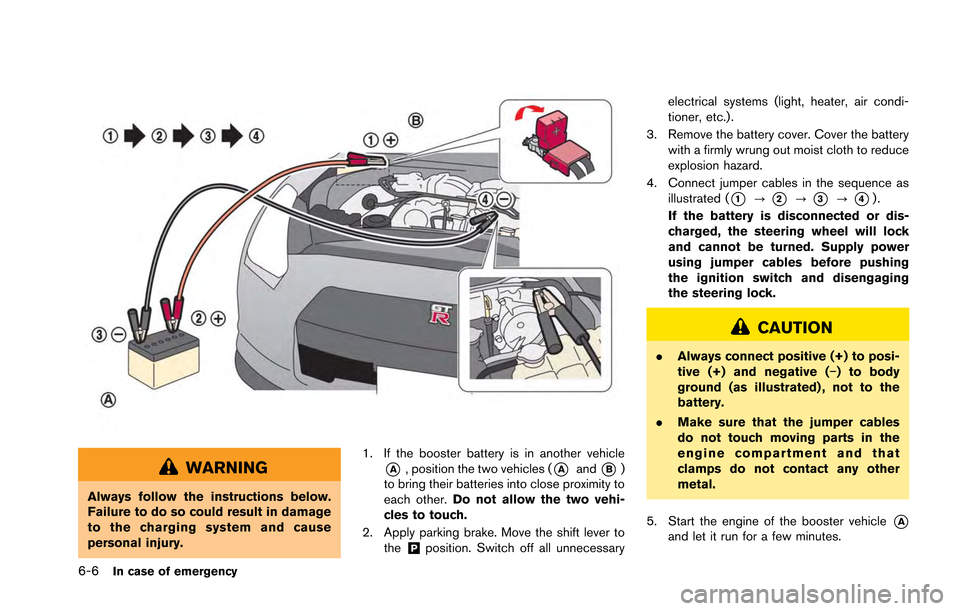
personal injury.1. If the booster battery is in another vehicle
*A, position the two vehicles (*Aand*B)
to bring their batteries into close proximity to
each other. Do not allow the two vehi-
cles to touch.
2. Apply parking brake. Move the shift lever to the
&Pposition. Switch off all unnecessary electrical systems (light, heater, air condi-
tioner, etc.).
3. Remove the battery cover. Cover the battery with a firmly wrung out moist cloth to reduce
explosion hazard.
4. Connect jumper cables in the sequence as illustrated (
*1?*2?*3?*4).
If the battery is disconnected or dis-
charged, the steering wheel will lock
and cannot be turned. Supply power
using jumper cables before pushing
the ignition switch and disengaging
the steering lock.
CAUTION
. Always connect positive (+) to posi-
tive (+) and negative (−) to body
ground (as illustrated) , not to the
battery.
. Make sure that the jumper cables
do not touch moving parts in the
engine compartment and that
clamps do not contact any other
metal.
5. Start the engine of the booster vehicle
*Aand let it run for a few minutes.
Page 254 of 346
6. Keep the engine speed of the boostervehicle
*Aat about 2,000 rpm, and start
the engine of the vehicle being jump started
*B.
NOTE:
Do not keep the starter motor engaged
for more than 10 seconds. If the engine
does not start right away, push the
ignition switch to the OFF position and
wait 10 seconds before trying again.
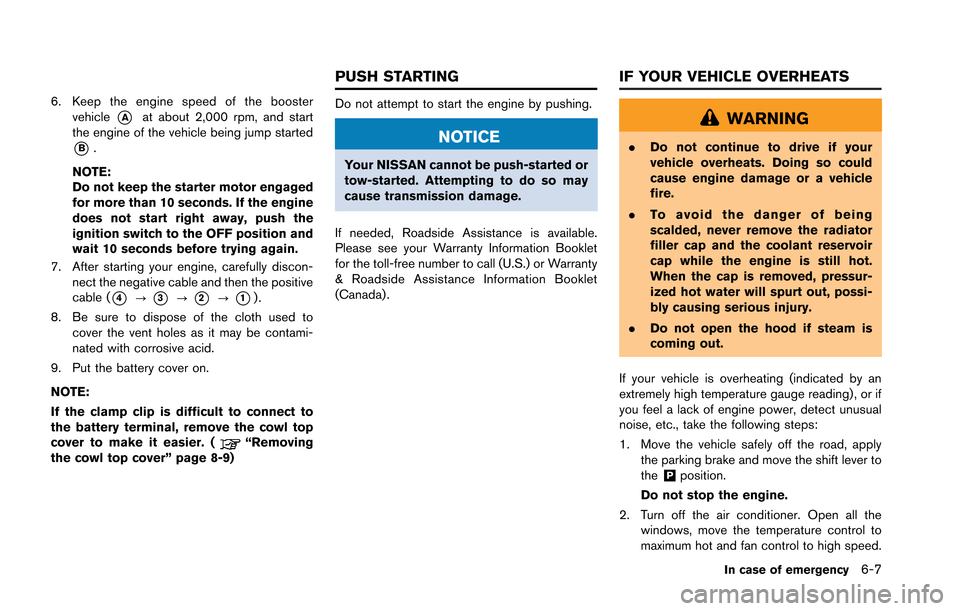
7. After starting your engine, carefully discon- nect the negative cable and then the positive
cable (
*4?*3?*2?*1).
8. Be sure to dispose of the cloth used to cover the vent holes as it may be contami-
nated with corrosive acid.
9. Put the battery cover on.
NOTE:
If the clamp clip is difficult to connect to
the battery terminal, remove the cowl top
cover to make it easier. (
“Removing
the cowl top cover” page 8-9)
Do not attempt to start the engine by pushing.
NOTICE
Your NISSAN cannot be push-started or
tow-started. Attempting to do so may
cause transmission damage.
If needed, Roadside Assistance is available.
Please see your Warranty Information Booklet
for the toll-free number to call (U.S.) or Warranty
& Roadside Assistance Information Booklet
(Canada) .
WARNING
. Do not continue to drive if your
vehicle overheats. Doing so could
cause engine damage or a vehicle
fire.
. To avoid the danger of being
scalded, never remove the radiator
filler cap and the coolant reservoir
cap while the engine is still hot.
When the cap is removed, pressur-
ized hot water will spurt out, possi-
bly causing serious injury.
. Do not open the hood if steam is
coming out.
If your vehicle is overheating (indicated by an
extremely high temperature gauge reading) , or if
you feel a lack of engine power, detect unusual
noise, etc., take the following steps:
1. Move the vehicle safely off the road, apply the parking brake and move the shift lever to
the
&Pposition.
Do not stop the engine.
2. Turn off the air conditioner. Open all the windows, move the temperature control to
maximum hot and fan control to high speed.
In case of emergency6-7
PUSH STARTING IF YOUR VEHICLE OVERHEATS
Page 273 of 346
8-6Maintenance and do-it-yourself
notice any leaks or if gasoline fumes are evident,
check for the cause and have it corrected
immediately.
Power steering fluid level* and lines:Check
the level when the fluid is cold, with the engine
off. Check the lines for proper attachment, leaks,
cracks, etc.
Radiator and hoses: Check the front of the
radiator and clean off any dirt, insects, leaves,
etc., that may have accumulated. Make sure the
hoses have no cracks, deformation, rot or loose
connections.
Underbody: The underbody is frequently ex-
posed to corrosive substances such as those
used on icy roads or to control dust. It is very
important to remove these substances, other-
wise rust will form on the floor pan, frame, fuel
lines and around the exhaust system. At the end
of winter, the underbody should be thoroughly
flushed with plain water, being careful to clean
those areas where mud and dirt may accumu-
late. (
“Underbody” page 7-3)
Windshield washer fluid*: Check that there is
adequate fluid in the reservoir.
When performing any inspection or mainte-
nance work on your vehicle, always take care
to prevent serious accidental injury to yourself or
damage to the vehicle. The following are general
precautions which should be closely observed.
WARNING
. Park the vehicle on a level surface,
apply the parking brake securely
and block the wheels to prevent
the vehicle from moving. Move the
shift lever to the
&Pposition.
. Be sure the ignition switch is in the
OFF or LOCK position when per-
forming any parts replacement or
repairs.
. If you must work with the engine
running, keep your hands, clothing,
hair and tools away from moving
fans, belts and any other moving
parts.
. It is advisable to secure or remove
any loose clothing and remove any
jewelry, such as rings, watches, etc.
before working on your vehicle.
. Always wear eye protection when-
ever you work on your vehicle. .
If you must run the engine in an
enclosed space such as a garage, be
sure there is proper ventilation for
exhaust gases to escape.
. Never get under the vehicle while it
is supported only by a jack. If it is
necessary to work under the vehicle,
support it with safety stands.
. Keep smoking materials, flame and
sparks away from fuel tank and the
battery.
. Your vehicle is equipped with an
automatic engine cooling fan. It may
come on at any time without warn-
ing, even if the ignition key is in the
OFF position and the engine is not
running. To avoid injury, always
disconnect the negative battery
cable before working near the fan.
. The fuel filter or fuel lines should be
serviced by a GT-R certified NISSAN
dealer because the fuel lines are
under high pressure even when the
engine is off.
MAINTENANCE PRECAUTIONS