2013 NISSAN GT-R ignition
[x] Cancel search: ignitionPage 188 of 346
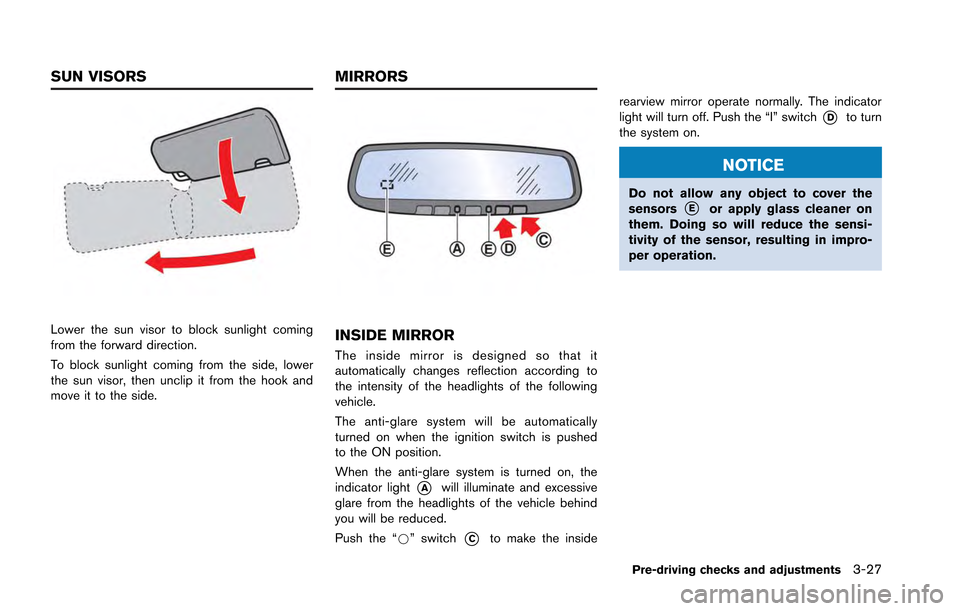
Lower the sun visor to block sunlight coming
from the forward direction.
To block sunlight coming from the side, lower
the sun visor, then unclip it from the hook and
move it to the side.INSIDE MIRROR
The inside mirror is designed so that it
automatically changes reflection according to
the intensity of the headlights of the following
vehicle.
The anti-glare system will be automatically
turned on when the ignition switch is pushed
to the ON position.
When the anti-glare system is turned on, the
indicator light
*Awill illuminate and excessive
glare from the headlights of the vehicle behind
you will be reduced.
Push the “*” switch
*Cto make the inside rearview mirror operate normally. The indicator
light will turn off. Push the “I” switch
*Dto turn
the system on.
NOTICE
Do not allow any object to cover the
sensors*Eor apply glass cleaner on
them. Doing so will reduce the sensi-
tivity of the sensor, resulting in impro-
per operation.
Pre-driving checks and adjustments3-27
SUN VISORS MIRRORS
Page 189 of 346
3-28Pre-driving checks and adjustments
OUTSIDE MIRRORS
WARNING
Objects viewed in the outside mirror on
the passenger side are closer than they
appear. Be careful when moving to the
right. Using only this mirror could cause
an accident. Use the inside mirror or
glance over your shoulder to properly
judge distances to other objects.
The outside mirror will operate only when the
ignition switch is in the ACC or ON position.
Adjusting the outside mirrors
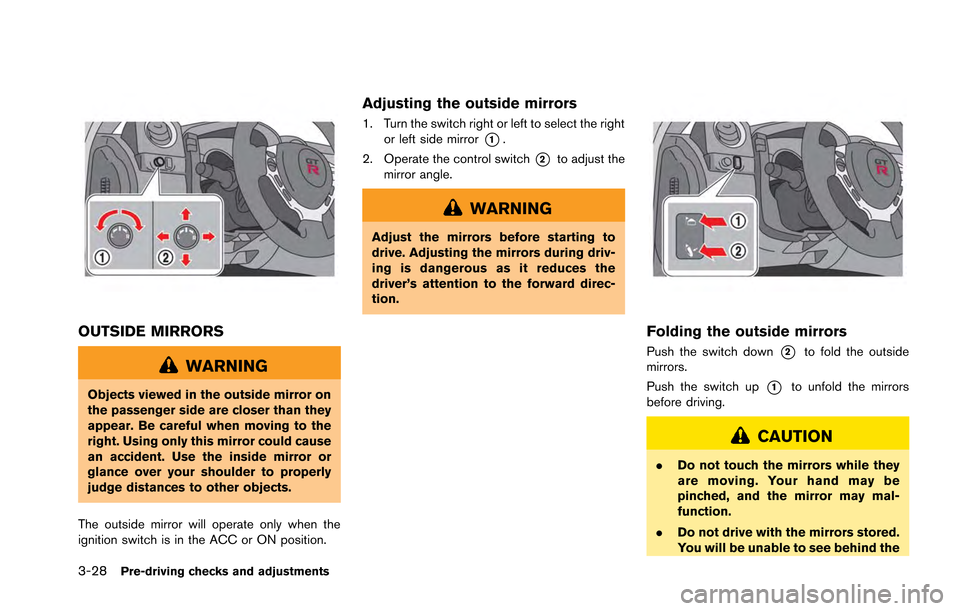
1. Turn the switch right or left to select the right or left side mirror
*1.
2. Operate the control switch
*2to adjust the
mirror angle.
WARNING
Adjust the mirrors before starting to
drive. Adjusting the mirrors during driv-
ing is dangerous as it reduces the
driver’s attention to the forward direc-
tion.
Folding the outside mirrors
Push the switch down*2to fold the outside
mirrors.
Push the switch up
*1to unfold the mirrors
before driving.
CAUTION
. Do not touch the mirrors while they
are moving. Your hand may be
pinched, and the mirror may mal-
function.
. Do not drive with the mirrors stored.
You will be unable to see behind the
Page 190 of 346
vehicle.
. If the mirrors were folded or un-
folded by hand, there is a chance
that the mirror will move forward or
backward during driving. If the mir-
rors were folded or unfolded by
hand, be sure to adjust them again
electrically before driving.
NOTE:
. If the switch is operated continuously,
the mirror may stop before movement
is completed. This does not indicate
that there is a malfunction. Wait a few
moments, then operate the switch
again.
. If the mirrors were folded or unfolded
by hand, the mirrors may start moving
when the ignition switch is set to the
ACC or ON position.
. When the ignition switch is in the ON
position, operating the rear window
defroster will also remove frost and
fog from the outside mirrors.
(
“Rear window defroster switch”
page 2-48)
VANITY MIRROR
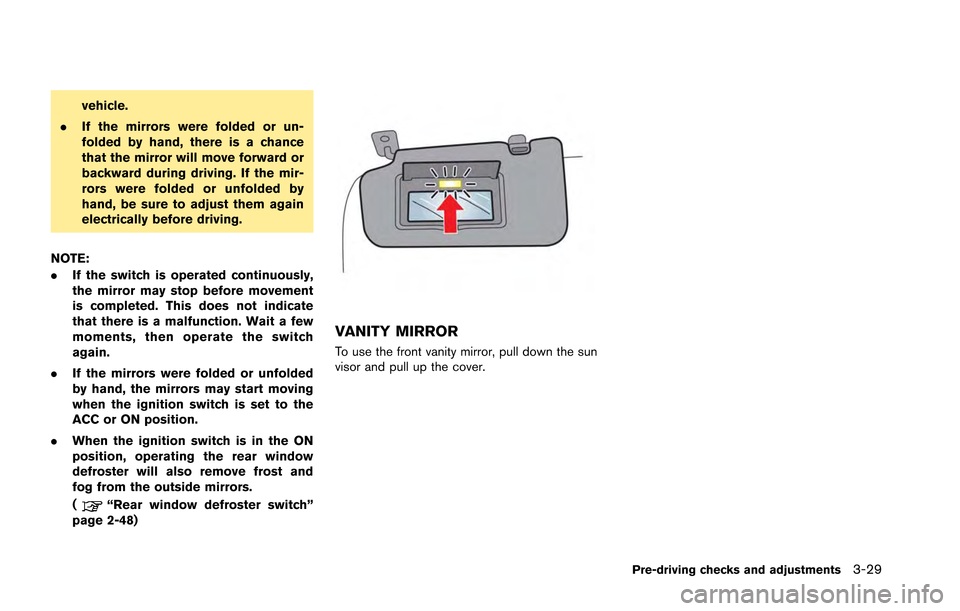
To use the front vanity mirror, pull down the sun
visor and pull up the cover.
Pre-driving checks and adjustments3-29
Page 194 of 346
5 Starting and driving
Precautions when starting and driving ............................... 5-3Exhaust gas (carbon monoxide) ..................................... 5-3Three-way catalyst ............................................................. 5-3
Tire Pressure Monitoring System (TPMS) ................... 5-4
Avoiding collision and rollover ........................................ 5-7
Off-road recovery ............................................................... 5-7
Rapid air pressure loss ..................................................... 5-8
Drinking alcohol/drugs and driving ................................ 5-8All-Wheel Drive (AWD) driving safety precautions .... 5-9
Push-button ignition switch ................................................... 5-9
Operating range for engine start ................................ 5-10
Ignition switch operation ............................................... 5-10
Ignition switch positions ................................................ 5-10
Emergency engine shut off ........................................... 5-11
Intelligent Key battery discharge ................................. 5-11
Before starting the engine .................................................. 5-13
Starting the engine ............................................................... 5-13
Driving the vehicle ................................................................ 5-15 Dual clutch transmission ............................................... 5-15
Driving tips ........................................................................\
5-21
VDC, transmission and suspension setup switches .... 5-24 How to switch the modes ............................................ 5-25
Features of each mode .................................................. 5-27 Turbocharger system ........................................................... 5-31
R mode start function ......................................................... 5-32
How to use R mode start function ........................... 5-33
Parking brake ........................................................................\
. 5-33
Cruise control ........................................................................\
5-34 Precautions on cruise control .................................... 5-35
Steering-wheel-mounted controls ............................ 5-35
Indicators and display .................................................. 5-36
Cruise control operations ........................................... 5-36
Hill Start Assist ..................................................................... 5-38
Break-in schedule ................................................................ 5-39 Wheel alignment ........................................................... 5-39
Increasing fuel economy ..................................................... 5-40
All-Wheel Drive (AWD) ...................................................... 5-41 AWD warning light ....................................................... 5-41
Tight corner braking phenomenon ........................... 5-42
Tires ........................................................................\
.......... 5-43AWD system characteristics ...................................... 5-43
Limited Slip Differential (LSD) .......................................... 5-44
Parking/parking on hills ....................................................... 5-45
Power steering ...................................................................... 5-46
Brake system ........................................................................\
. 5-47 Braking precautions ..................................................... 5-47
Parking brake break-in ................................................. 5-47
Page 197 of 346
5-4Starting and driving
WARNING
.The exhaust gas and the exhaust
system are very hot. Keep people,
animals or flammable materials
away from the exhaust system com-
ponents.
. Do not stop or park the vehicle over
flammable materials such as dry
grass, waste paper or rags. They
may ignite and cause a fire.
NOTICE
.Do not use leaded gasoline. Depos-
its from leaded gasoline seriously
reduce the three-way catalyst’s abil-
ity to help reduce exhaust pollu-
tants.
. Keep your engine tuned up. Mal-
functions in the ignition, fuel injec-
tion, or electrical systems can cause
overrich fuel flow into the three-way
catalyst, causing it to overheat. Do
not keep driving if the engine mis-
fires, or if noticeable loss of perfor-
mance or other unusual operating conditions are detected. Have the
vehicle inspected promptly by a
GT-R certified NISSAN dealer.
. Avoid driving with an extremely low
fuel level. Running out of fuel could
cause the engine to misfire, dama-
ging the three-way catalyst.
. Do not race the engine while warm-
ing it up.
. Do not push or tow your vehicle to
start the engine.
TIRE PRESSURE MONITORING
SYSTEM (TPMS)
Each tire should be checked monthly when cold
and inflated to the inflation pressure recom-
mended by the vehicle manufacturer on the
vehicle placard or tire inflation pressure label. (If
your vehicle has tires of a different size than the
size indicated on the vehicle placard or tire
inflation pressure label, you should determine
the proper tire inflation pressure for those tires.)
As an added safety feature, your vehicle has
been equipped with a Tire Pressure Monitoring
System (TPMS) that illuminates a low tire
pressure telltale when one or more of your tires
is significantly under-inflated. Accordingly, when the low tire pressure telltale illuminates, you
should stop and check your tires as soon as
possible, and inflate them to the proper pres-
sure. Driving on a significantly under-inflated tire
causes the tire to overheat and can lead to tire
failure. Under-inflation also reduces fuel effi-
ciency and tire tread life, and may affect the
vehicle’s handling and stopping ability.
If the vehicle is being driven with one or more flat
tires, the run-flat tire warning light will illuminate
continuously and a chime will sound for 10
seconds. The chime will only sound at the first
indication of a flat tire, and the warning light will
illuminate continuously. When the Flat tire
warning is activated, have the system reset
and the tire checked and replaced if necessary
by a GT-R certified NISSAN dealer. Even if the
tire is inflated to the specified COLD tire
pressure, the warning light will continue to
illuminate until the system is reset by a GT-R
certified NISSAN dealer. Your vehicle can be
driven for a limited time on a flat tire. (
“Run-
flat tires” page 8-37)
Please note that the TPMS is not a substitute for
proper tire maintenance, and it is the driver’s
responsibility to maintain correct tire pressure,
even if under-inflation has not reached the level
to trigger illumination of the TPMS low tire
pressure telltale.
Page 202 of 346
Remember, drinking and driving don’t mix! And
that is true for drugs, too (over-the-counter,
prescription, and illegal drugs) . Don’t drive if
your ability to operate your vehicle is impaired by
alcohol, drugs, or some other physical condition.
ALL-WHEEL DRIVE (AWD) DRIVING
SAFETY PRECAUTIONS
WARNING
.Do not drive beyond the perfor-
mance capability of the tires, even
with AWD engaged. Accelerating
quickly, sharp steering maneuvers
or sudden braking may cause loss
of control.
. Always use the specified tires on all
four wheels. Install tire chains on
the rear wheels when driving on
slippery roads and drive carefully.
. This vehicle is not designed for
offroad (rough road) use. Do not
drive on sandy or muddy roads that
tires may get stuck in.
. Do not attempt to raise two wheels
off the ground and shift the trans-
mission to any
&A↔&Mor&Rposition
with the engine running. Doing so may result in drivetrain damage or
unexpected vehicle movement
which could result in serious vehicle
damage or personal injury.
. Do not attempt to test an AWD
equipped vehicle on a 2-wheel dy-
namometer, (such as the dynam-
ometers used by some states for
emissions testing) , or similar equip-
ment even if the other two wheels
are raised off the ground. Make sure
you inform test facility personnel
that your vehicle is equipped with
AWD before it is placed on a
dynamometer. Using the wrong test
equipment may result in drivetrain
damage or unexpected vehicle
movement which could result in
serious vehicle damage or personal
injury.
. When a wheel is off the ground due
to an unlevel surface, do not spin
the wheel excessively.
WARNING
Do not operate the push-button ignition
switch while driving the vehicle except
in an emergency. (The engine will stop
when the ignition switch is pushed
three consecutive times or the ignition
switch is pushed and held for more than
2 seconds.) If the engine stops while
the vehicle is being driven, this could
lead to a crash and serious injury.
Before operating the push-button ignition
switch, be sure to move the shift lever to the
&Pposition.
Starting and driving5-9
PUSH-BUTTON IGNITION SWITCH
Page 203 of 346
5-10Starting and driving
OPERATING RANGE FOR ENGINE
START
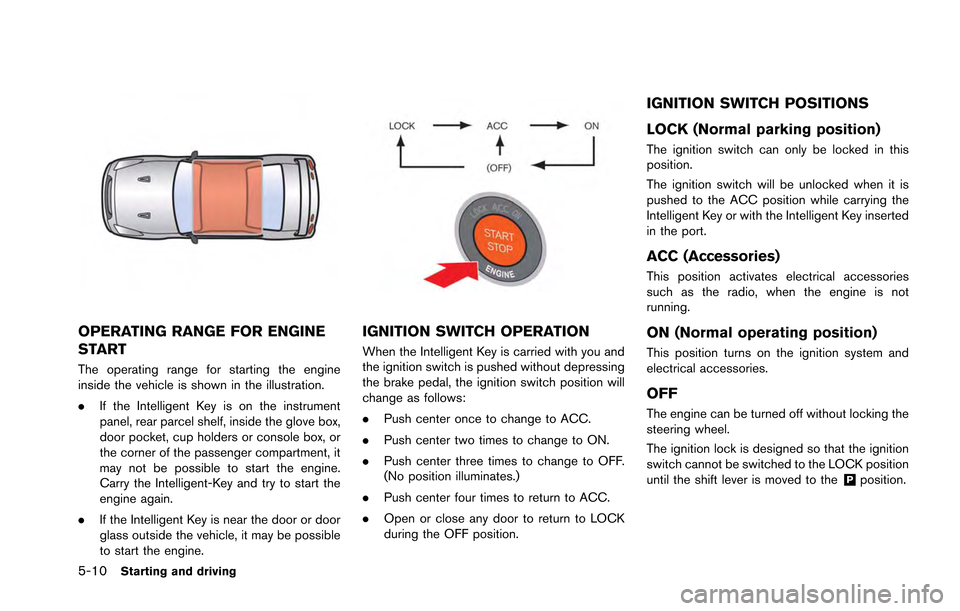
The operating range for starting the engine
inside the vehicle is shown in the illustration.
.If the Intelligent Key is on the instrument
panel, rear parcel shelf, inside the glove box,
door pocket, cup holders or console box, or
the corner of the passenger compartment, it
may not be possible to start the engine.
Carry the Intelligent-Key and try to start the
engine again.
. If the Intelligent Key is near the door or door
glass outside the vehicle, it may be possible
to start the engine.
IGNITION SWITCH OPERATION
When the Intelligent Key is carried with you and
the ignition switch is pushed without depressing
the brake pedal, the ignition switch position will
change as follows:
.Push center once to change to ACC.
. Push center two times to change to ON.
. Push center three times to change to OFF.
(No position illuminates.)
. Push center four times to return to ACC.
. Open or close any door to return to LOCK
during the OFF position.
IGNITION SWITCH POSITIONS
LOCK (Normal parking position)
The ignition switch can only be locked in this
position.
The ignition switch will be unlocked when it is
pushed to the ACC position while carrying the
Intelligent Key or with the Intelligent Key inserted
in the port.
ACC (Accessories)
This position activates electrical accessories
such as the radio, when the engine is not
running.
ON (Normal operating position)
This position turns on the ignition system and
electrical accessories.
OFF
The engine can be turned off without locking the
steering wheel.
The ignition lock is designed so that the ignition
switch cannot be switched to the LOCK position
until the shift lever is moved to the
&Pposition.
Page 204 of 346
NOTE:
.If the steering lock release malfunction
indicator appears on the vehicle infor-
mation display when the ignition
switch is pressed, press the ignition
switch again while gently turning the
steering wheel left and right.
(
“Steering lock release malfunc-
tion indicator” page 2-42)
. If the shift
&Pwarning appears on the
vehicle information display when the
ignition switch is pushed, the shift lever
is in any position except the
&Pposi-
tion. Move the shift lever to the&Pposition. (“Shift “P” warning”
page 2-42)
. If the Intelligent Key battery discharge
indicator appears on the vehicle infor-
mation display, the Intelligent Key
battery is discharged and the ignition
switch will not operate. Insert the
Intelligent Key into the key port to
operate the ignition switch.
(
“Intelligent Key battery discharge
indicator” page 2-43)
. When all of the following conditions
are met for 60 minutes, the battery
saver system will cut off the power
supply to prevent battery discharge. —
The ignition switch is in the ACC
position, and
— All doors are closed, and
— The shift lever is in the
&Pposition.
. Do not leave the vehicle with the
ignition switch in the ACC or ON
position when the engine is not run-
ning for an extended period of time.
This can discharge the battery.
EMERGENCY ENGINE SHUT OFF
To shut off the engine in an emergency situation
while driving, perform the following procedure:
.Rapidly push the push-button ignition switch
3 consecutive times in less than 1.5
seconds, or
. Push and hold the push button ignition
switch for more than 2 seconds.
INTELLIGENT KEY BATTERY DIS-
CHARGE
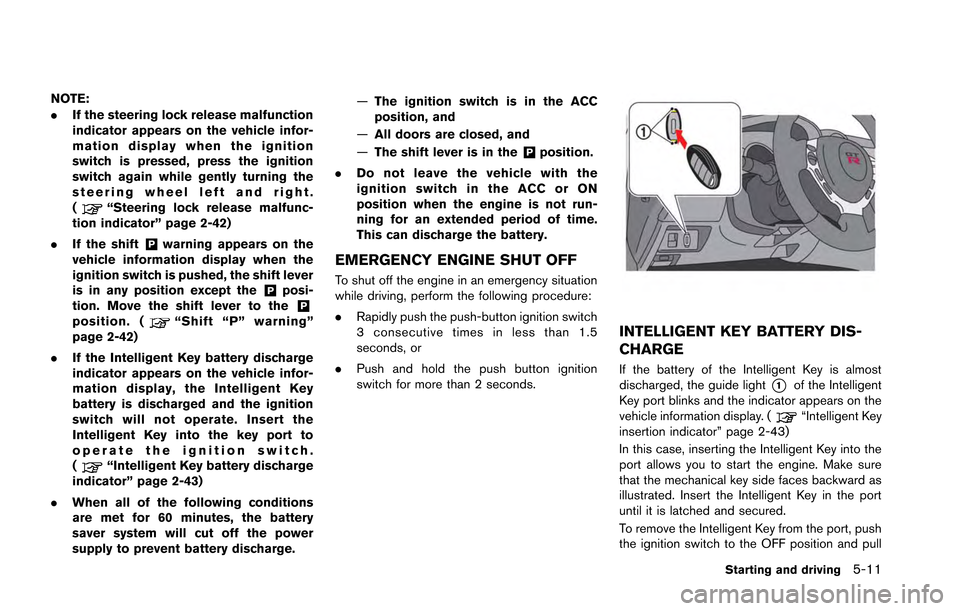
If the battery of the Intelligent Key is almost
discharged, the guide light
*1of the Intelligent
Key port blinks and the indicator appears on the
vehicle information display. (
“Intelligent Key
insertion indicator” page 2-43)
In this case, inserting the Intelligent Key into the
port allows you to start the engine. Make sure
that the mechanical key side faces backward as
illustrated. Insert the Intelligent Key in the port
until it is latched and secured.
To remove the Intelligent Key from the port, push
the ignition switch to the OFF position and pull
Starting and driving5-11