Page 142 of 346
window washer reservoir tank to
mix the washer fluid concentrate
and water.
The windshield wiper and washer operates
when the ignition switch is in the ON position.
USING THE WIPERS
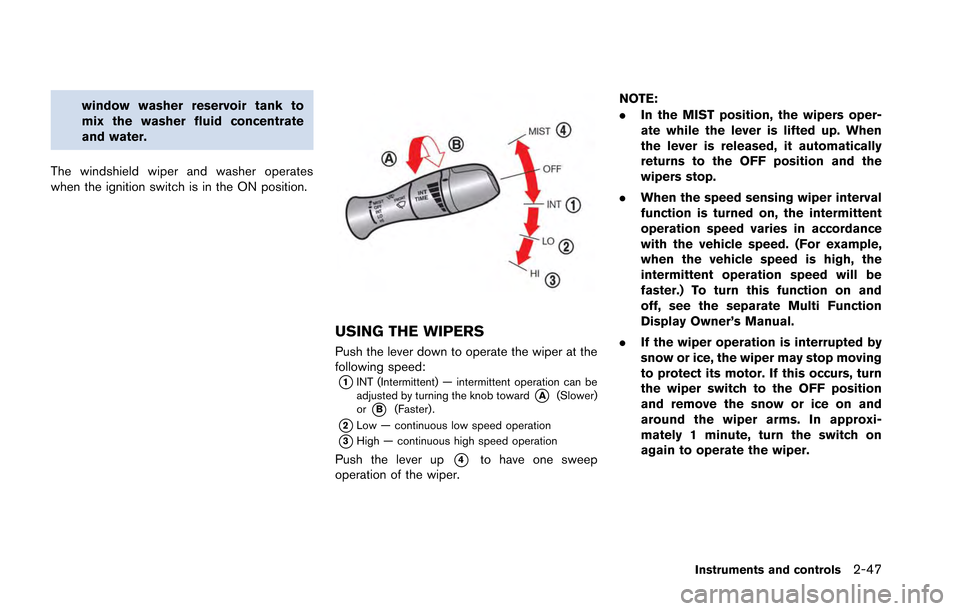
Push the lever down to operate the wiper at the
following speed:
*1INT (Intermittent) — intermittent operation can be
adjusted by turning the knob toward*A(Slower)
or*B(Faster).
*2Low — continuous low speed operation
*3High — continuous high speed operation
Push the lever up*4to have one sweep
operation of the wiper. NOTE:
.
In the MIST position, the wipers oper-
ate while the lever is lifted up. When
the lever is released, it automatically
returns to the OFF position and the
wipers stop.
. When the speed sensing wiper interval
function is turned on, the intermittent
operation speed varies in accordance
with the vehicle speed. (For example,
when the vehicle speed is high, the
intermittent operation speed will be
faster.) To turn this function on and
off, see the separate Multi Function
Display Owner’s Manual.
. If the wiper operation is interrupted by
snow or ice, the wiper may stop moving
to protect its motor. If this occurs, turn
the wiper switch to the OFF position
and remove the snow or ice on and
around the wiper arms. In approxi-
mately 1 minute, turn the switch on
again to operate the wiper.
Instruments and controls2-47
Page 145 of 346
2-50Instruments and controls
Autolight system
The autolight system allows the headlights to be
set so they turn on and off automatically.
To set the autolight system:
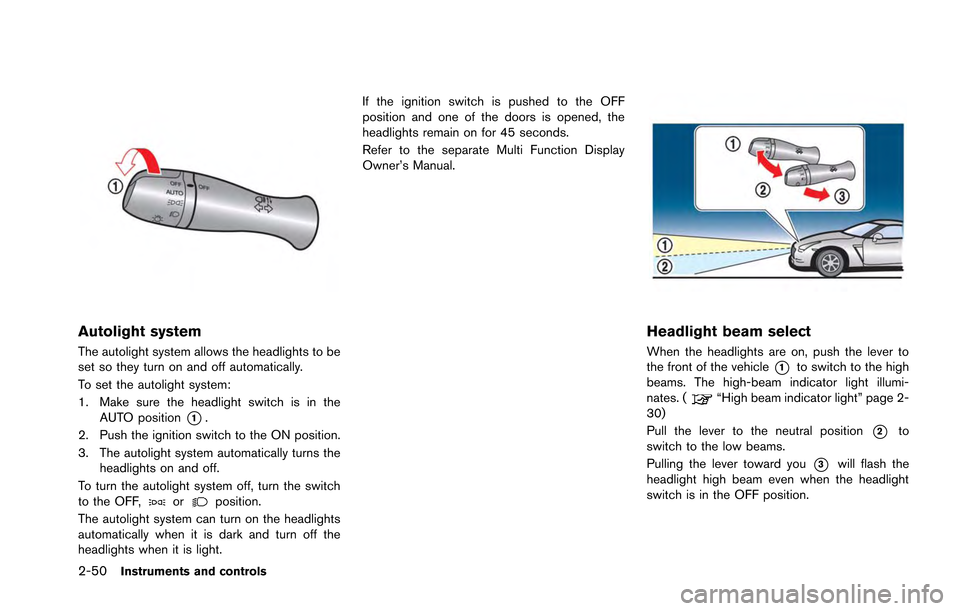
1. Make sure the headlight switch is in theAUTO position
*1.
2. Push the ignition switch to the ON position.
3. The autolight system automatically turns the headlights on and off.
To turn the autolight system off, turn the switch
to the OFF,
orposition.
The autolight system can turn on the headlights
automatically when it is dark and turn off the
headlights when it is light. If the ignition switch is pushed to the OFF
position and one of the doors is opened, the
headlights remain on for 45 seconds.
Refer to the separate Multi Function Display
Owner’s Manual.
Headlight beam select
When the headlights are on, push the lever to
the front of the vehicle
*1to switch to the high
beams. The high-beam indicator light illumi-
nates. (
“High beam indicator light” page 2-
30)
Pull the lever to the neutral position
*2to
switch to the low beams.
Pulling the lever toward you
*3will flash the
headlight high beam even when the headlight
switch is in the OFF position.
Page 146 of 346
CAUTION
Use low beams when there are cars
approaching from the opposite direc-
tion, during city driving and at similar
times.
Battery saver system
A chime will sound when the driver side door is
opened with the light switch in theorposition and the ignition switch in the ACC,
OFF or LOCK position. (“Light reminder
chime” page 2-31)
When the headlight switch is in the
orposition while the ignition switch is in the ON
position, the lights will automatically turn off 45
seconds after the ignition switch has been
pushed to the OFF position.
When the headlight switch remains in the
orposition after the lights automatically turn
off, the lights will turn on when the ignition
switch is pushed to the ON position.
NOTICE
. When you turn on the headlight
switch again after the lights auto-
matically turn off, the lights will not
turn off automatically. Be sure to
turn the light switch to the OFF
position when you leave the vehicle
for extended periods of time, other-
wise the battery will be discharged.
. Never leave the light switch on
when the engine is not running for
extended periods of time even if the
headlights turn off automatically.
Daytime running light system
The daytime running lights automatically illumi-
nate when the engine is started with the parking
brake released. The daytime running lights
operate with the headlight switch in the OFF
position. Turn the headlight switch to the
position for full illumination when driving at night.
If the parking brake is applied before the engine
is started, the daytime running lights do not
illuminate. The daytime running lights illuminate
once the parking brake is released. The daytime
running lights will remain on until the ignition
switch is pushed to the OFF position.
WARNING
When the daytime running light system
is active, tail lights on your vehicle are
not on. It is necessary at dusk to turn on
your headlights. Failure to do so could
cause an accident injuring yourself and
others.
Instruments and controls2-51
Page 147 of 346
2-52Instruments and controls
Turn signal
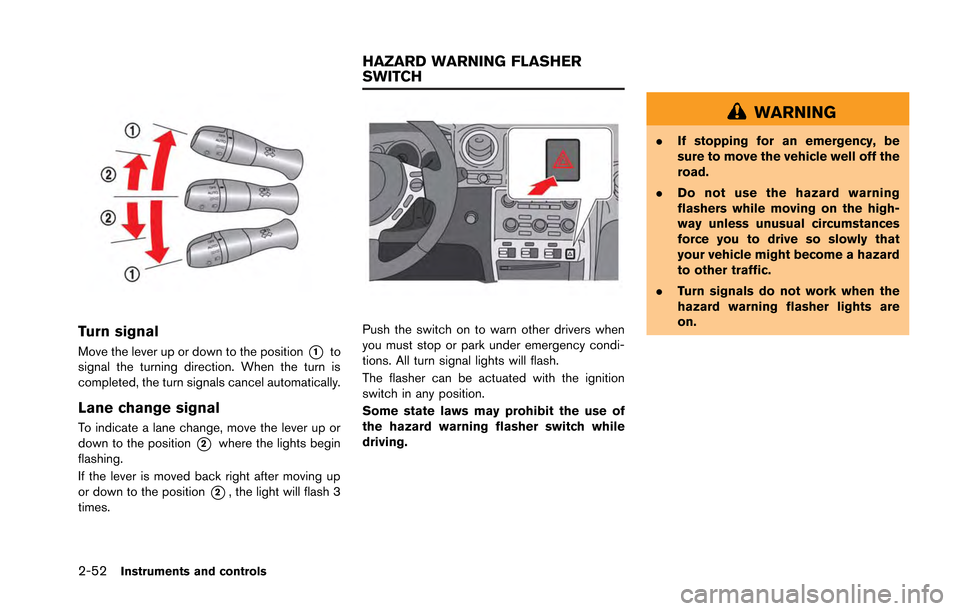
Move the lever up or down to the position*1to
signal the turning direction. When the turn is
completed, the turn signals cancel automatically.
Lane change signal
To indicate a lane change, move the lever up or
down to the position
*2where the lights begin
flashing.
If the lever is moved back right after moving up
or down to the position
*2, the light will flash 3
times.
Push the switch on to warn other drivers when
you must stop or park under emergency condi-
tions. All turn signal lights will flash.
The flasher can be actuated with the ignition
switch in any position.
Some state laws may prohibit the use of
the hazard warning flasher switch while
driving.
WARNING
. If stopping for an emergency, be
sure to move the vehicle well off the
road.
. Do not use the hazard warning
flashers while moving on the high-
way unless unusual circumstances
force you to drive so slowly that
your vehicle might become a hazard
to other traffic.
. Turn signals do not work when the
hazard warning flasher lights are
on.
HAZARD WARNING FLASHER
SWITCH
Page 148 of 346
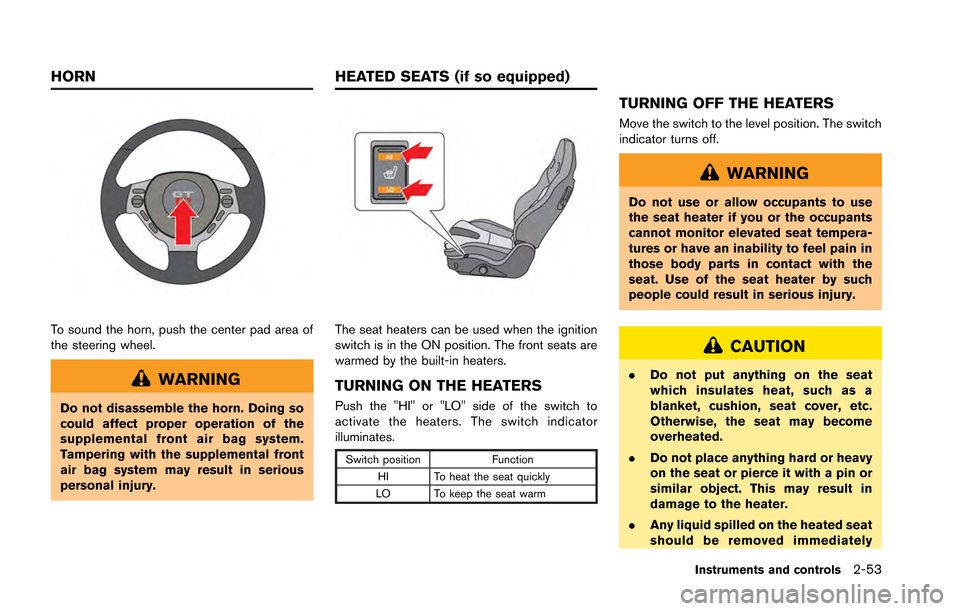
To sound the horn, push the center pad area of
the steering wheel.
WARNING
Do not disassemble the horn. Doing so
could affect proper operation of the
supplemental front air bag system.
Tampering with the supplemental front
air bag system may result in serious
personal injury.
The seat heaters can be used when the ignition
switch is in the ON position. The front seats are
warmed by the built-in heaters.
TURNING ON THE HEATERS
Push the "HI" or "LO" side of the switch to
activate the heaters. The switch indicator
illuminates.
Switch positionFunction
HI To heat the seat quickly
LO To keep the seat warm
TURNING OFF THE HEATERS
Move the switch to the level position. The switch
indicator turns off.
WARNING
Do not use or allow occupants to use
the seat heater if you or the occupants
cannot monitor elevated seat tempera-
tures or have an inability to feel pain in
those body parts in contact with the
seat. Use of the seat heater by such
people could result in serious injury.
CAUTION
. Do not put anything on the seat
which insulates heat, such as a
blanket, cushion, seat cover, etc.
Otherwise, the seat may become
overheated.
. Do not place anything hard or heavy
on the seat or pierce it with a pin or
similar object. This may result in
damage to the heater.
. Any liquid spilled on the heated seat
should be removed immediately
Instruments and controls2-53
HORN HEATED SEATS (if so equipped)
Page 154 of 346
NOTICE
Do not place items that are more than 2
lb (1 kg) on the hook.
POWER WINDOWS
WARNING
.Make sure that all passengers have
their hands, etc. inside the vehicle
while it is in motion and before
closing the windows. Use the win-
dow lock switch to prevent unex-
pected use of the power windows.
. Do not leave children unattended
inside the vehicle. They could un-
knowingly activate switches or con-
trols and become trapped in the
window. Unattended children could
become involved in serious acci-
dents.
The power windows operate when the ignition
switch is in the ON position or for about 45
seconds after the ignition switch is pushed to
the LOCK position. If the driver’s or front
passenger’s door is opened during this period
of about 45 seconds, power to the windows is
canceled.
Driver’s side1. Window lock button
2. Driver’s window switch
3. Front passenger’s window switch
Instruments and controls2-59
WINDOWS
Page 155 of 346
2-60Instruments and controls
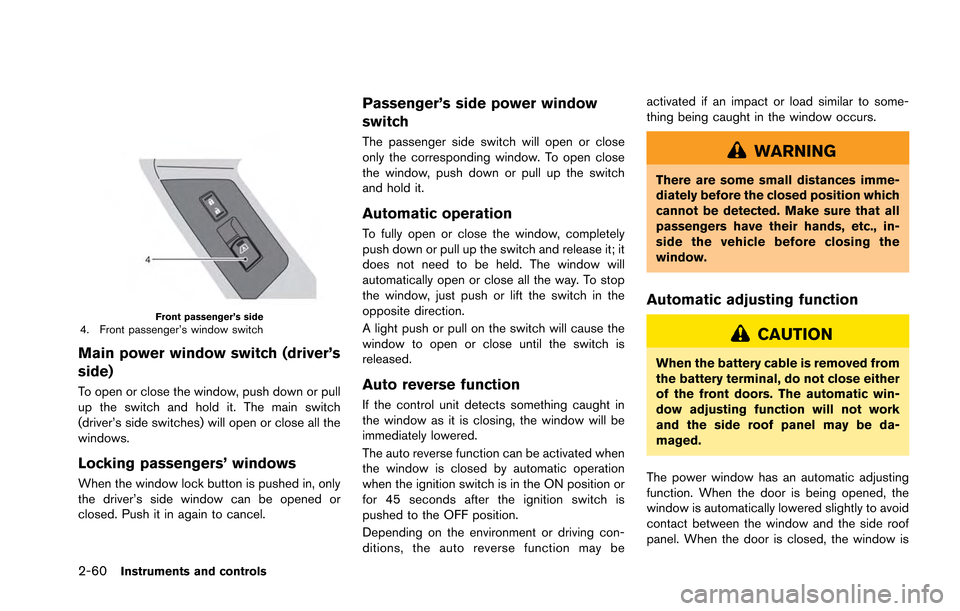
Front passenger’s side4. Front passenger’s window switch
Main power window switch (driver’s
side)
To open or close the window, push down or pull
up the switch and hold it. The main switch
(driver’s side switches) will open or close all the
windows.
Locking passengers’ windows
When the window lock button is pushed in, only
the driver’s side window can be opened or
closed. Push it in again to cancel.
Passenger’s side power window
switch
The passenger side switch will open or close
only the corresponding window. To open close
the window, push down or pull up the switch
and hold it.
Automatic operation
To fully open or close the window, completely
push down or pull up the switch and release it; it
does not need to be held. The window will
automatically open or close all the way. To stop
the window, just push or lift the switch in the
opposite direction.
A light push or pull on the switch will cause the
window to open or close until the switch is
released.
Auto reverse function
If the control unit detects something caught in
the window as it is closing, the window will be
immediately lowered.
The auto reverse function can be activated when
the window is closed by automatic operation
when the ignition switch is in the ON position or
for 45 seconds after the ignition switch is
pushed to the OFF position.
Depending on the environment or driving con-
ditions, the auto reverse function may beactivated if an impact or load similar to some-
thing being caught in the window occurs.
WARNING
There are some small distances imme-
diately before the closed position which
cannot be detected. Make sure that all
passengers have their hands, etc., in-
side the vehicle before closing the
window.
Automatic adjusting function
CAUTION
When the battery cable is removed from
the battery terminal, do not close either
of the front doors. The automatic win-
dow adjusting function will not work
and the side roof panel may be da-
maged.
The power window has an automatic adjusting
function. When the door is being opened, the
window is automatically lowered slightly to avoid
contact between the window and the side roof
panel. When the door is closed, the window is
Page 156 of 346
automatically raised slightly.
While the automatic adjusting function does not
work, the window will be controlled as follows:
.When the door is opened, the window
lowers for approximately 2 seconds.
. While the door is open, the window cannot
be raised.
If the windows do not close auto-
matically
If the power window automatic function (closing
only) does not operate properly, perform the
following procedure to initialize the power
window system.
1. Push the ignition switch to the ON position.
2. Close the door.
3. Open the window completely by operating
the power window switch.
4. Pull the power window switch and hold it to close the driver side window, and then hold
the switch more than 3 seconds after the
window is closed completely.
5. Release the power window switch. Operate the window by the automatic function to
confirm the initialization is complete.
6. Perform steps 2 through 5 above for the passenger side window by operating either
driver’s or passenger’s side switch. If the power window automatic function does
not operate properly after performing the pro-
cedure above, have your vehicle checked by a
GT-R certified NISSAN dealer.
MAP LIGHTS
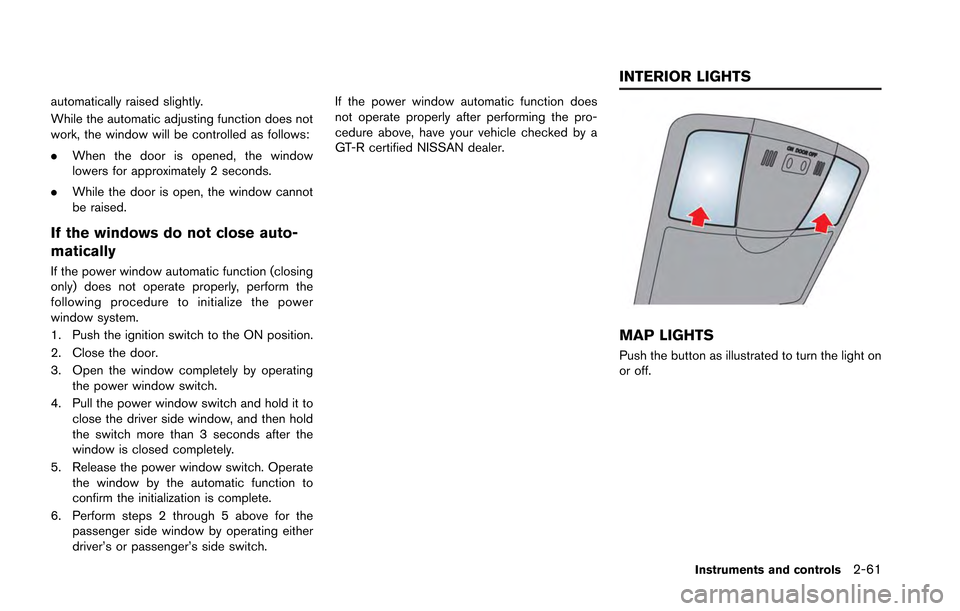
Push the button as illustrated to turn the light on
or off.
Instruments and controls2-61
INTERIOR LIGHTS