2013 NISSAN GT-R ignition
[x] Cancel search: ignitionPage 91 of 346
1-42Safety — Seats, seat belts and supplemental restraint system
practical away from the side air bags. The side
air bags and curtain air bags inflate quickly in
order to help protect occupants. Because of
this, the force of the side air bags and curtain air
bags inflating can increase the risk of injury if the
occupant is too close to, or is against, these air
bag modules during inflation. The side air bags
and curtain air bags will deflate quickly after the
collision is over.
The side air bags and curtain air bags operate
only when the ignition switch is in the ON
position.
After pushing the ignition switch to the ON
position, the supplemental air bag warning
light illuminates. The air bag warning light
will turn off after about 7 seconds if the
systems are operational.
WARNING
.Do not place any objects near the
seatback of the front seats. Also, do
not place any objects (an umbrella,
bag, etc.) between the front door
finisher and the front seat. Such
objects may become dangerous
projectiles and cause injury if a side
air bag inflates.
. Right after inflation, several side air bag and curtain air bag system
components will be hot. Do not
touch them; you may severely burn
yourself.
. No unauthorized changes should be
made to any components or wiring
of the side air bags and curtain air
bags. This is to prevent damage to
or accidental inflation of the side air
bag and curtain air bag systems.
. Do not make unauthorized changes
to your vehicle’s electrical system,
suspension system or side panel.
This could affect proper operation
of the side air bag and curtain air
bag systems.
. Tampering with the side air bag
system may result in serious perso-
nal injury. For example, do not
change the front seat by placing
material near the seatback or by
installing additional trim material,
such as seat covers, around the side
air bags.
. Work around and on the side air bag
and curtain air bag systems should
be done by a GT-R certified NISSAN
dealer. Installation of electrical equipment should also be done by
a GT-R certified NISSAN dealer. The
SRS wiring harnesses* should not
be modified or disconnected. Un-
authorized electrical test equipment
and probing devices should not be
used on the side air bag and curtain
air bag systems.
* The SRS wiring harness connectors are
yellow and orange for easy identification.
When selling your vehicle, we request that you
inform the buyer about the side air bag and
curtain air bag systems and guide the buyer to
the appropriate sections in this Owner’s Manual.
SEAT BELTS WITH PRETEN-
SIONERS (front seats)
WARNING
. The pretensioners cannot be reused
after activation. They must be re-
placed together with the retractor
and buckle as a unit.
. If the vehicle becomes involved in a
collision but the pretensioner is not
activated, be sure to have the pre-
tensioner system checked and, if
Page 93 of 346
1-44Safety — Seats, seat belts and supplemental restraint system
SUPPLEMENTAL AIR BAG WARN-
ING LIGHT
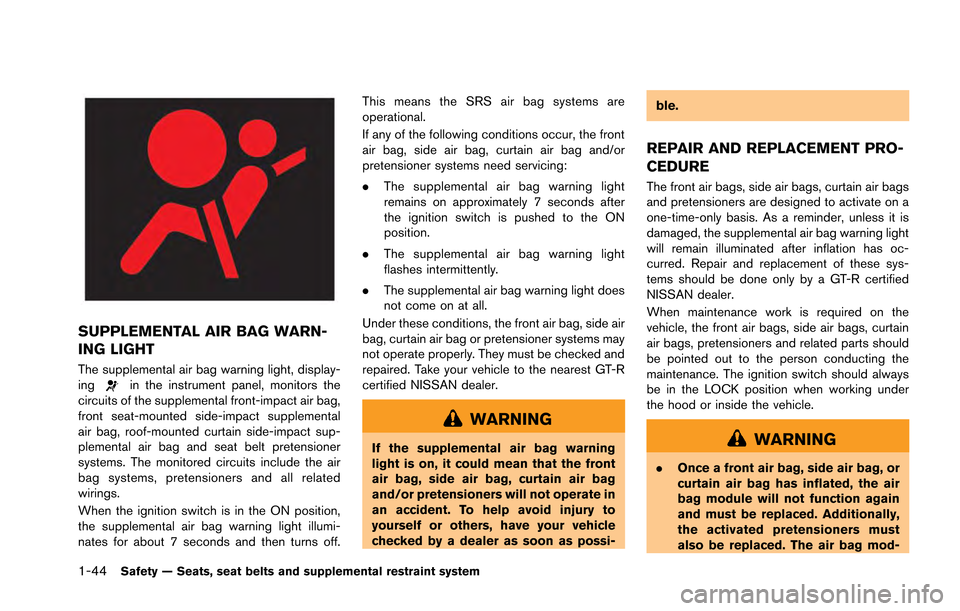
The supplemental air bag warning light, display-
ingin the instrument panel, monitors the
circuits of the supplemental front-impact air bag,
front seat-mounted side-impact supplemental
air bag, roof-mounted curtain side-impact sup-
plemental air bag and seat belt pretensioner
systems. The monitored circuits include the air
bag systems, pretensioners and all related
wirings.
When the ignition switch is in the ON position,
the supplemental air bag warning light illumi-
nates for about 7 seconds and then turns off. This means the SRS air bag systems are
operational.
If any of the following conditions occur, the front
air bag, side air bag, curtain air bag and/or
pretensioner systems need servicing:
.
The supplemental air bag warning light
remains on approximately 7 seconds after
the ignition switch is pushed to the ON
position.
. The supplemental air bag warning light
flashes intermittently.
. The supplemental air bag warning light does
not come on at all.
Under these conditions, the front air bag, side air
bag, curtain air bag or pretensioner systems may
not operate properly. They must be checked and
repaired. Take your vehicle to the nearest GT-R
certified NISSAN dealer.
WARNING
If the supplemental air bag warning
light is on, it could mean that the front
air bag, side air bag, curtain air bag
and/or pretensioners will not operate in
an accident. To help avoid injury to
yourself or others, have your vehicle
checked by a dealer as soon as possi- ble.
REPAIR AND REPLACEMENT PRO-
CEDURE
The front air bags, side air bags, curtain air bags
and pretensioners are designed to activate on a
one-time-only basis. As a reminder, unless it is
damaged, the supplemental air bag warning light
will remain illuminated after inflation has oc-
curred. Repair and replacement of these sys-
tems should be done only by a GT-R certified
NISSAN dealer.
When maintenance work is required on the
vehicle, the front air bags, side air bags, curtain
air bags, pretensioners and related parts should
be pointed out to the person conducting the
maintenance. The ignition switch should always
be in the LOCK position when working under
the hood or inside the vehicle.
WARNING
.
Once a front air bag, side air bag, or
curtain air bag has inflated, the air
bag module will not function again
and must be replaced. Additionally,
the activated pretensioners must
also be replaced. The air bag mod-
Page 98 of 346
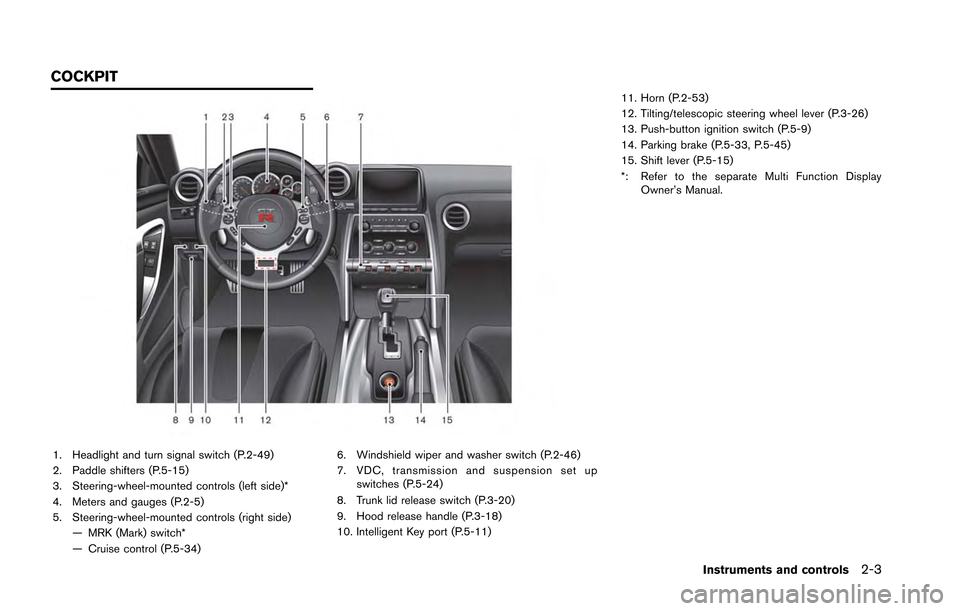
1. Headlight and turn signal switch (P.2-49)
2. Paddle shifters (P.5-15)
3. Steering-wheel-mounted controls (left side)*
4. Meters and gauges (P.2-5)
5. Steering-wheel-mounted controls (right side)— MRK (Mark) switch*
— Cruise control (P.5-34) 6. Windshield wiper and washer switch (P.2-46)
7. VDC, transmission and suspension set up
switches (P.5-24)
8. Trunk lid release switch (P.3-20)
9. Hood release handle (P.3-18)
10. Intelligent Key port (P.5-11) 11. Horn (P.2-53)
12. Tilting/telescopic steering wheel lever (P.3-26)
13. Push-button ignition switch (P.5-9)
14. Parking brake (P.5-33, P.5-45)
15. Shift lever (P.5-15)
*: Refer to the separate Multi Function Display
Owner’s Manual.
Instruments and controls2-3
COCKPIT
Page 100 of 346
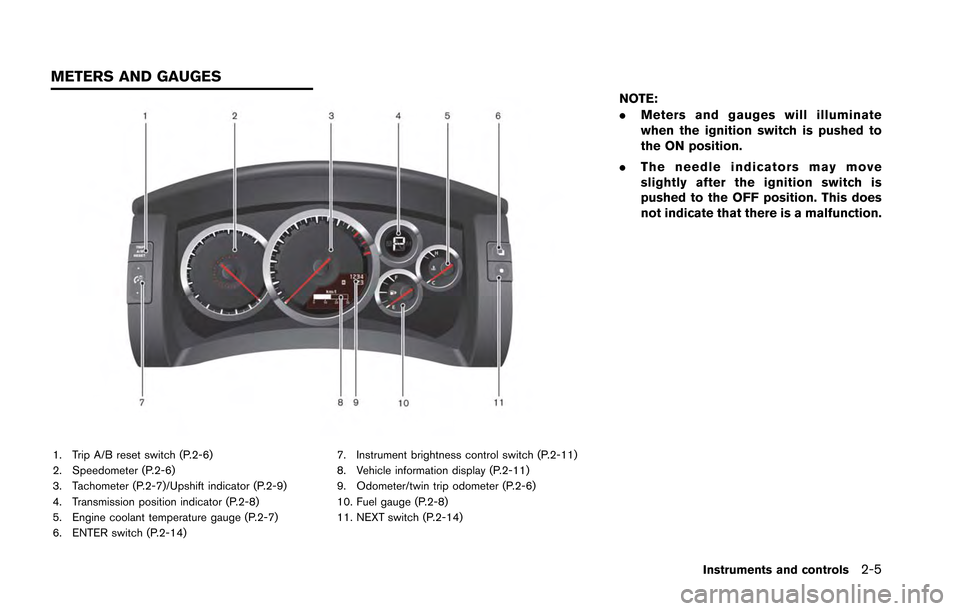
1. Trip A/B reset switch (P.2-6)
2. Speedometer (P.2-6)
3. Tachometer (P.2-7)/Upshift indicator (P.2-9)
4. Transmission position indicator (P.2-8)
5. Engine coolant temperature gauge (P.2-7)
6. ENTER switch (P.2-14)7. Instrument brightness control switch (P.2-11)
8. Vehicle information display (P.2-11)
9. Odometer/twin trip odometer (P.2-6)
10. Fuel gauge (P.2-8)
11. NEXT switch (P.2-14)
NOTE:
.
Meters and gauges will illuminate
when the ignition switch is pushed to
the ON position.
. The needle indicators may move
slightly after the ignition switch is
pushed to the OFF position. This does
not indicate that there is a malfunction.
Instruments and controls2-5
METERS AND GAUGES
Page 103 of 346
2-8Instruments and controls
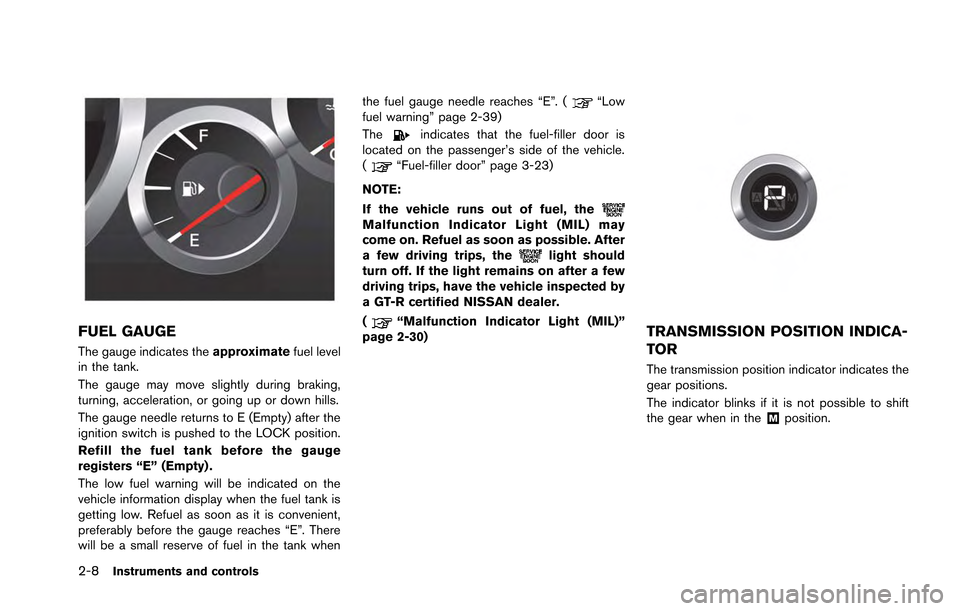
FUEL GAUGE
The gauge indicates theapproximatefuel level
in the tank.
The gauge may move slightly during braking,
turning, acceleration, or going up or down hills.
The gauge needle returns to E (Empty) after the
ignition switch is pushed to the LOCK position.
Refill the fuel tank before the gauge
registers “E” (Empty) .
The low fuel warning will be indicated on the
vehicle information display when the fuel tank is
getting low. Refuel as soon as it is convenient,
preferably before the gauge reaches “E”. There
will be a small reserve of fuel in the tank when the fuel gauge needle reaches “E”. (
“Low
fuel warning” page 2-39)
The
indicates that the fuel-filler door is
located on the passenger’s side of the vehicle.
(
“Fuel-filler door” page 3-23)
NOTE:
If the vehicle runs out of fuel, the
Malfunction Indicator Light (MIL) may
come on. Refuel as soon as possible. After
a few driving trips, the
light should
turn off. If the light remains on after a few
driving trips, have the vehicle inspected by
a GT-R certified NISSAN dealer.
(
“Malfunction Indicator Light (MIL)”
page 2-30)TRANSMISSION POSITION INDICA-
TOR
The transmission position indicator indicates the
gear positions.
The indicator blinks if it is not possible to shift
the gear when in the
&Mposition.
Page 105 of 346
2-10Instruments and controls
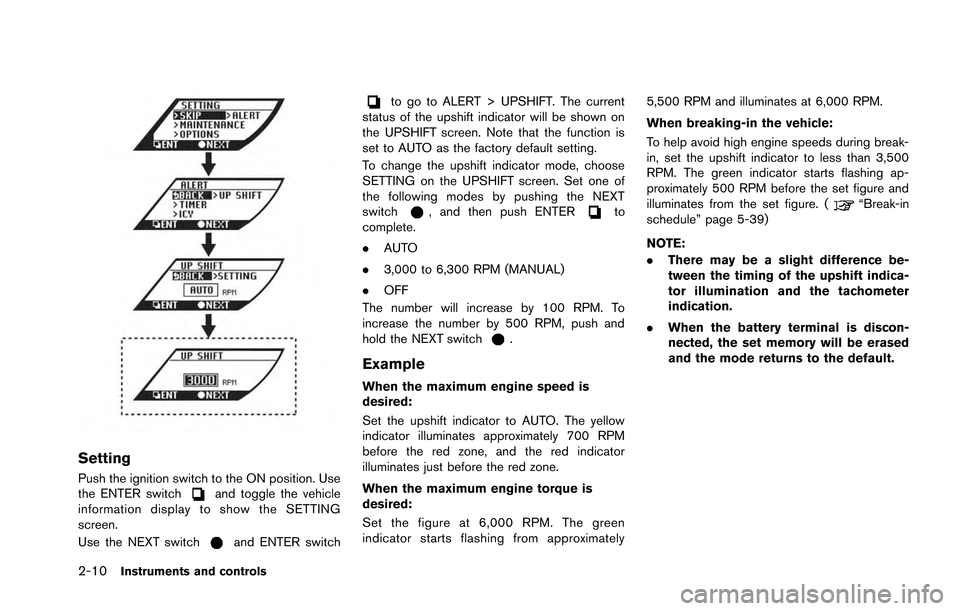
Setting
Push the ignition switch to the ON position. Use
the ENTER switchand toggle the vehicle
information display to show the SETTING
screen.
Use the NEXT switch
and ENTER switch
to go to ALERT > UPSHIFT. The current
status of the upshift indicator will be shown on
the UPSHIFT screen. Note that the function is
set to AUTO as the factory default setting.
To change the upshift indicator mode, choose
SETTING on the UPSHIFT screen. Set one of
the following modes by pushing the NEXT
switch
, and then push ENTERto
complete.
. AUTO
. 3,000 to 6,300 RPM (MANUAL)
. OFF
The number will increase by 100 RPM. To
increase the number by 500 RPM, push and
hold the NEXT switch
.
Example
When the maximum engine speed is
desired:
Set the upshift indicator to AUTO. The yellow
indicator illuminates approximately 700 RPM
before the red zone, and the red indicator
illuminates just before the red zone.
When the maximum engine torque is
desired:
Set the figure at 6,000 RPM. The green
indicator starts flashing from approximately 5,500 RPM and illuminates at 6,000 RPM.
When breaking-in the vehicle:
To help avoid high engine speeds during break-
in, set the upshift indicator to less than 3,500
RPM. The green indicator starts flashing ap-
proximately 500 RPM before the set figure and
illuminates from the set figure. (
“Break-in
schedule” page 5-39)
NOTE:
. There may be a slight difference be-
tween the timing of the upshift indica-
tor illumination and the tachometer
indication.
. When the battery terminal is discon-
nected, the set memory will be erased
and the mode returns to the default.
Page 106 of 346
INSTRUMENT BRIGHTNESS CON-
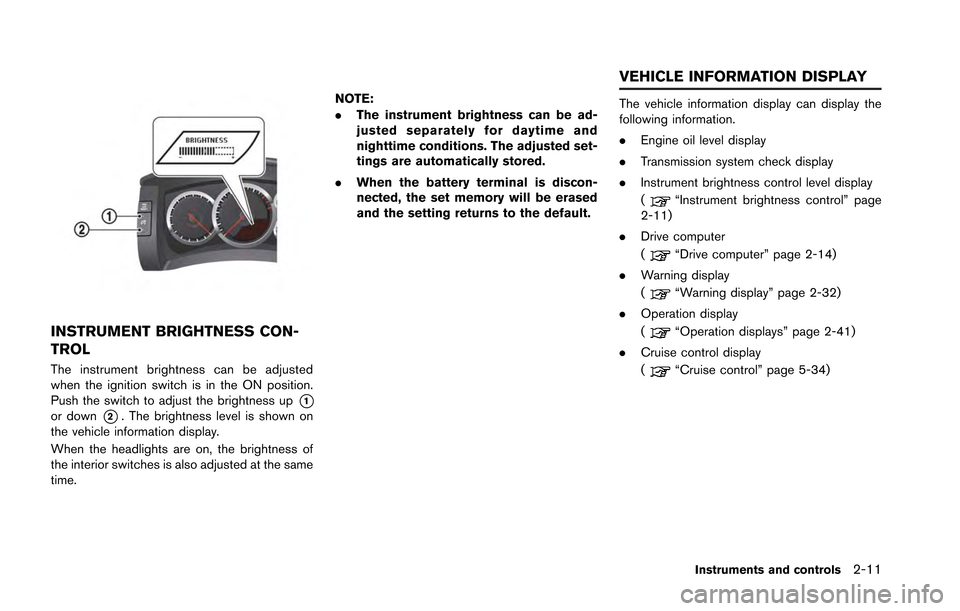
TROL
The instrument brightness can be adjusted
when the ignition switch is in the ON position.
Push the switch to adjust the brightness up
*1or down*2. The brightness level is shown on
the vehicle information display.
When the headlights are on, the brightness of
the interior switches is also adjusted at the same
time. NOTE:
.
The instrument brightness can be ad-
justed separately for daytime and
nighttime conditions. The adjusted set-
tings are automatically stored.
. When the battery terminal is discon-
nected, the set memory will be erased
and the setting returns to the default.
The vehicle information display can display the
following information.
.Engine oil level display
. Transmission system check display
. Instrument brightness control level display
(
“Instrument brightness control” page
2-11)
. Drive computer
(
“Drive computer” page 2-14)
. Warning display
(
“Warning display” page 2-32)
. Operation display
(
“Operation displays” page 2-41)
. Cruise control display
(
“Cruise control” page 5-34)
Instruments and controls2-11
VEHICLE INFORMATION DISPLAY
Page 107 of 346
2-12Instruments and controls
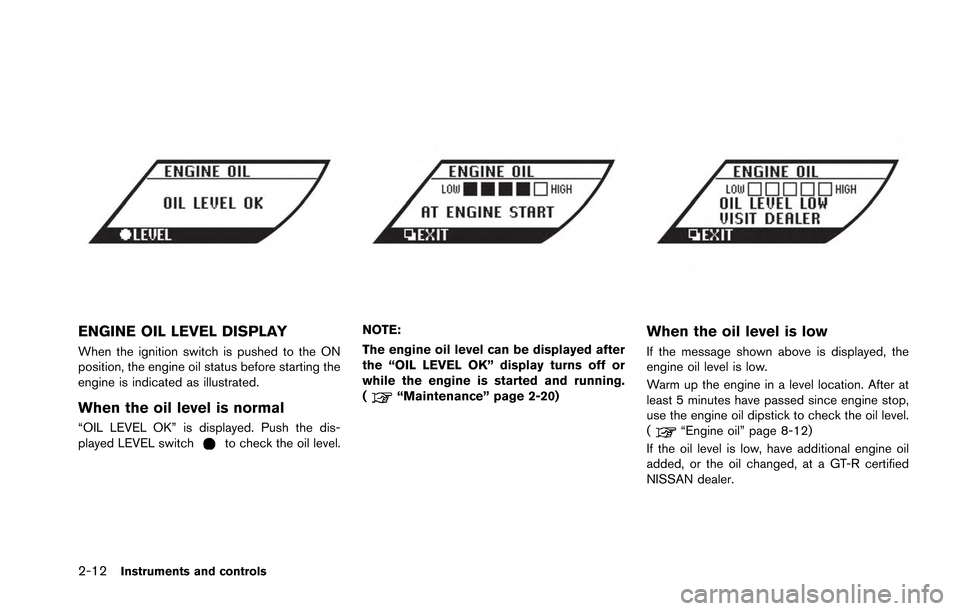
ENGINE OIL LEVEL DISPLAY
When the ignition switch is pushed to the ON
position, the engine oil status before starting the
engine is indicated as illustrated.
When the oil level is normal
“OIL LEVEL OK” is displayed. Push the dis-
played LEVEL switchto check the oil level.
NOTE:
The engine oil level can be displayed after
the “OIL LEVEL OK” display turns off or
while the engine is started and running.
(
“Maintenance” page 2-20)
When the oil level is low
If the message shown above is displayed, the
engine oil level is low.
Warm up the engine in a level location. After at
least 5 minutes have passed since engine stop,
use the engine oil dipstick to check the oil level.
(
“Engine oil” page 8-12)
If the oil level is low, have additional engine oil
added, or the oil changed, at a GT-R certified
NISSAN dealer.