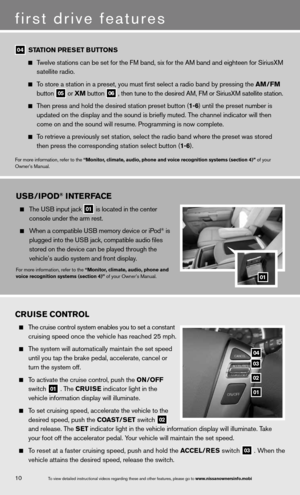
Page 17 of 26

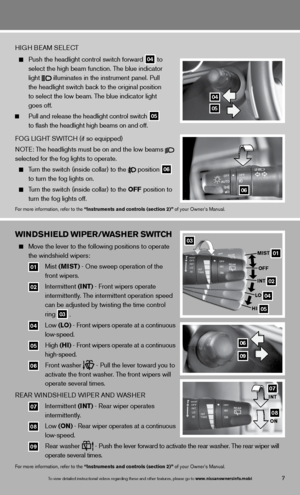
13To view detailed in\fstructional videos\f regarding these a\fnd other features\f \fplease go to www.nissanownersin\Sfo.mobi
Speak in a clear and natural voice without pausing between words.
Look straight ahead and avoid speaking too loudly or too softly.
To go back to the previous command, say “Go back” or “correction”.
To cancel a voice recognition session, simply wait 5 seconds or say “cancel” or “Quit”.
To interrupt the system voice and give a command quickly, press the
or
button on the
steering wheel.
When speaking Phonebook names, please be aware some phones require the la\
st name to be
spoken before the first name. For example, “Michael Smith” may be spoken as “Smith Michael”.
To increase or decrease the volume of the voice prompts, push the volume \
control switches
on the steering wheel down
or up
or turn the VOL/ON•OFF control knob on the audio
system while the system is responding.
Voice commands (if so equipped) can be used to operate various Bluetoot\
h System features.
See your Owner’s Manual for detailed information.
if the Voice Recognition system does not recognize your voice commands, train th\
e system
using the Speaker Adaptation Mode.
Some commands are not available while the vehicle is in motion.
The “Help” command can be used to hear a list of available commands\
at any time.
Please refer to the cellular phone manufacturer’s Owner’s Manual f\
or detailed information
regarding your Bluetooth phone.
f or recommended phones and detailed instructions, please visit
www.nissanusa.com/bluetooth.
Bluetooth system without navigation* (if so equipped)
PAiR inG PROcedu Re
n OTe: The vehicle must be stationery when pairing the
phone.
1. Press the
button on the steering wheel. The
system announces the available commands.
2. Say: “Setup”. The system acknowledges the
command and announces the next set of available
commands.
3. Say: “Pair phone”. The system acknowledges the
command and announces the next set of available commands.
4. Say: “new phone”. The system acknowledges the command and asks you to initiate pairing
from the phone handset.
5. initiate connecting from the phone.
• The pairing procedure varies according to each cellular phone model. For detailed pairing
instructions and a list of compatible phones, please visit www.nissanusa.com/bluetooth.
• When prompted for a PASSKEY code, enter “1234” from the handset. (The PASSKEY
code is assigned by ni SSAn and cannot be changed.)
*Some jurisdictions prohibit the use of cellular telephones while drivin\
g.
Page 18 of 26

6. When the system asks you to provide a name for the phone, say the name. You can give the
phone a name of your choice.
7. When the system asks you for a priority level, say a number between 1 and 5. The priority level
determines which phone interacts with the system when two or more paired phones are act\
ive
in the vehicle at the same time. choose 1 if this is the only phone or the primary phone.
8. When the system asks if you would like to select a custom ring tone, say “Yes” or “no”. f ollow
the instructions provided by the system to choose a ring tone.
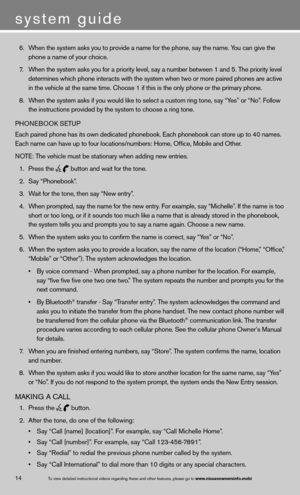
PHOne BOOk SeTu P
each paired phone has its own dedicated phonebook. each phonebook can store up to 40 names.
each name can have up to four locations/numbers: Home, Office, Mobile and\
Other.
n OTe: The vehicle must be stationary when adding new entries.
1. Press the
button and wait for the tone.
2. Say “Phonebook”.
3. Wait for the tone, then say “new entry”.
4. When prompted, say the name for the new entry. For example, say “Michelle”. If the name is too
short or too long, or if it sounds too much like a name that is already stored in the phonebook,
the system tells you and prompts you to say a name again. choose a new name.
5. When the system asks you to confirm the name is correct, say “Yes” or “no”.
6. When the system asks you to provide a location, say the name of the location (“Home,” “Office,”
“Mobile” or “Other”). The system acknowledges the location.
• By voice command - When prompted, say a phone number for the location. For example,
say “five five five one two one two.” The system repeats the number and prompts you for the
next command.
• By Bluetooth
® transfer - Say “Transfer entry”. The system acknowledges the command and
asks you to initiate the transfer from the phone handset. The new contact phone number will
be transferred from the cellular phone via the Bluetooth
® communication link. The transfer
procedure varies according to each cellular phone. See the cellular phone Owner’s Manual
for details.
7. When you are finished entering numbers, say “Store”. The system confirms the name, location
and number.
8. When the system asks if you would like to store another location for the \
same name, say “Yes”
or “no”. if you do not respond to the system prompt, the system ends the new entry session.
MAkin G A cALL
1. Press the
button.
2. After the tone, do one of the following:
• Say “Call [name] [location]”. For example, say “Call Michelle Home”.
• Say “Call [number]”. For example, say “Call 123-456-7891”.
• Say “Redial” to redial the previous phone number called by the system.
• Say “Call International” to dial more than 10 digits or any special characters.
system guide
14To view detailed in\fstructional videos\f regarding these a\fnd other features\f \fplease go to www.nissanownersin\Sfo.mobi
Page 19 of 26

15To view detailed in\fstructional videos\f regarding these a\fnd other features\f \fplease go to www.nissanownersin\Sfo.mobi
3. When you have finished speaking the phone number, wait for the system to repeat it back
to you, then say “dial”.
ReceiVin G/endin G A cALL
When you receive a phone call, a ring tone sounds through the audio syste\
m.
To accept the call, press the
button.
To reject the call, press the button.
To hang up the phone at the end of a call or to disconnect during call pl\
acement, press
the
button.
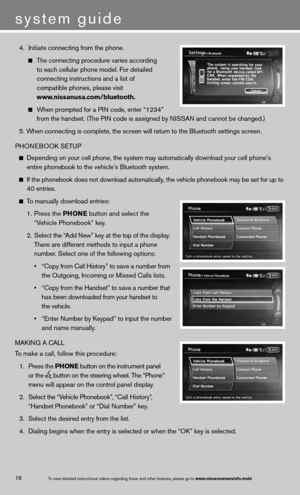
Bluetooth system with navigation* (if so equipped)
cOnnec TinG PROcedu Re
n OTe: The vehicle must be stationary when connecting
the phone.
1. Press the s EttinG button on the instrument panel
and select the “Bluetooth” key on the display.
2. Select the “connect Bluetooth” key.
3. A popup box will appear on the screen, prompting
you to confirm that the connection is for the phone
system. Select the “Yes” key.
*Some jurisdictions prohibit the use of cellular telephones while drivin\
g.
Page 20 of 26

4. initiate connecting from the phone.
The connecting procedure varies according
to each cellular phone model. f or detailed
connecting instructions and a list of
compatible phones, please visit
www.nissanusa.com/bluetooth.
When prompted for a P in code, enter “1234”
from the handset. (The P in code is assigned by ni SSAn and cannot be changed.)
5. When connecting is complete, the screen will return to the Bluetooth sett\
ings screen.
PHOne BOOk SeTu P
depending on your cell phone, the system may automatically download your \
cell phone’s
entire phonebook to the vehicle’s Bluetooth system.
if the phonebook does not download automatically, the vehicle phonebook may be set for up to 40 entries.
To manually download entries:
1. Press the Phon E
button and select the
“Vehicle Phonebook” key.
2. Select the “Add new” key at the top of the display.
There are different methods to input a phone
number. Select one of the following options:
• “Copy from Call History” to save a number from
the Outgoing, incoming or Missed calls lists.
• “Copy from the Handset” to save a number that
has been downloaded from your handset to
the vehicle.
• “Enter Number by Keypad” to input the number
and name manually.
MAkin G A cALL
To make a call, follow this procedure:
1. Press the Phon E button on the instrument panel
or the
button on the steering wheel. The “Phone”
menu will appear on the control panel display.
2. Select the “Vehicle Phonebook”, “ call History”,
“Handset Phonebook” or “ dial n umber” key.
3. Select the desired entry from the list.
4. dialing begins when the entry is selected or when the “O k” key is selected.
16
system guide
To view detailed in\fstructional videos\f regarding these a\fnd other features\f \fplease go to www.nissanownersin\Sfo.mobi
Page 21 of 26

Your navigation System can calculate a route from the current location to a pr\
eferred destination.
The real-time map display and turn-by-turn voice guida")
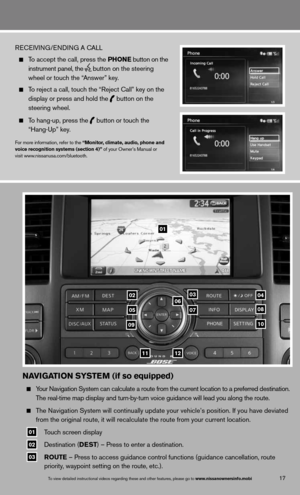
naviGation systE m (if so equipped)
Your navigation System can calculate a route from the current location to a pr\
eferred destination.
The real-time map display and turn-by-turn voice guidance will lead you a\
long the route.
The navigation System will continually update your vehicle’s position. if you have deviated
from the original route, it will recalculate the route from your current\
location.
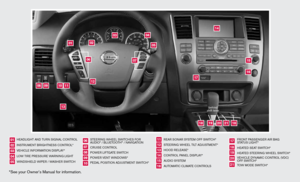
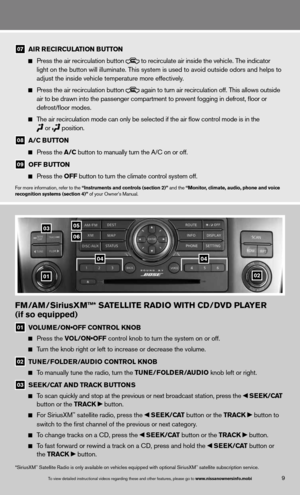
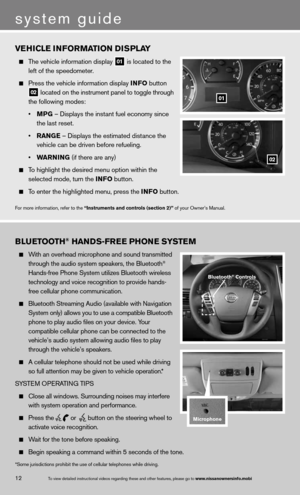
01 Touch screen display
02 destination (DEst
) – Press to enter a destination.
03 routE – Press to access guidance control functions (guidance cancellation\
, route
priority, waypoint setting on the route, etc.).
17To view detailed in\fstructional videos\f regarding these a\fnd other features\f \fplease go to www.nissanownersin\Sfo.mobi
ReceiVin G/endin G A cALL
To accept the call, press the Phon E button on the
instrument panel, the
button on the steering
wheel or touch the “Answer” key.
To reject a call, touch the “Reject call” key on the
display or press and hold the
button on the
steering wheel.
To hang-up, press the
button or touch the
“Hang-up” key.
for more information, refer to the “monitor, climate, audio, phone and
voice recognition systems (section 4)” of your Owner’s Manual or
visit www.nissanusa.com/bluetooth.
01
03
05
06
0708
10
1112
0204
09
Page 22 of 26
 and the night screen (dark).
Press and hold the button to turn the display off. Press again to turn t\
he display on.
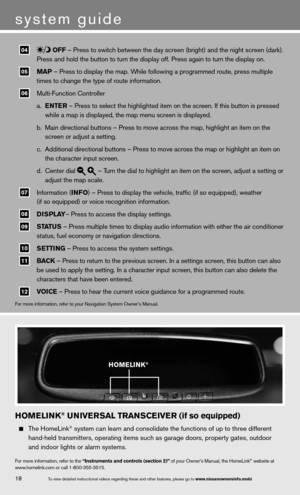
05 maP")
04 off – Press to switch between the day screen (bright) and the night screen (dark).
Press and hold the button to turn the display off. Press again to turn t\
he display on.
05 maP – Press to display the map. While following a programmed route, press multiple
times to change the type of route information.
06 Multi-function controller
a. EntE r – Press to select the highlighted item on the screen. if this button is pressed
while a map is displayed, the map menu screen is displayed.
b. Main directional buttons – Press to move across the map, highlight an\
item on the
screen or adjust a setting.
c. Additional directional buttons – Press to move across the map or high\
light an item on
the character input screen.
d. center dial
– Turn the dial to highlight an item on the screen, adjust a setting or
adjust the map scale.
07 information (info
) – Press to display the vehicle, traffic (if so equipped), weat\
her
(if so equipped) or voice recognition information.
08 DisP
lay– Press to access the display settings.
09 status – Press multiple times to display audio information with either the \
air conditioner
status, fuel economy or navigation directions.
10 s
Ettin G – Press to access the system settings.
11 BaC
k – Press to return to the previous screen. in a settings screen, this button can also
be used to apply the setting. in a character input screen, this button can also delete the
characters that have been entered.
12 voi
CE – Press to hear the current voice guidance for a programmed route.
for more information, refer to your navigation System Owner’s Manual.
homElink® univE rsal trans CEivE r (if so equipped)
The HomeLink® system can learn and consolidate the functions of up to three different\
hand-held transmitters, operating items such as garage doors, property gates, outdoor
and indoor lights or alarm systems.
for more information, refer to the “instruments and controls (section 2)” of your Owner’s Manual, the HomeLink® website at
www.homelink.com or call 1-800-355-3515.
homElink®
18
system guide
To view detailed in\fstructional videos\f regarding these a\fnd other features\f \fplease go to www.nissanownersin\Sfo.mobi
Page 23 of 26
Page 24 of 26