2013 MITSUBISHI iMiEV wheel
[x] Cancel search: wheelPage 193 of 258

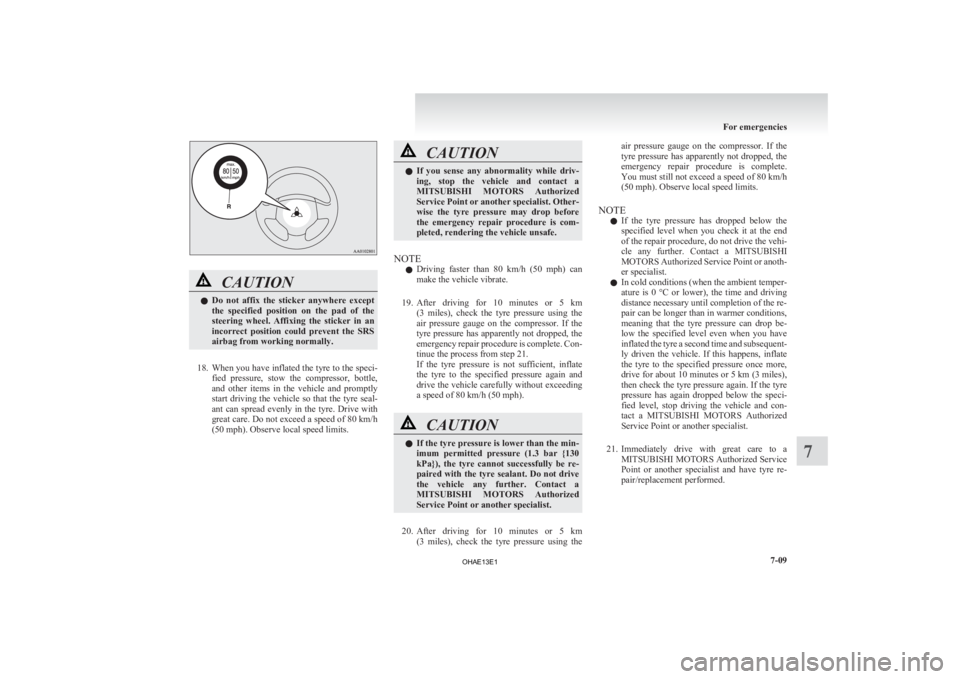
CAUTION
l
Do not affix the sticker anywhere except
the specified position on the pad of the
steering wheel. Affixing the sticker in an
incorrect position could prevent the SRS
airbag from working normally.
18. When
you have inflated the tyre to the speci- fied pressure, stow the compressor, bottle,
and other items in the vehicle and promptly
start driving the vehicle so that the tyre seal-
ant can spread evenly in the tyre. Drive with
great care. Do not exceed a speed of 80 km/h
(50 mph). Observe local speed limits. CAUTION
l
If
you sense any abnormality while driv-
ing, stop the vehicle and contact a
MITSUBISHI MOTORS Authorized
Service Point or another specialist. Other-
wise the tyre pressure may drop before
the emergency repair procedure is com-
pleted, rendering the vehicle unsafe.
NOTE l Driving
faster than 80 km/h (50 mph) can
make the vehicle vibrate.
19. After driving for 10 minutes or 5 km (3 miles), check the tyre pressure using the
air pressure gauge on the compressor. If the
tyre pressure has apparently not dropped, the
emergency repair procedure is complete. Con-
tinue the process from step 21.
If the tyre pressure is not sufficient, inflate
the tyre to the specified pressure again and
drive the vehicle carefully without exceeding
a speed of 80 km/h (50 mph). CAUTION
l
If
the tyre pressure is lower than the min-
imum permitted pressure (1.3 bar {130
kPa}), the tyre cannot successfully be re-
paired with the tyre sealant. Do not drive
the vehicle any further. Contact a
MITSUBISHI MOTORS Authorized
Service Point or another specialist.
20. After
driving for 10 minutes or 5 km (3 miles), check the tyre pressure using the air pressure gauge on the compressor. If the
tyre
pressure has apparently not dropped, the
emergency repair procedure is complete.
You must still not exceed a speed of 80 km/h
(50 mph). Observe local speed limits.
NOTE l If the tyre pressure has dropped below the
specified level when you check it at the end
of the repair procedure, do not drive the vehi-
cle any further. Contact a MITSUBISHI
MOTORS Authorized Service Point or anoth-
er specialist.
l In cold conditions (when the ambient temper-
ature is 0 °C or lower), the time and driving
distance necessary until completion of the re-
pair can be longer than in warmer conditions,
meaning that the tyre pressure can drop be-
low the specified level even when you have
inflated the tyre a second time and subsequent-
ly driven the vehicle. If this happens, inflate
the tyre to the specified pressure once more,
drive for about 10 minutes or 5 km (3 miles),
then check the tyre pressure again. If the tyre
pressure has again dropped below the speci-
fied level, stop driving the vehicle and con-
tact a MITSUBISHI MOTORS Authorized
Service Point or another specialist.
21. Immediately drive with great care to a MITSUBISHI MOTORS Authorized Service
Point or another specialist and have tyre re-
pair/replacement performed. For emergencies
7-09 7
OHAE13E1
Page 194 of 258

CAUTION
l
Be sure to check the tyre pressure for con-
firmation that the emergency repair pro-
cedure is complete.
NOTE l Please
give the empty sealant bottle to your
MITSUBISHI MOTORS Authorized Service
Point when you purchase new sealant or dis-
pose of the sealant bottle according to nation-
al regulations for the disposal of chemical
waste.
l A tyre in which puncture sealant has been
used should ideally be replaced with a new
one. If you wish to have such a tyre properly
repaired for reuse, please contact a
MITSUBISHI MOTORS Authorized Service
Point or another specialist. Note that a proper
repair is impossible following an emergency
repair if the puncture hole cannot be located.
l The manufacturer is unable to guarantee that
all tyre punctures can be repaired with the
tyre repair kit, in particular cuts or perfora-
tions with a diameter of more than 4 mm or
away from the tyre’s tread. The manufacturer
is not liable for damage sustained through im-
proper use of the tyre repair kit.
l The manufacturer is not liable for damage sus-
tained through re-use of any tyre in which
tyre sealant has been used. Towing
E00801503754
If your vehicle needs to be towed
If
you need to tow your vehicle, we recommend
that you contact a MITSUBISHI MOTORS Author-
ized Service Point or a commercial tow truck service.
Transport the vehicle on a flatbed truck or tow the
vehicle either with all wheels or the rear wheels
(drive wheels) off the ground.
Flat bed type
Dolly type
Towing with rear wheels off the ground In the following cases, transport the vehicle with
all wheels on a carriage.
l The
ready indicator illuminates but the vehi-
cle does not move, or an abnormal noise is
produced.
l The electric motor unit warning lamp comes
on.
l Inspection of the vehicle’s underside reveals
that oil or some other fluid is leaking.
l Your vehicle body is severely damaged or de-
formed in the event of an accident. If a wheel gets stuck in a ditch, do not try to tow
the
vehicle. Please contact your MITSUBISHI
MOTORS Authorized Service Point or a commer-
cial tow truck service for assistance.
In an emergency your vehicle may be temporarily
towed with the rear wheels (drive wheels) on the
ground only when the traction battery is complete-
ly discharged.
If your vehicle is to be towed by another vehicle,
carefully tow your vehicle for the shortest distance
possible and in accordance with the instructions giv-
en in “Emergency towing” in this part.
The regulations concerning towing may differ from
country to country. It is recommended that you
obey the regulations of the area where you are driv-
ing your vehicle.
Towing the vehicle by a tow truck WARNING
l Never
get under your vehicle after it has
been lifted by a tow truck.
l Never ride in a vehicle that is being towed.
l Never tow the vehicle with rear wheels
(drive wheels) on the ground. This may
cause damage to the electric motor. This
may also cause a fire, if wiring in the elec-
tric motor unit room becomes damaged. For emergencies
7-10
7
OHAE13E1
Page 195 of 258

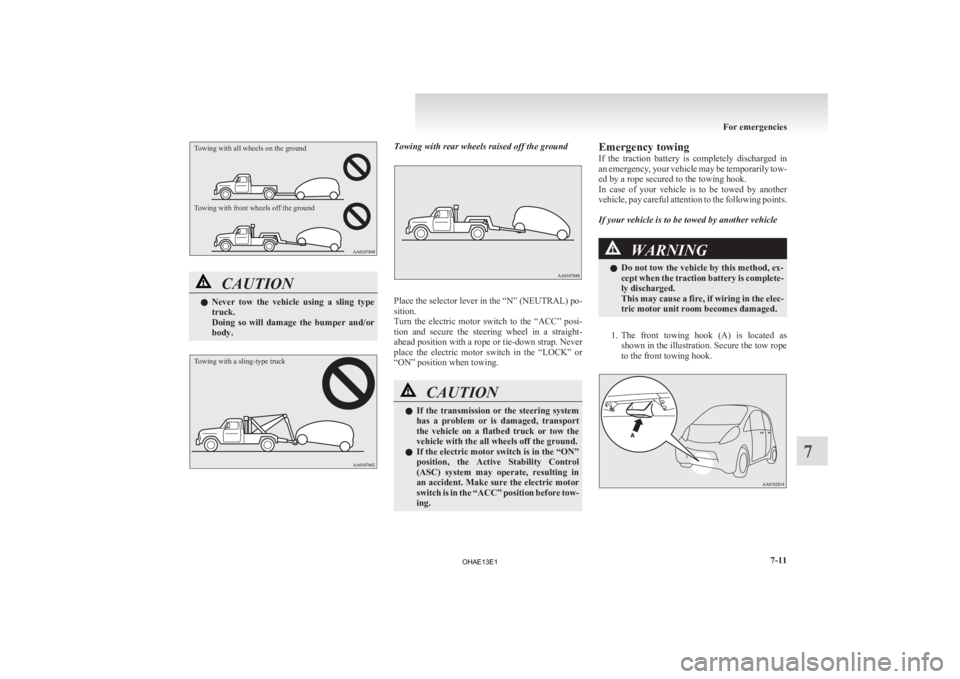
Towing with all wheels on the ground
Towing with front wheels off the groundCAUTION
l
Never
tow the vehicle using a sling type
truck.
Doing so will damage the bumper and/or
body.
Towing with a sling-type truck Towing with rear wheels raised off the ground
Place the selector lever in the “N” (NEUTRAL) po-
sition.
Turn
the electric motor switch to the “ACC” posi-
tion and secure the steering wheel in a straight-
ahead position with a rope or tie-down strap. Never
place the electric motor switch in the “LOCK” or
“ON” position when towing. CAUTION
l
If
the transmission or the steering system
has a problem or is damaged, transport
the vehicle on a flatbed truck or tow the
vehicle with the all wheels off the ground.
l If the electric motor switch is in the “ON”
position, the Active Stability Control
(ASC) system may operate, resulting in
an accident. Make sure the electric motor
switch is in the “ACC” position before tow-
ing. Emergency towing
If
the traction battery is completely discharged in
an emergency, your vehicle may be temporarily tow-
ed by a rope secured to the towing hook.
In case of your vehicle is to be towed by another
vehicle, pay careful attention to the following points.
If your vehicle is to be towed by another vehicle WARNING
l Do not tow the vehicle by this method, ex-
cept
when the traction battery is complete-
ly discharged.
This may cause a fire, if wiring in the elec-
tric motor unit room becomes damaged.
1. The
front towing hook (A) is located as shown in the illustration. Secure the tow rope
to the front towing hook. For emergencies
7-11 7
OHAE13E1
Page 196 of 258

NOTE
l Using
any part other than the designated tow-
ing hook (A) could result in damage to the ve-
hicle body.
l Using a wire rope or metal chain can result
in damage to the vehicle body. It is best to
use a non-metallic rope. If you use a wire
rope or metal chain, wrap it with cloth at any
point where it touches the vehicle body.
l Take care that the tow rope is kept as horizon-
tal as possible. An angled tow rope can dam-
age the vehicle body.
2. Start the electric motor unit. CAUTION
l
If
the vehicle is towed with the electric mo-
tor switch in the “ON” position without
starting the electric motor unit, the auxili-
ary battery may be flat during towing. In
this case, the brake performance may be
very poor. Steering is also very heavy.
l Do not leave the electric motor switch in
the “LOCK” position. The steering wheel
will lock, causing loss of control.
3. Place
the selector lever in the “N” (NEU- TRAL) position.
4. Turn on the hazard warning lamps if required by law. (Follow the local driving laws and
regulations.)
5. During towing make sure that close contact is maintained between the drivers of both ve-
hicles, and that the vehicles travel at low
speed. CAUTION
l
The
person in the vehicle being towed
must pay attention to the brake lamps of
the towing vehicle and make sure the
rope never becomes slack.
l Avoid sudden braking, sudden accelera-
tion and sharp turning; such operation
could cause damage to the towing hooks
or the tow rope.
People in the vicinity could be injured as
a result.
l When towing or being towed down a long
slope, the brakes may overheat reducing
the effectiveness. In this situation, have
your vehicle transported by a tow truck.
l When the vehicle is to be towed by anoth-
er vehicle with all wheels on the ground,
make sure that the towing speed and dis-
tance given below are never exceeded,
causing damage to the transmission.
Towing speed: 30 km/h (19 mph)
Towing distance: 30 km (19 miles)
For the towing speed and the towing dis-
tance, follow the local driving laws and
regulations.
Towing another vehicle
Your
vehicle cannot be used to tow another vehicle. Operation under adverse driving
conditions E00801702717
On a flooded road l Do
not drive on a flooded road. If you drive
on a flooded road, not only the electric motor
unit stops but also a failure like electric leak-
age or short circuit may occur.
If you inevitably had to run on a flooded
road and the vehicle was exposed to water,
be sure to have your vehicle inspected by a
MITSUBISHI MOTORS Authorized Service
Point.
l If there is water on the brakes after driving
through puddles or washing the vehicle, re-
sulting in temporarily ineffective brakes. In
such cases, lightly depress the brake pedal to
see if the brakes operate properly. If they do
not, lightly depress the pedal several times
while driving in order to dry the brake pads.
l When driving in rain or on a road with many
puddles a layer of water may form between
the tyres and the road surface.
This reduces a tyre’s frictional resistance on
the road, resulting in loss of steering stability
and braking capability.
To cope with this, observe the following items:
(a) Drive your vehicle at slow speed.
(b) Do not drive on worn tyres.
(c) Always maintain the specified tyre inflation pressures.For emergencies
7-12
7
OHAE13E1
Page 197 of 258

On a snow-covered or frozen road
l When
driving on a snow-covered or frozen
road, it is recommended that you use snow
tyres or tyre chains.
Refer to the “Snow tyres” and “Tyre chains”
sections.
l Avoid high-speed driving, sudden accelera-
tion, sudden braking, and sharp turns.
l Depressing the brake pedal during travel on
snowy or icy roads may cause tyre slippage
and skidding. Tyres may slip if the ability of
the tyres to grip the road surface lessens.
This may make it more difficult to stop the
vehicle with normal braking operations. For
vehicles with an anti-lock brake system
(ABS), firmly depress and hold down the
brake pedal.
l Allow extra distance between your vehicle
and the vehicle in front of you, and avoid sud-
den braking.
l Accumulation of ice on the braking system
can cause the wheels to lock. Pull away from
a standstill slowly after confirming safety
around the vehicle. CAUTION
l
Do
not press the accelerator pedal rapid-
ly. If the wheels break free of the ice, the
vehicle could suddenly start moving and
possibly cause an accident.
On a bumpy or rutted road
Drive
as slow as possible when driving on bumpy
or rutted roads. CAUTION
l
The
impact on tyres and/or wheels when
driving on a bumpy or rutted road can
damage the tyre and/or wheel.
l The vehicle’s body, bumper, muffler and
other parts may be damaged if the vehi-
cle is:
• driven over a step (for example, at theentrance or exit of a parking lot);
• parked too closely against a kerb or parking block, or by the side of a road
with kerbstones;
• driven on a steep slope; For emergencies
7-13 7
OHAE13E1
Page 201 of 258

NOTE
l If
genuine leather is wet with water or is wash-
ed in water, wipe off water as quickly as pos-
sible with a dry, soft cloth. If left damp, mil-
dew may grow.
l The genuine leather surface may be damaged
if a nylon brush or synthetic fibre is rubbed
hard against it.
l Organic solvents such as benzine, kerosene,
alcohol and petrol, acid or alkaline solvents
may discolour the genuine leather surface.
Be sure to use neutral detergents.
l Remove dirty patches or oil substances quick-
ly as they can stain genuine leather.
l The genuine leather surface may harden and
shrink if it is exposed to direct sun for long
hours. When your vehicle is parked, place it
in the shade as much as possible. Cleaning the exterior of your
vehicle E08400600010
If
the following is left on your vehicle, it may
cause corrosion, discolouration and stains, wash
the vehicle as soon as possible.
l Seawater, road deicing products.
l Soot and dust, iron powder from factories,
chemical substance (acids, alkalis, coal-tar,
etc.).
l Droppings from birds, carcasses of insects,
tree sap, etc.
Washing E08400700011
Chemicals contained in the dirt and dust picked up
from
the road surface can damage the paint coat
and body of your vehicle if left in prolonged contact.
Frequent washing and waxing is the best way to pro-
tect your vehicle from this damage. This will also
be effective in protecting it from environmental el-
ements such as rain, snow, salt air, etc.
Do not wash the vehicle in direct sunlight. Park the
vehicle in the shade and spray it with water to re-
move dust. Next, using an ample amount of clean
water and a car washing brush or sponge, wash the
vehicle from top to bottom.
Use a mild car washing soap if necessary. Rinse
thoroughly and wipe dry with a soft cloth. After
washing the vehicle, carefully clean the joints and
flanges of the doors, bonnet and other sections
where dirt is likely to remain. WARNING
l Do
not wash the vehicle while charging
the traction battery.
Doing so could cause fire or an electric
shock.
l Before washing the vehicle, make sure
that the charging lid and the inner lid are
completely closed.
If the lid is open, the charging unit is ex-
posed to water, resulting in fire or an elec-
tric shock.
l Do not pour water inside the electric mo-
tor unit room. Doing so could cause fire
or an electric shock.
l When washing the vehicle, turn the elec-
tric motor switch to the “LOCK” position.
l Do not use a high pressure washing ma-
chine to clean the underneath of the vehi-
cle.
Doing so might cause the electric motor
unit problem or malfunction.
l When washing the underside of your vehi-
cle or wheel, be careful not to injure your
hands.
l Refrain from excessively using a car wash
as its brushes may scratch the paint sur-
face, causing it to lose its gloss. Scratches
will be especially visible on darker col-
oured vehicles.
l Never spray or splash water on the electri-
cal components in the bonnet room.
Exercise caution also when washing the
underbody; be careful not to spray water
into the bonnet room.
l Some types of hot water washing equip-
ment apply high pressure and heat to the Vehicle care and Maintenance
8-03 8
OHAE13E1
Page 203 of 258

CAUTION
l
Do not use a scrubbing brush or other
hard tools as they may damage the plastic
part surface.
l Do not use wax containing compound (pol-
ishing powder) which may damage the
plastic part surface.
l Do not bring the plastic parts into contact
with petrol, light oil, brake fluids,
greases, paint thinners, and sulphuric
acid (battery electrolyte) which may
crack, stain or discolour the plastic parts.
If they touch the plastic parts, wipe them
off with soft cloth, chamois or the like
and an aqueous solution of neutral deter-
gent then immediately rinse the affected
parts with water.
Chrome parts E08401200013
In order to prevent spots and corrosion of chrome
parts,
wash with water, dry thoroughly, and apply a
special protective coating. This should be done
more frequently in winter.
Aluminium wheels E08401300014
1. Remove
dirt using a sponge while sprinkling
water on the vehicle.
2. Use neutral detergent on any dirt that cannot be removed easily with water.
Rinse off the neutral detergent after washing
the vehicle.
3. Dry the vehicle thoroughly using a chamois leather or a soft cloth. CAUTION
l
Do
not use a brush or other hard imple-
ment on the wheels.
Doing so could scratch the wheels.
l Do not use any cleaner that contains an
abrasive substance or is acidic or alka-
line. Doing so could cause the coating on
the wheels to peel or become discoloured
or stained.
l Do not directly apply hot water using a
steam cleaner or by any other means.
l Contact with seawater and road deicer
can cause corrosion. Rinse off such sub-
stances as soon as possible.
Window glass E08401400015
The window glass can normally be cleaned using
only a sponge and water.
Glass
cleaner can be used to remove oil, grease, in-
sect carcasses, etc. After washing the glass, wipe it
dry with a clean, dry, soft cloth. Never use a cloth
that is used for cleaning a painted surface to clean a
window. Wax from the painted surface could get
on the glass and lower glass transparency and visi-
bility.
NOTE
l To clean the inside of the rear window, al-
ways use a soft cloth and wipe the window
glass along the demister heater element so as
not to cause damage. Wiper blades
E08401500016
Use a soft cloth and glass cleaner to remove grease,
dead
insects, etc., from the wiper blades. Replace
the wiper blades when they no longer wipe proper-
ly. (Refer to page 8-17.)
Bonnet room E08401600017
Clean the bonnet room at the beginning and end of
winter.
Pay particular attention to flanges, crevices
and peripheral parts where dust containing road
chemicals and other corrosive materials might col-
lect.
If salt and other chemicals are used on the roads in
your area, clean the engine compartment at least ev-
ery three months.
Never spray or splash water on the electrical com-
ponents in the bonnet room, as this may cause dam-
age.
Do not bring the nearby parts, the plastic parts and
so on into contact with sulphuric acid (battery elec-
trolyte) which may crack, stain or discolour them.
If they are in contact, wipe off with soft cloth, cha-
mois or the like and an aqueous solution of neutral
detergent then immediately rinse the affected parts
with plenty of water. Vehicle care and Maintenance
8-05 8
OHAE13E1
Page 214 of 258

Wheel condition
E084030000151- Location of the tread wear indicator
2-
Tread wear indicator
Check the tyres for cuts, cracks and other damage.
Replace the tyres if there are deep cuts or cracks.
Also check each tyre for pieces of metal or pebbles.
The use of worn tyres can be very dangerous be-
cause of the greater chance of skidding or hydro-
planing. The tread depth of the tyres must exceed
1.6 mm in order for the tyres to meet the minimum
requirement for use.
Tread wear indicators will appear on the surface of
the tyre as the tyre wears, thereby indicating that
the tyre no longer meets the minimum requirement
for use. When these wear indicators appear, the
tyres must be replaced with new ones. CAUTION
l
Always
use tyres of the same size, same
type, and same brand, and which have no
wear differences. Using tyres of different
size, type, brands or degree of wear, will
increase the differential oil temperature,
resulting in possible damage to the driv-
ing system. Further, the drive train will
be subjected to excessive loading, possibly
leading to oil leakage, component seizure,
or other serious faults.
Replacing tyres and wheels E08403100016 CAUTION
l
Avoid
using different size tyres from the
one listed and the combined use of differ-
ent types of tyres, as this can affect driv-
ing safety. Refer to “Tyres and wheels”
on page 9-06.
l Even if a wheel has the same rim size and
offset as the specified type of wheel, its
shape may prevent it from being fitted cor-
rectly. We recommend you to consult a
specialist before using wheels that you
have. Tyre rotation
E08403200017
Because
the front and rear tyres and wheels are not
the same size, front and rear tyre rotation is not pos-
sible. *: Front
WARNING
l Rotating tyres would compromise the sta-
bility
and drivability of the vehicle and
could lead to a serious accident.
Snow tyres E08403300018
The use of snow tyres is recommended for driving
on
snow and ice. To preserve driving stability,
mount snow tyres of the same size and tread pat-
tern on wheels.
A snow tyre that is worn down more than 50% is
no longer appropriate to use.
Snow tyres which do not meet specifications must
not be used. Vehicle care and Maintenance
8-16
8
OHAE13E1